之前介绍过如何在UEFI 下显示 BMP【参考1】,PCX【参考2】,PNG【参考3】和 GIF【参考4】。这次介绍的是一个 DXE Driver, 使用之后会在系统中注册 EFI_JPEGDECODER_PROTOCOL,这样 UEFI Application 可以通过这个 Protocol 进行 JPEG 的解码显示。这个代码来自【参考5】,有兴趣的朋友可以到原文进行查看。
代码分为两个,一个是 DXE Driver,另外一个是用于测试的 UEFI Application
首先介绍 DXE Driver 的编译(这次使用的是EDK2 202108 【参考6】):
1. MdeModulePkg\MdeModulePkg.dsc 修改如下:
[Components]
  #LABZ_Debug_Start
  MdeModulePkg/JpegDecoderDxe/JpegDecoderDxe.inf
  MdeModulePkg/Application/JPGDecoderTest/JPGDecoderTest.inf
  #LABZ_Debug_End
  MdeModulePkg/Application/HelloWorld/HelloWorld.inf
  MdeModulePkg/Application/DumpDynPcd/DumpDynPcd.inf
  MdeModulePkg/Application/MemoryProfileInfo/MemoryProfileInfo.inf
2. MdeModulePkg\MdeModulePkg.dec 修改如下:
[Protocols]
  ##LABZ_Debug_Start
  gEfiJpegDecoderProtocolGuid          = { 0xa9396a81, 0x6231, 0x4dd7, {0xbd, 0x9b, 0x2e, 0x6b, 0xf7, 0xec, 0x73, 0xc2} }
  ##LABZ_Debug_End
  ## Load File protocol provides capability to load and unload EFI image into memory and execute it.
  #  Include/Protocol/LoadPe32Image.h
  #  This protocol is deprecated. Native EDKII module should NOT use this protocol to load/unload image.
  #  If developer need implement such functionality, they should use BasePeCoffLib.
  gEfiLoadPeImageProtocolGuid    = { 0x5CB5C776, 0x60D5, 0x45EE, { 0x88, 0x3C, 0x45, 0x27, 0x08, 0xCD, 0x74, 0x3F }}
3. 在\MdeModulePkg\Include\Protocol\下面放置 :JpegDecoder.h
4. 在 \MdeModulePkg\ 下面放置JpegDecoderDxe目录

接下来加入一个测试的 UEFI Application。为了简化代码,我首先使用工具将图片转化为C语言的 .h文件,代码直接引用对应内存:
#include <Uefi.h>
#include <Library/PcdLib.h>
#include <Library/UefiLib.h>
#include <Library/UefiApplicationEntryPoint.h>
#include <Library/MemoryAllocationLib.h>
#include <Protocol/GraphicsOutput.h>
#include <JpegDecoder.h>
#include "demo.h"

extern EFI_BOOT_SERVICES         *gBS;
extern EFI_SYSTEM_TABLE          *gST;

EFI_GUID GraphicsOutputProtocolGuid = EFI_GRAPHICS_OUTPUT_PROTOCOL_GUID;
EFI_GRAPHICS_OUTPUT_PROTOCOL          *GraphicsOutput = NULL;

EFI_STATUS
EFIAPI
UefiMain (
        IN EFI_HANDLE        ImageHandle,
        IN EFI_SYSTEM_TABLE  *SystemTable
)
{
        EFI_STATUS                      Status;
        EFI_JPEG_DECODER_PROTOCOL        *JpegDecoderProtocol;
        UINT8* RGB32;
        UINTN DecodedDataSize;
        UINTN Height,Width;
        EFI_JPEG_DECODER_STATUS DecoderStatus;

        Status = gBS->LocateProtocol(
                         &GraphicsOutputProtocolGuid,
                         NULL,
                         (VOID **) &GraphicsOutput);
        if (EFI_ERROR(Status))
        {
                GraphicsOutput = NULL;
                Print(L"Loading Graphics_Output_Protocol error!\n");
                return EFI_SUCCESS;
        }

        Status = gBS->LocateProtocol(
                         &gEfiJpegDecoderProtocolGuid,
                         NULL,
                         (VOID **) &JpegDecoderProtocol);
        if (EFI_ERROR(Status))
        {
                Print(L"Loading Efi_JpegDecoder_Protocol failed!\n");
                return EFI_SUCCESS;
        }

        RGB32 = (UINT8*)AllocatePool(636*373*4);
        JpegDecoderProtocol->DecodeImage(
                JpegDecoderProtocol,
                (UINT8 *)&demo_jpg,
                demo_jpg_size,
                &RGB32,
                &DecodedDataSize,
                &Height,
                &Width,
                &DecoderStatus
        );

        GraphicsOutput->Blt(
                GraphicsOutput,
                (EFI_GRAPHICS_OUTPUT_BLT_PIXEL *) RGB32,
                EfiBltBufferToVideo,
                0, 0,
                0, 0,
                Width, Height, 0);

        Print(L"Height=[%d],Width=[%d]\n",Height,Width);
        FreePool(RGB32);

        return EFI_SUCCESS;
}
简单的说就是在系统中查找EFI_JPEG_DECODER_PROTOCOL ,然后调用之。需要注意的是在调用的时候需要分配一个内存用于存储解压后的图像,但是这个 PROTOCOL 没有提供获得 JPEG 图片长宽的函数,因此要么直接分配足够大的内存,要么使用者知道图片的尺寸(比如,用于显示的 Logo,在Build的时候一定是知道具体尺寸的)。这里我知道图片尺寸,所以使用下面的方法直接开辟一段内存用于存储:
RGB32 = (UINT8*)AllocatePool(636*373*4);
使用方法是,首先 load JpegDecoderDxe.efi, 之后运行 jpgt.efi 即可显示:
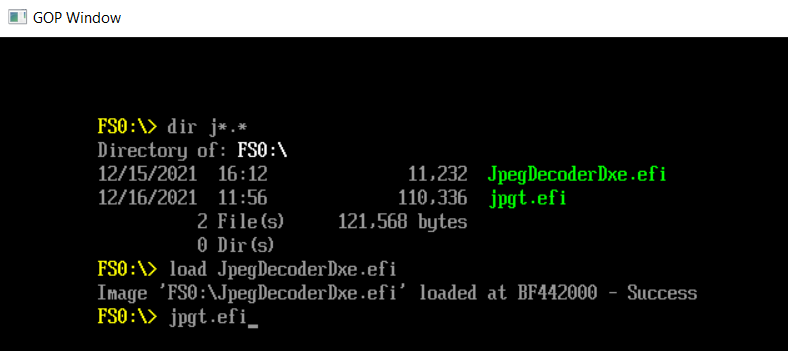
运行结果:
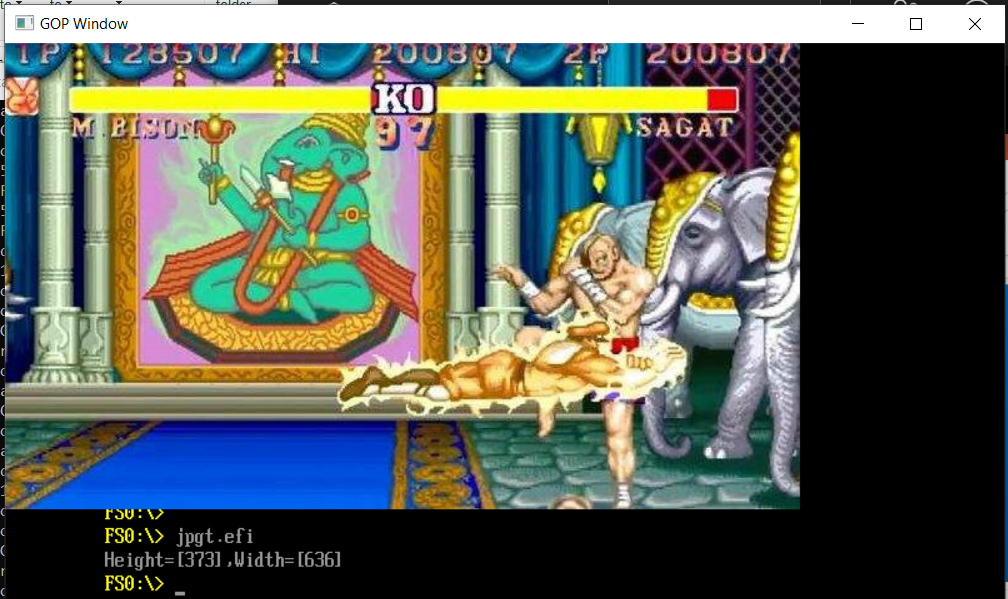
可以看到,这种方式能够方便的显示 JPEG 格式的图片。
完整的代码下载:
参考:
- https://www.lab-z.com/bmplib/ BmpSupportLib
- https://www.lab-z.com/pcxdecoder/ UEFI 下 PCX 的解码
- https://www.lab-z.com/uefipngdecoder/ UEFI 下的 PNG 解码
- https://www.lab-z.com/decodergif/ UEFI 下的 GIF 解码
- https://github.com/XENNOK/Insyde_BIOS_Source
- https://www.lab-z.com/edk202108/