SDT.dsl 2644: PARM |= (DerefOf (CDCT [^^MCHK.DCFE]) << 0x15) /* _SB_.PCI0.GFX0.PARM */
Error 6163 - ^ Object is created temporarily in another method and cannot be accessed (^^MCHK.DCFE)
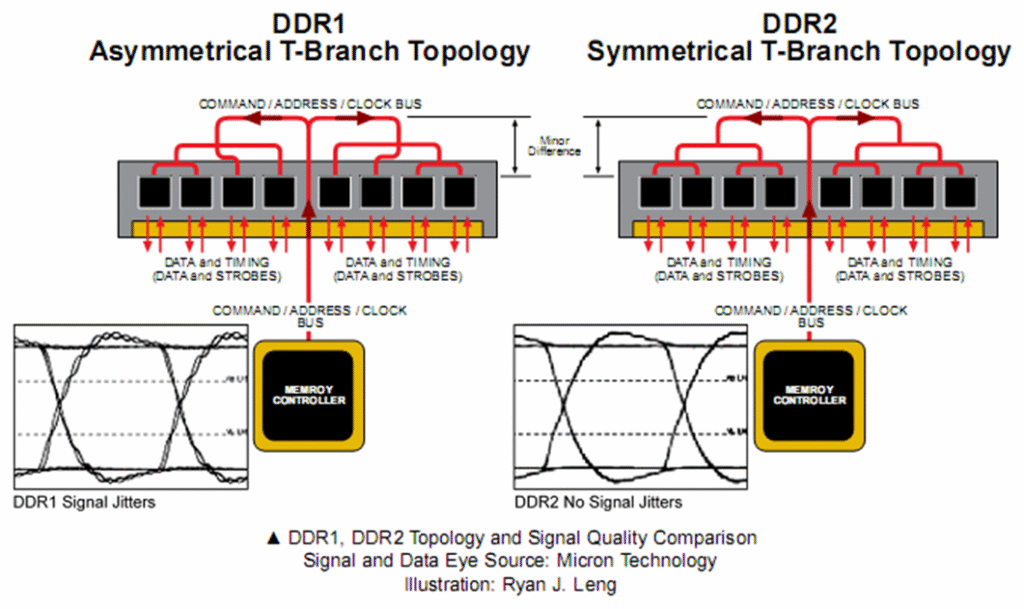
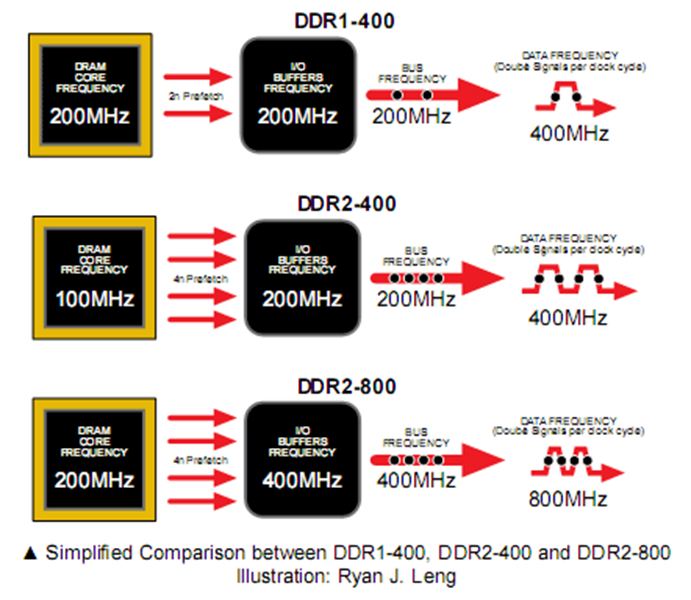
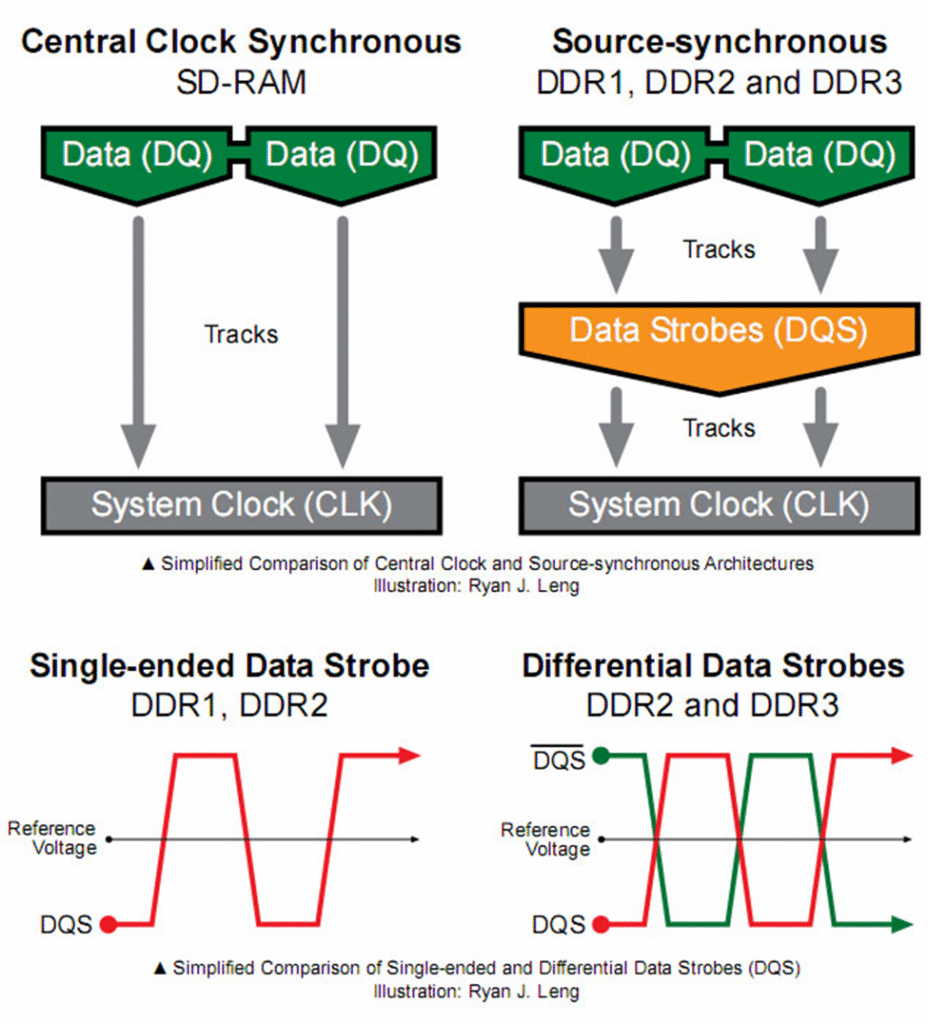
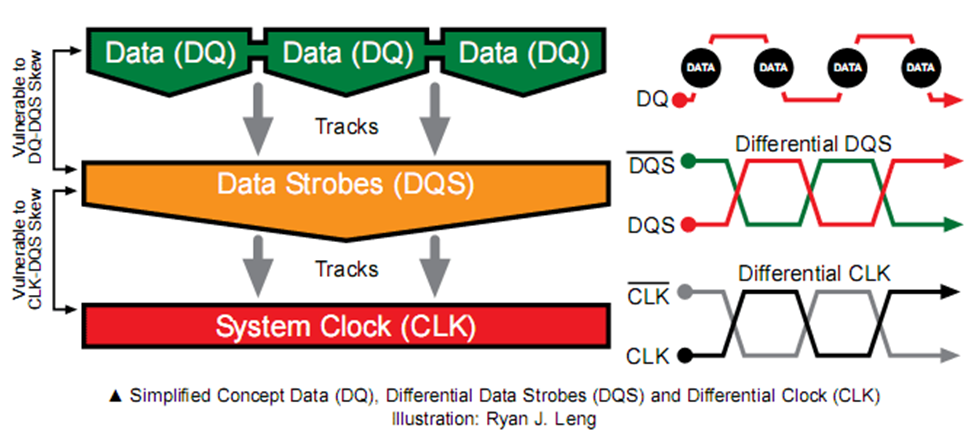
美光科技应用工程师 Aaron Boehm 解释说,问题在于“时钟可能会有很大差异,因此 DQS 用于将所有数据与时钟对齐。在 DRAM 内部,选通脉冲跟踪时钟。因此,当 DRAM 输出数据时,数据会与选通脉冲对齐,而选通脉冲又跟踪时钟。当内存控制器写入 DRAM 时,数据集中到选通脉冲。数据选通脉冲 (DQS) 允许控制器和 DRAM 查看并锁定数据。 ”
///
/// Pointer to the start of a variable argument list stored in a memory buffer. Same as UINT8 *.
///
typedef UINTN *BASE_LIST;
此外,经常和 BASE_ARG 结合起来使用,这个宏会返回指针指向的下一个值:
/**
  Returns an argument of a specified type from a variable argument list and updates
  the pointer to the variable argument list to point to the next argument.

  This function returns an argument of the type specified by TYPE from the beginning
  of the variable argument list specified by Marker.  Marker is then updated to point
  to the next argument in the variable argument list.  The method for computing the
  pointer to the next argument in the argument list is CPU specific following the EFIAPI ABI.

  @param   Marker   The pointer to the beginning of a variable argument list.
  @param   TYPE     The type of argument to retrieve from the beginning
                    of the variable argument list.

  @return  An argument of the type specified by TYPE.

**/
#define BASE_ARG(Marker, TYPE)  (*(TYPE *) ((Marker += _BASE_INT_SIZE_OF (TYPE)) - _BASE_INT_SIZE_OF (TYPE)))
About Smartmontools
The smartmontools package contains two utility programs (smartctl and smartd) to control and monitor storage systems using the Self-Monitoring, Analysis and Reporting Technology System (SMART) built into most modern ATA/SATA, SCSI/SAS and NVMe disks. In many cases, these utilities will provide advanced warning of disk degradation and failure.

Smartmontools was originally derived from the Linux smartsuite package and supports ATA/SATA, SCSI/SAS, and NVMe disks and also SCSI/SAS tape devices. It should run on any modern Linux, FreeBSD, NetBSD, OpenBSD, Darwin (macOS), Solaris, Windows, Cygwin, OS/2, eComStation, or QNX system. Smartmontools can also be run from one of many different Live CDs/DVDs.
有支持 Windows 的版本,安装后进入安装的目录,使用如下命令即可检测输出当前硬盘的信息:
smartctl,exe -x /dev/sda
例如,在一台测试机上结果如下:
smartctl 7.5 2025-04-30 r5714 [x86_64-w64-mingw32-w11-24H2] (AppVeyor)
Copyright (C) 2002-25, Bruce Allen, Christian Franke, www.smartmontools.org

=== START OF INFORMATION SECTION ===
Model Number:                       SKHynix_HFS256GEJ4X112N
Serial Number:                      4DBCQ48581010CG2R
Firmware Version:                   51030C31
PCI Vendor/Subsystem ID:            0x1c5c
IEEE OUI Identifier:                0xace42e
Controller ID:                      1
NVMe Version:                       1.4
Number of Namespaces:               1
Namespace 1 Size/Capacity:          256,060,514,304 [256 GB]
Namespace 1 Formatted LBA Size:     512
Namespace 1 IEEE EUI-64:            ace42e 0026df381b
Local Time is:                      Sun Jul 20 22:46:46 2025 PDT
Firmware Updates (0x16):            3 Slots, no Reset required
Optional Admin Commands (0x0017):   Security Format Frmw_DL Self_Test
Optional NVM Commands (0x005f):     Comp Wr_Unc DS_Mngmt Wr_Zero Sav/Sel_Feat Timestmp
Log Page Attributes (0x1e):         Cmd_Eff_Lg Ext_Get_Lg Telmtry_Lg Pers_Ev_Lg
Maximum Data Transfer Size:         64 Pages
Warning  Comp. Temp. Threshold:     86 Celsius
Critical Comp. Temp. Threshold:     87 Celsius

Supported Power States
St Op     Max   Active     Idle   RL RT WL WT  Ent_Lat  Ex_Lat
 0 +   4.5000W       -        -    0  0  0  0      100     100
 1 +   3.0000W       -        -    1  1  1  1      200     200
 2 +   0.6000W       -        -    2  2  2  2      400     400
 3 -   0.0150W       -        -    3  3  3  3     2000    2000
 4 -   0.0030W       -        -    4  4  4  4     5000   10000

Supported LBA Sizes (NSID 0x1)
Id Fmt  Data  Metadt  Rel_Perf
 0 +     512       0         0

=== START OF SMART DATA SECTION ===
SMART overall-health self-assessment test result: PASSED

SMART/Health Information (NVMe Log 0x02, NSID 0xffffffff)
Critical Warning:                   0x00
Temperature:                        30 Celsius
Available Spare:                    100%
Available Spare Threshold:          10%
Percentage Used:                    15%
Data Units Read:                    117,427,832 [60.1 TB]
Data Units Written:                 118,434,215 [60.6 TB]
Host Read Commands:                 565,071,947
Host Write Commands:                434,694,135
Controller Busy Time:               8,007
Power Cycles:                       5,554
Power On Hours:                     1,648
Unsafe Shutdowns:                   1,034
Media and Data Integrity Errors:    0
Error Information Log Entries:      21
Warning  Comp. Temperature Time:    0
Critical Comp. Temperature Time:    0
Temperature Sensor 1:               35 Celsius
Temperature Sensor 2:               30 Celsius
Thermal Temp. 1 Transition Count:   249

Error Information (NVMe Log 0x01, 16 of 256 entries)
No Errors Logged

Self-test Log (NVMe Log 0x06, NSID 0xffffffff)
Self-test status: No self-test in progress
No Self-tests Logged
A binary AML file tool 提供了 AML 文件比较功能,AML文件转 TEXT, TEXT转 AML ,显示AML文件头,重新计算填充 AML Checksum的功能,删除注释提供简洁代码(Terse mode),显示编译时间日期
Usage: acpibin [options] Options: -a <File1> <File2> Compare two binary AML files, dump all mismatches -c <File1> <File2> Compare two binary AML files, dump first 100 mismatches -d <In> <Out> Dump AML binary to text file -o <Value> Start comparison at this offset into second file -h <File> Display table header for binary AML file -s <File> Update checksum for binary AML file -t Terse mode -v Display version information -vd Display build date and time
acpidump.exe
Dump System ACPI Tables 读取当前系统中 ACPI Table 的工具。以文本方式输出。配合AcpiXtract 可以实现DSDR和SSDT的合并。
Usage: acpidump [options] Options: -b Dump tables to binary files -h -? This help message -o <File> Redirect output to file -r <Address> Dump tables from specified RSDP -s Print table summaries only -v Display version information -vd Display build date and time -z Verbose mode
Table Options: -a <Address> Get table via a physical address -c <on|off> Turning on/off customized table dumping -f <BinaryFile> Get table via a binary file -n <Signature> Get table via a name/signature -x Use RSDT instead of XSDT
acpiexec.exe
User Mode ACPI Execution/Simulation 在用户模式下运行一些 ACPI 命令/模拟,需要注意的是这些操作都是和硬件无关的。
Usage: acpiexec [options] AMLfile1 AMLfile2 … Options: -b “CommandLine” Batch mode command line execution (cmd1;cmd2;…) -h -? Display this help message -m [Method] Batch mode method execution. Default=MAIN -da Disable method abort on error -df Disable Local fault handler -di Disable execution of STA/INI methods during init -do Disable Operation Region address simulation -dr Disable repair of method return values -ds Disable method auto-serialization -dt Disable allocation tracking (performance) -ed Enable timer output for Debug Object -ef Enable display of final memory statistics -ei Enable additional tests for ACPICA interfaces -el Enable loading of additional test tables -eo Enable object evaluation log -es Enable Interpreter Slack Mode -et Enable debug semaphore timeout -fi <File> Specify namespace initialization file -fv <Value> Operation Region initialization fill value -l Load tables and namespace only -r Use hardware-reduced FADT V5 -te Exit loop on timeout instead of aborting method -to <Seconds> Set timeout period for AML while loops -v Display version information -va Display verbose dump of any memory leaks -vd Display build date and time -vh Verbose exception handler output -vi Verbose initialization output -vr Verbose region handler output -x <DebugLevel> Debug output level
acpihelp.exe
Display ACPI Help Information
显示当前工具支持的 ASL 操作和关键字,预定义信息等等。我个人的理解是:这一套工具可以自行扩展,或者说新版本可能会增加新定义的操作等等,这个工具能够输出当前支持的操作和关键字这种信息。
Usage: acpihelp <options> [Name/Prefix | HexValue] Options: -h Display help -v Display version information -vd Display build date and time
AML Names and Encodings (ACPI Machine Language): -a [Name/Prefix | *] Display both ASL operator and AML opcode name(s) -g [Name/Prefix | *] Display AML grammar elements(s) -m [Name/Prefix | *] Display AML opcode name(s)
Name/Prefix or HexValue not specified means “Display All”
Default search with valid Name/Prefix and no options: Find ASL/AML operator names – if NamePrefix does not start with underscore Find ASL predefined method names – if NamePrefix starts with underscore
acpisrc.exe
Convert ACPICA Source Code 将 ASL code 转为为 Linux 代码格式
Usage: acpisrc [-c|l|u] [-dsvy] <SourceDir> <DestinationDir> Options: -a <file> Check entire file for non-printable characters -c Generate cleaned version of the source -h Insert dual-license header into all modules -i Cleanup macro indentation -l Generate Linux version of the source -u Generate Custom source translation -d Leave debug statements in code -s Generate source statistics only -v Display version information -vb Verbose mode -vd Display build date and time -y Suppress file overwrite prompts
Usage: acpixtract [option] <InputFile> Options: -a Extract all tables, not just DSDT/SSDT -f Force extraction, even if there are errors -l List table summaries, do not extract -m Extract multiple DSDT/SSDTs to a single file -s <signature> Extract all tables with <signature> -v Display version information -vd Display build date and time
Extract binary ACPI tables from text acpidump output Default invocation extracts the DSDT and all SSDTs
iasl
Compiler 完整的 ASL/AML 编译/反编译工具
Usage: iasl [Options] [Files] General: -@ <file> Specify command file -I <dir> Specify additional include directory -p <prefix> Specify path/filename prefix for all output files -v Display compiler version -vd Display compiler build date and time -vo Enable optimization comments -vs Disable signon -ld Disable deterministic output
Help: -h This message -hc Display operators allowed in constant expressions -hd Info for obtaining and disassembling binary ACPI tables -hf Display help for output filename generation -hr Display ACPI reserved method names -ht Display currently supported ACPI table names
Preprocessor: -D <symbol> Define symbol for preprocessor use -li Create preprocessed output file (*.i) -P Preprocess only and create preprocessor output file (*.i) -Pn Disable preprocessor
Errors, Warnings, and Remarks: -va Disable all errors/warnings/remarks -ve Report only errors (ignore warnings and remarks) -vi Less verbose errors and warnings for use with IDEs -vr Disable remarks -vw <messageid> Ignore specific error, warning or remark -vx <messageid> Expect a specific warning, remark, or error -w <1|2|3> Set warning reporting level -we Report warnings as errors -ww <messageid> Report specific warning or remark as error
Firmware Support – C Text Output: -tc Create hex AML table in C (*.hex) -sc Create named hex AML arrays in C (*.c) -ic Create include file in C for -sc symbols (*.h) -so Create namespace AML offset table in C (*.offset.h)
Firmware Support – Assembler Text Output: -ta Create hex AML table in assembler (*.hex) -sa Create named hex AML arrays in assembler (*.asm) -ia Create include file in assembler for -sa symbols (*.inc)
Firmware Support – ASL Text Output: -ts Create hex AML table in ASL (Buffer object) (*.hex)
Legacy-ASL to ASL+ Converter: -ca <file> Convert legacy-ASL source file to new ASL+ file (Original comments are passed through to ASL+ file)
Data Table Compiler: -tp Compile tables with flex/bison prototype -G Compile custom table that contains generic operators -T <sig list>|ALL Create ACPI table template/example files -T <count> Emit DSDT and <count> SSDTs to same file -vt Create verbose template files (full disassembly)
AML Disassembler:
-d <f1 f2 …> Disassemble or decode binary ACPI tables to file (*.dsl) (Optional, file type is automatically detected) -da <f1 f2 …> Disassemble multiple tables from single namespace -db Do not translate Buffers to Resource Templates -dc <f1 f2 …> Disassemble AML and immediately compile it (Obtain DSDT from current system if no input file) -df Force disassembler to assume table contains valid AML -dl Emit legacy ASL code only (no C-style operators) -ds <signature(4)> Specify a table signature(4) (CDAT table only) -e <f1 f2 …> Include ACPI table(s) for external symbol resolution -fe <file> Specify external symbol declaration file -in Ignore NoOp opcodes -l Disassemble to mixed ASL and AML code -vt Dump binary table data in hex format within output file
Debug Options: -bc Create converter debug file (*.cdb) -bf Create debug file (full output) (*.txt) -bs Create debug file (parse tree only) (*.txt) -bp <depth> Prune ASL parse tree -bt <type> Object type to be pruned from the parse tree -f Ignore errors, force creation of AML output file(s) -m <size> Set internal line buffer size (in Kbytes) -n Parse only, no output generation -oc Display compile times and statistics -x <level> Set debug level for trace output -z Do not insert new compiler ID for DataTables