编译好的 EFI 文件本质上是一个 WinPE 文件,因此我们有机会在文件开始处加入一些我们需要的代码。这次介绍的就是一个手工在 EFI 入口处插入另外一个EFI 代码的试验。
这次进行一个特别的实验。基本的原理是:
编写一个在屏幕上输出字符串简单的程序,这样我们能得到一段EFI Shell下对屏幕输出字符串的机器码;
编写一个宿主程序,这个程序编译后的 EFI 文件使用 4K 对齐,这样话,存放代码的.text段会有足够的空间能够存放下步骤1生成的机器码;
修改生成的EFI文件的 Section Headers 中给出的.text 大小,保证足够放下我们增加的机器码;
将步骤1生成的代码,插入在步骤3生成的EFI中。
最终,我们得到一个新的 EFI 程序,运行之后它会先执行步骤1 的代码,然后再执行步骤2的代码。
步骤1:这里使用 NASM 汇编语言来完成。
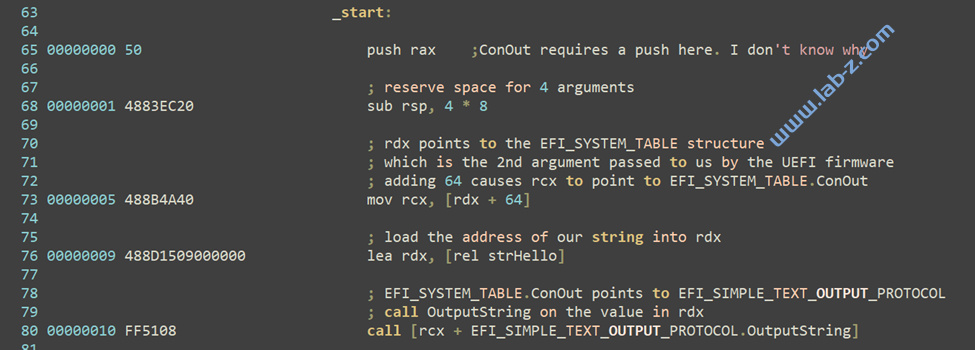
根据之前的文章【参考1】,编写一个程序实现在屏幕上输出字符串的代码。代码有部分修改,主要是将输出的字符串和代码放在了一起:
bits 64

; contains the code that will run
section .text

; allows the linker to see this symbol
global _start

; see http://www.uefi.org/sites/default/files/resources/UEFI Spec 2_7_A Sept 6.pdf#G8.1001729
struc EFI_TABLE_HEADER
    .Signature    RESQ 1
    .Revision     RESD 1
    .HeaderSize   RESD 1
    .CRC32        RESD 1
    .Reserved     RESD 1
endstruc

; see http://www.uefi.org/sites/default/files/resources/UEFI Spec 2_7_A Sept 6.pdf#G8.1001773
struc EFI_SYSTEM_TABLE
    .Hdr                  RESB EFI_TABLE_HEADER_size
    .FirmwareVendor       RESQ 1
    .FirmwareRevision     RESD 1
    .ConsoleInHandle      RESQ 1
    .ConIn                RESQ 1
    .ConsoleOutHandle     RESQ 1
    .ConOut               RESQ 1
    .StandardErrorHandle  RESQ 1
    .StdErr               RESQ 1
    .RuntimeServices      RESQ 1
    .BootServices         RESQ 1
    .NumberOfTableEntries RESQ 1
    .ConfigurationTable   RESQ 1
endstruc

; see http://www.uefi.org/sites/default/files/resources/UEFI Spec 2_7_A Sept 6.pdf#G16.1016807
struc EFI_SIMPLE_TEXT_OUTPUT_PROTOCOL
    .Reset             RESQ 1
    .OutputString      RESQ 1
    .TestString        RESQ 1
    .QueryMode         RESQ 1
    .SetMode           RESQ 1
    .SetAttribute      RESQ 1
    .ClearScreen       RESQ 1
    .SetCursorPosition RESQ 1
    .EnableCursor      RESQ 1
    .Mode              RESQ 1
endstruc

_start:

    push rax    ;ConOut requires a push here. I don't know why

    ; reserve space for 4 arguments
    sub rsp, 4 * 8

    ; rdx points to the EFI_SYSTEM_TABLE structure
    ; which is the 2nd argument passed to us by the UEFI firmware
    ; adding 64 causes rcx to point to EFI_SYSTEM_TABLE.ConOut
    mov rcx, [rdx + 64]

    ; load the address of our string into rdx
    lea rdx, [rel strHello]

    ; EFI_SYSTEM_TABLE.ConOut points to EFI_SIMPLE_TEXT_OUTPUT_PROTOCOL
    ; call OutputString on the value in rdx
    call [rcx + EFI_SIMPLE_TEXT_OUTPUT_PROTOCOL.OutputString]

    add rsp, 4 * 8
    pop rax
    ret

strHello db __utf16__ `Hello World from LAB-Z.COM!\n\r\0`

codesize equ $ - $$

; contains nothing - but it is required by UEFI
section .reloc
编译命令如下:
c:\nasm\nasm -f win64 hello.asm -l hello.lst
link /NODEFAULTLIB /IGNORE:4001 /OPT:REF /OPT:ICF=10 /MAP /ALIGN:32 /SECTION:.xdata,D /SECTION:.pdata,D /Machine:X64  /DLL /ENTRY:_start  /SUBSYSTEM:EFI_APPLICATION /SAFESEH:NO /DRIVER Hello.obj
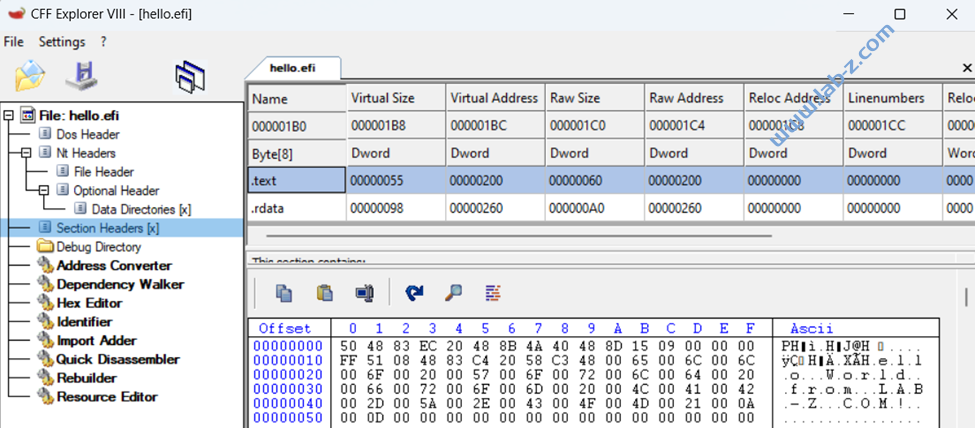
除了正常生成的 EFI 文件之外,还生成了 lst 文件,在其中能够看到代码生成的机器码用于对照参考:
在模拟器中测试可以正常执行。
根据【参考2】,具体对应如下:
.text:(代码段),可读、可执行
.data:(数据段),存放全局变量、全局常量等
.idata:(数据段),导入函数的代码段,存放外部函数地址。(当然还有 edata ,导出函数代码段,但不常用)
.rdata:(数据段),资源数据段,程序用到什么资源数据都在这里(包括自己打包的,还有开发工具打包的)
使用 CFF Explorer查看,我们需要的机器码就在.text段中:
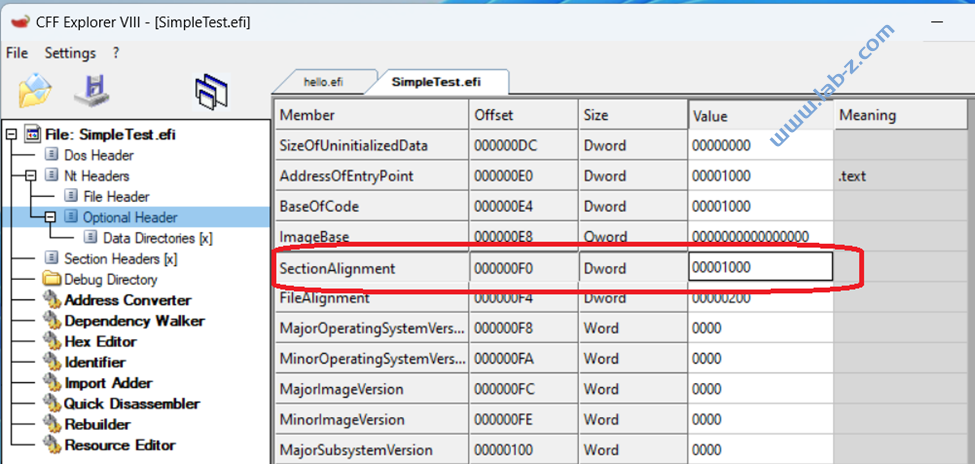
步骤2:我们根据【参考3】,编写一个简单的代码,功能上只是向屏幕输出字符串,然后使用 EDK2 进行开发。因为默认情况下,.text 空余空调很小,所以在编译完成后我们再打开 下面这个 makefile文件
edk2\Build\AppPkg\DEBUG_VS2019\X64\AppPkg\Applications\SimpleTest\SimpleTest\Makefile
将下面的一行中修改为 /ALIGN:0x1000
DLINK_FLAGS = /NOLOGO /NODEFAULTLIB /IGNORE:4001 /IGNORE:4281 /OPT:REF /OPT:ICF=10 /MAP /ALIGN:32 /SECTION:.xdata,D /SECTION:.pdata,D /Machine:X64 /LTCG /DLL /ENTRY:$(IMAGE_ENTRY_POINT) /SUBSYSTEM:EFI_BOOT_SERVICE_DRIVER /SAFESEH:NO /BASE:0 /DRIVER /DEBUG
然后进入对应目录,输入 nmake 重新编译,这样就得到一个段以4K 对齐的 EFI 文件。
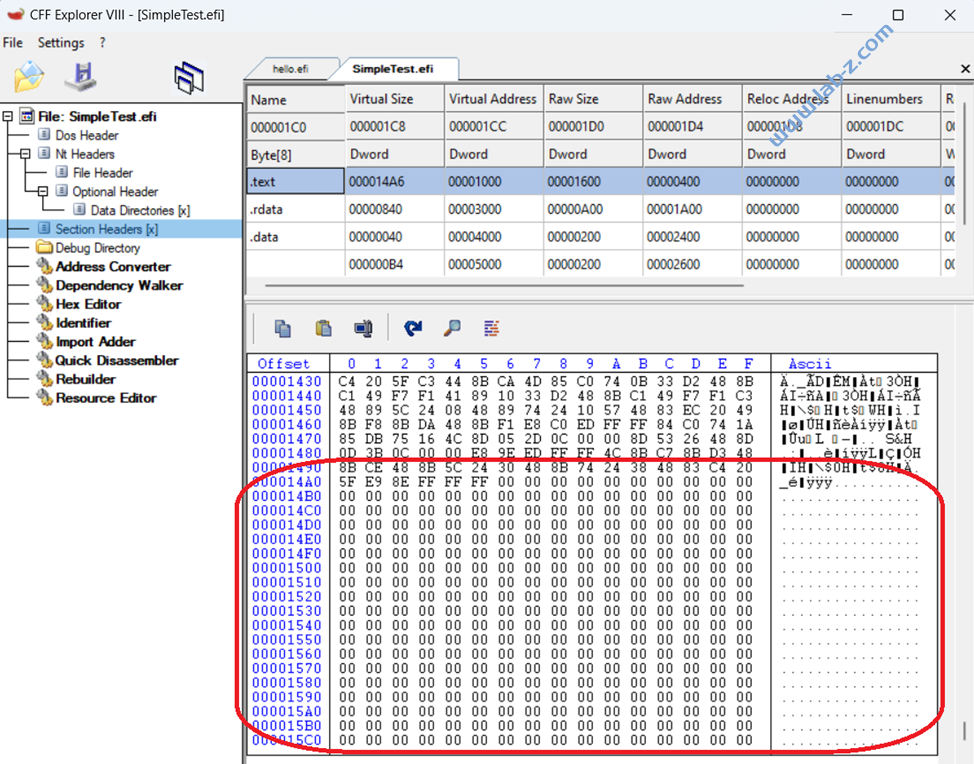
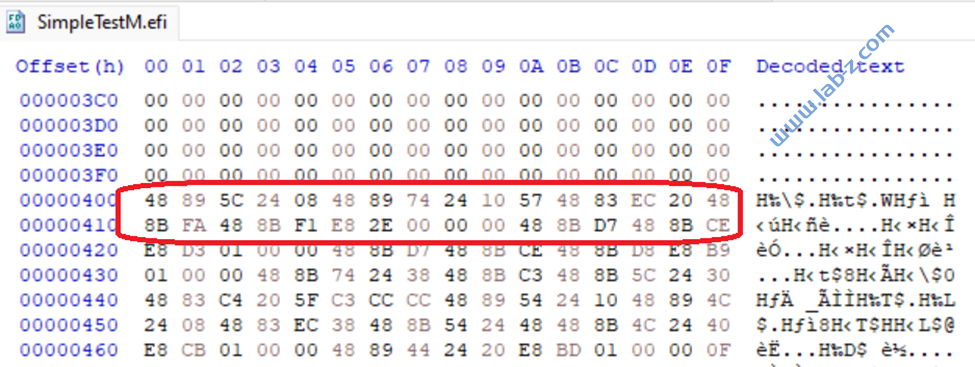
查看 .text段,这里有足够的空间插入我们的代码:
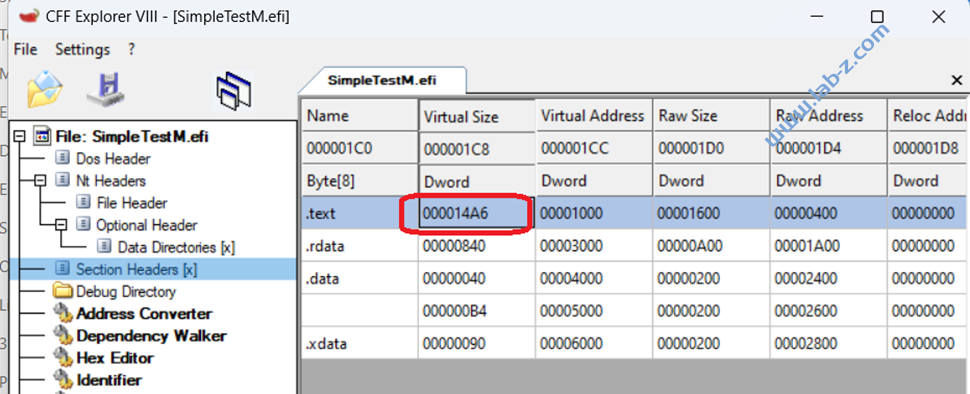
步骤3,修改Section Headers 中的.text Size,这里我们修改为 1600.
步骤4,我们手工插入。
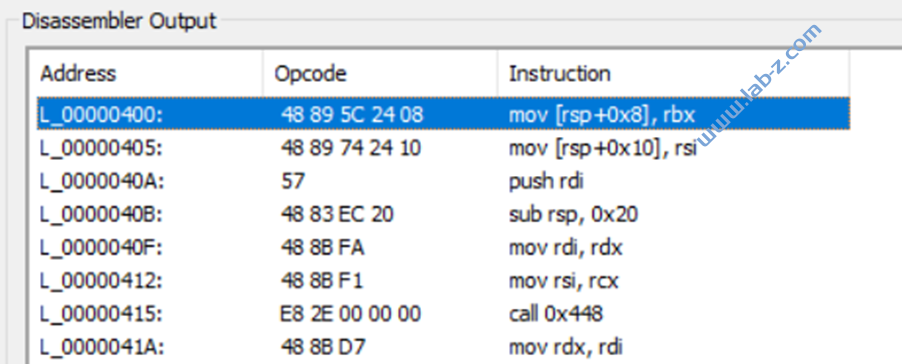
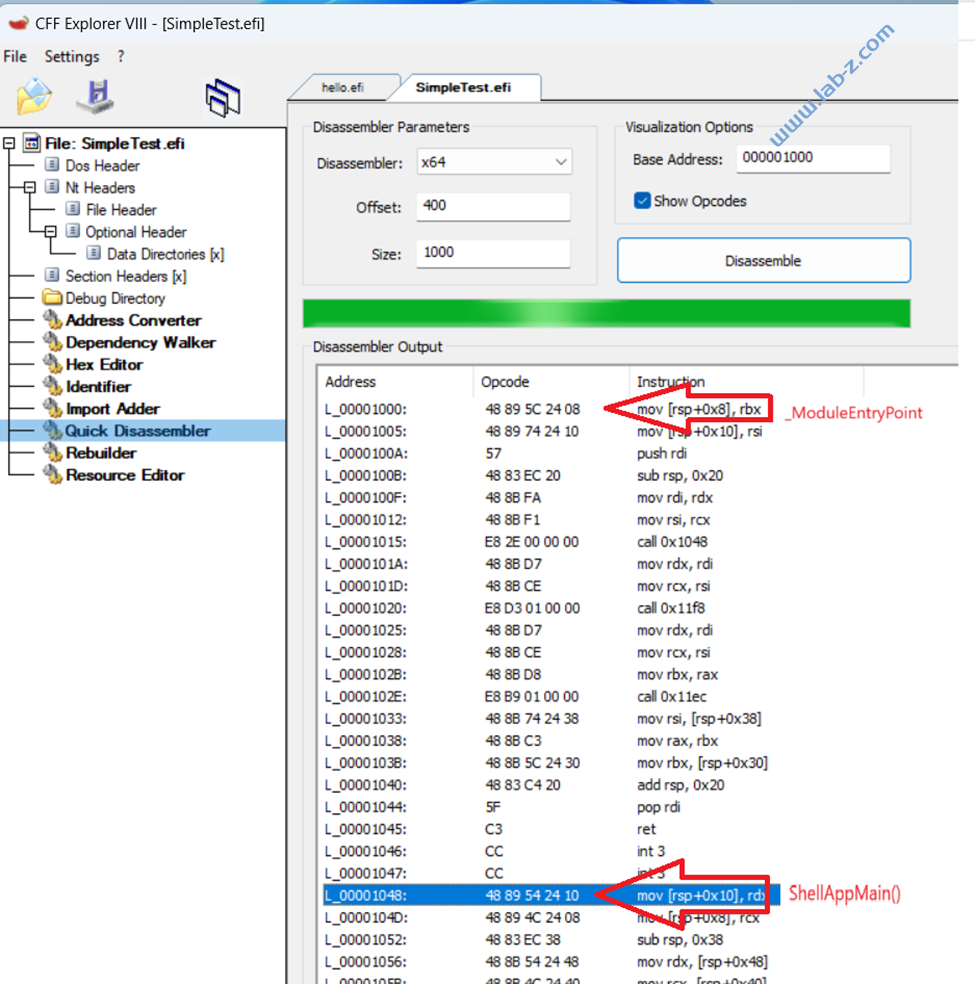
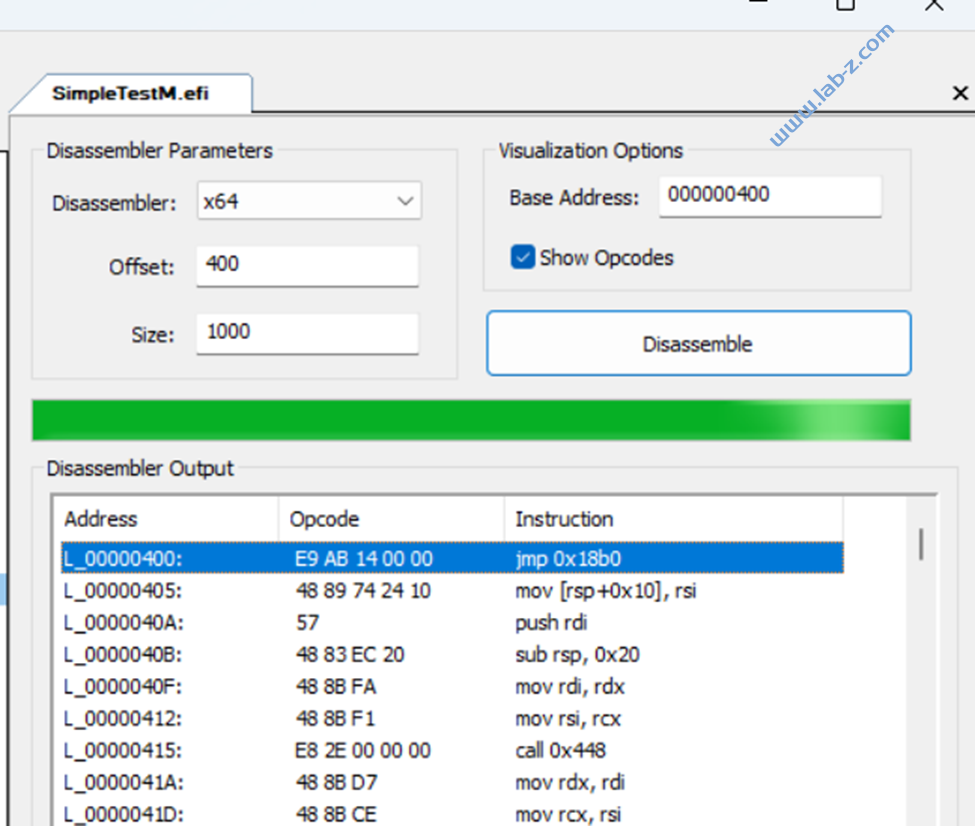
1.SimpleTestM.EFI的入口地址在 0x400处:
开始处对应的是 _ModuleEntryPoint() 函数,我们程序代码是从ShellAppMain() 函数开始的。
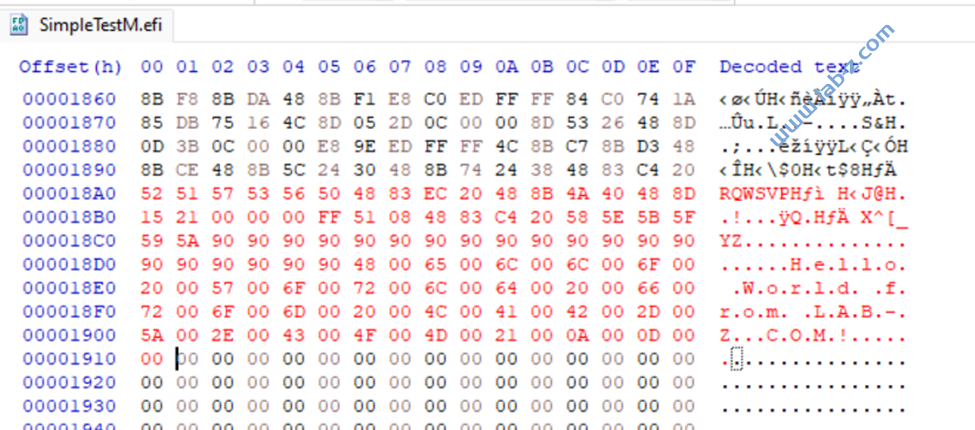
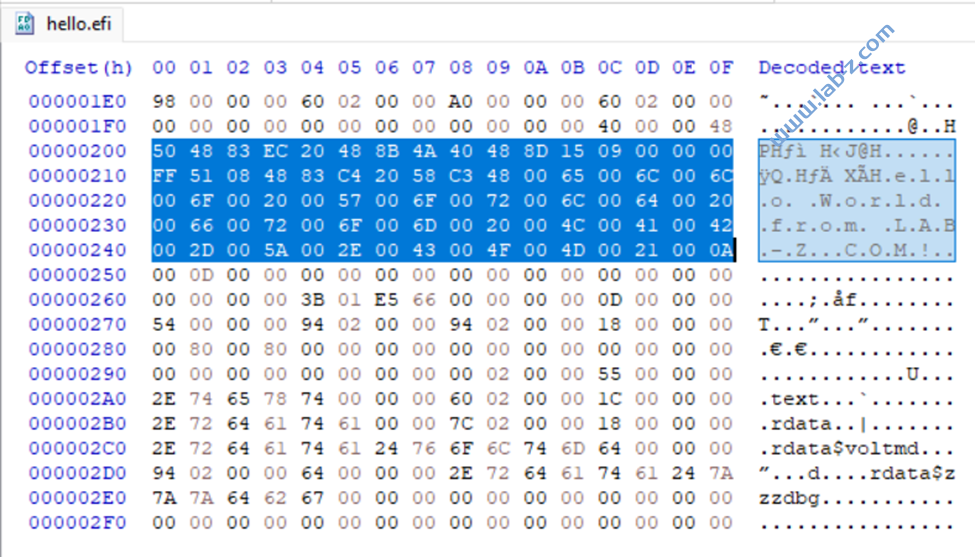
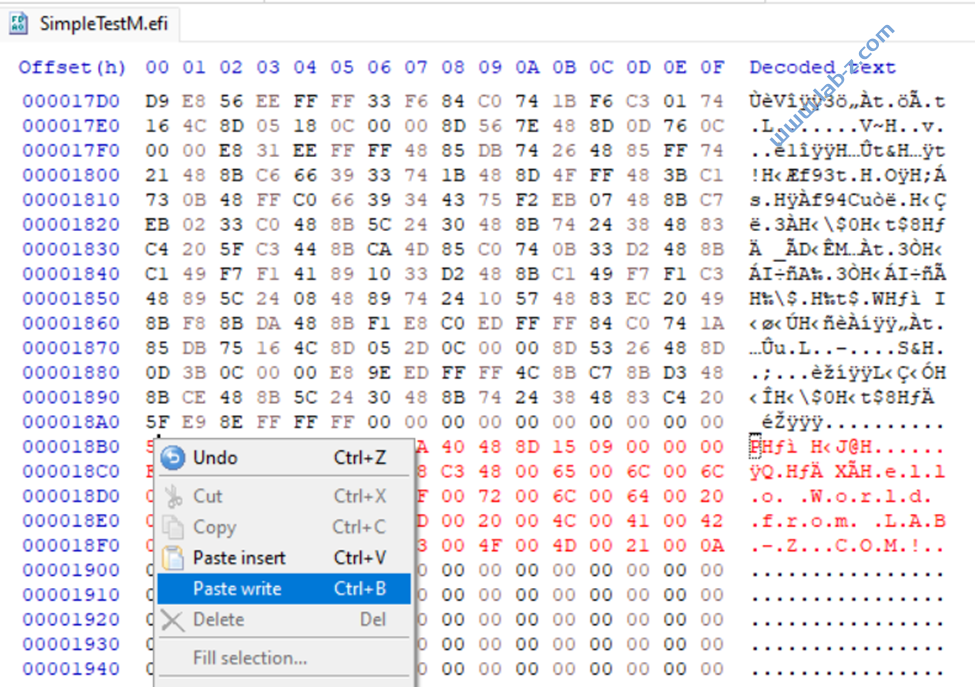
打开hello.efi ,拷贝这一段:
插入(Paste Write)到 SimpleTest.efi 中:
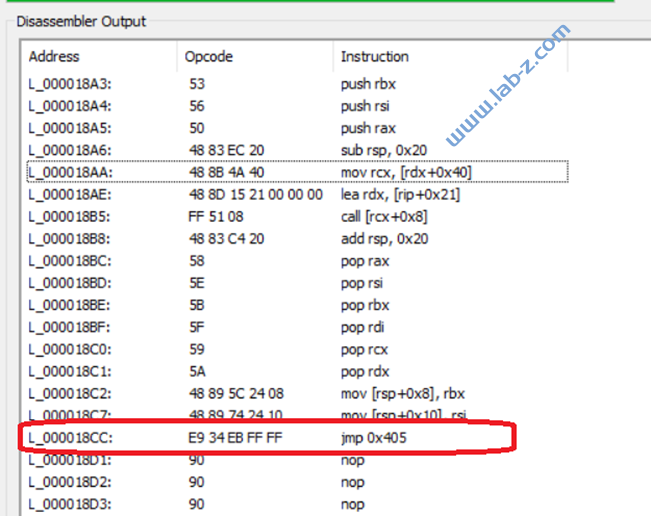
然后手工修改SimpleTest.efi 如下:
入口处修改为跳转指令, 这里使用的是一个相对跳转指令【参考4】
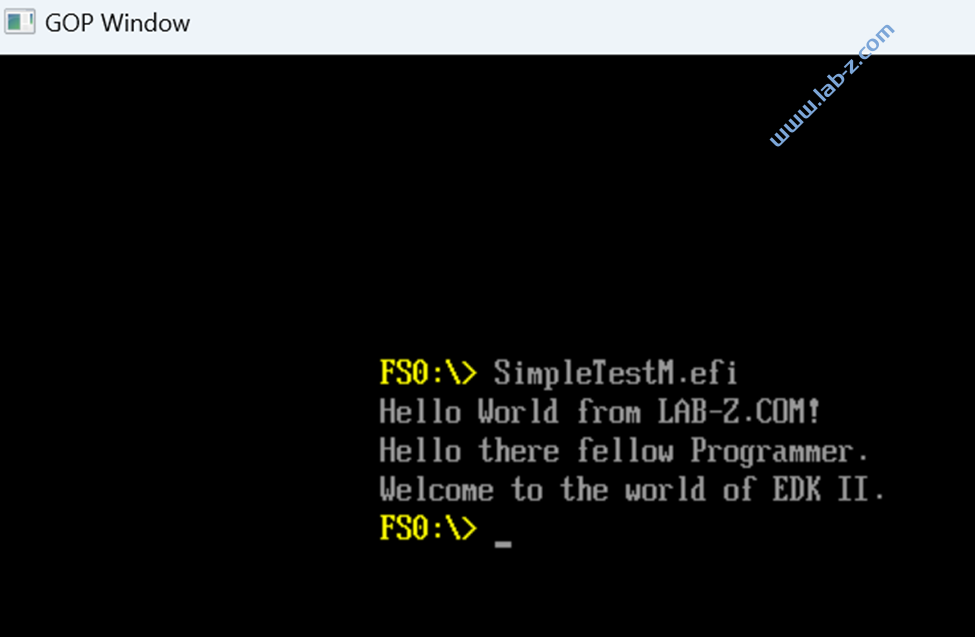
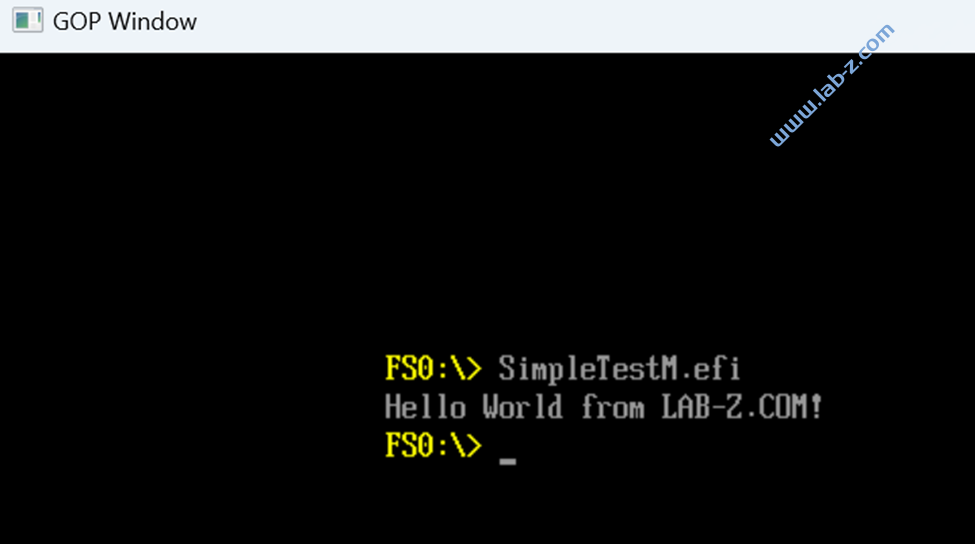
运行之后结果如下:
就是说我们通过 SimpleTestM 运行了hello.efi 中的内容。
当然这里和我们的预期还有差别
当然,这样的代码并不是我们期待的最终结果,我们期望两个程序能够同时运行。
这次只做到了在一个A.EFI中插入另外一个B.EFI 文件,然后运行A.EFI 实际执行B.EFI的代码。
参考:
https://www.lab-z.com/stu207/ https://blog.csdn.net/Simon798/article/details/96876910
https://www.lab-z.com/stu260/ https://www.felixcloutier.com/x86/jmp