之前的服务器受到攻击,所有内容丢失,只能恢复到 2018年7月30日的备份。
然后更换了空间供应商为 Godaddy, 希望能够稳定一些吧。
如果你有任何问题,欢迎给我留言,另外,推荐一下本站的公众号,在页面右下方可以看到。
另外,本站 https 已经开通,有需要的朋友(比如,你所在地方供应商有插入广告之类的行为),可以用 Https://www.lab-z.com 或者 https://lab-z.com
来完成访问。
之前的服务器受到攻击,所有内容丢失,只能恢复到 2018年7月30日的备份。
然后更换了空间供应商为 Godaddy, 希望能够稳定一些吧。
如果你有任何问题,欢迎给我留言,另外,推荐一下本站的公众号,在页面右下方可以看到。
另外,本站 https 已经开通,有需要的朋友(比如,你所在地方供应商有插入广告之类的行为),可以用 Https://www.lab-z.com 或者 https://lab-z.com
来完成访问。
最近一直在和Intel BVT 作战。
Intel BVT 工具的全称是 Intel Brand Verification Tool。 是一款用来测试vPro然后生成报告的工具。测试通过之后,客户通过提交报告即可获得贴vPro Logo的资格。这个工具并不是进行功能性检查,而只是检查配置。例如:报告上说TLS已经Ready,但是实际上软件只是测试标志位是否已经设置起来,但是并不表示这个功能没有问题。如果想确认功能好用,那么需要使用 PETS 之类的进行测试。
BVT 还有一个很大的坑就是关于 Wireless Lan 的设定,如果你没有设定那么测试会提示 “CLink interface to Wi-Fi adapter tests FAILED”。而解决方法是令人匪夷所思的从 Gbe 的Lan登录AMT 的WebUI (Http://IP:16992), 然后找到 Wireless 的设定部分随便写一个AP 设定。
===============================================
2019年1月22日 更新
关于最后一点,如果使用特定的Intel WireLess Driver ,可以在不通过 Gbe Lan的情况下通过 http://127.0.0.1:16992 的方式登录到 WebUI 进行设定。但是从测试结果上来看这样的方法并不稳定(经常会出现无法找到页面,需要再次刷新才能进去的情况)。
===============================================
2020年5月22日 更新
AMT 默认密码是 admin ,第一次进入之后会要求你重设一个密码,你可以使用 “Admin98#” 这个符合密码规则。
参考:
https://wenku.baidu.com/view/a09d33bd960590c69ec376b4.html
Intel主动管理技术(Intel AMT)设置指南
https://blog.51cto.com/lzlutao/1218077
如何使用Intel AMT 8.0技术远程管理PC
本文介绍一种在没有BIOS代码的情况下,修改 ACPI Table 的方法。实际上这种方法已经使用很多很多年了,作为一种测试的方法是非常有效的。
使用到的工具一个是asl 这是微软 wdk 里面带的,用来 dump 和 load 系统acpi table 的;另外一个是 iasl, 这是 acpica 提供的工具,用来编译和反编译 asl 。特别需要注意的问题是,我在实践中发现 iasl 不同版本之间差别很大,如果你在使用中发现编译或者反编译错误非常多,那么最好多尝试几个版本,如果有条件最好直接使用Build 你BIOS的版本。
原理:Windows每次使用的 ACPI table 不是直接从内存读取的,而是缓冲在系统注册表上,因此替换这个注册表里面的就可以取得替换 ACPI Table的效果。
操作:
1. 在 console 下面(需要 Administrator权限),使用命令 asl.exe /tab=DSDT /c


2. 反编译抓下来的 DSDT0000.bin ,使用命令 iasl2016 –ve DSDT0000.bin
虽然报错了,但是还是生成了 dsdt0000.dsl
3. 将生成的 DSDT0000.DSL 改名为 dsdt.dsl,再重新编译之 ,命令是 Iasl2016.exe –ve DSDT.dsl

编译直接出错,修改这个错误(单纯来说,我这次碰到的问题是因为 extern 了 BNUM 和 RTIP,但是后面又重新定义了这两个名字所以会有冲突,修改方法是去掉 extern 的 BNUM和RTIP)
修改之后就可以正常编译了
4. 加入一个我们自定义的设备做为标记,加入的位置在 EC 下面,这样便于观看。加入的代码如下:
Device (LABZ)
{
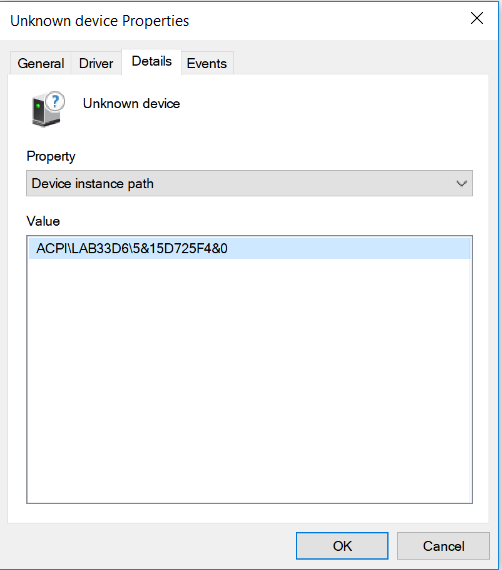
Name (_HID, EisaId ("LAB33D6") /* Intel Virtual Buttons Device */) // _HID: Hardware ID
Method (_STA, 0, Serialized) // _STA: Status
{
Return (0x0F)
}
}
再次编译,
5. 将编译后的结果加入系统中,命令是 asl /loadtable dsdt.aml
6. 重启之后,设备管理器中还是没有变化。需要再设置打开TestMode。 方法是在 console 下面使用
Bcdedit /set testsigning on
7.重启之后就可以在设备管理器中看到我们加入的设备了
加入之前
修改之后
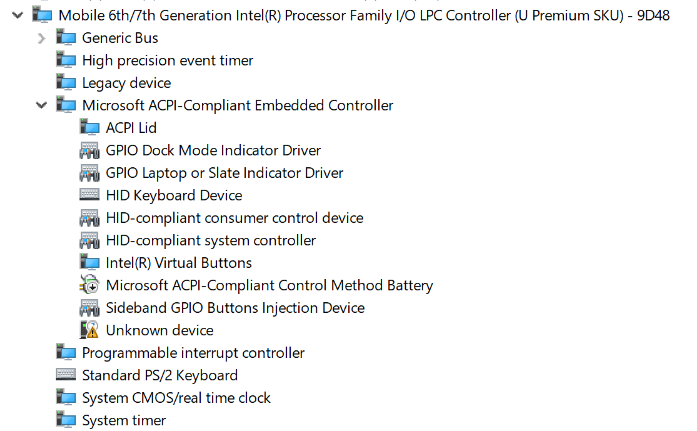
上面的 Unknown device就是我们新加入的设备,设备属性
8. 删除加载的 dsdt 的方法是 asl /loadtable dsdt.aml –d 重启之后即可恢复
从原理上说,Windows会将 DSDT Table “缓存” 在注册表中,在开机的过程中不会去内存解析DSDT而是直接使用缓存的。因此,我们可以通过上面的方法来加入我们需要的代码。
=====================================================
2024年5月20日 在 Windows 11 的虚拟机上测试过,上述方法仍然有效。
高考结束很多年了,班主任的音容笑貌仍然会出现在噩梦中,我仍然记得他在讲述虚数i的时候特别强调过时时刻刻牢记 i^2=-1,因为这是虚数和实数相互转换的门。
对于BIOS工程师来说SMI 就是当下OS和BIOS代码之间门。前面研究过了 gRT->GetVariable的Windows实现,因此,这里也可以作为非常简单的门。这次我们的目标是:在Shell 和 Windows下修改 Setup 的取值。比如说,我们当前的设计上需要更改四个Setup item才能去掉刷写BIOS的保护,这着实很麻烦,如果能自动修改就方便多了。
前文已经找到了BIOS对于Setup 限制访问的位置,经过研究,VarCheckLib.c 中的VarCheckLibSetVariableCheck() 函数会在 PlatformVarCheckLibNullClass.c 中的 mSetupVariableList[] 中查找 GUID 和 名称,对得上就会 Write Protect。为此,将 gSetupVariableGuid,L”Setup” 的定义去掉即可突破这个限制。
接下来,有2种实现的方法:
方法一:Windows Application直接对 Setup 变量的写入。这里选择 Setup 中的第二个UINT8 实验,对应的是 FastBoot 选项。
#define VariableGuidStr1     "{EC87D643-EBA4-4BB5-A1E5-3F3E36B20DA9}"
#define TestStr2             "Setup"

	printf("Check Setup");
	dwRet = GetFirmwareEnvironmentVariable(
		_T(TestStr2),
		_T(VariableGuidStr1),
		pBuffer,
		iBufferSize);
	printf("GetFirmwareEnvironmentVariable again, return value:%x\n", dwRet);
	Buffer[1] = 1;
	dwRet = SetFirmwareEnvironmentVariable(
		_T(TestStr2),
		_T(VariableGuidStr1),
		pBuffer,
		dwRet);
	printf("SetFirmwareEnvironmentVariable return value:%x\n", dwRet);
	printf("GetLastError:%x\n", GetLastError());

	printf("Check Setup again\n");

	dwRet = GetFirmwareEnvironmentVariable(
		_T(TestStr2),
		_T(VariableGuidStr1),
		pBuffer,
		iBufferSize);
	printf("GetFirmwareEnvironmentVariable again, return value:%x\n", dwRet);
运行结果:
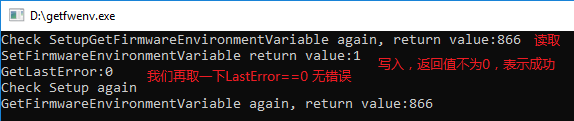
再进入 Setup检查,可以看到 Fast Boot 已经设置为 Disabled。
方法二:在代码中根据输入的 GUID 来判断,然后做出设定的动作。在 VariableSmmRuntimeDxe.c 中的 RuntimeGerviceGetVariable() 函数中加入对GUID 的判断,如果是我们期望的,那么就先取出 Setup Variable,修改之后再用 RuntimeServiceSetVariable()放回去。
/**
  This code finds variable in storage blocks (Volatile or Non-Volatile).

  Caution: This function may receive untrusted input.
  The data size is external input, so this function will validate it carefully to avoid buffer overflow.

  @param[in]      VariableName       Name of Variable to be found.
  @param[in]      VendorGuid         Variable vendor GUID.
  @param[out]     Attributes         Attribute value of the variable found.
  @param[in, out] DataSize           Size of Data found. If size is less than the
                                     data, this value contains the required size.
  @param[out]     Data               Data pointer.

  @retval EFI_INVALID_PARAMETER      Invalid parameter.
  @retval EFI_SUCCESS                Find the specified variable.
  @retval EFI_NOT_FOUND              Not found.
  @retval EFI_BUFFER_TO_SMALL        DataSize is too small for the result.

**/
EFI_STATUS
EFIAPI
RuntimeServiceGetVariable (
  IN      CHAR16                            *VariableName,
  IN      EFI_GUID                          *VendorGuid,
  OUT     UINT32                            *Attributes OPTIONAL,
  IN OUT  UINTN                             *DataSize,
  OUT     VOID                              *Data
  )
{
  EFI_STATUS                                Status;
  UINTN                                     PayloadSize;
  SMM_VARIABLE_COMMUNICATE_ACCESS_VARIABLE  *SmmVariableHeader;
  UINTN                                     TempDataSize;
  UINTN                                     VariableNameSize;

//LABZ_Start
  SETUP_DATA                   SetupData;
  UINTN                        VariableSize;
  UINT32                       VariableAttributes;

  if (CompareGuid (VendorGuid, &gLabZTestGuid)) { // 比较查看参数是否要触发

  VariableSize = sizeof (SETUP_DATA);
  Status = RuntimeServiceGetVariable (  //取Setup变量
                  L"Setup",
                  &gSetupVariableGuid,
                  &VariableAttributes,
                  &VariableSize,
                  &SetupData
                  );
  if (EFI_ERROR (Status)) {
    return Status;
  }
  SetupData.WakeOnRTCS5=1;  //修改选项值
  Status = RuntimeServiceSetVariable ( //将修改之后的结果回写
                  L"Setup",
                  &gSetupVariableGuid,
                  VariableAttributes,
                  VariableSize,
                  &SetupData
                  );
  ASSERT_EFI_ERROR(Status);

  }
//LABZ_End

  if (VariableName == NULL || VendorGuid == NULL || DataSize == NULL) {
    return EFI_INVALID_PARAMETER;
  }
在 KBL-R HDK 平台上实验,首先在Shell 中,为了便于实验编写一个测试程序,最主要的功能就是调用 gRT->GetVariable 发送gLabZTestGuid 来触发函数。
在 Windows下运行编译后的 Shell Application ,再进入 Setup查看是能够看到选项已经成功修改。
#define TestGuidStr          "{11111111-1111-1111-1111-111111111111}" //用这个定义只是方便

	dwRet = GetFirmwareEnvironmentVariable(
		_T(TestStr2),
		_T(TestGuidStr),
		pBuffer,
		iBufferSize);
	printf("GetFirmwareEnvironmentVariable again, return value:%x\n", dwRet);
仍然是成功的。
从上面可以看到,这个方法无论在 Shell 下还是 Windows下都能正常工作(虽然没有实验,但是我也相信支持 UEFI 的Linux也是可以使用的)。此外,作为参数的 GUID 足够多,能让我们灵活的处理各种情况。
之前的文章【参考1】提出了一个问题:为什么在Windows 下SetFirmwareEnvironmentVariable API 只能对有限的几个Variable有用?比如:可以修改“BootOrder”,但是无法修改 “Setup”的值。
文章比较长,大篇幅的罗列代码让文章更像技术手册,没有耐心的朋友可以直接拖动到文章末尾看结论。
我们已经知道 Windows 中的SetFirmwareEnvironmentVariable 函数最终是通过 gRT->SetVariable 调用到 RuntimeServiceSetVariable中的【参考2】 。所以我们可以使用WinDBG追踪代码查看是在哪里返回了错误值。
具体分析:
1.下断点
bp hal!HalEfiSetEnvironmentVariable
2. HalEfiSetEnvironmentVariable 函数中的call qword ptr [rax+28h] 这个位置就是跳到BIOS 中的SetVariable的入口(再介绍一下 COD文件的生成:
在VariableSmmRuntimeDxe.inf 加入下面的编译指令
[BuildOptions]
  MSFT:*_*_X64_CC_FLAGS = /Oi- /FAcs /Od
在编译过程中即可生成
\Build\KabylakePlatSamplePkg\RELEASE_VS2013x86\X64\MdeModulePkg\Universal\Variable\RuntimeDxe\VariableSmmRuntimeDxe\VariableSmmRuntimeDxe.cod 使用 WinDBG 追踪可以看到执行的代码是 RuntimeServiceSetVariable函数,前面的文章介绍过这样的方法追踪 GetVariable)
3.接下来查看BIOS的代码,因为有 COD文件的存在,我们也能知道每一条函数源代码对应的汇编指令。为了便于实验,在 Variable.c 中的 VariableServiceSetVariable中加入对 80 Port 输出91h的代码,这样可以在 WinDBG 追踪中确定具体“干活”代码的位置。
4.查看 RuntimeServiceSetVariable 函数的返回值部分,可以看到是通过 rax 来返回函数结果的
  001b0	48 8b 54 24 58	 mov	 rdx, QWORD PTR VendorGuid$[rsp]
  001b5	48 8b 4c 24 50	 mov	 rcx, QWORD PTR VariableName$[rsp]
  001ba	e8 00 00 00 00	 call	 SecureBootHook
$LN1@RuntimeSer:
$LN2@RuntimeSer:
; 642  :     }
; 643  :   }
; 644  :   return Status;
  001bf	48 8b 44 24 30	 mov	 rax, QWORD PTR Status$[rsp]
$LN9@RuntimeSer:
; 645  : }
5.编写 Application,调用2次SetFirmwareEnvironmentVariable,第一次是针对BootOrder 变量的,第二次是针对VendorKeys的。
#define VariableGuidStr      "{8BE4DF61-93CA-11D2-AA0D-00E098032B8C}"
#define BootOrderStr         "BootOrder"
	//Get BootOrder
	dwRet = GetFirmwareEnvironmentVariable(
		_T(BootOrderStr),
		_T(VariableGuidStr),
		pBuffer,
		iBufferSize);
	printf("GetFirmwareEnvironmentVariable return value:%x\n", dwRet);
实验结果是前者可以正常设置,但是后者会报错。对于SetFirmwareEnvironmentVariable 函数来说,返回值为0表示出错,不为0是正常【参考3】。

这个错误的含义是【参考4】,同样的这个错误的定义可以在【参考5】看到
ERROR_WRITE_PROTECT
19 (0x13)
The media is write protected.
6.使用 WinDBG 在调用处下断点
kd> u
hal!HalEfiSetEnvironmentVariable+0x41:
fffff800`ce10b8a5 4c8b4c2460      mov     r9,qword ptr [rsp+60h]
fffff800`ce10b8aa 458bc3          mov     r8d,r11d
fffff800`ce10b8ad 488b054c570300  mov     rax,qword ptr [hal!HalEfiRuntimeServicesTable (fffff800`ce141000)]
fffff800`ce10b8b4 488bd3          mov     rdx,rbx
fffff800`ce10b8b7 4c894c2420      mov     qword ptr [rsp+20h],r9
fffff800`ce10b8bc 488bcf          mov     rcx,rdi
fffff800`ce10b8bf 4d8bca          mov     r9,r10
fffff800`ce10b8c2 ff5028          call    qword ptr [rax+28h]
7.不知道什么原因,我在Application 中只调用了2次SetFirmwareEnvironmentVariable,但是 WinDBG 会停下来4次。经过观察前面2次返回值为0x0000000000000000,后面两次返回值0x8000000000000008。
至此,可以确定SetFirmwareEnvironmentVariable 无法修改是因为 UEFI 代码导致的问题,和 Windows 无关。确定这点之后,就可以在 BIOS Source code 中查找是哪里返回了这个错误。最终确定在 \MdeModulePkg\Library\VarCheckLib\VarCheckLib.c 下面的位置返回的 Write Protected
  //
  // Also check the property revision before using the property data.
  // There is no property set to this variable(wildcard name)
  // if the revision is not VAR_CHECK_VARIABLE_PROPERTY_REVISION.
  //
  if ((Property != NULL) && (Property->Revision == VAR_CHECK_VARIABLE_PROPERTY_REVISION)) {
    if ((RequestSource != VarCheckFromTrusted) && ((Property->Property & VAR_CHECK_VARIABLE_PROPERTY_READ_ONLY) != 0)) {
      DEBUG ((EFI_D_INFO, "Variable Check ReadOnly variable fail %r - %g:%s\n", EFI_WRITE_PROTECTED, VendorGuid, VariableName));
     return EFI_WRITE_PROTECTED;
    }
    if (!((((Attributes & EFI_VARIABLE_APPEND_WRITE) == 0) && (DataSize == 0)) || (Attributes == 0))) {
      //
      // Not to delete variable.
      //
      if ((Property->Attributes != 0) && ((Attributes & (~EFI_VARIABLE_APPEND_WRITE)) != Property->Attributes)) {
        DEBUG ((EFI_D_INFO, "Variable Check Attributes(0x%08x to 0x%08x) fail %r - %g:%s\n", Property->Attributes, Attributes, EFI_INVALID_PARAMETER, VendorGuid, VariableName));
        return EFI_INVALID_PARAMETER;
      }
      if (DataSize != 0) {
        if ((DataSize < Property->MinSize) || (DataSize > Property->MaxSize)) {
          DEBUG ((EFI_D_INFO, "Variable Check DataSize fail(0x%x not in 0x%x - 0x%x) %r - %g:%s\n", DataSize, Property->MinSize, Property->MaxSize, EFI_INVALID_PARAMETER, VendorGuid, VariableName));
          return EFI_INVALID_PARAMETER;
        }
      }
    }
  }
从代码中看,这个设定应该是一个安全的 Feature。
总结:BIOS中因为安全设定的缘故阻止了对于一些 Variable 的Write。Windows调用 gRT-> SetVariable 发现返回值是Error,于是 API 也会返回错误值。
参考;
1. http://www.lab-z.com/stu143/ Windows 下BootOrder研究
2. http://www.lab-z.com/haldbg1/ HAL.DLL 中的 HalEfiGetEnvironmentVariable
3. https://msdn.microsoft.com/en-us/library/ms724934(v=vs.85).aspx
4. https://msdn.microsoft.com/en-us/library/ms681382(v=vs.85).aspx
5. 这个错误在 UEFI 中的定义如下
/**
  Produces a RETURN_STATUS code with the highest bit set.

  @param  StatusCode    The status code value to convert into a warning code.
                        StatusCode must be in the range 0x00000000..0x7FFFFFFF.

  @return The value specified by StatusCode with the highest bit set.

**/
#define ENCODE_ERROR(StatusCode)     ((RETURN_STATUS)(MAX_BIT | (StatusCode)))

///
/// The device can not be written to.
///
#define RETURN_WRITE_PROTECTED       ENCODE_ERROR (8)
同样的,编写一个 Shell Application 可以确认就是 Write Protected 错误
Print(L" 0x13=[%r] \n",0x8000000000000008UL);
前面分析过GetVariable,这里继续证明“Windows 下GetFirmwareEnvironmentVariable 具体的实现代码是gRT->GetVariable ”。
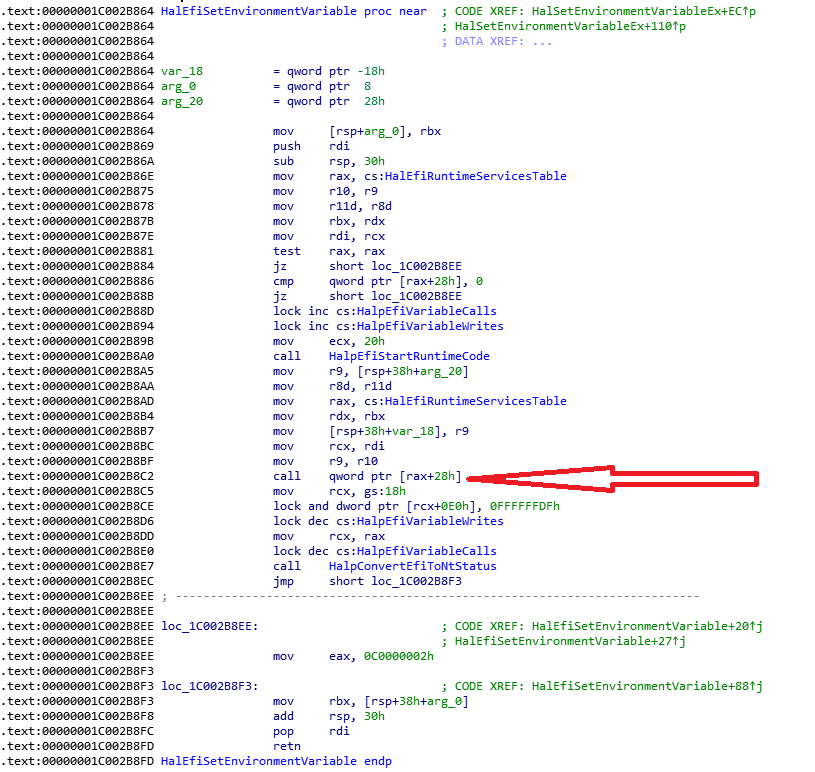
方法一,利用 WinDBG动态分析。首先使用 bp hal!HalEfiSetEnvironmentVariable 下断点。根据我们之前的分析结果,关注红色箭头指向的位置
在 WinDBG 中操作,触发函数断点:
2: kd> g
Breakpoint 1 hit
hal!HalEfiGetEnvironmentVariable:
fffff800`7b02d50c 48895c2408 mov qword ptr [rsp+8],rbx
0: kd> u
hal!HalEfiGetEnvironmentVariable:
fffff800`7b02d50c 48895c2408 mov qword ptr [rsp+8],rbx
fffff800`7b02d511 57 push rdi
fffff800`7b02d512 4883ec30 sub rsp,30h
fffff800`7b02d516 488b05e35a0300 mov rax,qword ptr [hal!HalEfiRuntimeServicesTable (fffff800`7b063000)]
fffff800`7b02d51d 4d8bd1 mov r10,r9
fffff800`7b02d520 4d8bd8 mov r11,r8
fffff800`7b02d523 488bda mov rbx,rdx
fffff800`7b02d526 488bf9 mov rdi,rcx
0: kd> u
hal!HalEfiGetEnvironmentVariable+0x1d:
fffff800`7b02d529 4885c0 test rax,rax
fffff800`7b02d52c 745a je hal!HalEfiGetEnvironmentVariable+0x7c (fffff800`7b02d588)
fffff800`7b02d52e 4883781800 cmp qword ptr [rax+18h],0
fffff800`7b02d533 7453 je hal!HalEfiGetEnvironmentVariable+0x7c (fffff800`7b02d588)
fffff800`7b02d535 f0ff05249d0200 lock inc dword ptr [hal!HalpEfiVariableCalls (fffff800`7b057260)]
fffff800`7b02d53c b908000000 mov ecx,8
fffff800`7b02d541 e876060000 call hal!HalpEfiStartRuntimeCode (fffff800`7b02dbbc)
fffff800`7b02d546 4c8b4c2460 mov r9,qword ptr [rsp+60h]
0: kd> u
hal!HalEfiGetEnvironmentVariable+0x3f:
fffff800`7b02d54b 4d8bc3 mov r8,r11
fffff800`7b02d54e 488b05ab5a0300 mov rax,qword ptr [hal!HalEfiRuntimeServicesTable (fffff800`7b063000)]
fffff800`7b02d555 488bd3 mov rdx,rbx
fffff800`7b02d558 4c894c2420 mov qword ptr [rsp+20h],r9
fffff800`7b02d55d 488bcf mov rcx,rdi
fffff800`7b02d560 4d8bca mov r9,r10
fffff800`7b02d563 ff5018 call qword ptr [rax+18h]
fffff800`7b02d566 65488b0c2518000000 mov rcx,qword ptr gs:[18h]
0: kd> u
hal!HalEfiGetEnvironmentVariable+0x63:
fffff800`7b02d56f f083a1e0000000f7 lock and dword ptr [rcx+0E0h],0FFFFFFF7h
fffff800`7b02d577 f0ff0de29c0200 lock dec dword ptr [hal!HalpEfiVariableCalls (fffff800`7b057260)]
fffff800`7b02d57e 488bc8 mov rcx,rax
fffff800`7b02d581 e802060000 call hal!HalpConvertEfiToNtStatus (fffff800`7b02db88)
fffff800`7b02d586 eb05 jmp hal!HalEfiGetEnvironmentVariable+0x81 (fffff800`7b02d58d)
fffff800`7b02d588 b8020000c0 mov eax,0C0000002h
fffff800`7b02d58d 488b5c2440 mov rbx,qword ptr [rsp+40h]
fffff800`7b02d592 4883c430 add rsp,30h
0: kd> u
hal!HalEfiGetEnvironmentVariable+0x8a:
fffff800`7b02d596 5f pop rdi
其中call qword ptr [rax+18h] 就是跳转到UEFI 的 GetVariable。在此下断点,动态运行可以看到函数执行的代码。这里还没有进入SMM Mode所以 WinDBG 是能够正常工作的。
Breakpoint 2 hit
hal!HalEfiGetEnvironmentVariable+0x57:
fffff800`7b02d563 ff5018 call qword ptr [rax+18h]
0: kd> t
fffff800`7e17ea2c 4c894c2420 mov qword ptr [rsp+20h],r9
0: kd> t
fffff800`7e17ea31 4c89442418 mov qword ptr [rsp+18h],r8
0: kd> t
fffff800`7e17ea36 4889542410 mov qword ptr [rsp+10h],rdx
0: kd> t
fffff800`7e17ea3b 48894c2408 mov qword ptr [rsp+8],rcx
0: kd> t
fffff800`7e17ea40 4881ece8080000 sub rsp,8E8h
0: kd> t
fffff800`7e17ea47 488d15b2160000 lea rdx,[fffff800`7e180100]
0: kd> t
fffff800`7e17ea4e 488b8c24f8080000 mov rcx,qword ptr [rsp+8F8h]
0: kd> t
fffff800`7e17ea56 e8290c0000 call fffff800`7e17f684
接下来在BIOS 的Source Code \MdeModulePkg\Universal\Variable\RuntimeDxe\VariableSmmRuntimeDxe.inf 添加如下编译指令:
[BuildOptions]
  MSFT:*_*_X64_CC_FLAGS = /Oi- /FAcs /Od
这样,在编译过程中会生成对应的 COD 文件。
\Build\KabylakePlatSamplePkg\RELEASE_VS2013x86\X64\MdeModulePkg\Universal\Variable\RuntimeDxe\VariableSmmRuntimeDxe\VariableSmmRuntimeDxe.cod
打开这个文件,可以看到源代码和上面 WinDBG 反编译后的结果相同(机器码相同同),因此,确定 Windows call 到了RuntimeServiceGetVariable 函数中
RuntimeServiceGetVariable PROC				; COMDAT
; 677  : {
$LN18:
  00000	4c 89 4c 24 20	 mov	 QWORD PTR [rsp+32], r9
  00005	4c 89 44 24 18	 mov	 QWORD PTR [rsp+24], r8
  0000a	48 89 54 24 10	 mov	 QWORD PTR [rsp+16], rdx
  0000f	48 89 4c 24 08	 mov	 QWORD PTR [rsp+8], rcx
  00014	48 81 ec e8 08
	00 00		 sub	 rsp, 2280		; 000008e8H

; 678  :   EFI_STATUS                                Status;
; 679  :   UINTN                                     PayloadSize;
; 680  :   SMM_VARIABLE_COMMUNICATE_ACCESS_VARIABLE  *SmmVariableHeader;
; 681  :   UINTN                                     TempDataSize;
; 682  :   UINTN                                     VariableNameSize;
因此,结论得证。
第二种方法,同样的生成对应的 COD文件。
在 Shell 下面运行之前Application显示当前系统中的gRT->GetVariable 的地址,结果为 3C9B9A2C;接下来启动到 Windows中使用 WinDBG 查看这个地址上的数值
kd> dd 3C9B9A2C
00000000`3c9b9a2c 244c894c 44894c20 89481824 48102454
00000000`3c9b9a3c 08244c89 e8ec8148 48000008 16b2158d
00000000`3c9b9a4c 8b480000 08f8248c 29e80000 0f00000c
00000000`3c9b9a5c c085c0b6 0083840f c7480000 66582444
00000000`3c9b9a6c 48000008 7024448d 24448948 4c8d4c20
00000000`3c9b9a7c 8d4c5824 48502444 1686158d 8d480000
00000000`3c9b9a8c 0016e70d ff96e800 8948ffff 48382444
00000000`3c9b9a9c 38247c83 480a7d00 3824448b 000265e9
这个值是可以和UEFI 代码中的RuntimeServiceGetVariable 函数对应起来的,因此可以确定gRT->GetVariable指向的就是这个函数。
结合之前的文章,我们可以明确“Windows API GetFirmwareEnvironmentVariable” 最终会使用 UEFI 的 gRT->GetVariable 来完成实际操作。
继续研究 Runtime Service Table 中的GetVariable 函数。本文讲述Runtime Service Table 中的GetVariable是如何实现的,因为 codebase 之间可能存在的差异,建议有兴趣的朋友按照文章提到的方法在实体平台上进行实验验证。也欢迎遇到不同情况的朋友在网站留言。
首先,GetVariable 函数处于 Runtime Service Table 中,因此有必要研究一下这个 Table 的由来。根据【参考1】,这个 Table 的初始化代码在 \UDK2017\MdeModulePkg\Core\Dxe\DxeMain\DxeMain.c 中。 同一个文件中还有Table 的结构体定义:
EFI_RUNTIME_SERVICES mEfiRuntimeServicesTableTemplate = {
{
EFI_RUNTIME_SERVICES_SIGNATURE, // Signature
EFI_RUNTIME_SERVICES_REVISION, // Revision
sizeof (EFI_RUNTIME_SERVICES), // HeaderSize
0, // CRC32
0 // Reserved
},
(EFI_GET_TIME) CoreEfiNotAvailableYetArg2, // GetTime
(EFI_SET_TIME) CoreEfiNotAvailableYetArg1, // SetTime
(EFI_GET_WAKEUP_TIME) CoreEfiNotAvailableYetArg3, // GetWakeupTime
(EFI_SET_WAKEUP_TIME) CoreEfiNotAvailableYetArg2, // SetWakeupTime
(EFI_SET_VIRTUAL_ADDRESS_MAP) CoreEfiNotAvailableYetArg4, // SetVirtualAddressMap
(EFI_CONVERT_POINTER) CoreEfiNotAvailableYetArg2, // ConvertPointer
(EFI_GET_VARIABLE) CoreEfiNotAvailableYetArg5, // GetVariable
(EFI_GET_NEXT_VARIABLE_NAME) CoreEfiNotAvailableYetArg3, // GetNextVariableName
(EFI_SET_VARIABLE) CoreEfiNotAvailableYetArg5, // SetVariable
(EFI_GET_NEXT_HIGH_MONO_COUNT) CoreEfiNotAvailableYetArg1, // GetNextHighMonotonicCount
(EFI_RESET_SYSTEM) CoreEfiNotAvailableYetArg4, // ResetSystem
(EFI_UPDATE_CAPSULE) CoreEfiNotAvailableYetArg3, // UpdateCapsule
(EFI_QUERY_CAPSULE_CAPABILITIES) CoreEfiNotAvailableYetArg4, // QueryCapsuleCapabilities
(EFI_QUERY_VARIABLE_INFO) CoreEfiNotAvailableYetArg4 // QueryVariableInfo
};
初始化之后,整个Table大部分内容都是空的,在BIOS运行的过程中会逐步填充值。
为了确认Runtime Service Table是在这里初始化,采用在DxeMain() 函数中下面位置加入 Debug 信息标记的方法:
  //
  // Allocate the EFI System Table and EFI Runtime Service Table from EfiRuntimeServicesData
  // Use the templates to initialize the contents of the EFI System Table and EFI Runtime Services Table
  //
  gDxeCoreST = AllocateRuntimeCopyPool (sizeof (EFI_SYSTEM_TABLE), &mEfiSystemTableTemplate);
  ASSERT (gDxeCoreST != NULL);

  gDxeCoreRT = AllocateRuntimeCopyPool (sizeof (EFI_RUNTIME_SERVICES), &mEfiRuntimeServicesTableTemplate);
  ASSERT (gDxeCoreRT != NULL);

  gDxeCoreST->RuntimeServices = gDxeCoreRT;
检查 Log 可以看到,这里分配给 Runtime Service Table的内存地址是0x3B954B98:
CoreInitializeMemoryServices:
AllocatePoolPages: failed to allocate 1 pages
AllocatePool: failed to allocate 144 bytes
AllocatePoolPages: failed to allocate 1 pages
AllocatePool: failed to allocate 160 bytes
BaseAddress – 0x3B8A1000 Length – 0x75E000 MinimalMemorySizeNeeded – 0x75E000
LABZ0 [3B953B98]
InstallProtocolInterface: 5B1B31A1-9562-11D2-8E3F-00A0C969723B 39902EB8
InstallProtocolInterface: 5CB5C776-60D5-45EE-883C-452708CD743F 39903028
HOBLIST address in DXE = 0x3689A018
在 Shell 下使用 mm 命令能看到相同的地址:
Valid EFI Header at Address 000000003B953018
———————————————
System: Table Structure size 00000078 revision 00020032
ConIn (0000000037D37AE0) ConOut (0000000036A94218) StdErr (0000000037D37C50)
Runtime Services 000000003B953B98
Boot Services 0000000039902D00
SAL System Table 0000000000000000
ACPI Table 000000003BFFD000
ACPI 2.0 Table 000000003BFFD014
MPS Table 0000000000000000
SMBIOS Table 000000003B94F000
因此,确定这里是Runtime Service Table 初始化的位置。
接下来研究 EFI_GET_VARIABLE具体实现的代码。在MdeModulePkg\Universal\Variable\RuntimeDxe\VariableSmmRuntimeDxe.c 的 SmmVariableReady() 函数中添加 Debug 信息
  //
  // Save the buffer physical address used for SMM conmunication.
  //
  mVariableBufferPhysical = mVariableBuffer;

  gRT->GetVariable         = RuntimeServiceGetVariable;
  gRT->GetNextVariableName = RuntimeServiceGetNextVariableName;
  gRT->SetVariable         = RuntimeServiceSetVariable;
  gRT->QueryVariableInfo   = RuntimeServiceQueryVariableInfo;
DEBUG ((EFI_D_INFO, "LABZ2 GetVariable[%X]\n",RuntimeServiceGetVariable));
  //
  // Install the Variable Architectural Protocol on a new handle.
  //
  Status = gBS->InstallProtocolInterface (
                  &mHandle,
                  &gEfiVariableArchProtocolGuid,
                  EFI_NATIVE_INTERFACE,
                  NULL
                  );
  ASSERT_EFI_ERROR (Status);
查看 Log 输出结果:
InstallProtocolInterface: 5B1B31A1-9562-11D2-8E3F-00A0C969723B 3845B4C0
Loading driver at 0x0003B8D4000 EntryPoint=0x0003B8D5000 VariableSmmRuntimeDxe.efi
InstallProtocolInterface: BC62157E-3E33-4FEC-9920-2D3B36D750DF 3845C818
PROGRESS CODE: V03040002 I0
LABZ2 GetVariable[3B8D5B00]
InstallProtocolInterface: 1E5668E2-8481-11D4-BCF1-0080C73C8881 0
InstallProtocolInterface: CD3D0A05-9E24-437C-A891-1EE053DB7638 3B8D9400
InstallProtocolInterface: AF23B340-97B4-4685-8D4F-A3F28169B21D 3B8D93E0
为了更方便的观察 Runtime Service Table 中的各项值,专门编写了一个简单的 EFI Application,在屏幕上输出各个函数的地址【参考2】。从结果上看,这次启动(每次启动函数地址会发生变化)后,GetVariable 的地址是0x3B8D5B00。
Runtime Service at [3B953B98]
GetTime [3B8C3478]
SetTime [3B8C3484]
GetWakeupTime [3B8C34A0]
SetWakeupTime [3B8C34AC]
ResetSystem [3B8E8730]
GetNextHighMonotonicCount [3B8BC67C]
GetVariable [3B8D5B00]
SetVariable [3B8D5E10]
GetNextVariableName [3B8D5C90]
QueryVariableInfo [3B8D5F6C]
UpdateCapsule [3B8B45BC]
QueryCapsuleCapabilities [3B8B47B8]
就是说在这个函数中,SetVariable 指向了 RuntimeServiceGetVariable 函数可以在\UDK2017\MdeModulePkg\Universal\Variable\RuntimeDxe\VariableSmmRuntimeDxe.c 中看到:
/**
  This code finds variable in storage blocks (Volatile or Non-Volatile).

  Caution: This function may receive untrusted input.
  The data size is external input, so this function will validate it carefully to avoid buffer overflow.

  @param[in]      VariableName       Name of Variable to be found.
  @param[in]      VendorGuid         Variable vendor GUID.
  @param[out]     Attributes         Attribute value of the variable found.
  @param[in, out] DataSize           Size of Data found. If size is less than the
                                     data, this value contains the required size.
  @param[out]     Data               Data pointer.

  @retval EFI_INVALID_PARAMETER      Invalid parameter.
  @retval EFI_SUCCESS                Find the specified variable.
  @retval EFI_NOT_FOUND              Not found.
  @retval EFI_BUFFER_TO_SMALL        DataSize is too small for the result.

**/
EFI_STATUS
EFIAPI
RuntimeServiceGetVariable (
  IN      CHAR16                            *VariableName,
  IN      EFI_GUID                          *VendorGuid,
  OUT     UINT32                            *Attributes OPTIONAL,
  IN OUT  UINTN                             *DataSize,
  OUT     VOID                              *Data
  )
在 Kabylake-R 的平台上实验,先用 RW Everything 修改80 Port 显示值,之后运行我们前面文章中提到的调用 GetEnvironmentVariable API 的函数,每次调用之后80 Port就会变成 89,因此可以确认这部分代码执行到了。完整的例子可以在附件中看到(来自 UDK2017)。
总结:调gRT->GetVariable 最终是通过SMI 来实现的,也正是因为这个原因,所以在 Windows 下能够实现访问。
参考:
1. https://blog.csdn.net/jiangwei0512/article/details/51627562?locationNum=4&fps=1
2. Shell 下显示 gRT 函数地址的小程序
#include <Library/BaseLib.h>
#include <Uefi.h>
#include <Library/UefiLib.h>
#include <Library/PrintLib.h>
#include <Library/ShellCEntryLib.h>
#include <Protocol/EfiShell.h>
#include <Library/ShellLib.h>

extern EFI_RUNTIME_SERVICES      *gRT;

INTN
EFIAPI
ShellAppMain (
  IN UINTN Argc,
  IN CHAR16 **Argv
  )
{
        Print(L"UEFI Runtime Serivice Table @[%x]\n",gRT);
        Print(L"       GetTime            @[%X]\n",gRT->GetTime);
        Print(L"       SetTime            @[%X]\n",gRT->SetTime);
        Print(L"       GetWakeupTime      @[%X]\n",gRT->GetWakeupTime);
        Print(L"       SetWakeupTime      @[%X]\n",gRT->SetWakeupTime);
        Print(L"       ConvertPointer     @[%X]\n",gRT->ConvertPointer);
        Print(L"       GetVariable        @[%X]\n",gRT->GetVariable);
        Print(L"  GetNextVariableName     @[%X]\n",gRT->GetNextVariableName);
        Print(L"       SetVariable        @[%X]\n",gRT->SetVariable);
        Print(L"       ResetSystem        @[%X]\n",gRT->ResetSystem);
        Print(L"       UpdateCapsule      @[%X]\n",gRT->UpdateCapsule);
        Print(L"       QueryVariableInfo  @[%X]\n",gRT->QueryVariableInfo);
        Print(L" QueryCapsuleCapabilities @[%X]\n",gRT->QueryCapsuleCapabilities);
        Print(L"GetNextHighMonotonicCount @[%X]\n",gRT->GetNextHighMonotonicCount);
        Print(L"     SetVirtualAddressMap @[%X]\n",gRT->SetVirtualAddressMap);

        return EFI_SUCCESS;
}
CPU 的功耗和频率是直接相关的,进入 Windows 后,IntelPPM 会接管频率控制,所以目前我还没有找到能够直接控制的方法,需要和 BIOS 进行配合才能完成。
在KBL-R HDK Windows 10 16299发现下面一个可行的方法:
![]()
写入之后,可以通过 MSR 198h 来读取当前的 Ratio。
上述设置完成之后,你会发现最低频率可以设置为 800Mhz,但是如果直接在BIOS中设定固定的频率,可以低到400Mhz;经过研究最终找到Root Cause: Race to halt 功能,这个功能大概的思想就是让CPU 超频一点点尽快完成操作然后休息节能。关闭这个功能之后可以设置最低到 400Mhz。
使用上述的方法再编写程序直接对 MSR 编程,在 Windows下工作正常。测试 400Mhz时播放视频感觉比较流畅,回想当年还要特意购买硬件解压卡才能在486DX2 66Mhz上观看VCD,CPU 运算能力真是不可同日而语了。
上述方法只在 Kabylake-R U42 Windows 16299 X64 上验证过,可以看出操作和 OS 有一定关系,笔者未能在其他版本上实验,有兴趣的朋友不妨试试然后给我留言交流。
MAX9814 IC包含低噪声放大器、输出放大器、麦克风偏置电压发生器和自动增益控制(AGC)等内部电路。麦克风放大器的总增益可选择40dB、50dB或60dB而无压缩。MAX9814利用压缩/限幅电路将麦克风输出限制为设定电压。
MAX9814评估板工作于2.7V至5.5V电源范围。评估板还具备低静态电流,提供关断控制以使功耗最小化。MAX9814 IC提供带裸焊盘的14引脚TDFN (3mm x 3mm x 0.8mm)封装。
关键特性
使用示波器测试一下这个模块,当 Gain Pin 处于不同模式下放大结果:
Gain -> Float
Gain -> GND
Gain -> VCC

参考:
1.https://www.maximintegrated.com/cn/products/analog/audio/MAX9814EVKIT.html
之前研究 Runtime Service 提到了 Windows 下可以使用 GetFirmwareEnvironmentVariable 获得 Variable,最近请天杀帮忙研究 Windows 层面的具体实现。结论是:在hal.dll中有下面这样的代码
mov _HalEfiRuntimeServicesTable, offset _HalEfiRuntimeServicesBlock
结构体 _HalEfiRuntimeServicesBlock RuntimeTable <?> 成员如下
00000000 RuntimeTable struc ; (sizeof=0x24, align=0x4, mappedto_402)
00000000 GetTime dd ? ; XREF: HalEfiGetTime(x)+5C/r
00000004 SetTime dd ? ; XREF: HalEfiSetTime(x)+153/r
00000008 ResetSystem dd ? ; XREF: HalEfiResetSystem(x)+3F/r
0000000C GetVariable dd ? ; XREF: HalEnumerateEnvironmentVariablesEx(x,x,x)+252/r
00000010 GetNextVariableName dd ? ; XREF: HalEnumerateEnvironmentVariablesEx(x,x,x)+10C/r
00000014 SetVariable dd ? ; XREF: HalEfiSetEnvironmentVariable(x,x,x,x,x)+43/r
00000018 UpdateCapsule dd ? ; XREF: HalEfiUpdateCapsule(x,x,x,x)+40/r
0000001C QueryCapsuleCapabilities dd ? ; XREF: HalEfiQueryCapsuleCapabilities(x,x,x,x)+3C/r
00000020 QueryVariableInfo dd ? ; XREF: HalEfiQueryVariableInfo(x,x,x,x)+32/r
00000024 RuntimeTable ends
这次使用 WinDBG 进行调试实验。
实验的平台是 KBL-R ,USB3.0 调试。
1.查看当前系统中的模块
0: kd> lm
start end module name
00000001`c0000000 00000001`c000e000 kdcom_0 (pdb symbols) C:\ProgramData\Dbg\sym\kdcom.pdb\DDE6FDAD8C7544FEB91485DD8E1832511\kdcom.pdb
ffffa11b`77600000 ffffa11b`77994000 win32kfull (deferred)
ffffa11b`779a0000 ffffa11b`77bb2000 win32kbase (deferred)
ffffa11b`77bd0000 ffffa11b`77bda000 TSDDD (deferred)
ffffa11b`77be0000 ffffa11b`77c21000 cdd (deferred)
ffffa11b`780a0000 ffffa11b`78117000 win32k (deferred)
fffff803`b6c1d000 fffff803`b74ef000 nt (pdb symbols) C:\ProgramData\Dbg\sym\ntkrnlmp.pdb\83DB42404EFD4AB6AFB6FA864B700CB31\ntkrnlmp.pdb
fffff803`b74ef000 fffff803`b756e000 hal (deferred)
fffff803`b7600000 fffff803`b7613000 kdcom (pdb symbols) C:\ProgramData\Dbg\sym\kdusb.pdb\619D7C9237D81A5C017DD6813BE76D7F1\kdusb.pdb
fffff803`ca600000 fffff803`ca637000 ndiswan (deferred)
…………..
我们要研究的是 HAL
2.检查 HAL 的 symbol
0: kd> !lmi hal
Loaded Module Info: [hal]
Module: hal
Base Address: fffff803b74ef000
Image Name: hal.dll
Machine Type: 34404 (X64)
Time Stamp: 869c055b (This is a reproducible build file hash, not a true timestamp)
Size: 7f000
CheckSum: 7cfc7
Characteristics: 2022
Debug Data Dirs: Type Size VA Pointer
CODEVIEW 20, 49db0, 475b0 RSDS – GUID: {B19D905A-E342-5D59-DE73-FDE2055F8636}
Age: 1, Pdb: hal.pdb
POGO 9f0, 49dd0, 475d0 [Data not mapped]
REPRO 0, 0, 0 [Debug data not mapped]
Symbol Type: DEFERRED – No error – symbol load deferred
Load Report: no symbols loaded
结论是 HAL 的 symbol 没有正常加载
3. 加载 symbol
0: kd> ld hal
Symbols loaded for hal
4.再次检查
0: kd> !lmi hal
Loaded Module Info: [hal]
Module: hal
Base Address: fffff803b74ef000
Image Name: hal.dll
Machine Type: 34404 (X64)
Time Stamp: 869c055b (This is a reproducible build file hash, not a true timestamp)
Size: 7f000
CheckSum: 7cfc7
Characteristics: 2022
Debug Data Dirs: Type Size VA Pointer
CODEVIEW 20, 49db0, 475b0 RSDS – GUID: {B19D905A-E342-5D59-DE73-FDE2055F8636}
Age: 1, Pdb: hal.pdb
POGO 9f0, 49dd0, 475d0 [Data not mapped]
REPRO 0, 0, 0 [Debug data not mapped]
Image Type: MEMORY – Image read successfully from loaded memory.
Symbol Type: PDB – Symbols loaded successfully from image header.
C:\ProgramData\Dbg\sym\hal.pdb\B19D905AE3425D59DE73FDE2055F86361\hal.pdb
Load Report: public symbols , not source indexed
C:\ProgramData\Dbg\sym\hal.pdb\B19D905AE3425D59DE73FDE2055F86361\hal.pdb
模块的 Symbol 已经正确加载了,下面可以继续
5.列出 hal 中的相关函数
0: kd> x hal!HalEfi*
fffff803`b751ab04 hal!HalEfiUpdateCapsule ()
fffff803`b751a774 hal!HalEfiQueryVariableInfo ()
fffff803`b751a864 hal!HalEfiSetEnvironmentVariable ()
fffff803`b751a50c hal!HalEfiGetEnvironmentVariable ()
fffff803`b7550000 hal!HalEfiRuntimeServicesTable =
fffff803`b7544240 hal!HalEfiMissedMappingsCount =
fffff803`b7544244 hal!HalEfiSetVirtualAddressMapStatus =
fffff803`b7535b10 hal!HalEfiToNtStatusMappings =
fffff803`b751a5a0 hal!HalEfiGetTime ()
fffff803`b7550010 hal!HalEfiRuntimeServicesBlock =
fffff803`b751a6f8 hal!HalEfiQueryCapsuleCapabilities ()
fffff803`b751a904 hal!HalEfiSetTime ()
fffff803`b751a7e0 hal!HalEfiResetSystem ()
6.对hal!HalEfiSetEnvironmentVariable 和 hal!HalEfiGetEnvironmentVariable下端点(bp)。然后在被测机上运行取得 Variable 的 application, Wndbg 会停下来:
0: kd> bl
0 e Disable Clear fffff803`b751a864 0001 (0001) hal!HalEfiSetEnvironmentVariable
1 e Disable Clear fffff803`b751a50c 0001 (0001) hal!HalEfiGetEnvironmentVariable
0: kd> g
Breakpoint 1 hit //这里会自动停下来
hal!HalEfiGetEnvironmentVariable:
fffff803`b751a50c 48895c2408 mov qword ptr [rsp+8],rbx
6: kd> g
Breakpoint 1 hit //这里会自动停下来
hal!HalEfiGetEnvironmentVariable:
fffff803`b751a50c 48895c2408 mov qword ptr [rsp+8],rbx
6: kd> g
因此,GetFirmwareEnvironmentVariable 这样的 API 最终会 call 到 HAL 中的 HalEfiGetEnvironmentVariable 来实现。
============================================================
2018年6月2日
补充两张 IDA 分析 HAL.DLL(X64 Windows) 的图片: