Step to UEFI (61) —– SHA-1的实现

前面介绍了 MD5 的实现,这里介绍一下 SHA-1 算法的实现。具体代码来自【参考1】。

和之前 MD5 程序有一些差别在于这个程序不是一次性将所有文件都放入内存中,而是放入一部分,计算一部分,再用中间结果继续计算下一部分。这样,再大的文件也可以正常处理。

#include  <Uefi.h>
#include  <Library/UefiLib.h>
#include  <Library/ShellCEntryLib.h>

#include  <stdio.h>
#include  <stdlib.h>
#include  <wchar.h>

#include <Protocol/EfiShell.h>
#include <Library/ShellLib.h>
#include <Library/MemoryAllocationLib.h>

#include "sha1.h"

#define BUFFERSIZE 2048

extern EFI_BOOT_SERVICES         *gBS;
extern EFI_SYSTEM_TABLE			 *gST;
extern EFI_RUNTIME_SERVICES 	 *gRT;

extern EFI_SHELL_PROTOCOL        *gEfiShellProtocol;

int
EFIAPI
main (
  IN int Argc,
  IN CHAR16 **Argv
  )
{
  EFI_FILE_HANDLE   FileHandle;
  RETURN_STATUS     Status;
  EFI_FILE_INFO     *FileInfo = NULL;
  EFI_HANDLE        *HandleBuffer=NULL;
  UINTN  			ReadSize=BUFFERSIZE;
  SHA1Context 		sha;
  
  //Check if there is a parameter
  if (Argc == 1) {
	Print(L"Usage: crctest [filename]\n");
	return 0;
  }
  
  //Open the file given by the parameter
  Status = ShellOpenFileByName(Argv[1], (SHELL_FILE_HANDLE *)&FileHandle,
                               EFI_FILE_MODE_READ , 0);

  if(Status != RETURN_SUCCESS) {
        Print(L"OpenFile failed!\n");
		return EFI_SUCCESS;
      }			

  //Get file size	  
  FileInfo = ShellGetFileInfo( (SHELL_FILE_HANDLE)FileHandle);	

  /*
   *  Reset the SHA-1 context and process input
  */
  SHA1Reset(&sha);
		
  //Allocate a memory buffer
  HandleBuffer = AllocateZeroPool(BUFFERSIZE);
  if (HandleBuffer == NULL) {
      return (SHELL_OUT_OF_RESOURCES);   }

	while (BUFFERSIZE == ReadSize)		
    {
		ReadSize=BUFFERSIZE;
		//Load the whole file to the buffer
		Status = ShellReadFile(FileHandle,&ReadSize,HandleBuffer);
		SHA1Input(&sha,(unsigned char *)  HandleBuffer, ReadSize);
   } 
  
  //Output
  Print(L"File Name: %s\n",Argv[1]);
  Print(L"File Size: %d\n",(UINTN)FileInfo-> FileSize);

  if (!SHA1Result(&sha))
        {
            Print(L"sha: could not compute message digest\n");
        }
  else
        {
            Print(L"%08X %08X %08X %08X %08X\n",
                    sha.Message_Digest[0],
                    sha.Message_Digest[1],
                    sha.Message_Digest[2],
                    sha.Message_Digest[3],
                    sha.Message_Digest[4]);
        }
  
  FreePool(HandleBuffer);	
  return EFI_SUCCESS;
}


运行结果:

sha-1

完整的代码下载:

sha1test

参考:

1.https://www.packetizer.com/

Step to UEFI (59) —– BMP 放在EFI文件中(上)

前面介绍了如何 Load 一幅 BMP 图片然后显示出来,然后就有一个问题:如何把这个图片也放在 EFI 文件中? 毕竟放在一起会显得更加专业。在【参考1】上,也有朋友问了同样的问题,博主的建议是“写个脚本直接把图片变成像素数组,直接弄,这样很简单”。下面就来实验一下。

首先,需要找一个将图片转为 C Header的工具。我找到的是 Bin2C 这个工具【参考2】. 用下面的命令即可完成转换,生成 show.h

bin2c -o show.h Untitled.bmp

转换之后 show.h 大概就是下面这个样子

showbmp2

然后,修改之前显示 BMP 的那个程序,用 include 来引用用到的 BMP 数据, 去掉 Load 文件的过程,直接使用内存地址。

#include  <Uefi.h>
#include  <Library/UefiLib.h>
#include  <Library/ShellCEntryLib.h>

#include  <stdio.h>
#include  <stdlib.h>
#include  <wchar.h>
#include  <time.h>
#include <Protocol/EfiShell.h>
#include <Library/ShellLib.h>

#include <Protocol/SimpleFileSystem.h>
#include <Protocol/BlockIo.h>
#include <Library/DevicePathLib.h>
#include <Library/HandleParsingLib.h>
#include <Library/SortLib.h>
#include <Library/MemoryAllocationLib.h>
#include <Library/BaseMemoryLib.h>

#include <Protocol/LoadedImage.h>

#define MAX_FILE_SIZE (1024*1024*1024)

extern EFI_BOOT_SERVICES         *gBS;
extern EFI_SYSTEM_TABLE			 *gST;
extern EFI_RUNTIME_SERVICES 	 *gRT;

extern EFI_SHELL_ENVIRONMENT2    *mEfiShellEnvironment2;
extern EFI_HANDLE				 gImageHandle;

static EFI_GUID GraphicsOutputProtocolGuid = EFI_GRAPHICS_OUTPUT_PROTOCOL_GUID;
static EFI_GRAPHICS_OUTPUT_PROTOCOL *GraphicsOutput = NULL;

#pragma pack(1)

//Copied from  C\MdePkg\Include\Protocol\UgaDraw.h
typedef struct {
  UINT8 Blue;
  UINT8 Green;
  UINT8 Red;
  UINT8 Reserved;
} EFI_UGA_PIXEL;

/* This should be compatible with EFI_UGA_PIXEL */
typedef struct {
    UINT8 b, g, r, a;
} EG_PIXEL;

typedef struct {
    CHAR8         CharB;
    CHAR8         CharM;
    UINT32        Size;
    UINT16        Reserved[2];
    UINT32        ImageOffset;
    UINT32        HeaderSize;
    UINT32        PixelWidth;
    UINT32        PixelHeight;
    UINT16        Planes;       // Must be 1
    UINT16        BitPerPixel;  // 1, 4, 8, or 24
    UINT32        CompressionType;
    UINT32        ImageSize;    // Compressed image size in bytes
    UINT32        XPixelsPerMeter;
    UINT32        YPixelsPerMeter;
    UINT32        NumberOfColors;
    UINT32        ImportantColors;
} BMP_IMAGE_HEADER;

typedef struct {
    UINTN       Width;
    UINTN       Height;
    BOOLEAN     HasAlpha;
    EG_PIXEL    *PixelData;
} EG_IMAGE;
#pragma pack()

//const unsigned char Untitled_bmp[289654] 
#include "show.h"

VOID egFreeImage(IN EG_IMAGE *Image)
{
    if (Image != NULL) {
        if (Image->PixelData != NULL)
            FreePool(Image->PixelData);
        FreePool(Image);
    }
}

//
// Basic image handling
//

EG_IMAGE * egCreateImage(IN UINTN Width, IN UINTN Height, IN BOOLEAN HasAlpha)
{
    EG_IMAGE        *NewImage;
    
    NewImage = (EG_IMAGE *) AllocatePool(sizeof(EG_IMAGE));
    if (NewImage == NULL)
        return NULL;
    NewImage->PixelData = (EG_PIXEL *) AllocatePool(
								Width * Height * sizeof(EG_PIXEL));
    if (NewImage->PixelData == NULL) {
        FreePool(NewImage);
        return NULL;
    }

    NewImage->Width = Width;
    NewImage->Height = Height;
    NewImage->HasAlpha = HasAlpha;
    return NewImage;
}

//
// Load BMP image
//

EG_IMAGE * egDecodeBMP
	(
		IN UINT8 *FileData, 
		IN UINTN FileDataLength, 
		IN BOOLEAN WantAlpha)
{
    EG_IMAGE            *NewImage;
    BMP_IMAGE_HEADER    *BmpHeader;
    EFI_UGA_PIXEL       *BmpColorMap;
    UINTN               x, y;
    UINT8               *ImagePtr;
    UINT8               *ImagePtrBase;
    UINTN               ImageLineOffset;
    UINT8               ImageValue=0, AlphaValue;
    EG_PIXEL            *PixelPtr;
    UINTN               Index, BitIndex;

    // read and check header
    if (FileDataLength < sizeof(BMP_IMAGE_HEADER) || FileData == NULL)
        return NULL;

    BmpHeader = (BMP_IMAGE_HEADER *) FileData;
    if (BmpHeader->CharB != 'B' || BmpHeader->CharM != 'M')
        return NULL;

    if (BmpHeader->CompressionType != 0)
        return NULL;

    if (BmpHeader->BitPerPixel != 1 && BmpHeader->BitPerPixel != 4 &&
        BmpHeader->BitPerPixel != 8 && BmpHeader->BitPerPixel != 24)
        return NULL;

    // calculate parameters
    ImageLineOffset = BmpHeader->PixelWidth;
    if (BmpHeader->BitPerPixel == 24)
        ImageLineOffset *= 3;
    else if (BmpHeader->BitPerPixel == 1)
        ImageLineOffset = (ImageLineOffset + 7) >> 3;
    else if (BmpHeader->BitPerPixel == 4)
        ImageLineOffset = (ImageLineOffset + 1) >> 1;
    if ((ImageLineOffset % 4) != 0)
        ImageLineOffset = ImageLineOffset + (4 - (ImageLineOffset % 4));
    // check bounds
    if (BmpHeader->ImageOffset + 
			ImageLineOffset * BmpHeader->PixelHeight > FileDataLength)
        return NULL;
    
    // allocate image structure and buffer
    NewImage = egCreateImage(BmpHeader->PixelWidth, 
								BmpHeader->PixelHeight, WantAlpha);
    if (NewImage == NULL)
        return NULL;
    AlphaValue = WantAlpha ? 255 : 0;
    
    // convert image
    BmpColorMap = (EFI_UGA_PIXEL *)(FileData + sizeof(BMP_IMAGE_HEADER));
    ImagePtrBase = FileData + BmpHeader->ImageOffset;
    for (y = 0; y < BmpHeader->PixelHeight; y++) {
        ImagePtr = ImagePtrBase;
        ImagePtrBase += ImageLineOffset;
        PixelPtr = NewImage->PixelData + 
				(BmpHeader->PixelHeight - 1 - y) * BmpHeader->PixelWidth;
        
        switch (BmpHeader->BitPerPixel) {
            
            case 1:
                for (x = 0; x < BmpHeader->PixelWidth; x++) {
                    BitIndex = x & 0x07;
                    if (BitIndex == 0)
                        ImageValue = *ImagePtr++;
                    
                    Index = (ImageValue >> (7 - BitIndex)) & 0x01;
                    PixelPtr->b = BmpColorMap[Index].Blue;
                    PixelPtr->g = BmpColorMap[Index].Green;
                    PixelPtr->r = BmpColorMap[Index].Red;
                    PixelPtr->a = AlphaValue;
                    PixelPtr++;
                }
                break;
            
            case 4:
                for (x = 0; x <= BmpHeader->PixelWidth - 2; x += 2) {
                    ImageValue = *ImagePtr++;
                    
                    Index = ImageValue >> 4;
                    PixelPtr->b = BmpColorMap[Index].Blue;
                    PixelPtr->g = BmpColorMap[Index].Green;
                    PixelPtr->r = BmpColorMap[Index].Red;
                    PixelPtr->a = AlphaValue;
                    PixelPtr++;
                    
                    Index = ImageValue & 0x0f;
                    PixelPtr->b = BmpColorMap[Index].Blue;
                    PixelPtr->g = BmpColorMap[Index].Green;
                    PixelPtr->r = BmpColorMap[Index].Red;
                    PixelPtr->a = AlphaValue;
                    PixelPtr++;
                }
                if (x < BmpHeader->PixelWidth) {
                    ImageValue = *ImagePtr++;
                    
                    Index = ImageValue >> 4;
                    PixelPtr->b = BmpColorMap[Index].Blue;
                    PixelPtr->g = BmpColorMap[Index].Green;
                    PixelPtr->r = BmpColorMap[Index].Red;
                    PixelPtr->a = AlphaValue;
                    PixelPtr++;
                }
                break;
            
            case 8:
                for (x = 0; x < BmpHeader->PixelWidth; x++) {
                    Index = *ImagePtr++;
                    PixelPtr->b = BmpColorMap[Index].Blue;
                    PixelPtr->g = BmpColorMap[Index].Green;
                    PixelPtr->r = BmpColorMap[Index].Red;
                    PixelPtr->a = AlphaValue;
                    PixelPtr++;
                }
                break;
            
            case 24:
                for (x = 0; x < BmpHeader->PixelWidth; x++) {
                    PixelPtr->b = *ImagePtr++;
                    PixelPtr->g = *ImagePtr++;
                    PixelPtr->r = *ImagePtr++;
                    PixelPtr->a = AlphaValue;
                    PixelPtr++;
                }
                break;
            
        }
    }
    
    return NewImage;
}


int
EFIAPI
main (                                         
  IN int Argc,
  IN char **Argv
  )
{
    EFI_STATUS    Status;
    EG_IMAGE        *Image;	

	
    Status = gBS->LocateProtocol(&GraphicsOutputProtocolGuid, 
						NULL, (VOID **) &GraphicsOutput);
    if (EFI_ERROR(Status)) {
        GraphicsOutput = NULL;
		Print(L"Loading Graphics_Output_Protocol error!\n");
		return EFI_SUCCESS;
	}	
	
    Image=egDecodeBMP((UINT8 *)&Untitled_bmp, Untitled_bmp_size, FALSE);

    Print(L"Image height [%d]:width[%d]",
					Image->Height,
					Image->Width);

	GraphicsOutput->Blt(
				GraphicsOutput, 
				(EFI_GRAPHICS_OUTPUT_BLT_PIXEL *) Image->PixelData,
				EfiBltBufferToVideo,
                0, 
				0 , 
				0x100, 
				0x20, 
				Image->Width, 
				Image->Height, 0); 					
	
  return EFI_SUCCESS;
  
}


运行结果:

showbmp2a

Bin2C 下载(内含原始图片)

bin2c

源代码下载

GFXTest7

参考:

1.http://www.cppblog.com/djxzh/archive/2015/02/08/209766.html 补充《UEFI原理与编程》中关于Edk2的调试

2. http://sourceforge.net/projects/bin2c/

Arduino 打造一个“鼠标尺”

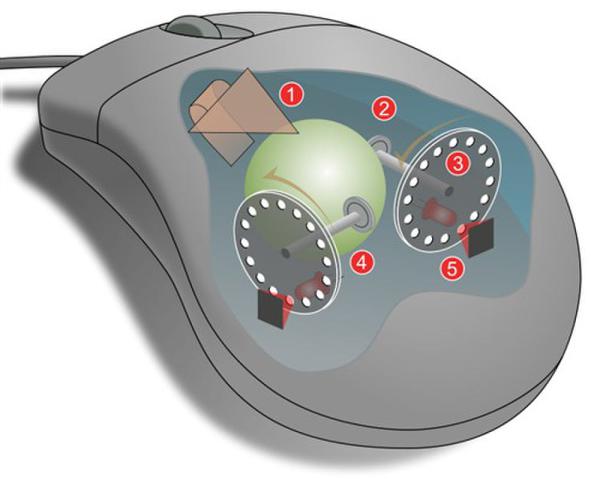
鼠标是目前玩电脑的必不可少的配备了。我最早接触的是机械鼠标,中间有一个滚球,带动内部的机械,配合光学器件将旋转信号转化为电子信号,通过串口或者PS2接口传输到电脑上。
image001
【参考1】

这样的鼠标缺点是定位不是很准确,并且容易脏,下面的球滚动一段就会蹭上泥垢,看起来比较恶心。
再后来出现了光电鼠标,那时候的光电鼠标必须在专用的鼠标垫上才能用,那种鼠标垫上面有网格状的东西,只有在它上面,鼠标发出光线才能正确的反馈,换句话说没有特定的鼠标垫根本无法使用。当然,那时候用电脑还是一项非常严重的事情,上机需要按照“团结紧张严肃活泼”的方针,先洗手再换鞋套之类的。
再再后来就出现了目前我们最常见到的光电鼠标,各种材质都可以使用,非常方便。原理上也发生了巨大的变化,简单的说就是现在的鼠标下面有一个类似照相机一样的东西不断给接触面拍照,移动会导致每次画面的变化,然后DSP根据画面不同计算出移动的距离再反馈给PC当前的移动距离信息。
当然,未来还可能出现更新原理的鼠标,比如:象象利用加速度传感器做的 “体感空中鼠”,等等。

我始终有一个想法:是否可以用鼠标来做一个电子尺,因为鼠标移动特定距离之后的输出也是固定的,意思是:鼠标移动10cm,输出的点位应该是固定的,比如:2000之类(DPI是定值)。反过来,如果我们知道鼠标移动了多少点,也就能确定鼠标移动了多少距离。最近接触了Arduino USB Shield ,于是打造一个鼠标尺。
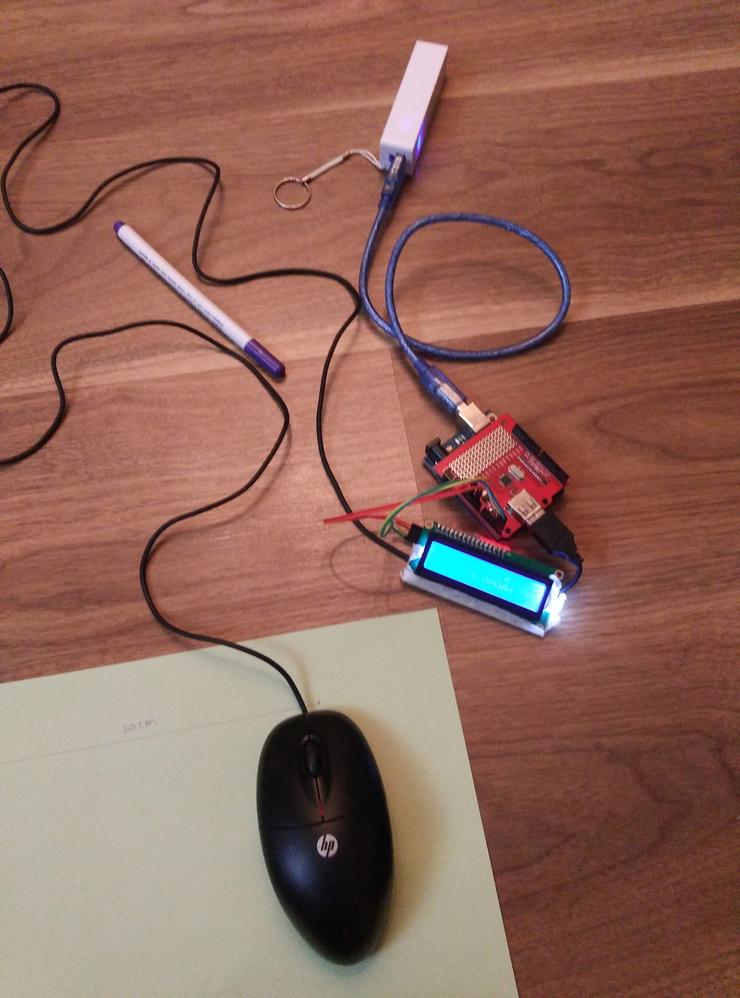
材料准备
Arduino Uno
Arduino USB Shield
USB鼠标
USB充电宝
1602 LCD
导线 4根

实现原理

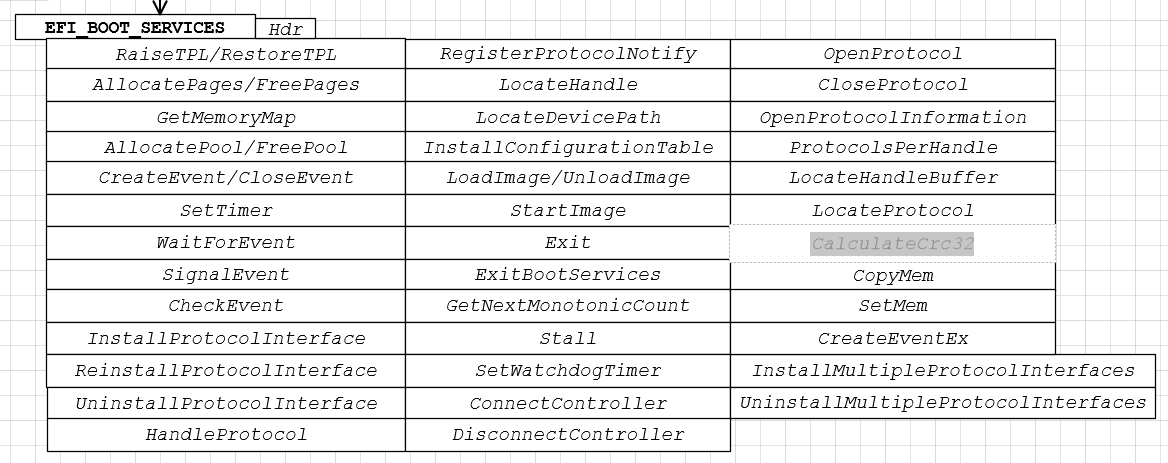
使用 USB Shield 来做USB HOST,在初始化的时候将鼠标切换到Boot Protocol,切换的好处是避免针对每种鼠标特别分析Descriptor,可以直接使用输出的数据(虽然是都要遵循HID协议,还真有不支持Boot Protocol的,这种情况需要单独处理了)。每次鼠标有动作,都会用Interrupt 方式通知到HOST来处理。我们根据输出的位移(相对位移),可以得知移动了多少。

#include “max3421e.h”
#include “usb.h”
#include “LiquidCrystal_I2C.h”
#include

#define DEVADDR 1
#define CONFVALUE 1
#define EP_MAXPKTSIZE 5
EP_RECORD ep_record[ 2 ]; //endpoint record structure for the mouse

void setup();
void loop();

MAX3421E Max;
USB Usb;

LiquidCrystal_I2C lcd(0x27,16,2);

double distance =0;

void setup()
{
lcd.init(); //初始化LCD
lcd.backlight(); //打开背光

Serial.begin( 115200 );
Serial.println(“Start”);
Max.powerOn();

lcd.setCursor(0,0);
lcd.print(” Distance “);

delay( 200 );
}

void loop()
{
byte rcode;
Max.Task();
Usb.Task();
if( Usb.getUsbTaskState() == USB_STATE_CONFIGURING ) {
mouse1_init();
}//if( Usb.getUsbTaskState() == USB_STATE_CONFIGURING…
if( Usb.getUsbTaskState() == USB_STATE_RUNNING ) { //状态机运行
rcode = mouse1_poll();
if( rcode ) {
Serial.print(“Mouse Poll Error: “);
Serial.println( rcode, HEX );
}//if( rcode…
}//if( Usb.getUsbTaskState() == USB_STATE_RUNNING…

}
/* 鼠标初始化 */
void mouse1_init( void )
{
byte rcode = 0; //return code
byte tmpdata;
byte* byte_ptr = &tmpdata;
/**/
ep_record[ 0 ] = *( Usb.getDevTableEntry( 0,0 )); //copy endpoint 0 parameters
ep_record[ 1 ].MaxPktSize = EP_MAXPKTSIZE;
ep_record[ 1 ].sndToggle = bmSNDTOG0;
ep_record[ 1 ].rcvToggle = bmRCVTOG0;
Usb.setDevTableEntry( 1, ep_record );
/* Configure device */
rcode = Usb.setConf( DEVADDR, 0, CONFVALUE );
if( rcode ) {
Serial.print(“Error configuring mouse. Return code : “);
Serial.println( rcode, HEX );
while(1); //stop
}//if( rcode…
rcode = Usb.getIdle( DEVADDR, 0, 0, 0, (char *)byte_ptr );
if( rcode ) {
Serial.print(“Get Idle error. Return code : “);
Serial.println( rcode, HEX );
while(1); //stop
}
Serial.print(“Idle Rate: “);
Serial.print(( tmpdata * 4 ), DEC ); //rate is returned in multiples of 4ms
Serial.println(” ms”);
tmpdata = 0;
rcode = Usb.setIdle( DEVADDR, 0, 0, 0, tmpdata ); //切换为Boot Protocol
if( rcode ) {
Serial.print(“Set Idle error. Return code : “);
Serial.println( rcode, HEX );
while(1); //stop
}
Usb.setUsbTaskState( USB_STATE_RUNNING );
return;
}
/* Poll mouse via interrupt endpoint and print result */
/* assumes EP1 as interrupt endpoint */
byte mouse1_poll( void )
{
byte rcode,i;
byte x;
byte y;
char res[12];

char buf[ 4 ] = { 0 };
/* poll mouse */
rcode = Usb.inTransfer( DEVADDR, 1, 4, buf, 1 ); //
if( rcode ) { //error
if( rcode == 0x04 ) { //NAK
rcode = 0;
}
return( rcode );
}
/* print buffer */
if( buf[ 0 ] & 0x01 ) {
distance=0;
}

//目前已经切换到 Boot Protocol, 输出的 Byte 2 3 分别是 X 和 Y
x=abs(buf[1]);
y=abs(buf[2]);

Serial.print(“X-axis: “);
Serial.print( buf[1], DEC); Serial.print(” “); Serial.println( x, DEC);
Serial.print(“Y-axis: “);
Serial.print( buf[2], DEC); Serial.print(” “); Serial.println(y , DEC);

distance=distance+sqrt(x*x+y*y); //计算移动距离
String dataString = “”;
//Double转String
dataString = dtostrf(distance, 5, 4, res);

Serial.println(dataString);

lcd.setCursor(0,1);
lcd.print(” “);
lcd.print(dataString);
lcd.print(” “);

return( rcode );
}
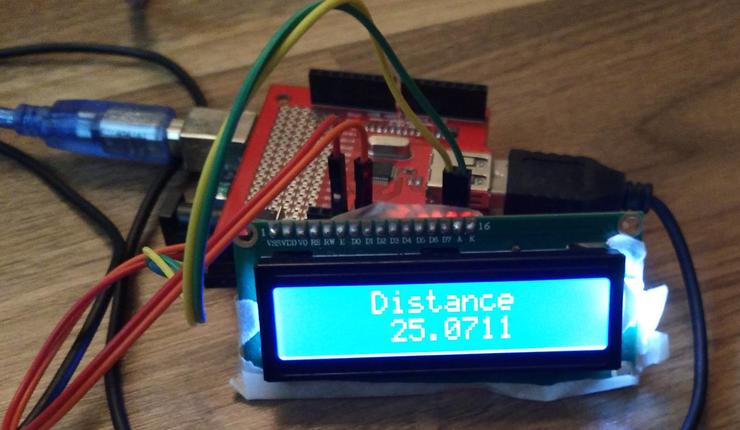
制作过程也就是连接过程,Shield直接插,1602 LCD四根线,GND VCC SDA SCL 接对了就好。
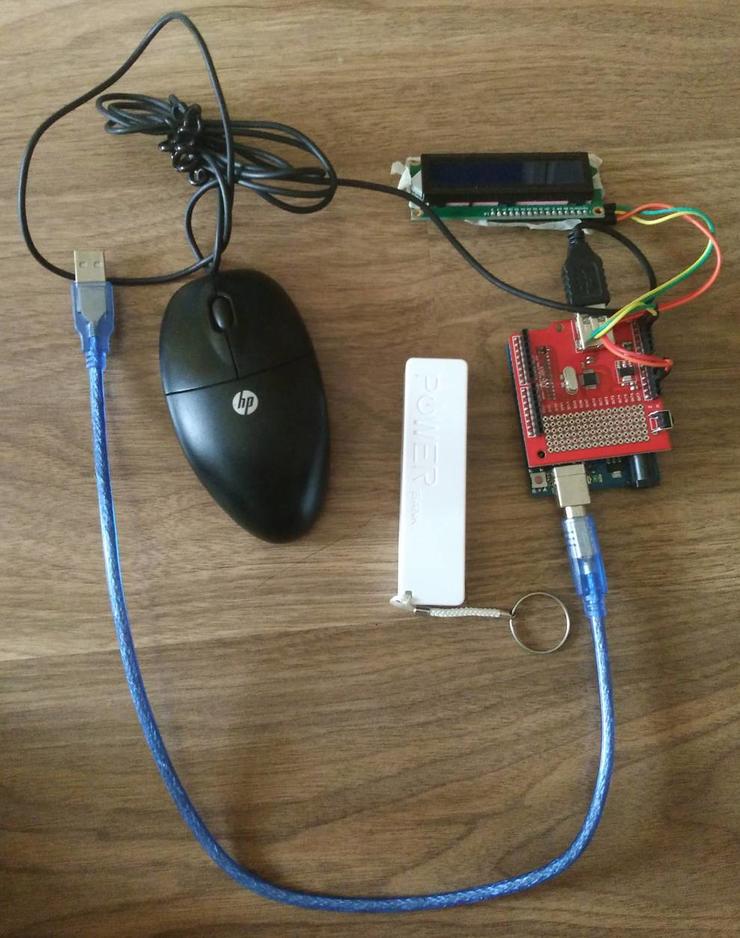
image003

工作时就是这个样子

image005

实际上显示的是移动了多少点,具体还要进行换算为实际的距离,每个鼠标的DPI不同,相同的点位表示的实际距离也不相同。上述程序我没有做这个转换,如果有需要在编程的时候拉一个已知长度的线段折算一下即可知。

image007

工作视频

http://www.tudou.com/programs/view/hcsKy9hKCVg/?resourceId=414535982_06_02_99

完整的代码下载
mruler

完成之后,到了老婆提问时间,我们有如下对话
她:这个是干什么的啊?
我:这个是尺
她:尺子是干什么的?
我:尺子就是测量距离的啊
她:那为什么要测量距离?
我:比如一根直线你想知道它多长,需要测量啊
她:那家里有直尺为什么不用。
(这个问题很Sharp…….我想了一会才回答)
我:万一你要测量一个非直线的物体你需要用这个啊。比如,测量一个圆。
她:我为什么要测量一个圆的周长啊
我:你能不能问点有建设性的问题?
她:唔。那我可以用直尺测量圆的直径然后根据圆周率测量周长啊。
(又是一个Sharp的问题!)
我:直径不好确定,另外,没有直接测量方便啊!
她:那你要沿着圆走一圈哎~ 这样不准
(更加Sharp的问题!!我想了一下)
我:从理论上来说,人类无法直接测量出一个圆的周长,因为Pi是无限不循环小数,周长一定也是一个无限不循环小数。人类历史上在逼近圆周率的时候就是采用……..
她:为什么要测量周长呢?
(沉思片刻)
我:比如,你要测量一个椭圆的周长
她:椭圆周长有公式,数学书上有,虽然我现在不记得但是确定有。
(长考虑中…….)
我:再举个例子,比如,你要测量一个抛物线(嗯,这个她听过,肯定也知道公式)。不~ 你要测量一个悬链线(我打赌她肯定都没有听说过)。
她:为什么我要…….
我:不说了,我去唱歌了 《1999谢谢你的爱》

参考:
1. 图片来自 http://it.21cn.com/hardware/mouse/a/2009/0428/20/6209325.shtml 蓝影PK激光!最强游戏鼠标“溜冰“测试
2. http://acc.pconline.com.cn/mouse/study_mouse/0902/1550361_1.html 让你一夜成高手!鼠标知识最全面充电宝典
3. http://www.lab-z.com/usbkb/ Arduino 控制USB设备(5)解析USB键盘的例子

Step to UEFI (58) —– 计算MD5

MD5 是目前常用的Hash算法,可以用来校验文件的完整性,或者比对密码等等。本文介绍如何在UEFI下实现计算一个文件MD5的方法。具体算法来自【参考1】,在编译过程中修正了几个关于类型转换的 Warning 。

程序结构很简单,和前一篇关于CRC32的没有多大差别。

#include  <Uefi.h>
#include  <Library/UefiLib.h>
#include  <Library/ShellCEntryLib.h>

#include  <stdio.h>
#include  <stdlib.h>
#include  <wchar.h>

#include <Protocol/EfiShell.h>
#include <Library/ShellLib.h>
#include <Library/MemoryAllocationLib.h>

#include "md5.h"

extern EFI_BOOT_SERVICES         *gBS;
extern EFI_SYSTEM_TABLE			 *gST;
extern EFI_RUNTIME_SERVICES 	 *gRT;

extern EFI_SHELL_PROTOCOL        *gEfiShellProtocol;

int
EFIAPI
main (
  IN int Argc,
  IN CHAR16 **Argv
  )
{
  EFI_FILE_HANDLE   FileHandle;
  RETURN_STATUS     Status;
  EFI_FILE_INFO     *FileInfo = NULL;
  EFI_HANDLE        *HandleBuffer=NULL;
  UINTN  			ReadSize;
  MD5_CTX			ctx;
  char				R[16];
  
  //Check if there is a parameter
  if (Argc == 1) {
	Print(L"Usage: crctest [filename]\n");
	return 0;
  }
  
  //Open the file given by the parameter
  Status = ShellOpenFileByName(Argv[1], (SHELL_FILE_HANDLE *)&FileHandle,
                               EFI_FILE_MODE_READ , 0);

  if(Status != RETURN_SUCCESS) {
        Print(L"OpenFile failed!\n");
		return EFI_SUCCESS;
      }			

  //Get file size	  
  FileInfo = ShellGetFileInfo( (SHELL_FILE_HANDLE)FileHandle);	

  //Allocate a memory buffer
  HandleBuffer = AllocateZeroPool((UINTN) FileInfo-> FileSize);
  if (HandleBuffer == NULL) {
      return (SHELL_OUT_OF_RESOURCES);   }

  ReadSize=(UINTN) FileInfo-> FileSize;
  
  //Load the whole file to the buffer
  Status = ShellReadFile(FileHandle,&ReadSize,HandleBuffer);
  
  MD5_Init(&ctx);
  MD5_Update(&ctx, HandleBuffer, ReadSize);
  MD5_Final((unsigned char *)&R, &ctx);
  
  //Output
  Print(L"File Name: %s\n",Argv[1]);
  Print(L"File Size: %d\n",ReadSize);
  Print(L"File Size: %d\n",ReadSize);
  Print(L"MD5      : %02X%02X%02X%02X%02X%02X%02X%02X%02X%02X%02X%02X%02X%02X%02X%02X\n",
					R[0]&0xFF  ,R[1]&0xFF  ,R[2]&0xFF  ,R[3]&0xFF  ,
					R[4]&0xFF  ,R[5]&0xFF  ,R[6]&0xFF  ,R[7]&0xFF  ,
					R[8]&0xFF  ,R[9]&0xFF  ,R[0xA]&0xFF,R[0xB]&0xFF,
					R[0xC]&0xFF,R[0xD]&0xFF,R[0xE]&0xFF,R[0xF]&0xFF);
  
  FreePool(HandleBuffer);	
  return EFI_SUCCESS;
}


运行结果

md51

可以看到,上面的例子能够在Shell下工作正常,但是需要特别注意,我没有验证过 X64 是否正常,如果你有这个需求,请自行验证。

完整的代码下载:

MD5Test

参考:

1.http://openwall.info/wiki/people/solar/software/public-domain-source-code/md5 A portable, fast, and free implementation of the MD5 Message-Digest Algorithm (RFC 1321)

Step to UEFI (57.5) —– 计算CRC32

这里介绍如何编写一个计算CRC32的工具。在EDK的代码中,BaseTools\Source\Common 中有Crc32的例子,这里直接引用了 CRC32.h 和 CRC32.C。

代码中有很多注释,因此不做解释了。

#include  <Uefi.h>
#include  <Library/UefiLib.h>
#include  <Library/ShellCEntryLib.h>

#include  <stdio.h>
#include  <stdlib.h>
#include  <wchar.h>

#include <Protocol/EfiShell.h>
#include <Library/ShellLib.h>
#include <Library/MemoryAllocationLib.h>

#include "Crc32.h"

extern EFI_BOOT_SERVICES         *gBS;
extern EFI_SYSTEM_TABLE			 *gST;
extern EFI_RUNTIME_SERVICES 	 *gRT;

extern EFI_SHELL_PROTOCOL        *gEfiShellProtocol;

int
EFIAPI
main (
  IN int Argc,
  IN CHAR16 **Argv
  )
{
  EFI_FILE_HANDLE   FileHandle;
  RETURN_STATUS     Status;
  EFI_FILE_INFO     *FileInfo = NULL;
  EFI_HANDLE        *HandleBuffer=NULL;
  UINTN  			ReadSize;
  UINT32			CrcOut=0;
  
  //Check if there is a parameter
  if (Argc == 1) {
	Print(L"Usage: crctest [filename]\n");
	return 0;
  }
  
  //Open the file given by the parameter
  Status = ShellOpenFileByName(Argv[1], (SHELL_FILE_HANDLE *)&FileHandle,
                               EFI_FILE_MODE_READ , 0);

  if(Status != RETURN_SUCCESS) {
        Print(L"OpenFile failed!\n");
		return EFI_SUCCESS;
      }			

  //Get file size	  
  FileInfo = ShellGetFileInfo( (SHELL_FILE_HANDLE)FileHandle);	

  //Allocate a memory buffer
  HandleBuffer = AllocateZeroPool((UINTN) FileInfo-> FileSize);
  if (HandleBuffer == NULL) {
      return (SHELL_OUT_OF_RESOURCES);   }

  ReadSize=(UINTN) FileInfo-> FileSize;
  
  //Load the whole file to the buffer
  Status = ShellReadFile(FileHandle,&ReadSize,HandleBuffer);
  
  //Calculate the CRC32
  CalculateCrc32 ((UINT8*)HandleBuffer,ReadSize,&CrcOut);
  
  //Output
  Print(L"File Name: %s\n",Argv[1]);
  Print(L"File Size: %d\n",ReadSize);
  Print(L"CRC32    : %x\n",CrcOut);
  
  FreePool(HandleBuffer);	
  return EFI_SUCCESS;
}


运行结果 (计算自己的CRC32)

crc

为了保证正确,下载了一个CRC计算工具,可以看出,计算结果和上面的相同。

compare

完整代码下载

CRCTest

实际上除了上面的方法之外,还有更加简单的方法:直接使用 Boot Services 中的 CalculateCrc32 功能:

Capture

就是这样。

重新编译EDK2工具的方法(Python部分)

之前在《重新编译EDK2工具的方法(C语言部分)》【参考1】中介绍了重新编译C语言编写的编译工具的方法。本文介绍重新编译Python工具的方法。

我们知道,每次编译时,先运行 edksetup.bat 然后使用 build 命令即可进行编译。下面先说build命令的来龙去脉。

我们运行的Build实际上是 BaseTools\bin\Win32 下面的 Build.exe 。运行 edksetup.bat 之后,会自动把这个目录加入到 Path 中。它的源代码可以在BaseTools\Source\Python下面找到。

根据BaseTools\Source\Python\MakeFile中的建议,编译需要使用 cx_Freeze 4.2.3 和 Python 2.7.2。Python是解释型语言,需要解释器才能正常执行程序,Cx_Freeze是将Python源程序转换为EXE的工具,转换之后即可脱离Python解析器单独运行(相当于把解释器打包到EXE中)。特别提醒,一定要使用上面说的这个版本, cx_Freeze版本之间差别很大,选择其他版本会有莫名的问题。这里【参考2】提供上述版本的下载,有需要的朋友可以直接抓取。

接下来是Python的安装,安装完之后,在命令行下手工输入 Python查看能否运行,如果无法运行,请在环境变量中加入Python的路径。如下图所示。

image001

加入Path后,可以在任意位置调用到Python。

image002

之后安装cx_Freeze。安装完成之后在Python27\Scripts下面会有cxfreeze.bat文件,可以运行这个批处理检查是否能正常工作。

image003

还可以编写一个简单的Python文件然后使用下面的命令生成EXE进行测试
cxfreeze hello.py –target-dir dist

最后,可以开始重新编译工具了。在toolsetup.bat 中加入下面语句指定 cxFreeze 和Python的路径。
Set PYTHON_HOME=c:\python27
Set PYTHON_FREEZE_PATH=c:\python27\Scripts

image004

编译的方法是:首先运行 edksetup.bat ,然后进入BaseTools目录,运行
toolsetup.bat ForceRebuild

image005

运行结果如下

image006

编译后生成的EXE 会直接放置到 BaseTools\Bin\Win32下面。

为了验证这个方法,我在 Build.py上加入输出字符串的语句,重新编译工具后再编译整个BIOS。可以看到执行了我加入的语句。

image007

如果你对 buid 的过程感兴趣,下面就可以慢慢分析了。

就是这样。

参考:

1. http://www.lab-z.com/%E9%87%8D%E6%96%B0%E7%BC%96%E8%AF%91edk2%E5%B7%A5%E5%85%B7%E7%9A%84%E6%96%B9%E6%B3%95%EF%BC%88c%E8%AF%AD%E8%A8%80%E9%83%A8%E5%88%86%EF%BC%89/ 重新编译EDK2工具的方法(C语言部分)》
2. Baidu 网盘链接: http://pan.baidu.com/s/1kTjDDf5 密码: 4wsf

Step to UEFI (57) —– 只在一个有显示?

之前的很多实验都有一个奇怪的显现,开出了2个模拟窗口,只有一个上面有显示。琢磨了一下,猜测是因为只打开了一个设备上面的Protocol,于是用命令查看了一下有Graphics 的 Protocol,发现有三个(模拟环境下)

handle

之前我们的代码都是用 gBS->LocateProtocol 打开的,这个函数的意思是“是从内核中找出指定Protocol的第一个实例。”【参考1】

gBS->LocateProtocol(&GraphicsOutputProtocolGuid, NULL, (VOID **) &GraphicsOutput);


我们遇到问题就是【参考1】中提到的:“UEFI内核中某个Protocol的实例可能不止一个,例如每个硬盘及每个分区都有一个EFI_DISK_IO_PROTOCOL实例。LocateProtocol顺序搜索HANDLE链表,返回找到的第一个该Protocol的实例。我们可以用BootServices提供的其它函数处理HANDLE和Protocol。”

编写代码如下,枚举系统中的所有实例,然后逐个打开并且调用:

#include  <Uefi.h>
#include  <Library/UefiLib.h>
#include  <Library/ShellCEntryLib.h>

#include  <stdio.h>
#include  <stdlib.h>
#include  <wchar.h>
#include  <time.h>
#include <Protocol/EfiShell.h>
#include <Library/ShellLib.h>

#include <Protocol/SimpleFileSystem.h>
#include <Protocol/BlockIo.h>
#include <Library/DevicePathLib.h>
#include <Library/HandleParsingLib.h>
#include <Library/SortLib.h>
#include <Library/MemoryAllocationLib.h>
#include <Library/BaseMemoryLib.h>

#include <Protocol/LoadedImage.h>


extern EFI_BOOT_SERVICES         *gBS;
extern EFI_SYSTEM_TABLE			 *gST;
extern EFI_RUNTIME_SERVICES 	 *gRT;

extern EFI_SHELL_ENVIRONMENT2    *mEfiShellEnvironment2;
extern EFI_HANDLE				 gImageHandle;

static EFI_GUID GraphicsOutputProtocolGuid = EFI_GRAPHICS_OUTPUT_PROTOCOL_GUID;
static EFI_GRAPHICS_OUTPUT_PROTOCOL *GraphicsOutput = NULL;

//Copied from  C\MdePkg\Include\Protocol\UgaDraw.h
typedef struct {
  UINT8 Blue;
  UINT8 Green;
  UINT8 Red;
  UINT8 Reserved;
} EFI_UGA_PIXEL;


int
EFIAPI
main (                                         
  IN int Argc,
  IN char **Argv
  )
{
    EFI_STATUS    Status;
    UINTN i;
    UINTN HandleIndex;	
	EFI_GRAPHICS_OUTPUT_BLT_PIXEL FillColor;
    UINTN HandleCount;
	EFI_HANDLE   *HandleBuffer;
    //
    // Search for the shell protocol
    //
    Status = gBS->LocateHandleBuffer(
	 ByProtocol,
      &GraphicsOutputProtocolGuid,
      NULL,
	  &HandleCount,
      &HandleBuffer
     );

    Print(L"[%d] \r\n",HandleCount);
	 
	for (HandleIndex=0; HandleIndex<HandleCount;HandleIndex++)
	{
		Status = gBS -> HandleProtocol (
							HandleBuffer[HandleIndex],
							&gEfiGraphicsOutputProtocolGuid,
							(void **)&GraphicsOutput);
		if (!(EFI_ERROR(Status))) {
			for (i=0;i<100;i++) {
				FillColor.Blue=rand() % 256;
				FillColor.Red=rand() % 256;
				FillColor.Green=rand() % 256;
	
				GraphicsOutput->Blt(GraphicsOutput, &FillColor, EfiBltVideoFill,
					0, 
					0 , 
					rand() % (GraphicsOutput->Mode->Info->HorizontalResolution-100), 
					rand() % (GraphicsOutput->Mode->Info->VerticalResolution-100), 
					100, 100, 0); 
				gBS->Stall(50000);
			} // For i
		}
		else {
		    Print(L"Error @[%d] \r\n",HandleCount);
		}
	} // For HandleIndex		

  return EFI_SUCCESS;
  
}


运行结果:

gfxtest6

可以看到现在两个窗口都会有显示。

完整代码下载:

GFXTest6

参考:

1.http://www.cppblog.com/djxzh/archive/2012/03/06/167106.html UEFI 实战(4) protocol

Step to UEFI (56) —– 在屏幕上显示一幅BMP

前面介绍了如何截图,如果把这个过程反过来,先是读取BMP文件到内存,然后重新排列RGB,再用Blt输出到Video上就是显示BMP的过程。

根据这个原理编写程序如下:

#include  <Uefi.h>
#include  <Library/UefiLib.h>
#include  <Library/ShellCEntryLib.h>

#include  <stdio.h>
#include  <stdlib.h>
#include  <wchar.h>
#include  <time.h>
#include <Protocol/EfiShell.h>
#include <Library/ShellLib.h>

#include <Protocol/SimpleFileSystem.h>
#include <Protocol/BlockIo.h>
#include <Library/DevicePathLib.h>
#include <Library/HandleParsingLib.h>
#include <Library/SortLib.h>
#include <Library/MemoryAllocationLib.h>
#include <Library/BaseMemoryLib.h>

#include <Protocol/LoadedImage.h>

#define MAX_FILE_SIZE (1024*1024*1024)

extern EFI_BOOT_SERVICES         *gBS;
extern EFI_SYSTEM_TABLE			 *gST;
extern EFI_RUNTIME_SERVICES 	 *gRT;

extern EFI_SHELL_ENVIRONMENT2    *mEfiShellEnvironment2;
extern EFI_HANDLE				 gImageHandle;

static EFI_GUID GraphicsOutputProtocolGuid = EFI_GRAPHICS_OUTPUT_PROTOCOL_GUID;
static EFI_GRAPHICS_OUTPUT_PROTOCOL *GraphicsOutput = NULL;

#pragma pack(1)

//Copied from  C\MdePkg\Include\Protocol\UgaDraw.h
typedef struct {
  UINT8 Blue;
  UINT8 Green;
  UINT8 Red;
  UINT8 Reserved;
} EFI_UGA_PIXEL;

/* This should be compatible with EFI_UGA_PIXEL */
typedef struct {
    UINT8 b, g, r, a;
} EG_PIXEL;

typedef struct {
    CHAR8         CharB;
    CHAR8         CharM;
    UINT32        Size;
    UINT16        Reserved[2];
    UINT32        ImageOffset;
    UINT32        HeaderSize;
    UINT32        PixelWidth;
    UINT32        PixelHeight;
    UINT16        Planes;       // Must be 1
    UINT16        BitPerPixel;  // 1, 4, 8, or 24
    UINT32        CompressionType;
    UINT32        ImageSize;    // Compressed image size in bytes
    UINT32        XPixelsPerMeter;
    UINT32        YPixelsPerMeter;
    UINT32        NumberOfColors;
    UINT32        ImportantColors;
} BMP_IMAGE_HEADER;

typedef struct {
    UINTN       Width;
    UINTN       Height;
    BOOLEAN     HasAlpha;
    EG_PIXEL    *PixelData;
} EG_IMAGE;
#pragma pack()


VOID egFreeImage(IN EG_IMAGE *Image)
{
    if (Image != NULL) {
        if (Image->PixelData != NULL)
            FreePool(Image->PixelData);
        FreePool(Image);
    }
}


static EFI_GUID ESPGuid = { 0xc12a7328, 0xf81f, 0x11d2, 
				{ 0xba, 0x4b, 0x00, 0xa0, 0xc9, 0x3e, 0xc9, 0x3b } };

static EFI_STATUS egFindESP(OUT EFI_FILE_PROTOCOL *RootDir)
{
    EFI_STATUS          Status;


    return Status;
}

//
// Basic image handling
//

EG_IMAGE * egCreateImage(IN UINTN Width, IN UINTN Height, IN BOOLEAN HasAlpha)
{
    EG_IMAGE        *NewImage;
    
    NewImage = (EG_IMAGE *) AllocatePool(sizeof(EG_IMAGE));
    if (NewImage == NULL)
        return NULL;
    NewImage->PixelData = (EG_PIXEL *) AllocatePool(
								Width * Height * sizeof(EG_PIXEL));
    if (NewImage->PixelData == NULL) {
        FreePool(NewImage);
        return NULL;
    }

    NewImage->Width = Width;
    NewImage->Height = Height;
    NewImage->HasAlpha = HasAlpha;
    return NewImage;
}

EFI_STATUS LoadFile(  IN CHAR16 *FileName,
                      IN UINT8 **FileData, 
					  IN UINTN *FileDataLength)
{
    EFI_STATUS          Status;
    EFI_FILE_HANDLE     FileHandle;
    EFI_FILE_PROTOCOL   *Root;
	EFI_SIMPLE_FILE_SYSTEM_PROTOCOL *SimpleFileSystem;
	EFI_FILE_INFO     *FileInfo = NULL;
	
    Status = gBS->LocateProtocol(
						&gEfiSimpleFileSystemProtocolGuid, 
						NULL,
						(VOID **)&SimpleFileSystem);
    if (EFI_ERROR(Status)) {
		    Print(L"Cannot find EFI_SIMPLE_FILE_SYSTEM_PROTOCOL \r\n");
            return Status;	
	}

	Status = SimpleFileSystem->OpenVolume(SimpleFileSystem, &Root);
    if (EFI_ERROR(Status)) {
		    Print(L"OpenVolume error \r\n");
            return Status;	
	}

    Status = Root->Open(
							Root, 
							&FileHandle, 
							FileName,
							EFI_FILE_MODE_READ , 
							0);
    if (EFI_ERROR(Status))
	  {
        Print(L"Error Open NULL\n");
        return Status;
	  }	

	FileInfo = ShellGetFileInfo( (SHELL_FILE_HANDLE)FileHandle);	
    Print(L"Filesize [%ld] bytes\n",FileInfo-> FileSize);
	*FileDataLength=(UINTN) FileInfo->FileSize;
	
	*FileData  = AllocatePool((UINTN) FileInfo->FileSize);
    Status = FileHandle->Read(FileHandle, FileDataLength, *FileData );
    if (EFI_ERROR(Status)) {
		Print(L"Loading file error! \n");
	}
	Print(L"Get file size [%d]!\n",*FileDataLength);
    

    FileHandle->Close(FileHandle);
    
    return Status;
}


//
// Load BMP image
//

EG_IMAGE * egDecodeBMP
	(
		IN UINT8 *FileData, 
		IN UINTN FileDataLength, 
		IN BOOLEAN WantAlpha)
{
    EG_IMAGE            *NewImage;
    BMP_IMAGE_HEADER    *BmpHeader;
    EFI_UGA_PIXEL       *BmpColorMap;
    UINTN               x, y;
    UINT8               *ImagePtr;
    UINT8               *ImagePtrBase;
    UINTN               ImageLineOffset;
    UINT8               ImageValue=0, AlphaValue;
    EG_PIXEL            *PixelPtr;
    UINTN               Index, BitIndex;

    // read and check header
    if (FileDataLength < sizeof(BMP_IMAGE_HEADER) || FileData == NULL)
        return NULL;

    BmpHeader = (BMP_IMAGE_HEADER *) FileData;
    if (BmpHeader->CharB != 'B' || BmpHeader->CharM != 'M')
        return NULL;

    if (BmpHeader->CompressionType != 0)
        return NULL;

    if (BmpHeader->BitPerPixel != 1 && BmpHeader->BitPerPixel != 4 &&
        BmpHeader->BitPerPixel != 8 && BmpHeader->BitPerPixel != 24)
        return NULL;

    // calculate parameters
    ImageLineOffset = BmpHeader->PixelWidth;
    if (BmpHeader->BitPerPixel == 24)
        ImageLineOffset *= 3;
    else if (BmpHeader->BitPerPixel == 1)
        ImageLineOffset = (ImageLineOffset + 7) >> 3;
    else if (BmpHeader->BitPerPixel == 4)
        ImageLineOffset = (ImageLineOffset + 1) >> 1;
    if ((ImageLineOffset % 4) != 0)
        ImageLineOffset = ImageLineOffset + (4 - (ImageLineOffset % 4));
    // check bounds
    if (BmpHeader->ImageOffset + 
			ImageLineOffset * BmpHeader->PixelHeight > FileDataLength)
        return NULL;
    
    // allocate image structure and buffer
    NewImage = egCreateImage(BmpHeader->PixelWidth, 
								BmpHeader->PixelHeight, WantAlpha);
    if (NewImage == NULL)
        return NULL;
    AlphaValue = WantAlpha ? 255 : 0;
    
    // convert image
    BmpColorMap = (EFI_UGA_PIXEL *)(FileData + sizeof(BMP_IMAGE_HEADER));
    ImagePtrBase = FileData + BmpHeader->ImageOffset;
    for (y = 0; y < BmpHeader->PixelHeight; y++) {
        ImagePtr = ImagePtrBase;
        ImagePtrBase += ImageLineOffset;
        PixelPtr = NewImage->PixelData + 
				(BmpHeader->PixelHeight - 1 - y) * BmpHeader->PixelWidth;
        
        switch (BmpHeader->BitPerPixel) {
            
            case 1:
                for (x = 0; x < BmpHeader->PixelWidth; x++) {
                    BitIndex = x & 0x07;
                    if (BitIndex == 0)
                        ImageValue = *ImagePtr++;
                    
                    Index = (ImageValue >> (7 - BitIndex)) & 0x01;
                    PixelPtr->b = BmpColorMap[Index].Blue;
                    PixelPtr->g = BmpColorMap[Index].Green;
                    PixelPtr->r = BmpColorMap[Index].Red;
                    PixelPtr->a = AlphaValue;
                    PixelPtr++;
                }
                break;
            
            case 4:
                for (x = 0; x <= BmpHeader->PixelWidth - 2; x += 2) {
                    ImageValue = *ImagePtr++;
                    
                    Index = ImageValue >> 4;
                    PixelPtr->b = BmpColorMap[Index].Blue;
                    PixelPtr->g = BmpColorMap[Index].Green;
                    PixelPtr->r = BmpColorMap[Index].Red;
                    PixelPtr->a = AlphaValue;
                    PixelPtr++;
                    
                    Index = ImageValue & 0x0f;
                    PixelPtr->b = BmpColorMap[Index].Blue;
                    PixelPtr->g = BmpColorMap[Index].Green;
                    PixelPtr->r = BmpColorMap[Index].Red;
                    PixelPtr->a = AlphaValue;
                    PixelPtr++;
                }
                if (x < BmpHeader->PixelWidth) {
                    ImageValue = *ImagePtr++;
                    
                    Index = ImageValue >> 4;
                    PixelPtr->b = BmpColorMap[Index].Blue;
                    PixelPtr->g = BmpColorMap[Index].Green;
                    PixelPtr->r = BmpColorMap[Index].Red;
                    PixelPtr->a = AlphaValue;
                    PixelPtr++;
                }
                break;
            
            case 8:
                for (x = 0; x < BmpHeader->PixelWidth; x++) {
                    Index = *ImagePtr++;
                    PixelPtr->b = BmpColorMap[Index].Blue;
                    PixelPtr->g = BmpColorMap[Index].Green;
                    PixelPtr->r = BmpColorMap[Index].Red;
                    PixelPtr->a = AlphaValue;
                    PixelPtr++;
                }
                break;
            
            case 24:
                for (x = 0; x < BmpHeader->PixelWidth; x++) {
                    PixelPtr->b = *ImagePtr++;
                    PixelPtr->g = *ImagePtr++;
                    PixelPtr->r = *ImagePtr++;
                    PixelPtr->a = AlphaValue;
                    PixelPtr++;
                }
                break;
            
        }
    }
    
    return NewImage;
}


int
EFIAPI
main (                                         
  IN int Argc,
  IN char **Argv
  )
{
    EFI_STATUS    Status;
    EG_IMAGE        *Image;	
    UINT8           *FileData=NULL;
    UINTN           FileDataLength;

	
    Status = gBS->LocateProtocol(&GraphicsOutputProtocolGuid, 
						NULL, (VOID **) &GraphicsOutput);
    if (EFI_ERROR(Status)) {
        GraphicsOutput = NULL;
		Print(L"Loading Graphics_Output_Protocol error!\n");
		return EFI_SUCCESS;
	}	
    
	Status=LoadFile(L"test.bmp",&FileData,&FileDataLength);
    Print(L"Get file size [%d]!\n",FileDataLength);	
	
    Image=egDecodeBMP(FileData, FileDataLength, FALSE);

    Print(L"Image height [%d]:width[%d]",
					Image->Height,
					Image->Width);

	GraphicsOutput->Blt(
				GraphicsOutput, 
				(EFI_GRAPHICS_OUTPUT_BLT_PIXEL *) Image->PixelData,
				EfiBltBufferToVideo,
                0, 
				0 , 
				0x20, 
				0x0, 
				Image->Width, 
				Image->Height, 0); 					
	
  return EFI_SUCCESS;
  
}


运行结果:

showbmp

完整代码例子:

ShowBMP

本文同样参考了之前提到的 https://github.com/chengs/UEFI 的代码,再次感谢!

Step to UEFI (54) —– EFI_SIMPLE_FILE_SYSTEM_PROTOCOL 写文件

通常,每个UEFI系统至少有一个 ESP (EFI System Partition)分区,在这个分区上存放启动文件。EFI内置了EFI_SIMPLE_FILE_SYSTEM_PROTOCOL(简称 FileSystemIo)可以用来操作FAT文件系统【参考1】。

相关的介绍:

\MdePkg\Include\Protocol\SimpleFileSystem.h

///
/// The EFI_FILE_PROTOCOL provides file IO access to supported file systems.
/// An EFI_FILE_PROTOCOL provides access to a file's or directory's contents, 
/// and is also a reference to a location in the directory tree of the file system 
/// in which the file resides. With any given file handle, other files may be opened 
/// relative to this file's location, yielding new file handles.
///
struct _EFI_FILE_PROTOCOL {
  ///
  /// The version of the EFI_FILE_PROTOCOL interface. The version specified 
  /// by this specification is EFI_FILE_PROTOCOL_LATEST_REVISION.
  /// Future versions are required to be backward compatible to version 1.0.
  ///
  UINT64                Revision;
  EFI_FILE_OPEN         Open;
  EFI_FILE_CLOSE        Close;
  EFI_FILE_DELETE       Delete;
  EFI_FILE_READ         Read;
  EFI_FILE_WRITE        Write;
  EFI_FILE_GET_POSITION GetPosition;
  EFI_FILE_SET_POSITION SetPosition;
  EFI_FILE_GET_INFO     GetInfo;
  EFI_FILE_SET_INFO     SetInfo;
  EFI_FILE_FLUSH        Flush;
  EFI_FILE_OPEN_EX      OpenEx;
  EFI_FILE_READ_EX      ReadEx;
  EFI_FILE_WRITE_EX     WriteEx;
  EFI_FILE_FLUSH_EX     FlushEx;
};


\MdePkg\Include\Protocol\SimpleFileSystem.h

#define EFI_SIMPLE_FILE_SYSTEM_PROTOCOL_GUID \
  { \
    0x964e5b22, 0x6459, 0x11d2, {0x8e, 0x39, 0x0, 0xa0, 0xc9, 0x69, 0x72, 0x3b } \
  }


\EdkCompatibilityPkg\Foundation\Efi\Protocol\SimpleFileSystem\SimpleFileSystem.c

EFI_GUID  gEfiSimpleFileSystemProtocolGuid = EFI_SIMPLE_FILE_SYSTEM_PROTOCOL_GUID;


从原理上来说,先通过这个Protocol OpenVolume,即可获得FAT文件系统上的根目录句柄。目录句柄(EFI_FILE_PROTOCOL)包含了操作该目录里文件的文件操作接口。之后我们再用 Open打开这个目录,选定需要操作的文件即可写入。

\MdePkg\Include\Protocol\SimpleFileSystem.h

/**
  Writes data to a file.

  @param  This       A pointer to the EFI_FILE_PROTOCOL instance that is the file
                     handle to write data to.
  @param  BufferSize On input, the size of the Buffer. On output, the amount of data
                     actually written. In both cases, the size is measured in bytes.
  @param  Buffer     The buffer of data to write.

  @retval EFI_SUCCESS          Data was written.
  @retval EFI_UNSUPPORTED      Writes to open directory files are not supported.
  @retval EFI_NO_MEDIA         The device has no medium.
  @retval EFI_DEVICE_ERROR     The device reported an error.
  @retval EFI_DEVICE_ERROR     An attempt was made to write to a deleted file.
  @retval EFI_VOLUME_CORRUPTED The file system structures are corrupted.
  @retval EFI_WRITE_PROTECTED  The file or medium is write-protected.
  @retval EFI_ACCESS_DENIED    The file was opened read only.
  @retval EFI_VOLUME_FULL      The volume is full.

**/
typedef
EFI_STATUS
(EFIAPI *EFI_FILE_WRITE)(
  IN EFI_FILE_PROTOCOL        *This,
  IN OUT UINTN                *BufferSize,
  IN VOID                     *Buffer
  );


完整代码:

#include  <Uefi.h>
#include  <Library/UefiLib.h>
#include  <Library/ShellCEntryLib.h>

#include <Protocol/EfiShell.h>
#include <Library/ShellLib.h>

#include <Protocol/SimpleFileSystem.h>

extern EFI_BOOT_SERVICES         *gBS;
extern EFI_SYSTEM_TABLE			 *gST;


int
EFIAPI
main (                                         
  IN int Argc,
  IN char **Argv
  )
{
    EFI_STATUS          			Status;
	EFI_FILE_PROTOCOL    			*Root;
	EFI_SIMPLE_FILE_SYSTEM_PROTOCOL *SimpleFileSystem;
	UINTN	BufSize;
	CHAR16 *Textbuf = (CHAR16*) L"www.lab-z.com";
	EFI_FILE_PROTOCOL *FileHandle=0;
	
    Status = gBS->LocateProtocol(
						&gEfiSimpleFileSystemProtocolGuid, 
						NULL,
						(VOID **)&SimpleFileSystem);
						
	
    if (EFI_ERROR(Status)) {
		    Print(L"Cannot find EFI_SIMPLE_FILE_SYSTEM_PROTOCOL \r\n");
            return Status;	
	}

	Status = SimpleFileSystem->OpenVolume(SimpleFileSystem,&Root);
    if (EFI_ERROR(Status)) {
		    Print(L"OpenVolume error \r\n");
            return Status;	
	}
   
    Status = Root -> Open(Root,
			&FileHandle,
			(CHAR16 *) L"atest.txt",
			EFI_FILE_MODE_CREATE | EFI_FILE_MODE_READ | EFI_FILE_MODE_WRITE,
			0);
			
    if (EFI_ERROR(Status) || (FileHandle==0)) {
		    Print(L"Open error \r\n");
            return Status;	
	}	
	
	BufSize = StrLen (Textbuf) * 2;
	Print(L"[%d]\r\n",BufSize);		
	Print(L"[%s]\r\n",Textbuf);			
	Status = FileHandle -> Write(FileHandle, &BufSize, Textbuf);
	
	Print(L"Write Done \r\n");	
	
	Status  = FileHandle -> Close (FileHandle);
	
    return EFI_SUCCESS;
}


运行结果:

esptest

比较有意思的是,我们按照上面的程序写入之后,使用 type 文件名 来显示文件内容和我们的预期有差别,原因是Type命令默认使用 ASCII 来显内容,而我们的文件中写入的是 Unicode。使用 type -u 强制使用 Unicode即可看到我们期望的内容。

根据【参考2】的提示,我们还可以通过给TXT文件加一个头来通知当前内容格式的方法克服这个问题。

关键代码:

	UINT16  TextHeader =0xFEFF;


	BufSize = 2;
	Status = FileHandle -> Write(FileHandle, &BufSize, &TextHeader);
	
	BufSize = StrLen (Textbuf) * 2;
	Print(L"[%d]\r\n",BufSize);		
	Print(L"[%s]\r\n",Textbuf);			
	Status = FileHandle -> Write(FileHandle, &BufSize, Textbuf);


运行结果:

esptest2

可以看到经过这样的处理,都可以正常显示内容了。

完整代码下载
ESPTest

参考:

1.UEFI 原理与编程 戴正华 著 P152页

2.http://www.biosren.com/thread-6541-2-1.html UEFI下使用EFI_FILE_PROTOCOL 檔案操作能多次讀寫嗎?


=============================================================

2024年9月20日

下面这个代码段能够实现将指定内存内容保存为文件,方便调试,有需要的朋友可以试试。

#include &lt;Library/BaseMemoryLib.h>
#include &lt;Library/MemoryAllocationLib.h>
#include &lt;Protocol/SimpleFileSystem.h>

extern EFI_HANDLE        			  gImageHandle;

EFI_STATUS
WriteMemoryToFile(
    IN EFI_HANDLE ImageHandle,
    IN CHAR16 *FileName,
    IN VOID *Buffer,
    IN UINTN BufferSize
)
{
    EFI_STATUS Status;
    EFI_SIMPLE_FILE_SYSTEM_PROTOCOL *SimpleFileSystem;
    EFI_FILE_PROTOCOL *Root;
    EFI_FILE_PROTOCOL *File;
    EFI_HANDLE *Handles = NULL;
    UINTN HandleCount = 0;

    // Locate all handles that support the Simple File System Protocol
    Status = gBS->LocateHandleBuffer(ByProtocol, &amp;gEfiSimpleFileSystemProtocolGuid, NULL, &amp;HandleCount, &amp;Handles);
    if (EFI_ERROR(Status)) {
        Print(L"Failed to locate handles for Simple File System Protocol: %r\n", Status);
        return Status;
    }

    // Open the first Simple File System Protocol
    Status = gBS->HandleProtocol(Handles[0], &amp;gEfiSimpleFileSystemProtocolGuid, (VOID **)&amp;SimpleFileSystem);
    if (EFI_ERROR(Status)) {
        Print(L"Failed to open Simple File System Protocol: %r\n", Status);
        return Status;
    }

    // Open the root directory
    Status = SimpleFileSystem->OpenVolume(SimpleFileSystem, &amp;Root);
    if (EFI_ERROR(Status)) {
        Print(L"Failed to open root directory: %r\n", Status);
        return Status;
    }

    // Create or open the file
    Status = Root->Open(Root, &amp;File, FileName, EFI_FILE_MODE_CREATE | EFI_FILE_MODE_WRITE | EFI_FILE_MODE_READ, 0);
    if (EFI_ERROR(Status)) {
        Print(L"Failed to open or create file: %r\n", Status);
        return Status;
    }

    // Write the buffer to the file
    Status = File->Write(File, &amp;BufferSize, Buffer);
    if (EFI_ERROR(Status)) {
        Print(L"Failed to write to file: %r\n", Status);
        File->Close(File);
        return Status;
    }

    // Close the file
    Status = File->Close(File);
    if (EFI_ERROR(Status)) {
        Print(L"Failed to close file: %r\n", Status);
        return Status;
    }

    Print(L"Memory successfully written to file: %s\n", FileName);
    return EFI_SUCCESS;
}


USB HID class: Difference between report protocol and boot protocol?

USB HID class: Difference between report protocol and boot protocol?

Hi All

I would like to know:
1- For USB-HID class: What is the difference between report protocol and boot protocol?
2- For keyboard: the input report format is unique for both report/boot protocol?
3- When Host send Request(GET_DESCRIPTOR) specifying the report descriptor type, Will Device return the report descriptor including the input report data(i.e: 8-byte for keyboard) ? OR Host need to send Request GET_REPORT to get the input report?

In short, boot protocol is used on BIOS, report protocol is used on OS.

The device capability of boot protocol is shown at the interface triad,
(interfaceClass, interfaceSubclass, interfaceProtocol) field on the HID interface descriptor.
(interfaceClass, interfaceSubclass, interfaceProtocol) = (3, 1, 1): boot keyboard
(interfaceClass, interfaceSubclass, interfaceProtocol) = (3, 1, 2): boot mouse

BIOS checks just this triad, and it recognizes the device (interface) as specified.
BIOS doesn’t actually read out report descriptor from the device; It assumes that the device has standard keyboard or mouse report descriptor (*1) while the device in boot protocol.
After enumeration, BIOS puts Set_Protocol( BOOT ) to switch the device into boot protocol, if the device has boot capability. While BIOS is running, the device works as keyboard or mouse.
If the device doesn’t have boot capability, BIOS doesn’t enumerate the device.

At the start up of OS after BIOS, OS puts bus reset. The device gets back to default report protocol.
Usually, OS doesn’t put any Set_Protocol, the device is held in report protocol.
On the enumeration, OS reads out report descriptor of the device, and it determines the type of HID device, regardless of above subclass-protocol field.

(*1) see HID spec Appendix B: Boot Interface Descriptors

As I wrote above,
For boot protocol, the report format is fixed one.
For report protocol, you can define any report format on the report descriptor.

Device returns just the report descriptor, when host puts Get_Descriptor().
Actual input report is sent for Get_Report( input ) request, or for IN transfer over the interrupt IN endpoint.

本文来自 http://community.silabs.com/t5/8-bit-MCU/USB-HID-class-Difference-between-report-protocol-and-boot/td-p/78797

这篇文章简单介绍了一下USB键盘鼠标report protocol 和 boot protocol的差别,个人理解二者的差别是 Boot Protocol已经规定出来了发送数据的格式,这样在无需解析 HID 协议的情况下,可以直接解读出来键值等有用的信息,如果USB HOST资源有限,这样可以方便使用。比如:BIOS 中使用这个协议方便Setup处理。 report protocol 的话,就是标准的HID协议,需要根据Descriptor才能得知具体含义。