Step to UEFI (31) —– CLIB:Rand 随机数生成

很多时候我们期望使用随机数来测试我们的结果,在C99中有给出2个随机函数

int rand(void);

void srand(unsigned int seed);

CLIB中,在 \StdLib\Include\stdlib.h 有如下定义

/* ################  Pseudo-random sequence generation functions  ######### */

/** The rand function computes a sequence of pseudo-random integers in the
    range 0 to RAND_MAX.

    @return   The rand function returns a pseudo-random integer.
**/
int     rand(void);

/** The srand function uses the argument as a seed for a new sequence of
    pseudo-random numbers to be returned by subsequent calls to rand.

    If srand is then called with the same seed value, the sequence of
    pseudo-random numbers shall be repeated. If rand is called before any calls
    to srand have been made, the same sequence shall be generated as when srand
    is first called with a seed value of 1.
**/
void    srand(unsigned seed);


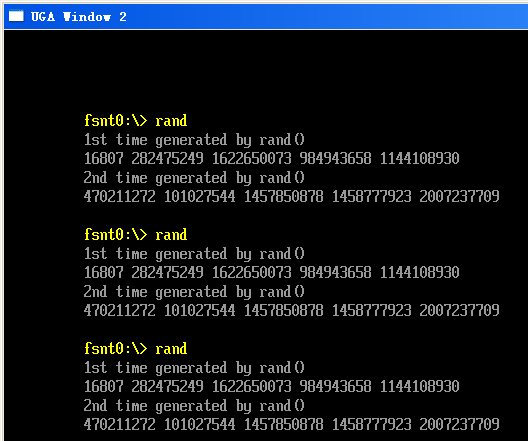
前者rand 是“伪随机”数,因为生成随机数的种子是固定的,所以每次生成的序列都是相同的。比如,我们用下面的程序段测试:

  printf("1st time generated by rand()\n");
  for (i=0;i<5;i++)   
  {
	printf("%d ",rand());
  }
  printf("\n");

  printf("2nd time generated by rand()\n");
  for (i=0;i<5;i++)   
  {
	printf("%d ",rand());
  }
  printf("\n");


得到的结果如下,可以看出来:生成的数值之间是随机的,但是每次运行生成的序列是一样的。这也就是“伪随机”的由来。

rand

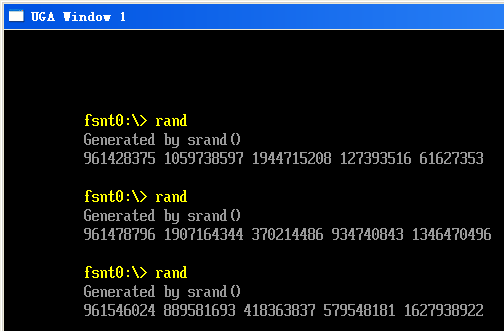
此外,在程序的开始处,运行 srand 指定一个种子,就可以让 rand生成“随机数”。运行 srand的结果如下:

srand

进一步分析随机函数,可以在 \StdLib\LibC\StdLib\Rand.c 看到

static UINT32 next = 1;

/** Compute a pseudo-random number.
  *
  * Compute x = (7^5 * x) mod (2^31 - 1)
  * without overflowing 31 bits:
  *      (2^31 - 1) = 127773 * (7^5) + 2836
  * From "Random number generators: good ones are hard to find",
  * Park and Miller, Communications of the ACM, vol. 31, no. 10,
  * October 1988, p. 1195.
**/
int
rand()
{
  INT32 hi, lo, x;

  /* Can't be initialized with 0, so use another value. */
  if (next == 0)
    next = 123459876;
  hi = next / 127773;
  lo = next % 127773;
  x = 16807 * lo - 2836 * hi;
  if (x < 0)
    x += 0x7fffffff;
  return ((next = x) % ((UINT32)RAND_MAX + 1));
}

void
srand(unsigned int seed)
{
  next = (UINT32)seed;
}


就是说当我们使用 rand 函数的时候,种子 static UINT32 next = 1; 默认为 1.而当我们首先给定一个种子的时候,next会被替换为我们指定的值。从而达到随机的目的。(话说感觉这样做出来的随机似乎也不是很可靠。如果我们有足够多的序列,完全也能推测出随机种子,也能预测出下面将要出现的数值)

一般随机种子都是直接取当前的时间,于是写一个是程序验证:

#include  <Uefi.h>
#include  <Library/UefiLib.h>
#include  <Library/ShellCEntryLib.h>

#include  <stdio.h>
#include  <stdlib.h>
#include  <wchar.h>
#include  <time.h>
#include <Protocol/EfiShell.h>
#include <Library/ShellLib.h>

extern EFI_BOOT_SERVICES        *gBS;
extern EFI_SYSTEM_TABLE		*gST;
extern EFI_RUNTIME_SERVICES 	*gRT;

int
EFIAPI
main (
  IN int Argc,
  IN char **Argv
  )
{
  INTN i;
  time_t t;

  printf("1st time generated by rand()\n");
  for (i=0;i<5;i++)   
  {
	printf("%d ",rand());
  }
  printf("\n");

  printf("2nd time generated by rand()\n");
  for (i=0;i<5;i++)   
  {
	printf("%d ",rand());
  }
  printf("\n");

  printf("Generated by srand()\n");
  time(&t);
  srand(t);
  for (i=0;i<5;i++)   
  {
	printf("%d ",rand());
  }
  printf("\n");
  
  return EFI_SUCCESS;
}


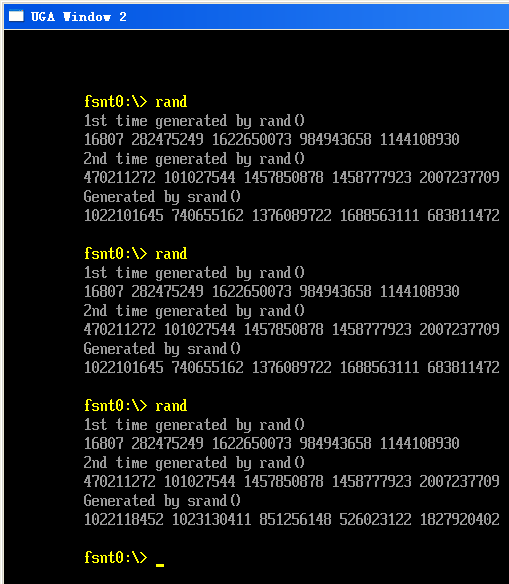
这个程序工作正常,不过有一个“奇怪”的现象:当你连续运行这个程序的时候,2nd time generated by rand() 生成的序列有时候会相同,您说这是为什么呢?

randfail

完整程序代码下载
rand

参考:

1.http://blog.csdn.net/zhenyongyuan123/article/details/5810253 C99标准库函数

Step to UEFI (30) —- UEFI 下SMBIOS的读取

有朋友提出一个问题:UEFI 下如何读取SMBIOS信息?

smbiosq

查阅了一下资料,在 EFI_CONFIGURATION_TABLE 中有 SMBIOS_TABLE_GUID 可以用来获得SMBIOS信息。此外,推荐看一下 http://blog.chinaunix.net/uid-20757375-id-3531318.html 。

可供直接参考的代码有 ShellPkg\Library\UefiShellDebug1CommandsLib\SmbiosView 如果你看着觉得过于复杂的话,还可以参考 https://github.com/fpmurphy/UEFI-Utilities 。这个程序结构清晰,功能简单。每种不足是直接下载的代码有一些错误之类的,需要修正。下面就是修改之后的代码(代码很多是从EDK中直接copy出来的,因为装一些头文件和调用会很复杂,用到的只是那么一两个函数,所以最简单的就是直接copy,放在代码中了.其中头文件 smbios.h 可以在\MdePkg\Include\IndustryStandard 中找到)

//
//  Copyright (c) 2012  Finnbarr P. Murphy.   All rights reserved.
//
//  Display  Firmware Information Vendor, Version and Release Date via SMBIOS
//
//  Any source code included from EDK2 is copyright Intel Corporation
// 
//  Licence: BSD License
//
 
 
#define GUID EFI_GUID     // hack for SmBios.h
#include "IndustryStandard/SmBios.h"       // from EDK2. GNU_EFI libsmbios.h is defective
#include <Library/UefiLib.h>
#include <Library/ShellCEntryLib.h>
#include <Library/MemoryAllocationLib.h>

#define EFI_GLOBAL_VARIABLE \
  { \
    0x8BE4DF61, 0x93CA, 0x11d2, {0xAA, 0x0D, 0x00, 0xE0, 0x98, 0x03, 0x2B, 0x8C } \
  }

#define EFI_SMBIOS_TABLE_GUID \
  { \
    0xeb9d2d31, 0x2d88, 0x11d3, {0x9a, 0x16, 0x0, 0x90, 0x27, 0x3f, 0xc1, 0x4d} \
  }
  
#define BUFSIZE 64
 
#define INVALID_HANDLE  (UINT16) (-1)
#define DMI_INVALID_HANDLE  0x83
#define DMI_SUCCESS 0x00
 
STATIC SMBIOS_TABLE_ENTRY_POINT *mSmbiosTable = 0; //NULL;
STATIC SMBIOS_STRUCTURE_POINTER m_SmbiosStruct;
STATIC SMBIOS_STRUCTURE_POINTER *mSmbiosStruct = &m_SmbiosStruct;
 
EFI_GUID  SMBIOSTableGuid = EFI_SMBIOS_TABLE_GUID;

extern EFI_SYSTEM_TABLE			 *gST;

int
Strlen(const char *str)
{
    const char *s;
 
    for (s = str; *s; ++s)
        ;
    return (s - str);
}
 
 
//
// Modified from EDK2 source code.  Copyright Intel Corporation.
//
CHAR8*
LibGetSmbiosString ( SMBIOS_STRUCTURE_POINTER *Smbios,
                     UINT16 StringNumber)
{
    UINT16  Index;
    CHAR8   *String;
 
    //ASSERT (Smbios != NULL);
 
    String = (CHAR8 *) (Smbios->Raw + Smbios->Hdr->Length);
 
    for (Index = 1; Index <= StringNumber; Index++) {
        if (StringNumber == Index) {
            return String;
        }
        for (; *String != 0; String++)
             ;
        String++;
 
        if (*String == 0) {
            Smbios->Raw = (UINT8 *)++String;
            return NULL;
        }
    }
 
    return NULL;
}
 
 
//
// Modified from EDK2 source code. Copyright Intel Corporation.
//
EFI_STATUS
LibGetSmbiosStructure ( UINT16 *Handle,
                        UINT8  **Buffer,
                        UINT16 *Length)
{
     SMBIOS_STRUCTURE_POINTER  Smbios;
     SMBIOS_STRUCTURE_POINTER  SmbiosEnd;
     UINT8 *Raw;
 
     if (*Handle == INVALID_HANDLE) {
          *Handle =  mSmbiosStruct->Hdr->Handle;
          return DMI_INVALID_HANDLE;
     }
 
     if ((Buffer == NULL) || (Length == NULL)) {
          Print(L"Invalid handle\n");
          return DMI_INVALID_HANDLE;
     }
 
     *Length = 0;
     Smbios.Hdr = mSmbiosStruct->Hdr;
     SmbiosEnd.Raw = Smbios.Raw + mSmbiosTable->TableLength;
     while (Smbios.Raw < SmbiosEnd.Raw) {
          if (Smbios.Hdr->Handle == *Handle) {
             Raw = Smbios.Raw;
             LibGetSmbiosString (&Smbios, (UINT16) (-1));
             *Length = (UINT16) (Smbios.Raw - Raw);
             *Buffer = Raw;
             if (Smbios.Raw < SmbiosEnd.Raw) {
                  *Handle = Smbios.Hdr->Handle;
             } else {
                  *Handle = INVALID_HANDLE;
             }
             return DMI_SUCCESS;
         }
         LibGetSmbiosString (&Smbios, (UINT16) (-1));
    }
 
    *Handle = INVALID_HANDLE;
 
    return DMI_INVALID_HANDLE;
}
 
 
CHAR16 *
ASCII_to_UCS2(const char *s, int len)
{
    CHAR16 *ret = NULL;
    int i;
 
    ret = AllocateZeroPool(len*2 + 2);
    if (!ret)
        return NULL;
 
    for (i = 0; i < len; i++)
        ret[i] = s[i];
 
    return ret;
}

BOOLEAN
EfiCompareGuid (
  IN EFI_GUID *Guid1,
  IN EFI_GUID *Guid2
  )
/*++

Routine Description:

  Compares two GUIDs

Arguments:

  Guid1 - guid to compare

  Guid2 - guid to compare

Returns:
  TRUE     if Guid1 == Guid2
  FALSE    if Guid1 != Guid2

--*/
{
  UINTN Index;

  //
  // compare byte by byte
  //
  for (Index = 0; Index < 16; ++Index) {
    if (*(((UINT8*) Guid1) + Index) != *(((UINT8*) Guid2) + Index)) {
      return FALSE;
    }
  }
  return TRUE;
}

 
EFI_STATUS
EfiLibGetSystemConfigurationTable (
  IN EFI_GUID *TableGuid,
  OUT VOID **Table
  )
/*++

Routine Description:

  Get table from configuration table by name

Arguments:

  TableGuid       - Table name to search
  
  Table           - Pointer to the table caller wants

Returns: 

  EFI_NOT_FOUND   - Not found the table
  
  EFI_SUCCESS     - Found the table

--*/
{
  UINTN Index;

  *Table = NULL;
  for (Index = 0; Index < gST->NumberOfTableEntries; Index++) {
    if (EfiCompareGuid (TableGuid, &(gST->ConfigurationTable[Index].VendorGuid))==TRUE) {
      *Table = gST->ConfigurationTable[Index].VendorTable;
      return EFI_SUCCESS;
    }
  }

  return EFI_NOT_FOUND;
}

/**
  Compares two memory buffers of a given length.

  @param  DestinationBuffer The first memory buffer.
  @param  SourceBuffer      The second memory buffer.
  @param  Length            Length of DestinationBuffer and SourceBuffer memory
                            regions to compare. Must be non-zero.

  @return 0                 All Length bytes of the two buffers are identical.
  @retval Non-zero          The first mismatched byte in SourceBuffer subtracted from the first
                            mismatched byte in DestinationBuffer.

**/
INTN
EFIAPI
InternalMemCompareMemZ (
  IN      CONST VOID                *DestinationBuffer,
  IN      CONST VOID                *SourceBuffer,
  IN      UINTN                     Length
  )
{
  while ((--Length != 0) &&
         (*(INT8*)DestinationBuffer == *(INT8*)SourceBuffer)) {
    DestinationBuffer = (INT8*)DestinationBuffer + 1;
    SourceBuffer = (INT8*)SourceBuffer + 1;
  }
  return (INTN)*(UINT8*)DestinationBuffer - (INTN)*(UINT8*)SourceBuffer;
}

/**
  Compares the contents of two buffers.

  This function compares Length bytes of SourceBuffer to Length bytes of DestinationBuffer.
  If all Length bytes of the two buffers are identical, then 0 is returned.  Otherwise, the
  value returned is the first mismatched byte in SourceBuffer subtracted from the first
  mismatched byte in DestinationBuffer.
  
  If Length > 0 and DestinationBuffer is NULL, then ASSERT().
  If Length > 0 and SourceBuffer is NULL, then ASSERT().
  If Length is greater than (MAX_ADDRESS - DestinationBuffer + 1), then ASSERT().
  If Length is greater than (MAX_ADDRESS - SourceBuffer + 1), then ASSERT().

  @param  DestinationBuffer A pointer to the destination buffer to compare.
  @param  SourceBuffer      A pointer to the source buffer to compare.
  @param  Length            The number of bytes to compare.

  @return 0                 All Length bytes of the two buffers are identical.
  @retval Non-zero          The first mismatched byte in SourceBuffer subtracted from the first
                            mismatched byte in DestinationBuffer.
                            
**/
INTN
EFIAPI
CompareMem (
  IN CONST VOID  *DestinationBuffer,
  IN CONST VOID  *SourceBuffer,
  IN UINTN       Length
  )
{
  if (Length == 0 || DestinationBuffer == SourceBuffer) {
    return 0;
  }

  return InternalMemCompareMemZ (DestinationBuffer, SourceBuffer, Length);
}
 
 
EFI_STATUS
UefiMain (EFI_HANDLE image, EFI_SYSTEM_TABLE *systab)
{
    EFI_STATUS status = EFI_SUCCESS;
    CHAR16 *ptr;
    CHAR8  *str;
    UINT16  Handle;
    UINTN   Index;
    UINT16  Length;
    UINT8   *Buffer;
    SMBIOS_STRUCTURE_POINTER SmbiosStruct;
 
    //InitializeLib(image, systab);
 
    status = EfiLibGetSystemConfigurationTable(&SMBIOSTableGuid, (VOID**)&mSmbiosTable);
    if ((status != EFI_SUCCESS || mSmbiosTable == NULL) ||
        (CompareMem (mSmbiosTable->AnchorString, "_SM_", 4) != 0)) {
        Print(L"ERROR: SMBIOS table not found.\n");
        return status;
    }
 
    mSmbiosStruct->Raw  = (UINT8 *) (UINTN) (mSmbiosTable->TableAddress);
 
    Print(L"SMBIOS Ver: %x.%x  Rev: %x  Table Count: %d\n",
            mSmbiosTable->MajorVersion,
            mSmbiosTable->MinorVersion,
            mSmbiosTable->EntryPointRevision,
            mSmbiosTable->NumberOfSmbiosStructures);
 
    Handle  = INVALID_HANDLE;
    LibGetSmbiosStructure (&Handle, NULL, NULL);
 
    // loop though the tables looking for a type 0 table.
    for (Index = 0; Index < mSmbiosTable->NumberOfSmbiosStructures; Index++) {
        if (Handle == INVALID_HANDLE) {
            break;
        }
        if (LibGetSmbiosStructure (&Handle, &Buffer, &Length) != DMI_SUCCESS) {
            break;
        }
        SmbiosStruct.Raw = Buffer;
        if (SmbiosStruct.Hdr->Type == 0) {     // Type 0 - BIOS
 
             /* vendor string */
             str = LibGetSmbiosString(&SmbiosStruct, 1);
             ptr = ASCII_to_UCS2(str, Strlen(str));
             Print(L"Firmware Vendor: %s\n", ptr);   
             FreePool(ptr);
                        
             /* version string */
             str = LibGetSmbiosString(&SmbiosStruct, 2);
             ptr = ASCII_to_UCS2(str, Strlen(str));
             Print(L"Firmware Version: %s\n", ptr);
             FreePool(ptr);
 
             /* release string */
             str = LibGetSmbiosString(&SmbiosStruct, 3);
             ptr = ASCII_to_UCS2(str, Strlen(str));
             Print(L"Firmware Release: %s\n", ptr);
             FreePool(ptr);
 
             break;
        }
    }
 
    return status;
}


运行结果

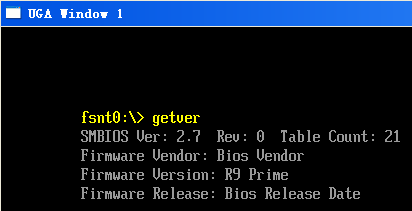
smbios

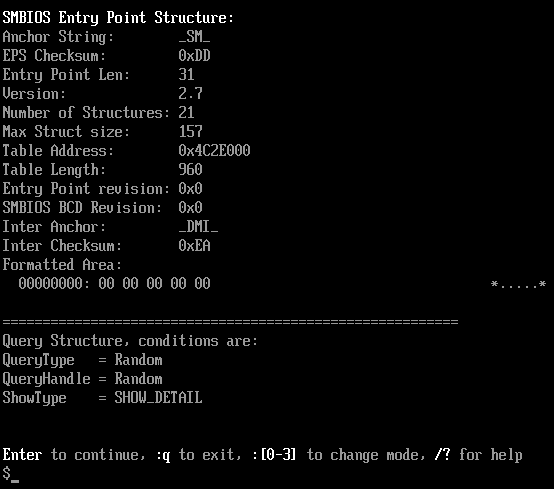
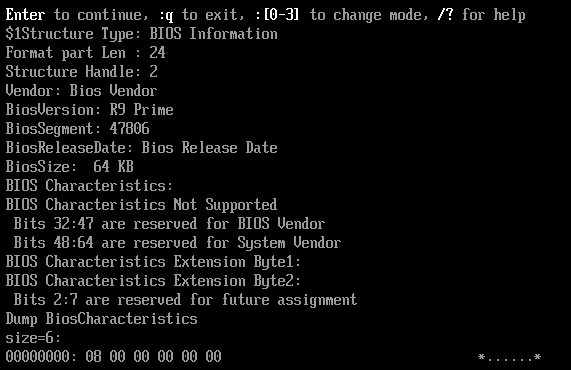
对比 SMBIOSVIEW

smbiosview

smbiosview2

可以看到二者是相同的。

代码下载
GetVer

顺便多说一点:

SMBIOS中可以获得一些硬件信息,比如当前的内存插槽信息等等。但是,因为这个是BIOS在POST过程中加入的,很可能出现错误,甚至就是忘记做这个东西(MS的软件非常不信任BIOS提供的信息,如果有可能他们宁可自己重新获取一下)。如果只是想做个参考,并且你的软件需要兼容大量的设备,从这里获得信息是完全没问题的(比如MemTest86);但是如果你期望准确一些,最好还是自己手工做一下。另外一方面,如果你使用了从SMBIOS获得信息的方法,结果在客户现场遇到了问题,不妨考虑一下是否为 SMBIOS 不正确导致的。

VirtualBox 4.3.XXXX遇到的一个问题

最近又在Virtualbox下面装 Ubuntu,在设置共享目录的时候出现了一个错误,百思不得其解。

vbe

Command: sudo mount -t vboxsf

Error:

mount: wrong fs type, bad option, bad superblock on /home/h0ward/share,
missing codepage or helper program, or other error
In some cases useful info is found in syslog – try
dmesg | tail or so

上网搜了一圈,最后看到了靠谱的解释,说是 VirtualBox 4.3.10 r93012 里面有个小错误,vboxsf的链接存在问题。【参考:http://www.puppychau.com/archives/278】

最省事的解决方法就是升级VirtualBox然后升级Ubuntu里面的VBoxGuessAdditions。然后问题就搞定了…….

Step to UEFI (29) —– ShellPrintEx

之前使用TC的时候,有一个控制光标的函数 GotoXY(int,int) 【参考1 参考2】 可以很方便的控制光标在屏幕指定的位置写字符。我在CLIB中找了一大圈也没有踪影,后来查了一下 C99 标准【参考 3】,这个并非标准函数,所以也没有实现。

翻阅代码发现 Shell下面也有一个类似的函数 ShellPrintEx。在 \ShellPkg\Include\Library\ShellLib.h 申明如下:

/**
  Print at a specific location on the screen.

  This function will move the cursor to a given screen location and print the specified string.

  If -1 is specified for either the Row or Col the current screen location for BOTH
  will be used.

  If either Row or Col is out of range for the current console, then ASSERT.
  If Format is NULL, then ASSERT.

  In addition to the standard %-based flags as supported by UefiLib Print() this supports
  the following additional flags:
    %N       -   Set output attribute to normal
    %H       -   Set output attribute to highlight
    %E       -   Set output attribute to error
    %B       -   Set output attribute to blue color
    %V       -   Set output attribute to green color

  Note: The background color is controlled by the shell command cls.

  @param[in] Col        The column to print at.
  @param[in] Row        The row to print at.
  @param[in] Format     The format string.
  @param[in] ...        The variable argument list.

  @return EFI_SUCCESS           The printing was successful.
  @return EFI_DEVICE_ERROR      The console device reported an error.
**/
EFI_STATUS
EFIAPI
ShellPrintEx(
  IN INT32                Col OPTIONAL,
  IN INT32                Row OPTIONAL,
  IN CONST CHAR16         *Format,
  ...
  );


从上面可以看出,我们可以用这个函数来控制写入的位置。同时他还扩展了几个 Format.

写个程序实验一下

#include  <Uefi.h>
#include  <Library/UefiLib.h>
#include  <Library/ShellCEntryLib.h>

#include  <stdio.h>
#include  <stdlib.h>
#include  <wchar.h>

#include <Protocol/EfiShell.h>
#include <Library/ShellLib.h>

extern EFI_BOOT_SERVICES             *gBS;
extern EFI_SYSTEM_TABLE			 	 *gST;
extern EFI_RUNTIME_SERVICES 		 *gRT;

int
EFIAPI
main (
  IN int Argc,
  IN char **Argv
  )
{
  
  //%H       -   Set output attribute to highlight.	
	ShellPrintEx(4,4,L"%H%S",L"LAB-Z [highlight]");
  //  %B       -   Set output attribute to blue color.	
	ShellPrintEx(6,6,L"%B%S",L"LAB-Z [blue color]");  
  //  %V       -   Set output attribute to green color.
	ShellPrintEx(8,8,L"%V%S",L"LAB-Z [green color]");  
  //  %N       -   Set output attribute to normal.
	ShellPrintEx(10,10,L"%N%S",L"LAB-Z [normal]");    
  //  %E       -   Set output attribute to error.	
	ShellPrintEx(12,12,L"%E%S",L"LAB-Z [error]");     
	
  return EFI_SUCCESS;
}


运行结果

29

需要特别注意的是:Error 是黄色,HightLight 是白色……..

看一下具体的实现代码,在 \ShellPkg\Library\UefiShellLib\UefiShellLib.c

EFI_STATUS
EFIAPI
ShellPrintEx(
  IN INT32                Col OPTIONAL,
  IN INT32                Row OPTIONAL,
  IN CONST CHAR16         *Format,
  ...
  )
{
  VA_LIST           Marker;
  EFI_STATUS        RetVal;
  if (Format == NULL) {
    return (EFI_INVALID_PARAMETER);
  }
  VA_START (Marker, Format);
  RetVal = InternalShellPrintWorker(Col, Row, Format, Marker);
  VA_END(Marker);
  return(RetVal);
}


调用的 InternalShellPrintWorker 也在同一个文件中

EFI_STATUS
EFIAPI
InternalShellPrintWorker(
  IN INT32                Col OPTIONAL,
  IN INT32                Row OPTIONAL,
  IN CONST CHAR16         *Format,
  IN VA_LIST              Marker
  )


其中控制写入位置的是

gST->ConOut->SetCursorPosition(gST->ConOut, gST->ConOut->Mode->CursorColumn - 1, gST->ConOut->Mode->CursorRow);


而控制写入颜色的是

        switch (*(ResumeLocation+1)) {
          case (L'N'):
            gST->ConOut->SetAttribute(gST->ConOut, OriginalAttribute);
            break;
          case (L'E'):
            gST->ConOut->SetAttribute(gST->ConOut, EFI_TEXT_ATTR(EFI_YELLOW, ((OriginalAttribute&(BIT4|BIT5|BIT6))>>4)));
            break;
          case (L'H'):
            gST->ConOut->SetAttribute(gST->ConOut, EFI_TEXT_ATTR(EFI_WHITE, ((OriginalAttribute&(BIT4|BIT5|BIT6))>>4)));
            break;
          case (L'B'):
            gST->ConOut->SetAttribute(gST->ConOut, EFI_TEXT_ATTR(EFI_BLUE, ((OriginalAttribute&(BIT4|BIT5|BIT6))>>4)));
            break;
          case (L'V'):
            gST->ConOut->SetAttribute(gST->ConOut, EFI_TEXT_ATTR(EFI_GREEN, ((OriginalAttribute&(BIT4|BIT5|BIT6))>>4)));
            break;
          default:


可以看出来,Error 是黄色,HightLight 是白色……..

完整代码下载

PrintEx

参考:

1.http://zhidao.baidu.com/link?url=gKNVf5BWdsVs8-NfWFmp_lbGXQNUAa5UISVTGyMusQgHQDedSwWA6ZydJIwRsEuMgd05OHN-4qR_iDNxSUkTb_

gotoxy(int x, int y);
包含头文件为:
#include

2.http://zhidao.baidu.com/link?url=knYo-KswVT4e3IOWvZc54LXR6Vh_hcfLBA6sLLKOMQImC4KN6pPoeF4pqg4QKO5cQk4PRe4FPydcBq5ZuVDprK

包含在conio.h TC2.0中应该是这个文件引入的

3.http://blog.csdn.net/zhenyongyuan123/article/details/5810253 C99标准库函数

Step to UEFI (28) —– Shell GetCurDir 补遗

上一篇给出了GetCurDir的方法,不过这样玩多多少少看起来让人觉得不够简洁。于是又在EDK2 ShellPkg中翻了一下,在\ShellPkg\Include\Library\ShellLib.h 中有定义 ShellGetCurrentDir 函数

/**
  Retreives the current directory path.

  If the DeviceName is NULL, it returns the current device's current directory
  name. If the DeviceName is not NULL, it returns the current directory name
  on specified drive.

  @param[in] DeviceName         The name of the file system to get directory on.

  @retval NULL                  The directory does not exist.
  @retval != NULL               The directory.
**/
CONST CHAR16*
EFIAPI
ShellGetCurrentDir (
  IN CHAR16                     * CONST DeviceName OPTIONAL
  );


看一下具体实现在 \ShellPkg\Library\UefiShellLib\UefiShellLib.c

/**
  Retreives the current directory path

  If the DeviceName is NULL, it returns the current device's current directory
  name. If the DeviceName is not NULL, it returns the current directory name
  on specified drive.

  @param DeviceName             the name of the drive to get directory on

  @retval NULL                  the directory does not exist
  @return != NULL               the directory
**/
CONST CHAR16*
EFIAPI
ShellGetCurrentDir (
  IN CHAR16                     * CONST DeviceName OPTIONAL
  )
{
  //
  // Check for UEFI Shell 2.0 protocols
  //
  if (gEfiShellProtocol != NULL) {
    return (gEfiShellProtocol->GetCurDir(DeviceName));
  }

  //
  // Check for EFI shell
  //
  if (mEfiShellEnvironment2 != NULL) {
    return (mEfiShellEnvironment2->CurDir(DeviceName));
  }

  return (NULL);
}


就是说它内部实际上是直接判断了当前哪个Protocol能用,就用对应的来实现取得当前目录的功能。于是,直接使用它就能避免我们需要特别选择 Protocol 的烦恼。尝试编写程序如下

#include  <Uefi.h>
#include  <Library/UefiLib.h>
#include  <Library/ShellCEntryLib.h>

#include  <stdio.h>
#include  <stdlib.h>
#include  <wchar.h>

#include <Protocol/EfiShell.h>
#include <Library/ShellLib.h>

extern EFI_BOOT_SERVICES             	 *gBS;
extern EFI_SYSTEM_TABLE			 *gST;
extern EFI_RUNTIME_SERVICES 		 *gRT;

extern EFI_SHELL_PROTOCOL            *gEfiShellProtocol;

int
EFIAPI
main (
  IN int Argc,
  IN char **Argv
  )
{
  CHAR16 *R=0;
  
  R=(CHAR16 *)ShellGetCurrentDir(NULL);
  
  Print(L"%s",ShellGetCurrentDir(0));
  return EFI_SUCCESS;
}


同时给出对应的 INF,如果你再编译时出现Link之类的错误,最大的可能就是头文件和INF中没有引用对应的库支持。

## @file
#   A simple, basic, application showing how the Hello application could be
#   built using the "Standard C Libraries" from StdLib.
#
#  Copyright (c) 2010 - 2011, Intel Corporation. All rights reserved.<BR>
#  This program and the accompanying materials
#  are licensed and made available under the terms and conditions of the BSD License
#  which accompanies this distribution. The full text of the license may be found at
#  http://opensource.org/licenses/bsd-license.
#
#  THE PROGRAM IS DISTRIBUTED UNDER THE BSD LICENSE ON AN "AS IS" BASIS,
#  WITHOUT WARRANTIES OR REPRESENTATIONS OF ANY KIND, EITHER EXPRESS OR IMPLIED.
##

[Defines]
  INF_VERSION                    = 0x00010006
  BASE_NAME                      = getcurdir2
  FILE_GUID                      = 4ea97c46-7491-4dfd-0028-747010f3ce5f
  MODULE_TYPE                    = UEFI_APPLICATION
  VERSION_STRING                 = 0.1
  ENTRY_POINT                    = ShellCEntryLib

#   
#  VALID_ARCHITECTURES           = IA32 X64 IPF
#

[Sources]
  GetCurDir2.c

[Packages]
  StdLib/StdLib.dec   
  MdePkg/MdePkg.dec
  ShellPkg/ShellPkg.dec 


[LibraryClasses]
  LibC
  LibStdio
  ShellCEntryLib   
  ShellLib
  
[Protocols]
	
[BuildOptions]


从功能上来说,和之前的完全一样

28

GetCurDir2

Step to UEFI (27) —– Shell GetCurDir

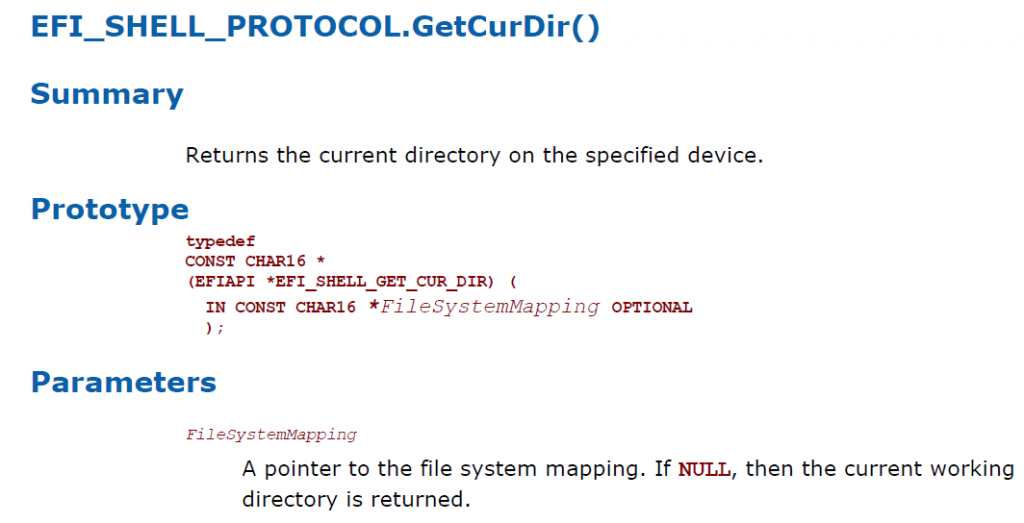
翻看 Shell Specification【参考 1】,发现上面介绍了一个Shell下取得当前目录的函数

getcurdir

看起来这个函数很简单,于是动手写程序。注意到 \ShellPkg\Library\UefiShellLib\UefiShellLib.c 中有声明,于是直接 extern EFI_SHELL_PROTOCOL *gEfiShellProtocol; 过来用。之所以能这样做,是因为这个位置是 Shell 程序在编译过程中特别加入的头,具体请参考之前的文章。

编译完成之后,进入虚拟环境实验,非常奇怪,每次运行都会出现错误提示,然后NT32就会崩溃掉。

getcurdirerror

真相到底是什么呢?一检查,gEfiShellProtocol == 0 。还要追根溯源,到定义他的地方去查看。

代码在 \ShellPkg\Library\UefiShellLib\UefiShellLib.c

为了Debug,在关键的地方添加上的一点代码,输出信息

  Status = gBS->OpenProtocol(
    ImageHandle,
    &gEfiShellParametersProtocolGuid,
    (VOID **)&gEfiShellParametersProtocol,
    ImageHandle,
    NULL,
    EFI_OPEN_PROTOCOL_GET_PROTOCOL
   );
  if (EFI_ERROR(Status)) {
    gEfiShellParametersProtocol = NULL;
  }
SystemTable->ConOut->OutputString(SystemTable->ConOut,L"TestA\n\r"); //LabZDebug
  if (gEfiShellParametersProtocol == NULL || gEfiShellProtocol == NULL) {
SystemTable->ConOut->OutputString(SystemTable->ConOut,L"TestB\n\r"); //LabZDebug
    //
    // Moved to seperate function due to complexity
    //
    Status = ShellFindSE2(ImageHandle);

    if (EFI_ERROR(Status)) {
      DEBUG((DEBUG_ERROR, "Status: 0x%08x\r\n", Status));
      mEfiShellEnvironment2 = NULL;
    }
    Status = gBS->OpenProtocol(ImageHandle,
                               &gEfiShellInterfaceGuid,
                               (VOID **)&mEfiShellInterface,
                               ImageHandle,
                               NULL,
                               EFI_OPEN_PROTOCOL_GET_PROTOCOL
                              );
    if (EFI_ERROR(Status)) {
      mEfiShellInterface = NULL;
    }
  }
if (0==gEfiShellProtocol) { 
SystemTable->ConOut->OutputString(SystemTable->ConOut,L"TestE\n\r"); //LabZDebug
  }

SystemTable->ConOut->OutputString(SystemTable->ConOut,L"TestC\n\r"); //LabZDebug


输出的结果是: TestA TestB TestE 和 TestC。 就是说这段代码尝试取 Shell Protocol 但是没有取到。再仔细看一下代码,这里没有取得到。因此,此路不通。再向下看发现初始化了EFI_SHELL_ENVIRONMENT2 *mEfiShellEnvironment2,再看了一下他的定义,在\ShellPkg\Include\Protocol\EfiShellEnvironment2.h 中

/// EFI_SHELL_ENVIRONMENT2 protocol structure.
typedef struct {
  SHELLENV_EXECUTE                        Execute;
  SHELLENV_GET_ENV                        GetEnv;
  SHELLENV_GET_MAP                        GetMap;
  SHELLENV_ADD_CMD                        AddCmd;
  SHELLENV_ADD_PROT                       AddProt;
  SHELLENV_GET_PROT                       GetProt;
  SHELLENV_CUR_DIR                        CurDir;
  SHELLENV_FILE_META_ARG                  FileMetaArg;
  SHELLENV_FREE_FILE_LIST                 FreeFileList;

  //
  // The following services are only used by the shell itself.
  //
  SHELLENV_NEW_SHELL                      NewShell;
  SHELLENV_BATCH_IS_ACTIVE                BatchIsActive;

  SHELLENV_FREE_RESOURCES                 FreeResources;

  //
  // GUID to differentiate ShellEnvironment2 from ShellEnvironment.
  //
  EFI_GUID                                SESGuid;
  //
  // Major Version grows if shell environment interface has been changes.
  //
  UINT32                                  MajorVersion;
  UINT32                                  MinorVersion;
  SHELLENV_ENABLE_PAGE_BREAK              EnablePageBreak;
  SHELLENV_DISABLE_PAGE_BREAK             DisablePageBreak;
  SHELLENV_GET_PAGE_BREAK                 GetPageBreak;

  SHELLENV_SET_KEY_FILTER                 SetKeyFilter;
  SHELLENV_GET_KEY_FILTER                 GetKeyFilter;

  SHELLENV_GET_EXECUTION_BREAK            GetExecutionBreak;
  SHELLENV_INCREMENT_SHELL_NESTING_LEVEL  IncrementShellNestingLevel;
  SHELLENV_DECREMENT_SHELL_NESTING_LEVEL  DecrementShellNestingLevel;
  SHELLENV_IS_ROOT_SHELL                  IsRootShell;

  SHELLENV_CLOSE_CONSOLE_PROXY            CloseConsoleProxy;
  HANDLE_ENUMERATOR                       HandleEnumerator;
  PROTOCOL_INFO_ENUMERATOR                ProtocolInfoEnumerator;
  GET_DEVICE_NAME                         GetDeviceName;
  GET_SHELL_MODE                          GetShellMode;
  SHELLENV_NAME_TO_PATH                   NameToPath;
  SHELLENV_GET_FS_NAME                    GetFsName;
  SHELLENV_FILE_META_ARG_NO_WILDCARD      FileMetaArgNoWildCard;
  SHELLENV_DEL_DUP_FILE                   DelDupFileArg;
  SHELLENV_GET_FS_DEVICE_PATH             GetFsDevicePath;
} EFI_SHELL_ENVIRONMENT2;

因此,尝试一下SHELLENV_CUR_DIR. 这个函数头文件也在同一个文件中

/**
  This function returns a string array containing the current directory on
  a given device.

  If DeviceName is specified, then return the current shell directory on that
  device.  If DeviceName is NULL, then return the current directory on the
  current device.  The caller us responsible to free the returned string when
  no longer required.

  @param[in] DeviceName         The name of the device to get the current
                                directory on, or NULL for current device.

  @return String array with the current directory on the current or specified device.

**/
typedef
CHAR16*
(EFIAPI *SHELLENV_CUR_DIR) (
  IN CHAR16 *DeviceName OPTIONAL
  );


最后的 C 代码如下

#include  <Uefi.h>
#include  <Library/UefiLib.h>
#include  <Library/ShellCEntryLib.h>

#include  <stdio.h>
#include  <stdlib.h>
#include  <wchar.h>

#include <Protocol/EfiShell.h>
#include <Library/ShellLib.h>

extern EFI_BOOT_SERVICES         *gBS;
extern EFI_SYSTEM_TABLE		 *gST;
extern EFI_RUNTIME_SERVICES 	 *gRT;

extern EFI_SHELL_ENVIRONMENT2        *mEfiShellEnvironment2;

/***
  Demonstrates basic workings of the main() function by displaying a
  welcoming message.

  Note that the UEFI command line is composed of 16-bit UCS2 wide characters.
  The easiest way to access the command line parameters is to cast Argv as:
      wchar_t **wArgv = (wchar_t **)Argv;

  @retval  0         The application exited normally.
  @retval  Other     An error occurred.
***/
int
EFIAPI
main (
  IN int Argc,
  IN char **Argv
  )
{
  Print(L"%s",mEfiShellEnvironment2->CurDir(0));
  return EFI_SUCCESS;
}


对应的 INF 代码如下

## @file
#   A simple, basic, application showing how the Hello application could be
#   built using the "Standard C Libraries" from StdLib.
#
#  Copyright (c) 2010 - 2011, Intel Corporation. All rights reserved.<BR>
#  This program and the accompanying materials
#  are licensed and made available under the terms and conditions of the BSD License
#  which accompanies this distribution. The full text of the license may be found at
#  http://opensource.org/licenses/bsd-license.
#
#  THE PROGRAM IS DISTRIBUTED UNDER THE BSD LICENSE ON AN "AS IS" BASIS,
#  WITHOUT WARRANTIES OR REPRESENTATIONS OF ANY KIND, EITHER EXPRESS OR IMPLIED.
##

[Defines]
  INF_VERSION                    = 0x00010006
  BASE_NAME                      = getcurdir
  FILE_GUID                      = 4ea97c46-7491-4dfd-0027-747010f3ce5f
  MODULE_TYPE                    = UEFI_APPLICATION
  VERSION_STRING                 = 0.1
  ENTRY_POINT                    = ShellCEntryLib

#   
#  VALID_ARCHITECTURES           = IA32 X64 IPF
#

[Sources]
  GetCurDir.c

[Packages]
  StdLib/StdLib.dec   
  MdePkg/MdePkg.dec
  ShellPkg/ShellPkg.dec 

[LibraryClasses]
  LibC
  LibStdio
  ShellCEntryLib   
  ShellLib

[Protocols]

[BuildOptions]


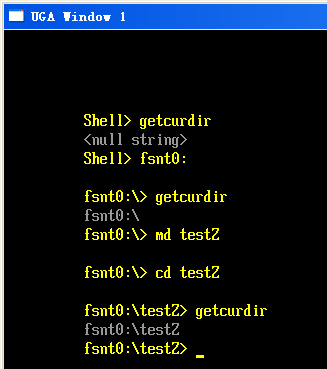
运行结果

getcurdir1


说明工作正常。

完整下载

GetCurDir

参考:

1.UEFI Shell Specification July 2, 2014 EFI_SHELL_PROTOCOL.GetCurDir() P24

Step to UEFI (25) —– 命令行参数为什么是Unicode

之前的文章【参考1】,提出了一个问题:为什么 CLIB 下面收到的参数 IN char **Argv 实际上是一个 Unicode ?

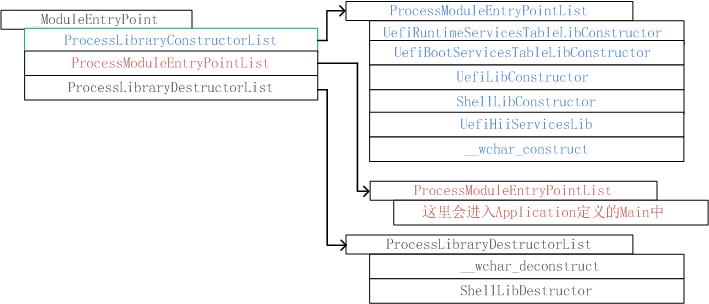
为了回答这个问题,还要在代码中寻找答案。同样,追踪一下当我们使用 CLIB 的时候,编译过程中程序被添加了什么。分析方法和之前的类似,我们最终得到下面这个结果:

_ModuleEntryPoint:\MdePkg\Library\UefiApplicationEntryPoint\ApplicationEntryPoint.c 入口还是他

框架没变

ProcessLibraryConstructorList (1)
ProcessModuleEntryPointList (2)
ProcessLibraryDestructorList (3)

(1) ProcessLibraryConstructorList:\Build\AppPkg\DEBUG_VS2008\IA32\AppPkg\Applications\ArgTest\ArgTest\DEBUG\AutoGen.c

  Status = UefiRuntimeServicesTableLibConstructor (ImageHandle, SystemTable);  (1.1)
  Status = UefiBootServicesTableLibConstructor (ImageHandle, SystemTable);(1.2)
  Status = UefiLibConstructor (ImageHandle, SystemTable);	(1.3)
  Status = ShellLibConstructor (ImageHandle, SystemTable);	(1.4)
  Status = UefiHiiServicesLibConstructor (ImageHandle, SystemTable); 	(1.5)
  Status = __wchar_construct (ImageHandle, SystemTable);	(1.6)


(1.1) UefiRuntimeServicesTableLibConstructor :\MdePkg\Library\UefiRuntimeServicesTableLib\UefiRuntimeServicesTableLib.c

(1.2) UefiBootServicesTableLibConstructor :\MdePkg\Library\UefiBootServicesTableLib\UefiBootServicesTableLib.c

(1.3) UefiLibConstructor :\MdePkg\Library\UefiLib\UefiLib.c

(1.4) ShellLibConstructor :\ShellPkg\Library\UefiShellLib\UefiShellLib.c

ShellLibConstructorWorker //加载一些 Shell Protocol

(1.5) UefiHiiServicesLibConstructor :\MdeModulePkg\Library\UefiHiiServicesLib\UefiHiiServicesLib.c

(1.6) __wchar_construct :\StdLib\LibC\Wchar\ConsDecons.c

(2) ProcessModuleEntryPointList :\Build\AppPkg\DEBUG_VS2008\IA32\AppPkg\Applications\ArgTest\ArgTest\DEBUG\AutoGen.c

	return ShellCEntryLib (ImageHandle, SystemTable); (2.1)


(2.1) ShellCEntryLib : \ShellPkg\Library\UefiShellCEntryLib\UefiShellCEntryLib.c

ReturnFromMain = ShellAppMain (
                       EfiShellParametersProtocol->Argc,
                       EfiShellParametersProtocol->Argv
                      );  


(2.1.1) ShellAppMain : \StdLib\LibC\Main\Main.c

	ExitVal = (INTN)main( (int)Argc, (wchar_t **)Argv);


对照 map 文件可以看到这个main就是我们写的 ArgTest中的Main

0001:000007d0 _ShellGetEnvironmentVariable 00000a50 f UefiShellLib:UefiShellLib.obj
0001:000007eb _ShellIsFile 00000a6b f UefiShellLib:UefiShellLib.obj
0001:00000830 _UefiHiiServicesLibConstructor 00000ab0 f UefiHiiServicesLib:UefiHiiServicesLib.obj
0001:000008a8 _main 00000b28 f ArgTest:ArgTest.obj
0001:00000962 _GetPerformanceCounter 00000be2 f BaseTimerLibNullTemplate:TimerLibNull.obj
0001:00000967 _GetPerformanceCounterProperties 00000be7 f BaseTimerLibNullTemplate:TimerLibNull.obj

(3) ProcessLibraryDestructorList :\Build\AppPkg\DEBUG_VS2008\IA32\AppPkg\Applications\ArgTest\ArgTest\DEBUG\AutoGen.c

	  Status = __wchar_deconstruct (ImageHandle, SystemTable); (3.1)
	  Status = ShellLibDestructor (ImageHandle, SystemTable);  (3.2)


(3.1) __wchar_deconstruct :\StdLib\LibC\Wchar\ConsDecons.c
(3.2) ShellLibDestructor :\ShellPkg\Library\UefiShellLib\UefiShellLib.c

上面的调用关系可以用下面的图来简单总结一下

UEFICLIBAPP

====================================分割线====================================

我们在运行期确定是下面的代码来取得参数的

    //
    // try to get shell 1.0 interface instead.
    //
    Status = SystemTable->BootServices->OpenProtocol(ImageHandle,
                               &gEfiShellInterfaceGuid,
                               (VOID **)&EfiShellInterface,
                               ImageHandle,
                               NULL,
                               EFI_OPEN_PROTOCOL_GET_PROTOCOL
                              );
    if (!EFI_ERROR(Status)) {
      //
      // use shell 1.0 interface
      //
      ReturnFromMain = ShellAppMain (
                         EfiShellInterface->Argc,
                         EfiShellInterface->Argv
                        );
    } else {
      ASSERT(FALSE);
    }


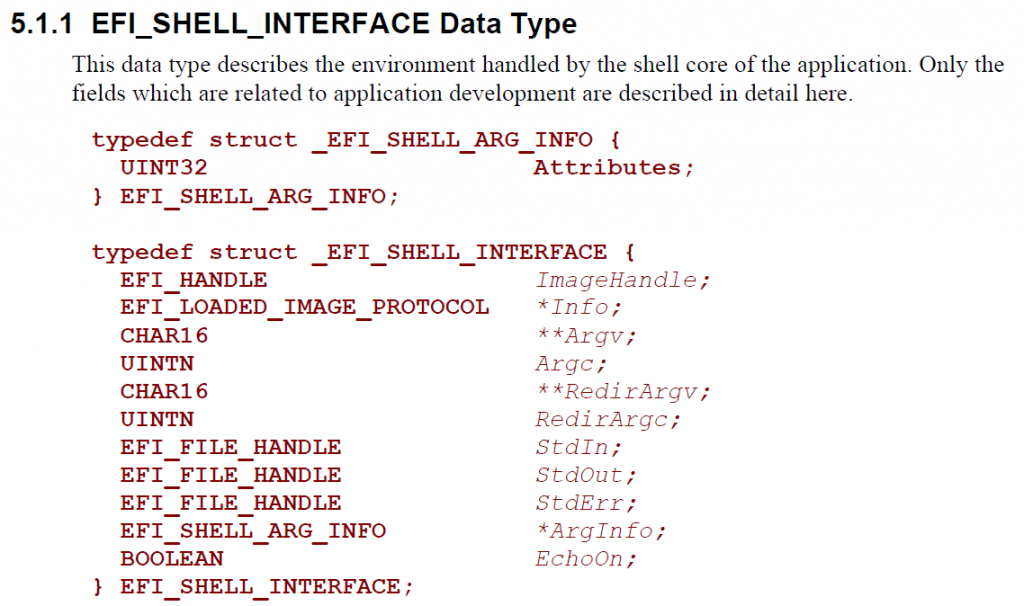
对于这个EfiShellInterface ,我们可以在 《EFI Shell Developer’s Guide》 找到。

25

因此,可以看到,取出来的Argc就是CHAR16.

参考:

1.http://www.lab-z.com/step-to-uefi-15%EF%BC%89-%E5%91%BD%E4%BB%A4%E8%A1%8C%E5%8F%82%E6%95%B0-again/

Step to UEFI (24) —– Print的换行问题

前面一篇介绍了 ConOut 的换行,然后问题就来了:为什么 Print 的String不需要 \n \r 呢?

这里继续分析:

首先看一下ClsTest.map

 0001:0000006d       _DebugAssert               000002cd f   BaseDebugLibNull:DebugLib.obj
 0001:0000006e       _DebugAssertEnabled        000002ce f   BaseDebugLibNull:DebugLib.obj
 0001:00000071       _InternalPrint             000002d1 f   UefiLib:UefiLibPrint.obj
 0001:000000b1       _Print                     00000311 f   UefiLib:UefiLibPrint.obj
 0001:000000cc       _InternalAllocatePool      0000032c f   UefiMemoryAllocationLib:MemoryAllocationLib.obj
 0001:000000f3       _UnicodeVSPrint            00000353 f   BasePrintLib:PrintLib.obj
 0001:00000112       _BasePrintLibFillBuffer    00000372 f   BasePrintLib:PrintLibInternal.obj

就是说 Print 是来自 UefiLibPrint.Obj,接下来搜索 UefiLibPrint 能找到2个,用实验的方法确定我们需要的是在 \MdePkg\Library\UefiLib\UefiLibPrint.c

INTN
EFIAPI
Print (
  IN CONST CHAR16  *Format,
  ...
  )
{
  VA_LIST Marker;
  UINTN   Return;

  VA_START (Marker, Format);

  Return = InternalPrint (Format, gST->ConOut, Marker);

  VA_END (Marker);

  return Return;
}

继续追 InternalPrint 发现它调用下面的语句

Return = UnicodeVSPrint (Buffer, BufferSize, Format, Marker);

而这个函数在 \MdePkg\Library\BasePrintLib\PrintLib.c 中

UINTN
EFIAPI
UnicodeVSPrint (
  OUT CHAR16        *StartOfBuffer,
  IN  UINTN         BufferSize,
  IN  CONST CHAR16  *FormatString,
  IN  VA_LIST       Marker
  )
{

  ASSERT_UNICODE_BUFFER (StartOfBuffer);
  ASSERT_UNICODE_BUFFER (FormatString);
  return BasePrintLibSPrintMarker ((CHAR8 *)StartOfBuffer, BufferSize >> 1, FORMAT_UNICODE | OUTPUT_UNICODE, (CHAR8 *)FormatString, Marker, NULL);
}

继续追踪 BasePrintLibSPrintMarker 发现他在 \MdePkg\Library\BasePrintLib\PrintLibInternal.c

其中有一个程序段,如下

    case '\r':
      Format += BytesPerFormatCharacter;
      FormatCharacter = ((*Format & 0xff) | (*(Format + 1) << 8)) & FormatMask;
      if (FormatCharacter == '\n') {
        //
        // Translate '\r\n' to '\r\n'
        //
        ArgumentString = "\r\n";
      } else {
        //
        // Translate '\r' to '\r'
        //
        ArgumentString = "\r";
        Format   -= BytesPerFormatCharacter;
      }
      break;

    case '\n':
      //
      // Translate '\n' to '\r\n' and '\n\r' to '\r\n'
      //
      ArgumentString = "\r\n";
      Format += BytesPerFormatCharacter;
      FormatCharacter = ((*Format & 0xff) | (*(Format + 1) << 8)) & FormatMask;
      if (FormatCharacter != '\r') {
        Format   -= BytesPerFormatCharacter;
      }
      break;

就是说,实际上他在检查字符串是否有 \n 和 \r如果有,那么用 \n \r 替换之(文件中有2处干这个事情的,第一个是在分析 “%”,第二个才是我们想要的)。为了验证,我们将上面这段替换的代码删除,重新编译,运行结果如下:

24

上面一次运行结果是修改之前,下面是修改之后。可以看到,当我们去掉那段自己添加 \n \r做结尾的代码之后,同样会出现只换行不移动到行首的问题。

结论:Print 之所以 \n 直接就能换行移动到行首,是因为他代码中有特殊处理。

Step to UEFI (23) —– ConOut ->OutputString 的换行问题

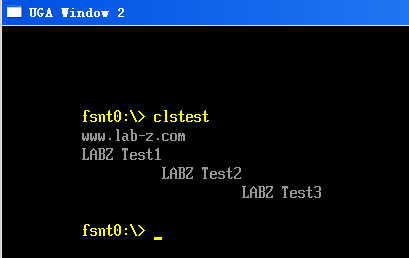
前面的一篇文章遇到了奇怪的问题,字符串输出看起来很不规整。于是研究一下为什么。

首先,试试 Application 是否也会有这样的显示问题,修改程序如下

#include <Uefi.h>
#include <Library/UefiLib.h>
#include <Library/ShellLib.h>
#include <Library/UefiApplicationEntryPoint.h>

extern EFI_BOOT_SERVICES             	 *gBS;
extern EFI_SYSTEM_TABLE			 *gST;
extern EFI_RUNTIME_SERVICES 		 *gRT;

//
// Entry point function 
//
EFI_STATUS
UefiMain (
  IN EFI_HANDLE        ImageHandle,
  IN EFI_SYSTEM_TABLE  *SystemTable
  )
{
  Print(L"www.lab-z.com\n");
  gST->ConOut->OutputString(gST->ConOut,L"LABZ Test1\n");
  gST->ConOut->OutputString(gST->ConOut,L"LABZ Test2\n");
  gST->ConOut->OutputString(gST->ConOut,L"LABZ Test3\n");  
 
  return EFI_SUCCESS;
}


我们看到有同样的现象。

23a
为了查看汇编级别的程序,我们可以在 ClsTest.inf 加入下面的代码

[BuildOptions]
  MSFT:*_*_IA32_CC_FLAGS  = /Oi- /FAcs


真正有效的成分是 /FAcs,这让编译器在编译过程中生成C语言和汇编代码对应的中间文件。

再次编译之后我们可以在 \Build\AppPkg\DEBUG_VS2008\IA32\AppPkg\Applications\ClsTest\ClsTest 找到 ClsTest.cod

文件。这就是我们想要的。它的内容如下:

; Listing generated by Microsoft (R) Optimizing Compiler Version 15.00.30729.01 

	TITLE	c:\edk2\AppPkg\Applications\ClsTest\ClsTest.c
	.686P
	.XMM
	include listing.inc
	.model	flat

INCLUDELIB OLDNAMES

PUBLIC	??_C@_1BO@BCGMLOBC@?$AAw?$AAw?$AAw?$AA?4?$AAl?$AAa?$AAb?$AA?9?$AAz?$AA?4?$AAc?$AAo?$AAm?$AA?6?$AA?$AA@ ; `string'
PUBLIC	??_C@_1BI@GJIEKEJP@?$AAL?$AAA?$AAB?$AAZ?$AA?5?$AAT?$AAe?$AAs?$AAt?$AA1?$AA?6?$AA?$AA@ ; `string'
PUBLIC	??_C@_1BI@OPBANGDB@?$AAL?$AAA?$AAB?$AAZ?$AA?5?$AAT?$AAe?$AAs?$AAt?$AA2?$AA?6?$AA?$AA@ ; `string'
PUBLIC	??_C@_1BI@CEEMAFJE@?$AAL?$AAA?$AAB?$AAZ?$AA?5?$AAT?$AAe?$AAs?$AAt?$AA3?$AA?6?$AA?$AA@ ; `string'
;	COMDAT ??_C@_1BI@CEEMAFJE@?$AAL?$AAA?$AAB?$AAZ?$AA?5?$AAT?$AAe?$AAs?$AAt?$AA3?$AA?6?$AA?$AA@
CONST	SEGMENT
??_C@_1BI@CEEMAFJE@?$AAL?$AAA?$AAB?$AAZ?$AA?5?$AAT?$AAe?$AAs?$AAt?$AA3?$AA?6?$AA?$AA@ DB 'L'
	DB	00H, 'A', 00H, 'B', 00H, 'Z', 00H, ' ', 00H, 'T', 00H, 'e', 00H
	DB	's', 00H, 't', 00H, '3', 00H, 0aH, 00H, 00H, 00H ; `string'
CONST	ENDS
;	COMDAT ??_C@_1BI@OPBANGDB@?$AAL?$AAA?$AAB?$AAZ?$AA?5?$AAT?$AAe?$AAs?$AAt?$AA2?$AA?6?$AA?$AA@
CONST	SEGMENT
??_C@_1BI@OPBANGDB@?$AAL?$AAA?$AAB?$AAZ?$AA?5?$AAT?$AAe?$AAs?$AAt?$AA2?$AA?6?$AA?$AA@ DB 'L'
	DB	00H, 'A', 00H, 'B', 00H, 'Z', 00H, ' ', 00H, 'T', 00H, 'e', 00H
	DB	's', 00H, 't', 00H, '2', 00H, 0aH, 00H, 00H, 00H ; `string'
CONST	ENDS
;	COMDAT ??_C@_1BI@GJIEKEJP@?$AAL?$AAA?$AAB?$AAZ?$AA?5?$AAT?$AAe?$AAs?$AAt?$AA1?$AA?6?$AA?$AA@
CONST	SEGMENT
??_C@_1BI@GJIEKEJP@?$AAL?$AAA?$AAB?$AAZ?$AA?5?$AAT?$AAe?$AAs?$AAt?$AA1?$AA?6?$AA?$AA@ DB 'L'
	DB	00H, 'A', 00H, 'B', 00H, 'Z', 00H, ' ', 00H, 'T', 00H, 'e', 00H
	DB	's', 00H, 't', 00H, '1', 00H, 0aH, 00H, 00H, 00H ; `string'
CONST	ENDS
;	COMDAT ??_C@_1BO@BCGMLOBC@?$AAw?$AAw?$AAw?$AA?4?$AAl?$AAa?$AAb?$AA?9?$AAz?$AA?4?$AAc?$AAo?$AAm?$AA?6?$AA?$AA@
CONST	SEGMENT
??_C@_1BO@BCGMLOBC@?$AAw?$AAw?$AAw?$AA?4?$AAl?$AAa?$AAb?$AA?9?$AAz?$AA?4?$AAc?$AAo?$AAm?$AA?6?$AA?$AA@ DB 'w'
	DB	00H, 'w', 00H, 'w', 00H, '.', 00H, 'l', 00H, 'a', 00H, 'b', 00H
	DB	'-', 00H, 'z', 00H, '.', 00H, 'c', 00H, 'o', 00H, 'm', 00H, 0aH
	DB	00H, 00H, 00H				; `string'
PUBLIC	_UefiMain
; Function compile flags: /Ogspy
; File c:\edk2\apppkg\applications\clstest\clstest.c
;	COMDAT _UefiMain
_TEXT	SEGMENT
_UefiMain PROC						; COMDAT

; 22   :   Print(L"www.lab-z.com\n");

  00000	68 00 00 00 00	 push	 OFFSET ??_C@_1BO@BCGMLOBC@?$AAw?$AAw?$AAw?$AA?4?$AAl?$AAa?$AAb?$AA?9?$AAz?$AA?4?$AAc?$AAo?$AAm?$AA?6?$AA?$AA@
  00005	e8 00 00 00 00	 call	 _Print

; 23   :   gST->ConOut->OutputString(gST->ConOut,L"LABZ Test1\n");

  0000a	a1 00 00 00 00	 mov	 eax, DWORD PTR _gST
  0000f	8b 40 2c	 mov	 eax, DWORD PTR [eax+44]
  00012	c7 04 24 00 00
	00 00		 mov	 DWORD PTR [esp], OFFSET ??_C@_1BI@GJIEKEJP@?$AAL?$AAA?$AAB?$AAZ?$AA?5?$AAT?$AAe?$AAs?$AAt?$AA1?$AA?6?$AA?$AA@
  00019	50		 push	 eax
  0001a	ff 50 04	 call	 DWORD PTR [eax+4]

; 24   :   gST->ConOut->OutputString(gST->ConOut,L"LABZ Test2\n");

  0001d	a1 00 00 00 00	 mov	 eax, DWORD PTR _gST
  00022	8b 40 2c	 mov	 eax, DWORD PTR [eax+44]
  00025	68 00 00 00 00	 push	 OFFSET ??_C@_1BI@OPBANGDB@?$AAL?$AAA?$AAB?$AAZ?$AA?5?$AAT?$AAe?$AAs?$AAt?$AA2?$AA?6?$AA?$AA@
  0002a	50		 push	 eax
  0002b	ff 50 04	 call	 DWORD PTR [eax+4]

; 25   :   gST->ConOut->OutputString(gST->ConOut,L"LABZ Test3\n");  

  0002e	a1 00 00 00 00	 mov	 eax, DWORD PTR _gST
  00033	8b 40 2c	 mov	 eax, DWORD PTR [eax+44]
  00036	68 00 00 00 00	 push	 OFFSET ??_C@_1BI@CEEMAFJE@?$AAL?$AAA?$AAB?$AAZ?$AA?5?$AAT?$AAe?$AAs?$AAt?$AA3?$AA?6?$AA?$AA@
  0003b	50		 push	 eax
  0003c	ff 50 04	 call	 DWORD PTR [eax+4]
  0003f	83 c4 18	 add	 esp, 24			; 00000018H

; 26   :   
; 27   :   return EFI_SUCCESS;

  00042	33 c0		 xor	 eax, eax

; 28   : }

  00044	c3		 ret	 0
_UefiMain ENDP
END


特别注意到,编译后,我们定义的字符串汇编写成下面这样形式的Unicode字符串

CONST	SEGMENT
??_C@_1BI@CEEMAFJE@?$AAL?$AAA?$AAB?$AAZ?$AA?5?$AAT?$AAe?$AAs?$AAt?$AA3?$AA?6?$AA?$AA@ DB 'L'
	DB	00H, 'A', 00H, 'B', 00H, 'Z', 00H, ' ', 00H, 'T', 00H, 'e', 00H
	DB	's', 00H, 't', 00H, '3', 00H, 0aH, 00H, 00H, 00H ; `string'
CONST	ENDS


可以看到上面只有 0ah 这是换行的意思,并没有“换行然后切换到下行行首”的意思。

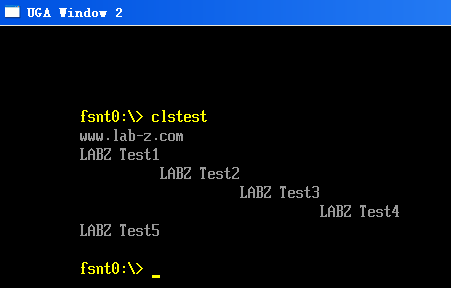
找到原因,我们可以加上切换到行首,就是下面这个样子

  gST->ConOut->OutputString(gST->ConOut,L"LABZ Test4\n\r");    
  gST->ConOut->OutputString(gST->ConOut,L"LABZ Test5\n\r");   


再编译查看生成的 COD 文件

CONST	SEGMENT
??_C@_1BK@FBECEOIH@?$AAL?$AAA?$AAB?$AAZ?$AA?5?$AAT?$AAe?$AAs?$AAt?$AA5?$AA?6?$AA?$AN?$AA?$AA@ DB 'L'
	DB	00H, 'A', 00H, 'B', 00H, 'Z', 00H, ' ', 00H, 'T', 00H, 'e', 00H
	DB	's', 00H, 't', 00H, '5', 00H, 0aH, 00H, 0dH, 00H, 00H, 00H ; `string'
CONST	ENDS
;	COMDAT ??_C@_1BK@JNOIEOBJ@?$AAL?$AAA?$AAB?$AAZ?$AA?5?$AAT?$AAe?$AAs?$AAt?$AA4?$AA?6?$AA?$AN?$AA?$AA@
CONST	SEGMENT
??_C@_1BK@JNOIEOBJ@?$AAL?$AAA?$AAB?$AAZ?$AA?5?$AAT?$AAe?$AAs?$AAt?$AA4?$AA?6?$AA?$AN?$AA?$AA@ DB 'L'
	DB	00H, 'A', 00H, 'B', 00H, 'Z', 00H, ' ', 00H, 'T', 00H, 'e', 00H
	DB	's', 00H, 't', 00H, '4', 00H, 0aH, 00H, 0dH, 00H, 00H, 00H ; `string'
CONST	ENDS
;	COMDAT ??_C@_1BI@CEEMAFJE@?$AAL?$AAA?$AAB?$AAZ?$AA?5?$AAT?$AAe?$AAs?$AAt?$AA3?$AA?6?$AA?$AA@
CONST	SEGMENT
??_C@_1BI@CEEMAFJE@?$AAL?$AAA?$AAB?$AAZ?$AA?5?$AAT?$AAe?$AAs?$AAt?$AA3?$AA?6?$AA?$AA@ DB 'L'
	DB	00H, 'A', 00H, 'B', 00H, 'Z', 00H, ' ', 00H, 'T', 00H, 'e', 00H
	DB	's', 00H, 't', 00H, '3', 00H, 0aH, 00H, 00H, 00H ; `string'
CONST	ENDS
;	COMDAT ??_C@_1BI@OPBANGDB@?$AAL?$AAA?$AAB?$AAZ?$AA?5?$AAT?$AAe?$AAs?$AAt?$AA2?$AA?6?$AA?$AA@
CONST	SEGMENT
??_C@_1BI@OPBANGDB@?$AAL?$AAA?$AAB?$AAZ?$AA?5?$AAT?$AAe?$AAs?$AAt?$AA2?$AA?6?$AA?$AA@ DB 'L'
	DB	00H, 'A', 00H, 'B', 00H, 'Z', 00H, ' ', 00H, 'T', 00H, 'e', 00H
	DB	's', 00H, 't', 00H, '2', 00H, 0aH, 00H, 00H, 00H ; `string'
CONST	ENDS
;	COMDAT ??_C@_1BI@GJIEKEJP@?$AAL?$AAA?$AAB?$AAZ?$AA?5?$AAT?$AAe?$AAs?$AAt?$AA1?$AA?6?$AA?$AA@
CONST	SEGMENT
??_C@_1BI@GJIEKEJP@?$AAL?$AAA?$AAB?$AAZ?$AA?5?$AAT?$AAe?$AAs?$AAt?$AA1?$AA?6?$AA?$AA@ DB 'L'
	DB	00H, 'A', 00H, 'B', 00H, 'Z', 00H, ' ', 00H, 'T', 00H, 'e', 00H
	DB	's', 00H, 't', 00H, '1', 00H, 0aH, 00H, 00H, 00H ; `string'
CONST	ENDS
;	COMDAT ??_C@_1BO@BCGMLOBC@?$AAw?$AAw?$AAw?$AA?4?$AAl?$AAa?$AAb?$AA?9?$AAz?$AA?4?$AAc?$AAo?$AAm?$AA?6?$AA?$AA@
CONST	SEGMENT
??_C@_1BO@BCGMLOBC@?$AAw?$AAw?$AAw?$AA?4?$AAl?$AAa?$AAb?$AA?9?$AAz?$AA?4?$AAc?$AAo?$AAm?$AA?6?$AA?$AA@ DB 'w'
	DB	00H, 'w', 00H, 'w', 00H, '.', 00H, 'l', 00H, 'a', 00H, 'b', 00H
	DB	'-', 00H, 'z', 00H, '.', 00H, 'c', 00H, 'o', 00H, 'm', 00H, 0aH
	DB	00H, 00H, 00H				; `string'


运行结果:

23b

最后,提一个问题,如果程序写成这个样子

EFI_STATUS
UefiMain (
  IN EFI_HANDLE        ImageHandle,
  IN EFI_SYSTEM_TABLE  *SystemTable
  )
{
  Print(L"www.lab-z.com\n");
  gST->ConOut->OutputString(gST->ConOut,L"LABZ Test1\r");
  gST->ConOut->OutputString(gST->ConOut,L"LABZ Test2\r");
  gST->ConOut->OutputString(gST->ConOut,L"LABZ Test3\n");  
  
  return EFI_SUCCESS;
}


输出结果应该是什么样的呢?

DHT11 测试

DHT11 是一款温度湿度传感器。具体可以看【参考1】。参考中使用的是单独的元件,而我使用的是做好的模块,因此不需要额外的电阻。

dht11

硬件方面,只有三根线,GND VCC 和OUT。 对照参考中的程序,很容易上手。

dht11r

下面的代码也是参考中的代码,只是修改了一下波特率为 9600,这样方便我们测试之后,直接打开串口监视。

#include "dht11.h"

dht11 DHT11;
#define DHT11PIN 3 //DHT11 PIN 3 连接UNO 3
 
void setup()
{
  Serial.begin(9600);
  Serial.println("DHT11 TEST PROGRAM ");
  Serial.print("LIBRARY VERSION: ");
  Serial.println(DHT11LIB_VERSION);
  Serial.println();
}
 
void loop()
{
  Serial.println("\n");
 
  int chk = DHT11.read(DHT11PIN);
 
  Serial.print("Read sensor: ");
  switch (chk)
  {
    case DHTLIB_OK: 
                Serial.println("OK"); 
                break;
    case DHTLIB_ERROR_CHECKSUM: 
                Serial.println("Checksum error"); 
                break;
    case DHTLIB_ERROR_TIMEOUT: 
                Serial.println("Time out error"); 
                break;
    default: 
                Serial.println("Unknown error"); 
                break;
  }
  Serial.print("Humidity (%): ");
  Serial.println((float)DHT11.humidity, 2);
  Serial.print("Temperature (oC): ");
  Serial.println((float)DHT11.temperature-2, 2);
  delay(2000);
}


简单测试一下,对着传感器吹一口气,数值会有变化

dht11test

完整代码下载

DHT11Test
参考:

1.http://www.geek-workshop.com/forum.php?mod=viewthread&tid=997&extra=&highlight=dht11&page=1 DHT11 测试