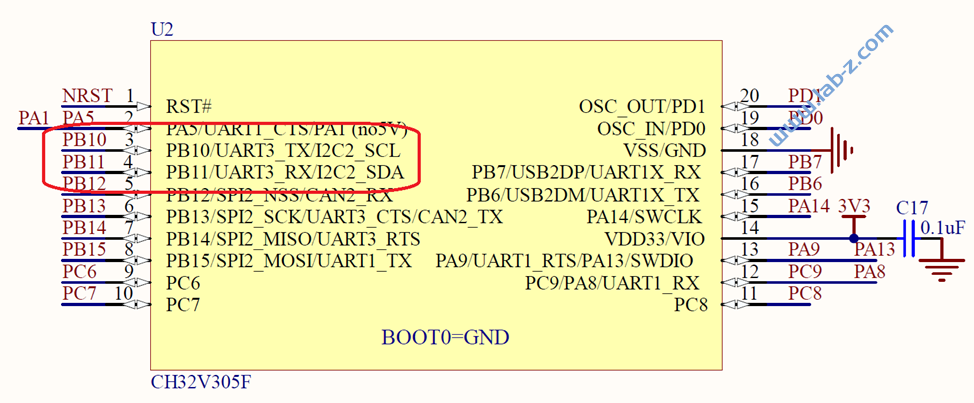
根据 Ch32V307 的 “USART_Printf:串口打印调试例程” 修改而来。对于Ch32V305来说,UART3 在电路图如下位置:
Arduino 代码如下:
void zUSART_Printf_Init(uint32_t baudrate)
{
    GPIO_InitTypeDef  GPIO_InitStructure;
    USART_InitTypeDef USART_InitStructure;

    RCC_APB1PeriphClockCmd(RCC_APB1Periph_USART3, ENABLE);
    RCC_APB2PeriphClockCmd(RCC_APB2Periph_GPIOB, ENABLE);

    GPIO_InitStructure.GPIO_Pin = GPIO_Pin_10;
    GPIO_InitStructure.GPIO_Speed = GPIO_Speed_50MHz;
    GPIO_InitStructure.GPIO_Mode = GPIO_Mode_AF_PP;
    GPIO_Init(GPIOB, &GPIO_InitStructure);

    USART_InitStructure.USART_BaudRate = baudrate;
    USART_InitStructure.USART_WordLength = USART_WordLength_8b;
    USART_InitStructure.USART_StopBits = USART_StopBits_1;
    USART_InitStructure.USART_Parity = USART_Parity_No;
    USART_InitStructure.USART_HardwareFlowControl = USART_HardwareFlowControl_None;
    USART_InitStructure.USART_Mode = USART_Mode_Tx;

    USART_Init(USART3, &USART_InitStructure);
    USART_Cmd(USART3, ENABLE);

}

 void OutUart(char *buf, int size)
{
    for(int i = 0; i < size; i++)
    {
        while(USART_GetFlagStatus(USART3, USART_FLAG_TC) == RESET);
        USART_SendData(USART3, *buf++);
    }
}

void setup() {
  zUSART_Printf_Init(115200);
}

void loop() {
  char sMsg[]="www.lab-z.com";
  OutUart(sMsg,sizeof(sMsg));
  delay(1000);
}
// USART3 缓冲区最大长度
#define RXBUFFER3SIZE 100
// USART3 缓冲区
u8 RxBuffer3[RXBUFFER3SIZE];
// USART3 缓冲区内数据长度
volatile u8 RxCnt3 = 0;
#ifdef __cplusplus
extern "C" {
#endif // __cplusplus
void USART2_IRQHandler(void) __attribute__((interrupt("WCH-Interrupt-fast")));
void USART3_IRQHandler(void) __attribute__((interrupt("WCH-Interrupt-fast")));
#ifdef __cplusplus
} // extern "C"
#endif // __cplusplus
/*********************************************************************
@fn USARTx_CFG
@brief Initializes the USART2 & USART3 peripheral.
@return none
*/
void USARTx_CFG(void)
{
GPIO_InitTypeDef GPIO_InitStructure = {0};
USART_InitTypeDef USART_InitStructure = {0};
NVIC_InitTypeDef NVIC_InitStructure = {0};
RCC_APB1PeriphClockCmd(RCC_APB1Periph_USART3, ENABLE);
RCC_APB2PeriphClockCmd(RCC_APB2Periph_GPIOB, ENABLE);
/* USART3 TX-->B.10 RX-->B.11 */
GPIO_InitStructure.GPIO_Pin = GPIO_Pin_10;
GPIO_InitStructure.GPIO_Speed = GPIO_Speed_50MHz;
GPIO_InitStructure.GPIO_Mode = GPIO_Mode_AF_PP;
GPIO_Init(GPIOB, &GPIO_InitStructure);
GPIO_InitStructure.GPIO_Pin = GPIO_Pin_11;
GPIO_InitStructure.GPIO_Mode = GPIO_Mode_IN_FLOATING;
GPIO_Init(GPIOB, &GPIO_InitStructure);
USART_InitStructure.USART_BaudRate = 115200;
USART_InitStructure.USART_WordLength = USART_WordLength_8b;
USART_InitStructure.USART_StopBits = USART_StopBits_1;
USART_InitStructure.USART_Parity = USART_Parity_No;
USART_InitStructure.USART_HardwareFlowControl = USART_HardwareFlowControl_None;
USART_InitStructure.USART_Mode = USART_Mode_Tx | USART_Mode_Rx;
USART_Init(USART3, &USART_InitStructure);
USART_ITConfig(USART3, USART_IT_RXNE, ENABLE);
NVIC_InitStructure.NVIC_IRQChannel = USART3_IRQn;
NVIC_InitStructure.NVIC_IRQChannelPreemptionPriority = 2;
NVIC_InitStructure.NVIC_IRQChannelSubPriority = 2;
NVIC_InitStructure.NVIC_IRQChannelCmd = ENABLE;
NVIC_Init(&NVIC_InitStructure);
USART_Cmd(USART3, ENABLE);
}
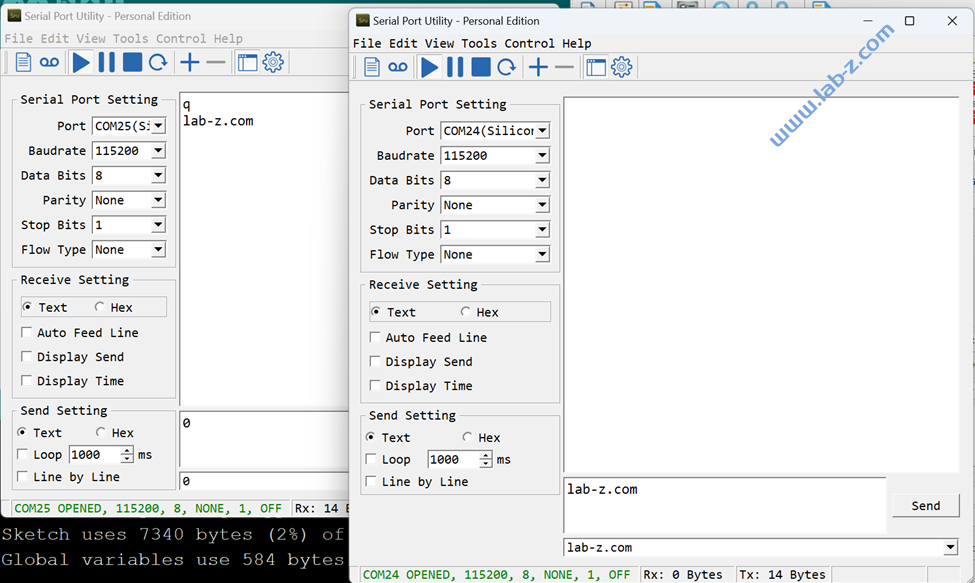
void setup() {
// 这次的测试是从 USART3 接收,然后将收到的数据从 USART1 送出
Serial.begin(115200);
Serial.println("Start");
USARTx_CFG();
Serial.println("Init Done");
}
void loop() {
if (RxCnt3!=0) {
for (int i=0;i<RxCnt3;i++) {
Serial.write(RxBuffer3[i]);
}
RxCnt3=0;
}
delay(1000);
}
/*********************************************************************
* @fn USART3_IRQHandler
*
* @brief This function handles USART3 global interrupt request.
*
* @return none
*/
void USART3_IRQHandler(void)
{
if(USART_GetITStatus(USART3, USART_IT_RXNE) != RESET)
{
RxBuffer3[RxCnt3++] = USART_ReceiveData(USART3);
}
}