互联网账号共享器(DFRobot论坛首发)

在很久之前,共享一个账号是很简单的事情,只需要告诉对方账号和密码即可。但是随着时代的发展,除了账号密码之外,登陆还需要短信验证。比如目前国内功能最强,应用最广泛的某个网盘,很多资源都可以直接在上面找到免除了搜索之苦,另外和 BT 下载相比,只要保存了资源就不用担心内容不全(试想一下,历经千辛万苦淘到的种子,始终卡在99%远比找不到资源更加抑郁)。接下来的问题就是费用,每月25元的会员费用对于下载狂魔来说并不是问题,但是对于我这样一个月只有一两次下载需求的人来说就显得不那么划算,因此如果能和同学朋友共享一个账号是最好不过的了。唯一的问题是似乎网盘考虑到了这样的场景,经常在登陆时需要通过短信进行身份验证。如果能将验证短信一同分享给同学朋友,那就不存在这样的问题了。本文就介绍如何通过将身份验证短信发送到邮箱中来解决这个问题。

首先选择合适的开发板。这里我选择的是 LilyGo 推出的的T-Call开发板,它主控是 ESP32 板载了Sim800,因此可以用它实现收发短信,拨打电话和连接互联网的功能(ESP32本身可以实现WIFI上网,SIM800可以实现运营商的GPRS通讯功能)。

LilyGo T-Call

ESP32 是通过串口和SIM800 进行通讯的:

T-Call 串口
SIM800L 串口

ESP32 的一个特点是:具有OUTPUT功能的GPIOPin 可以任意定义为其他功能。例如,通过下面的代码指定了IO26/27作为串口使用:

#define MODEM_TX            27
#define MODEM_RX            26
// ESP32 对 SIM800串口
SerialAT.begin(115200,SERIAL_8N1, MODEM_RX, MODEM_TX);


SIIM800L 是通过串口用 AT 命令和 ESP32 打交道的,为了便于测试设计如下的测试代码:

#include <Wire.h>


// Set serial for AT commands (to the module)
 
#define SerialAT  Serial1


#define MODEM_RST             5
 
#define MODEM_PWRKEY          4
 
#define MODEM_POWER_ON       23
 
#define MODEM_TX             27
 
#define MODEM_RX             26


#define I2C_SDA              21
 
#define I2C_SCL              22
 
#define LED_GPIO             13
 
#define LED_ON               HIGH
 
#define LED_OFF              LOW


#define IP5306_ADDR          0x75
 
#define IP5306_REG_SYS_CTL0  0x00


void setup() {
 
    // put your setup code here, to run once:
 
    Serial.begin(115200);


    // Set GSM module baud rate and UART pins
 
    SerialAT.begin(115200, SERIAL_8N1, MODEM_RX, MODEM_TX);
 
    delay(1000);


    #ifdef MODEM_RST
 
    // Keep reset high
 
    pinMode(MODEM_RST, OUTPUT);
 
    digitalWrite(MODEM_RST, HIGH);
 
#endif


    pinMode(MODEM_PWRKEY, OUTPUT);
 
    pinMode(MODEM_POWER_ON, OUTPUT);


    // Turn on the Modem power first
 
    digitalWrite(MODEM_POWER_ON, HIGH);


    // Pull down PWRKEY for more than 1 second according to manual requirements
 
    digitalWrite(MODEM_PWRKEY, HIGH);
 
    delay(100);
 
    digitalWrite(MODEM_PWRKEY, LOW);
 
    delay(1000);
 
    digitalWrite(MODEM_PWRKEY, HIGH);


    // Initialize the indicator as an output
 
    pinMode(LED_GPIO, OUTPUT);
 
    digitalWrite(LED_GPIO, LED_OFF);


    Serial.println("Starting......");
 
}


void loop() {
 
  if (Serial.available()) {      // If anything comes in Serial (USB),
 
    SerialAT.write(Serial.read());   // read it and send it out Serial1
 
  }


  if (SerialAT.available()) {     // If anything comes in Serial1
 
    Serial.write(SerialAT.read());   // read it and send it out Serial (USB)
 
  }
 
}

这个代码前部分是 T-Call开发板提供的初始化代码,主要是对模块 Reset 之类的,然后在 Loop 中设置了一个USB串口和 SIM800L 互传的代码,就是USB串口的内容接收后转发到SerialAT上,同样的 SerialAT 上的内容也会转发给 USB串口。
烧写之后,可以在串口监视器中和SIM800L直接通讯,这样可以方便的进行命令的测试。需要注意的是在下面一定要选择“BOTHBL&CR”,这样每次发送的数据都是使用回车和换行结尾,这样才能保证 SIM800L 识别。
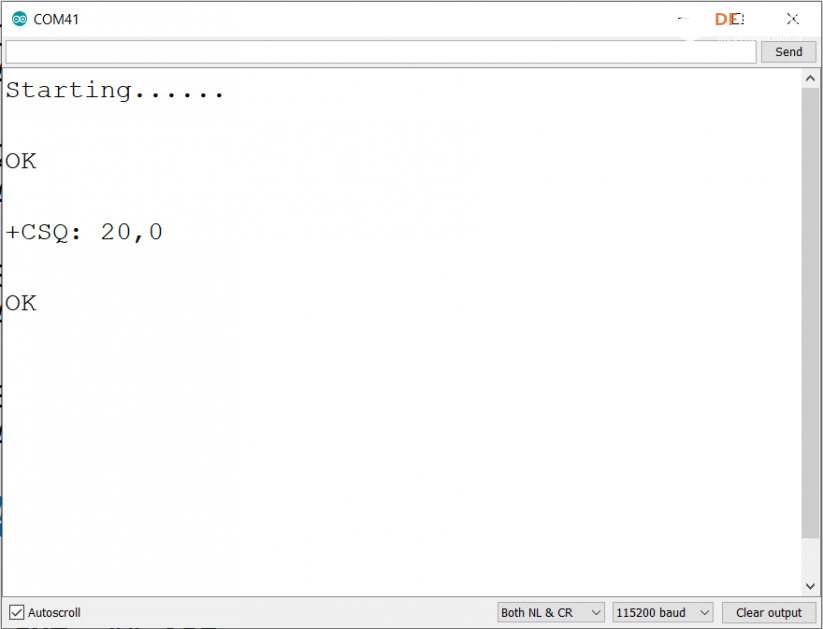
AT+CSQ 命令查询当前信号强度结果

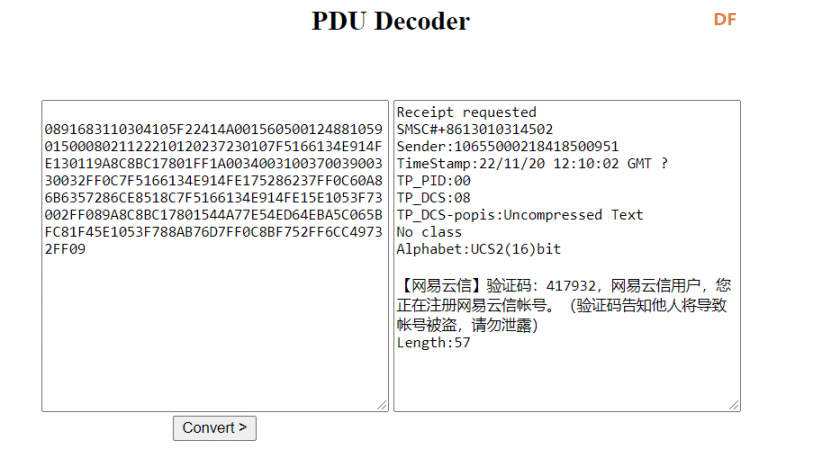
因为国内的验证码短信大多是包含中文的,所以需要使用 AT+CMGF=0命令设置为 PDU模式(与之对应的另外一种模式是 TEXT, 是纯 ASCII )。切换为 PDU 之后,收到的一个条短信示例如下:
+CMGL: 2,0,””,800891683110304105F22412A10156155931010536300008020130224352233A30104EAC4E1C30119A8C8BC178014E3A003100330038003200390035FF0C8BF757286CE8518C987597624E2D8F9351654EE55B8C62106CE8518C
有兴趣的朋友可以去研究一下 PDU 的格式,这里我们使用一个在线的工具进行解析【参考1】
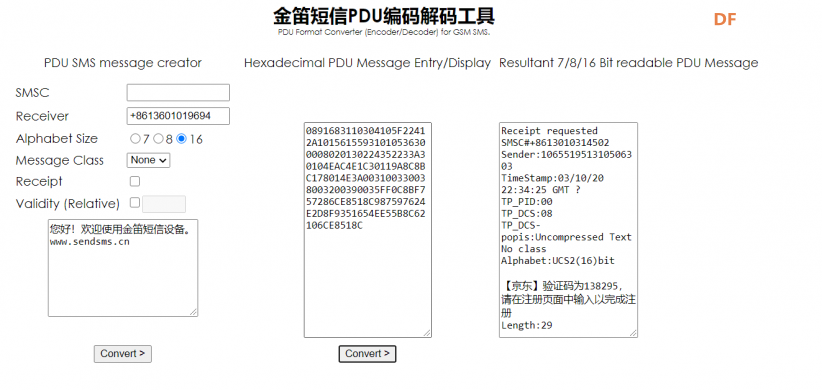
在线解析 PDU

将收到的短信内容(数字部分),填写到中间,然后使用 Convert 即可完成解析。
了解了基本原理后就可以开始着手代码编写了。代码主要分成两部分:第一部分,短信的接收。通过一个 AT 告诉 SIM800L 之后每次模块收到短信后会自动将其发送到串口,这样简化了操作,也避免因为SIM卡短信满了的情况;第二部分,通过 EMAIL 转发短信内容。这里使用 ESP32_MailClient 这个库来实现。另外因为 PDU 短信格式比较复杂,还涉及到了 Unicode 的编码问题,想 ESP32 直接解析有困难,因此,这里采用将短信内容嵌入一个解析的 HTML文件,然后按照附件发送的方法。用户收到邮件后,下载附件,打开即可看到内容(因为HTML中有需要执行的 JS 代码,邮箱系统预览附件无法看到最终结果)。
完整的代码如下:

#include <Wire.h>
 
#include "ESP32_MailClient.h"
 
#include "parta.h"
 
#include "partc.h"


// WIFI 账号和密码
 
#define WIFI_SSID "WIFINAME"
 
#define WIFI_PASSWORD "WIFIPASSWORD"


// 给 Serial1 赋予别称
 
#define SerialAT  Serial1


// 声明发送用到的对象
 
SMTPData smtpData;


// 设置短信为PDU 模式
 
String PDUModeCMD="AT+CMGF=0\n\r";
 
// 设置收到短信后直接发送给 ESP32, 不存储在 SIM卡上
 
String DirectSMSCMD="AT+CNMI=1,2,0,0,0\n\r";


#define MODEM_RST             5
 
#define MODEM_PWRKEY          4
 
#define MODEM_POWER_ON       23
 
#define MODEM_TX             27
 
#define MODEM_RX             26


#define I2C_SDA              21
 
#define I2C_SCL              22
 
#define LED_GPIO             13
 
#define LED_ON               HIGH
 
#define LED_OFF              LOW


#define IP5306_ADDR          0x75
 
#define IP5306_REG_SYS_CTL0  0x00


String SMSReady="";
 
char   c;
 
long int Elsp=-1;


void SendMail() {
 
        Serial.println("Sending email...");


        //【登录】服务器(服务器地址,端口,账号,授权码)
 
        smtpData.setLogin("smtp.163.com", 465, "SenderAddress@163.com", "SenderPassword"); 
 
        //启用【TLS】协议支持,在587端口  
 
        //smtpData.setSTARTTLS(true);
 
        //设置【发件人】
 
        smtpData.setSender("YOURNAME", "SenderAddress@163.com");
 
        //设置【优先级】(High, Normal, Low or 1 to 5 (1 is highest))
 
        smtpData.setPriority("Low");
 
        //设置【主题】
 
        smtpData.setSubject("SMS data");
 
        //设置【消息文本】(普通的文本或html)
 
        smtpData.setMessage("<div style=\"color:#ff0000;font-size:20px;\">SMS in attachment</div>", true);
 
        //添加【收件人】,可以添加多个收件人
 
        smtpData.addRecipient("Receiver@qq.com");
 
        //设置【存储类型】读取附加文件


        // put your setup code here, to run once:
 
        char *p;
 
        if ((p = (char *) malloc (PartA_html_size+SMSReady.length()+PartC_html_size)) == 0)
 
          {
 
            //out of memory
 
            Serial.println("Can't allocate memeory");
 
            smtpData.empty();
 
            return ;
 
          }
 
        for (int i=0;i<PartA_html_size;i++) {p[i]=PartA_html[i];}
 
        for (int i=0;i<SMSReady.length();i++) {p[i+PartA_html_size]=SMSReady[i];}
 
        for (int i=0;i<PartC_html_size;i++) {p[i+PartA_html_size+SMSReady.length()]=PartC_html[i];}
 
        smtpData.addAttachData("SMS.html", "image/png", (uint8_t *)p, PartA_html_size+SMSReady.length()+PartC_html_size); //从内存中
 
        //【发送】
 
        if (!MailClient.sendMail(smtpData)) {
 
        Serial.println("Error sending Email, " + MailClient.smtpErrorReason());
 
        }
 
        //【清空】缓存
 
        smtpData.empty();
 
        free(p);
 
}


void setup() {
 
    // USB 串口
 
    Serial.begin(115200);


    // ESP32 对 SIM800 串口
 
    SerialAT.begin(115200, SERIAL_8N1, MODEM_RX, MODEM_TX);


    Serial.print("Connecting to AP");


    WiFi.begin(WIFI_SSID, WIFI_PASSWORD);
 
    while (WiFi.status() != WL_CONNECTED)
 
    {
 
      Serial.print(".");
 
      delay(200);
 
    }


    Serial.println("");
 
    Serial.println("WiFi connected.");
 
    Serial.println("IP address: ");
 
    Serial.println(WiFi.localIP());
 
    Serial.println();


    #ifdef MODEM_RST
 
      // Reset 模块
 
      pinMode(MODEM_RST, OUTPUT);
 
      digitalWrite(MODEM_RST, HIGH);
 
    #endif


    pinMode(MODEM_PWRKEY, OUTPUT);
 
    pinMode(MODEM_POWER_ON, OUTPUT);


    // Turn on the Modem power first
 
    digitalWrite(MODEM_POWER_ON, HIGH);


    // Pull down PWRKEY for more than 1 second according to manual requirements
 
    digitalWrite(MODEM_PWRKEY, HIGH);
 
    delay(100);
 
    digitalWrite(MODEM_PWRKEY, LOW);
 
    delay(1000);
 
    digitalWrite(MODEM_PWRKEY, HIGH);


    // Initialize the indicator as an output
 
    pinMode(LED_GPIO, OUTPUT);
 
    digitalWrite(LED_GPIO, LED_OFF);


    Serial.println("Power on");
 
    delay(20000);
 
    Serial.println("Start");


    Serial.println("Set to PDU Mode");
 
    SerialAT.print(PDUModeCMD);
 
    delay(200);
 
    Serial.println("Direct show SMS to uart");
 
    SerialAT.print(DirectSMSCMD);
 
    delay(200);   
 
}


void loop() {
 
  if (Serial.available()) {      // If anything comes in Serial (USB),
 
    SerialAT.write(Serial.read());   // read it and send it out Serial1
 
  }


  if (SerialAT.available()) {     // If anything comes in Serial1
 
    Elsp=millis();
 
    c=SerialAT.read();
 
    SMSReady=SMSReady+c;
 
    Serial.write(c);   // read it and send it out Serial (USB)
 
  }


  if ((Elsp!=-1)&&(millis()-Elsp>500)) {
 
      Serial.print("Buffer [");
 
      Serial.print(SMSReady);
 
      Serial.println("]");
 
      if (SMSReady.indexOf("+CMT:")!=-1) {
 
            // 删除 "+CMT:" 以及他之前的字符(主要是 \n \r)
 
            SMSReady=SMSReady.substring(SMSReady.indexOf("+CMT:")+5);
 
            SMSReady=SMSReady.substring(SMSReady.indexOf('\n')+1);
 
      Serial.print("<");
 
      Serial.print(SMSReady);
 
      Serial.println(">");


            SendMail();
 
            SMSReady="";
 
            Elsp=-1;
 
        }
 
      else {SMSReady="";}
 
      Elsp=-1;
 
    }
 
}

运行结果:
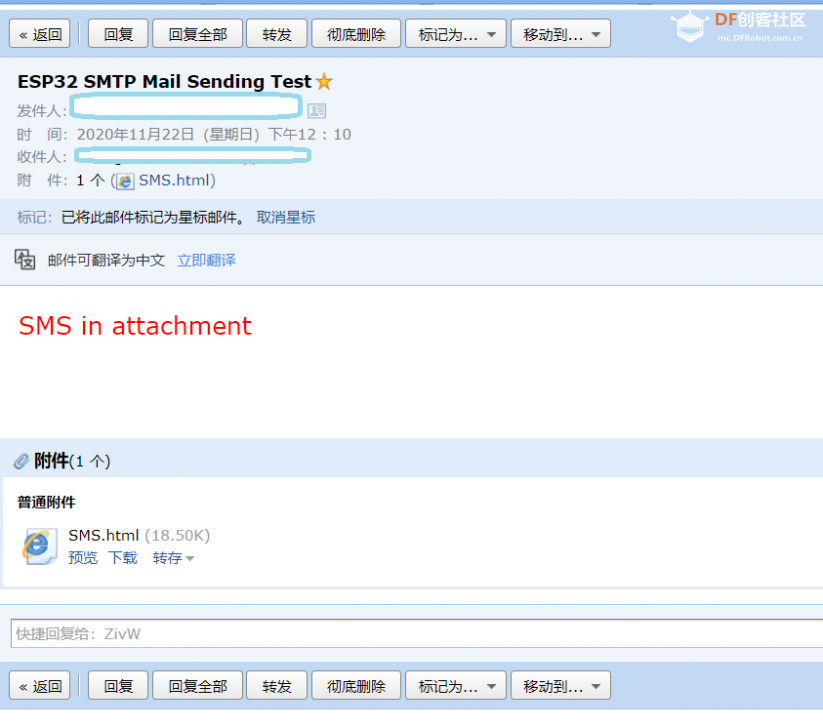
收到的邮件
打下载附件后打开即可看到结果


最后特别注意的事情还有:

1. SIM卡的选择。切勿选择物联网卡,这种卡没有短信收发和电话拨打的功能。另外,我测试了上电的联通和电信卡,前者工作正常,后者虽然在手机上显示有2G网络,但是无法正常工作;

2. 这个开发板背后的 SIM插槽比较松,我拿到第一天就干掉卡片了,好在装上去还能正常工作,所以在使用时无比小心;

3. 如果发现无法接收到短信,请检查信号强度,或者用其他手机拨打号码查看能否接通;

4. SIM800L 提供上网功能的,但是同ESP32_MailClient不兼容,所以最终还是使用 ESP32 的 WIFI 功能进行上网发送邮件;

本文首发在 DFRobot 论坛

https://mc.dfrobot.com.cn/thread-307727-1-1.html


参考:
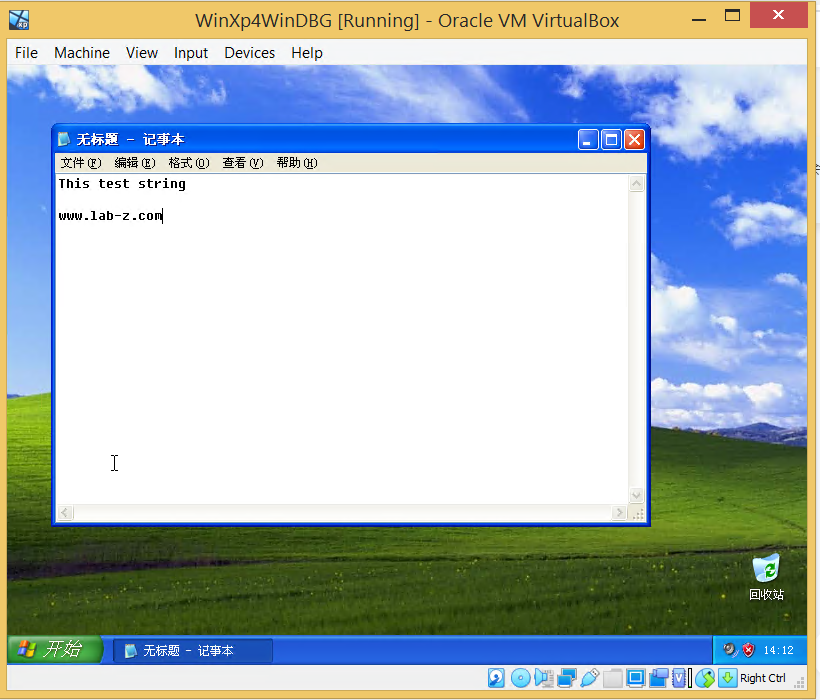
1. http://www.sendsms.cn/pdu/

WinDBG Remote 获得 Notepad内容

最近偶然看到一篇文章“windbg修改notepad内容(!pte/!dd/.process/s命令)”【参考1】,介绍使用 WinDBG Kernel Debug 的方式修改 Noetpad 中的内容。根据这篇文章进行了实验。

这次实验的目标是通过 WinDBG 修改被调试机上运行的 Notepad 中内容,实验使用 Kernel Mode 在 VirtualBox上进行。 VirtualBox 中运行的是 Windows XP SP3 (特别注意,必须使用 32位 Windows),二者是通过 PIPE方式连接的。关于他们的连接方式,网上有很多文章,特别需要注意的是:你可以使用\\.\pipe\LABZ这样的名称,但是不要使用 \\.\pipe\com1 这个名称, COMx 这样的在 Windows中表示COM设备。

Step1. 启动 VirtualBox 中的Windows,然后确定 WinDBG已经连接。之后运行这个Windows 中的 NotePad, 在其中输入一些字符。

虚拟机中运行 WindowsXP

Step2. 在 WinDBG 中停下来,另外,确保已经加载了 Symbols, 否则无法进行。使用 !process 0 0 命令列出全部进程:

!Process 0 0 列出所有进程

列出来的进程很多,我们需要的在最后:

Notepad 进程

Notepad 的页目录表在 15075000

Step3. 使用入侵式切换到 Notepad 进程,命令是 .process /i /p 8968dba0

入侵式切换

这时候会停下来,需要输入 g 继续。

输入 g ,过一会自动中断下来

再次停下时 WinDBG 已经切换到了 Notepad 的空间。

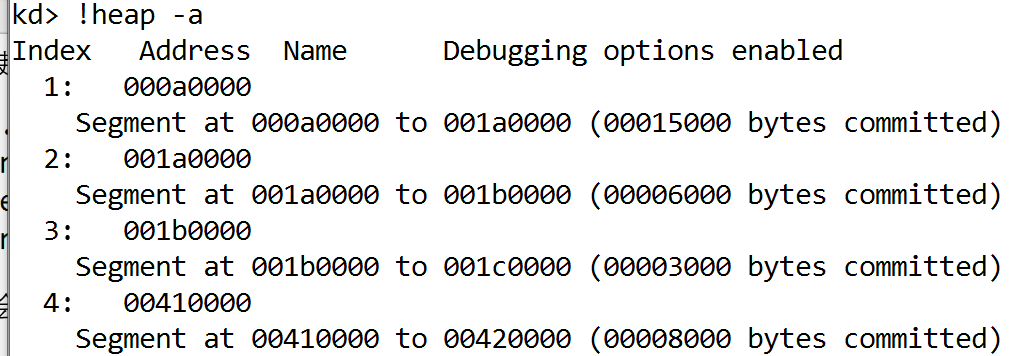
Step4. 因为猜测 NotePad 将内容信息放置在 Heap上,所以首先用 !heap -a 查看这个进程的 heap 分布:

列出 notepad 进程的 heap

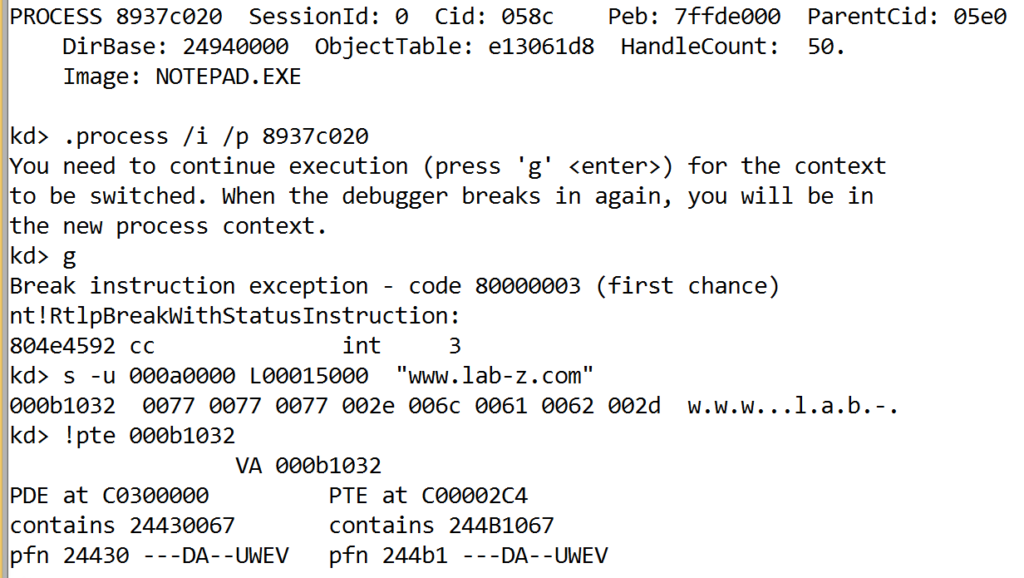
然后使用 s 命令在其中搜索,我们在第一个heap 上搜索(一共有9个heap理论上应该是每个都搜索的),命令是 s -u 000a0000 L00015000 “www.lab-z.com”:

在给定的范围内搜索字符串

Step5. 使用 WinDBG 的 memory 窗口查看上面的内存地址,可以看到这段内存就是我们在 Notepad 中写入的:

WinDBG memory 窗口查看内存

这时候可以尝试直接修改上面的字符串,然后再使用 g  命令让虚拟器中的 Windows 跑起来,刚跑起来的时候 Notepad 中的内容不会改变,因为 Windows 没有重新绘制,摇晃一下 Notepad 的窗体就可以看到发生了变化。

Step6.可以让 WinDBG 再次停下来,这时候 Memory 窗口已经失效,因为 Windows 已经切换到其他的进程中。如果想再次修改内存,需要再使用 Step 3 中的方法入侵 Notepad 进程。

==========================================================

上面的一切都发生在Notepad 的虚拟内存中,接下来实验如何在物理内存中找到上面的位置。

重来一次上面的操作
  1. 重复上面的 Step 3 操作,确保 WinDBG 处于 Notepad 的进程中;
  2. 使用 !pte 00014c2 命令

计算方法是 0x15264067 and 0x000 (低12位清零),然后加上 0x000b14c2 的低12位,结果是 0x152644c2

3.使用 !db 0x152644c2 查看物理内存,和我们上面看到的内容相同:

!db 查看物理内存

==========================================================

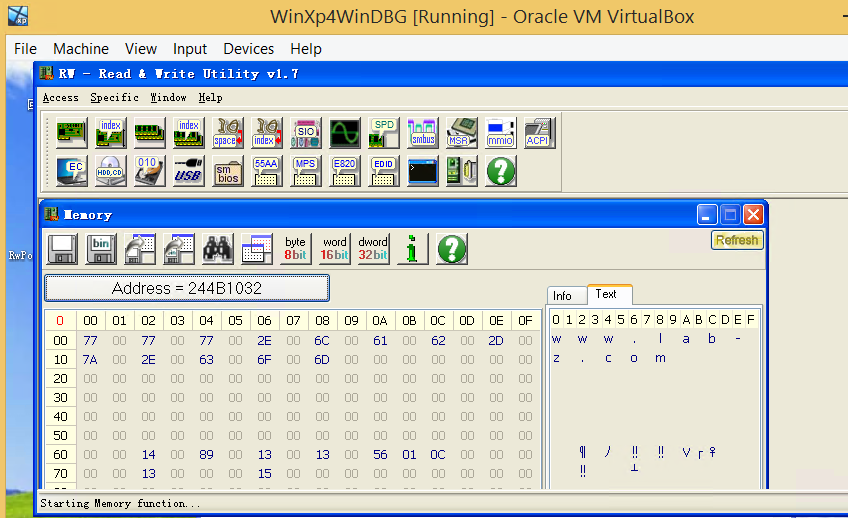
在虚拟机 Windows XP系统中安装了一个 RW Everything, 重复上面的动作

再次计算0x244B067 and 0x000 (低12位清零),然后加上 0x000b1032的低12位,结果是 0x244B032 ,用 RW 查看这个物理地址可以看到相同的结果:

Rw 查看物理内存

总结:通过上面的方法可以使用 WinDBG Kernel Debug 的方式修改目标机的 NotePad 中的内容,同时简单介绍了从一个进程的虚拟地址计算为物理地址的方法。有兴趣的朋友可以动手试试。

参考:

1. https://blog.csdn.net/lixiangminghate/article/details/53086667

关于DDR4内存的一些知识

最近在知乎上看到了两篇关于 DDR4 内存方面的文章,是从 FPGA 设计的角度来讲述 DDR4 信号的,这样比从 X86 CPU 角度观察简单和单纯的多,推荐给大家:

译文: DDR4 SDRAM – Understanding the Basics(上)

https://zhuanlan.zhihu.com/p/262052220

译文: DDR4 SDRAM – Understanding the Basics(下)

https://zhuanlan.zhihu.com/p/263080272

译文:DDR4 – Initialization, Training and Calibration

https://zhuanlan.zhihu.com/p/261747940

DDR3内存详解,存储器结构+时序+初始化过程

https://blog.csdn.net/a_chinese_man/article/details/73381338

Step to UEFI (224)编写自己的 Shell 命令(下)

在李安先生的《色戒》之前,还有宾·纳伦(PAN NALIN)导演的同名电影。当然这样也远不如直接说“钟丽缇的‘色戒’”。

色戒

所谓内事不决问百度,外事不决问谷歌,房事不决问和尚。其中男主角的师父就曾经点拨过他:要想将一滴水隐藏起来最好的办法就是把它放入大海。可惜男主角没有领悟师父的思想最后痛苦万分。

有些时候,我们编写的 EFI 程序不希望有人改动,这个时候就可以考虑将程序“藏”到 Shell 中。本文就实验将 RU.EFI 编译到 Shell 中。为了更好的理解本文的方案,最好先阅读理解前介绍过的如何将一个 EFI 程序包含在另外的 EFI中运行的方法【参考1】。具体方法是将下面的代码直接插入上一篇的 lzc.c 中:

      //
      // print it...
      //
      if (ShellStatus == SHELL_SUCCESS) {
        ShellPrintHiiEx(-1, -1, NULL, STRING_TOKEN (STR_LZC_OUTPUT),gShellLevel3HiiHandle);
        //Your code
        DP=FileDevicePath(NULL,L"fso:\\fake.efi");
        Print(L"%s\n",ConvertDevicePathToText(DP,TRUE,FALSE));
    
        //
        // Load the image with:
        // FALSE - not from boot manager and NULL, 0 being not already in memory
        //
        Status = gBS->LoadImage(
                        FALSE,
                        ImageHandle,
                        DP,
                        (VOID*)&Hello2_efi[0],
                        sizeof(Hello2_efi),
                        &NewHandle);     
        if (EFI_ERROR(Status)) {
                Print(L"Load image Error!  [%r]\n",Status);
                return 0;
        }
        //
        // now start the image, passing up exit data if the caller requested it
        //
        Status = gBS->StartImage(
                     NewHandle,
                     &ExitDataSizePtr,
                     NULL
              );
        if (EFI_ERROR(Status)) {
                Print(L"\nError during StartImage [%X]\n",Status);
                return 0;
        }       
        
        Status = gBS->UnloadImage(NewHandle);                        
        if (EFI_ERROR(Status)) {
                Print(L"Un-Load image Error! %r\n",Status);
                return 0;
        }

但是,运行结果显示无法加载,原因是 Invalid Parameter。同样的代码单独编译为完全可以在 Shell 下运行。经过VS2015 动态调试发现,ImageHandle 参数为 0,就是说下面这个函数入口处的 ImageHandle 直接就是0.

/**
  Function for 'lzc' command.

  @param[in] ImageHandle  Handle to the Image (NULL if Internal).
  @param[in] SystemTable  Pointer to the System Table (NULL if Internal).
**/
SHELL_STATUS
EFIAPI
ShellCommandRunLzc (
  IN EFI_HANDLE        ImageHandle,
  IN EFI_SYSTEM_TABLE  *SystemTable
  )

经过研究,产生问题的原因应该是下面代码,因此在调用每一个命令的时候,入口上的 ImageHandle 直接就赋值为0.

edk202008\ShellPkg\Library\UefiShellCommandLib\UefiShellCommandLib.c

/**
  Checks if a command string has been registered for CommandString and if so it runs
  the previously registered handler for that command with the command line.

  If CommandString is NULL, then ASSERT().

  If Sections is specified, then each section name listed will be compared in a casesensitive
  manner, to the section names described in Appendix B UEFI Shell 2.0 spec. If the section exists,
  it will be appended to the returned help text. If the section does not exist, no
  information will be returned. If Sections is NULL, then all help text information
  available will be returned.

  @param[in]  CommandString          Pointer to the command name.  This is the name
                                     found on the command line in the shell.
  @param[in, out] RetVal             Pointer to the return vaule from the command handler.

  @param[in, out]  CanAffectLE       indicates whether this command's return value
                                     needs to be placed into LASTERROR environment variable.

  @retval RETURN_SUCCESS            The handler was run.
  @retval RETURN_NOT_FOUND          The CommandString did not match a registered
                                    command name.
  @sa SHELL_RUN_COMMAND
**/
RETURN_STATUS
EFIAPI
ShellCommandRunCommandHandler (
  IN CONST CHAR16               *CommandString,
  IN OUT SHELL_STATUS           *RetVal,
  IN OUT BOOLEAN                *CanAffectLE OPTIONAL
  )
………………..
      if (RetVal != NULL) {
        *RetVal = Node->CommandHandler(NULL, gST);
      } else {
        Node->CommandHandler(NULL, gST);
      }
      return (RETURN_SUCCESS);

搜索其他命令作为参考,都没有使用ImageHandle作为参数,但是有使用 gImageHandle。于是,就使用 gImageHandle 作为参数。最终代码如下:

/** @file
  Main file for LABZ Command Test shell level 3 function.

  (C) Copyright 2015 Hewlett-Packard Development Company, L.P.<BR>
  Copyright (c) 2009 - 2018, Intel Corporation. All rights reserved. <BR>
  SPDX-License-Identifier: BSD-2-Clause-Patent

**/

#include "UefiShellLevel3CommandsLib.h"
#include  <Library/DevicePathLib.h>
#include <Library/ShellLib.h>

#include  <ru.h>

/**
  Function for 'lzc' command.

  @param[in] ImageHandle  Handle to the Image (NULL if Internal).
  @param[in] SystemTable  Pointer to the System Table (NULL if Internal).
**/
SHELL_STATUS
EFIAPI
ShellCommandRunLzc (
  IN EFI_HANDLE        ImageHandle,
  IN EFI_SYSTEM_TABLE  *SystemTable
  )
{
  EFI_STATUS          Status;
  LIST_ENTRY          *Package;
  CHAR16              *ProblemParam;
  SHELL_STATUS        ShellStatus;

  EFI_DEVICE_PATH  *DP;
  EFI_HANDLE      NewHandle;
  UINTN           ExitDataSizePtr; 
        
  ProblemParam        = NULL;
  ShellStatus         = SHELL_SUCCESS;
  //CpuBreakpoint();
  //
  // initialize the shell lib (we must be in non-auto-init...)
  //
  Status = ShellInitialize();
  ASSERT_EFI_ERROR(Status);

  //
  // parse the command line
  //
  Status = ShellCommandLineParse (EmptyParamList, &Package, &ProblemParam, TRUE);
  if (EFI_ERROR(Status)) {
    if (Status == EFI_VOLUME_CORRUPTED && ProblemParam != NULL) {
      ShellPrintHiiEx(-1, -1, NULL, STRING_TOKEN (STR_GEN_PROBLEM), gShellLevel3HiiHandle, L"lzc", ProblemParam);
      FreePool(ProblemParam);
      ShellStatus = SHELL_INVALID_PARAMETER;
    } else {
      ASSERT(FALSE);
    }
  } else {
    //
    // check for "-?"
    //
    if (ShellCommandLineGetFlag(Package, L"-?")) {
      ASSERT(FALSE);
    } else if (ShellCommandLineGetRawValue(Package, 1) != NULL) {
      ShellPrintHiiEx(-1, -1, NULL, STRING_TOKEN (STR_GEN_TOO_MANY), gShellLevel3HiiHandle, L"lzc");
      ShellStatus = SHELL_INVALID_PARAMETER;
    } else {
      //
      // print it...
      //
      if (ShellStatus == SHELL_SUCCESS) {
        ShellPrintHiiEx(-1, -1, NULL, STRING_TOKEN (STR_LZC_OUTPUT),gShellLevel3HiiHandle);
        
        //Your code start
        DP=FileDevicePath(NULL,L"fso:\\fake.efi");
        Print(L"%s\n",ConvertDevicePathToText(DP,TRUE,FALSE));
    
        //
        // Load the image with:
        // FALSE - not from boot manager and NULL, 0 being not already in memory
        //
        Status = gBS->LoadImage(
                        FALSE,
                        gImageHandle,
                        DP,
                        (VOID*)&RU_efi[0],
                        sizeof(RU_efi),
                        &NewHandle);
        if (EFI_ERROR(Status)) {
                Print(L"Load image Error!  [%r]\n",Status);
                return 0;
        }

        //
        // now start the image, passing up exit data if the caller requested it
        //
        Status = gBS->StartImage(
                     NewHandle,
                     &ExitDataSizePtr,
                     NULL
              );
        if (EFI_ERROR(Status)) {
                Print(L"\nError during StartImage [%X]\n",Status);
                return 0;
        }       
        
        Status = gBS->UnloadImage(NewHandle);                        
        if (EFI_ERROR(Status)) {
                Print(L"Un-Load image Error! %r\n",Status);
                return 0;
        } 
        //Your code end
        
      }
    }
    //
    // free the command line package
    //
    ShellCommandLineFreeVarList (Package);
  }

  return (ShellStatus);
}

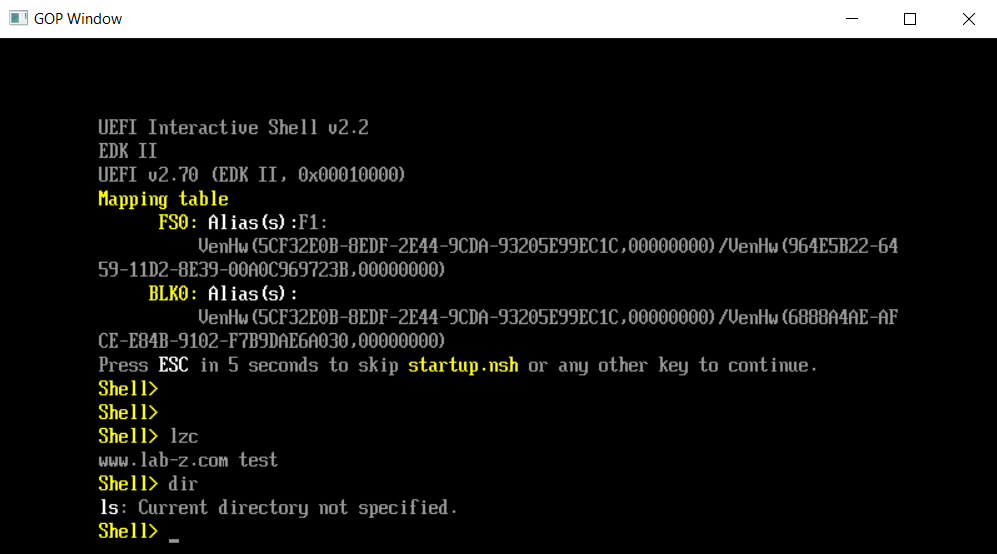
编译之后可以在 WinHost 下运行 lzc 命令(RU涉及到硬件的直接访问,界面闪现就会退出)。

模拟器里面的 Shell 运行自定义的 command

使用 build -a X64 -p ShellPkg\ShellPkg.dsc 命令后可以得到包含了 lzc 命令的 Shell ,放置到 U盘 \EFI\Boot\ 下,改名为  BootX64.efi 后即可从 U盘直接启, 有兴趣的朋友可以自己动手实验。

本文涉及到的代码可以在这里下载:

编译后的 Shell.EFI 可以在这里下载:

参考:

1. http://www.lab-z.com/stu165/  在Application 中调用包裹的 Application(上)

Step to UEFI (223)编写自己的 Shell 命令(上)

Shell 下命令代码可以在ShellPkg 中看到,具体的编译方法可以从【参考1】看到,这样的方法在 EDK202008仍然有效。这次实验的目标是编写一个自定义的Shell命令,更具体来说是在 Shell 中加入自定义的 command: lzc, 它的功能只是在屏幕上显示一段字符串表示这个命令已经运行。需要修改的文件如下:

修改前后文件比较

1.UefiShellLevel3CommandsLib.uni  加入了一个帮助信息和显示字符串:

#string STR_GET_HELP_LZC          #language en-US ""
".TH lzc 0 "www.lab-z.com test command"\r\n"
".SH NAME\r\n"

#string STR_LZC_OUTPUT            #language en-US www.lab-z.com test\r\n

  1. UefiShellLevel3CommandsLib.inf 中[Sources.common]节加入 lzc.c 文件名
  2. UefiShellLevel3CommandsLib.h 中声明ShellCommandRunLzc 函数
/**
  Function for 'getmtc' command.

  @param[in] ImageHandle  Handle to the Image (NULL if Internal).
  @param[in] SystemTable  Pointer to the System Table (NULL if Internal).
**/
SHELL_STATUS
EFIAPI
ShellCommandRunLzc (
  IN EFI_HANDLE        ImageHandle,
  IN EFI_SYSTEM_TABLE  *SystemTable
  );

4.UefiShellLevel3CommandsLib.c 在其中加入代码,将我们定义的  lzc 这个命令插入到 Shell 中。这样当我们在 Shell 中输入 lzc 的时候,会运行ShellCommandRunLzc   函数:

ShellCommandRegisterCommandName(L"help",    ShellCommandRunHelp   , ShellCommandGetManFileNameLevel3, 3, L"", TRUE , gShellLevel3HiiHandle, STRING_TOKEN(STR_GET_HELP_HELP));
  ShellCommandRegisterCommandName(L"lzc",     ShellCommandRunLzc    , ShellCommandGetManFileNameLevel3, 3, L"", TRUE , gShellLevel3HiiHandle, STRING_TOKEN(STR_GET_HELP_LZC));

  ShellCommandRegisterAlias(L"type", L"cat");

5.lzc.c 真正实现我们自定义功能的代码:

/** @file
  Main file for LABZ Command Test shell level 3 function.

  (C) Copyright 2015 Hewlett-Packard Development Company, L.P.<BR>
  Copyright (c) 2009 - 2018, Intel Corporation. All rights reserved. <BR>
  SPDX-License-Identifier: BSD-2-Clause-Patent

**/

#include "UefiShellLevel3CommandsLib.h"

#include <Library/ShellLib.h>

/**
  Function for 'lzc' command.

  @param[in] ImageHandle  Handle to the Image (NULL if Internal).
  @param[in] SystemTable  Pointer to the System Table (NULL if Internal).
**/
SHELL_STATUS
EFIAPI
ShellCommandRunLzc (
  IN EFI_HANDLE        ImageHandle,
  IN EFI_SYSTEM_TABLE  *SystemTable
  )
{
  EFI_STATUS          Status;
  LIST_ENTRY          *Package;
  CHAR16              *ProblemParam;
  SHELL_STATUS        ShellStatus;

  ProblemParam        = NULL;
  ShellStatus         = SHELL_SUCCESS;

  //
  // initialize the shell lib (we must be in non-auto-init...)
  //
  Status = ShellInitialize();
  ASSERT_EFI_ERROR(Status);

  //
  // parse the command line
  //
  Status = ShellCommandLineParse (EmptyParamList, &Package, &ProblemParam, TRUE);
  if (EFI_ERROR(Status)) {
    if (Status == EFI_VOLUME_CORRUPTED && ProblemParam != NULL) {
      ShellPrintHiiEx(-1, -1, NULL, STRING_TOKEN (STR_GEN_PROBLEM), gShellLevel3HiiHandle, L"lzc", ProblemParam);
      FreePool(ProblemParam);
      ShellStatus = SHELL_INVALID_PARAMETER;
    } else {
      ASSERT(FALSE);
    }
  } else {
    //
    // check for "-?"
    //
    if (ShellCommandLineGetFlag(Package, L"-?")) {
      ASSERT(FALSE);
    } else if (ShellCommandLineGetRawValue(Package, 1) != NULL) {
      ShellPrintHiiEx(-1, -1, NULL, STRING_TOKEN (STR_GEN_TOO_MANY), gShellLevel3HiiHandle, L"lzc");
      ShellStatus = SHELL_INVALID_PARAMETER;
    } else {
      //
      // print it...
      //
      if (ShellStatus == SHELL_SUCCESS) {
        ShellPrintHiiEx(-1, -1, NULL, STRING_TOKEN (STR_LZC_OUTPUT),gShellLevel3HiiHandle);
      }
    }
    //
    // free the command line package
    //
    ShellCommandLineFreeVarList (Package);
  }

  return (ShellStatus);
}

首先在 EDK2 提供的模拟环境中实验,编译命令是:

build -p EmulatorPkg\EmulatorPkg.dsc -t VS2015x86 -a X64

运行 \edk202008\Build\EmulatorX64\DEBUG_VS2015x86\X64\WinHost.exe 结果如下:

模拟环境下测试的结果

接下来再使用下面的命令编译 Shell.efi

build -a X64 -p ShellPkg\ShellPkg.dsc -b RELEASE

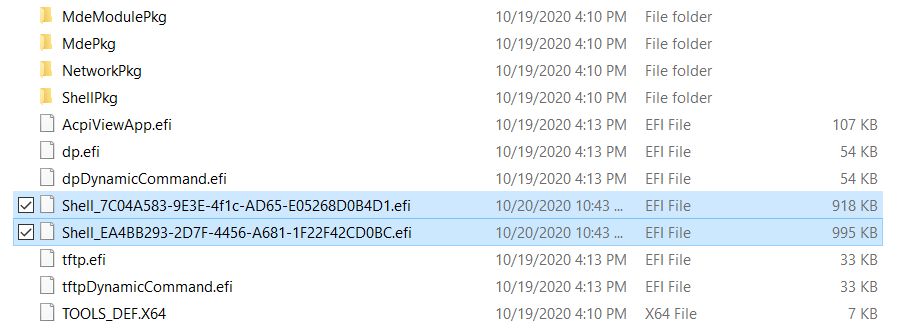
在edk202008\Build\Shell\RELEASE_VS2015x86\X64下面可以看到2个 Shell 文件:

生成的 2个Shell 文件

上面的 Shell_7C04A583-9E3E-4f1c-AD65-E05268D0B4D1.efi 是从edk202008\ShellPkg\Application\Shell\Shell.inf 编译生成的:

[Defines]
  INF_VERSION                    = 0x00010006
  BASE_NAME                      = Shell
  FILE_GUID                      = 7C04A583-9E3E-4f1c-AD65-E05268D0B4D1 # gUefiShellFileGuid
  MODULE_TYPE                    = UEFI_APPLICATION
  VERSION_STRING                 = 1.0
  ENTRY_POINT                    = UefiMain

下面的Shell_EA4BB293-2D7F-4456-A681-1F22F42CD0BC.efi 是在\edk202008\ShellPkg\ShellPkg.dsc 中定义的:

#
  # Build a second version of the shell with all commands integrated
  #
  ShellPkg/Application/Shell/Shell.inf {
   &lt;Defines>
      FILE_GUID = EA4BB293-2D7F-4456-A681-1F22F42CD0BC
    &lt;PcdsFixedAtBuild>
      gEfiShellPkgTokenSpaceGuid.PcdShellLibAutoInitialize|FALSE
    &lt;LibraryClasses>
      NULL|ShellPkg/Library/UefiShellLevel2CommandsLib/UefiShellLevel2CommandsLib.inf
      NULL|ShellPkg/Library/UefiShellLevel1CommandsLib/UefiShellLevel1CommandsLib.inf
      NULL|ShellPkg/Library/UefiShellLevel3CommandsLib/UefiShellLevel3CommandsLib.inf
      NULL|ShellPkg/Library/UefiShellDriver1CommandsLib/UefiShellDriver1CommandsLib.inf
      NULL|ShellPkg/Library/UefiShellInstall1CommandsLib/UefiShellInstall1CommandsLib.inf
      NULL|ShellPkg/Library/UefiShellDebug1CommandsLib/UefiShellDebug1CommandsLib.inf
      NULL|ShellPkg/Library/UefiShellNetwork1CommandsLib/UefiShellNetwork1CommandsLib.inf
      NULL|ShellPkg/Library/UefiShellNetwork2CommandsLib/UefiShellNetwork2CommandsLib.inf
      NULL|ShellPkg/Library/UefiShellAcpiViewCommandLib/UefiShellAcpiViewCommandLib.inf
  }

从注释上看,两者文件体积不同,大一些的中的 Command 会比较齐全。将这个文件改名BOOTX64.efi后放置在U盘 EFI\BOOT\ 目录下。从U盘启动后会自动进入Shell,然后输入 lzc 结果和上面相同。

参考:

  1. http://www.lab-z.com/how2buildshell/  How to build Shell.efi
  2. https://uefi.org/sites/default/files/resources/UEFI_Shell_2_2.pdf

ILI9341实现模拟时钟

参考  http://embedded-lab.com/blog/tutorial-8-esp8266-internet-clock/ 这个代码,在 ILI9431 上实现模拟时钟的显示。

/***************************************************
  This is our GFX example for the Adafruit ILI9341 Breakout and Shield
  ----> http://www.adafruit.com/products/1651

  Check out the links above for our tutorials and wiring diagrams
  These displays use SPI to communicate, 4 or 5 pins are required to
  interface (RST is optional)
  Adafruit invests time and resources providing this open source code,
  please support Adafruit and open-source hardware by purchasing
  products from Adafruit!

  Written by Limor Fried/Ladyada for Adafruit Industries.
  MIT license, all text above must be included in any redistribution
 ****************************************************/


#include "SPI.h"
#include "Adafruit_GFX.h"
#include "Adafruit_ILI9341.h"

// For the Adafruit shield, these are the default.
//#define ILI9341_DC 9
//#define ILI9341_CS 10

// For the Adafruit shield, these are the default.
#define ILI9341_DC D9
#define ILI9341_CS D8
#define ILI9341_MOSI MOSI
#define ILI9341_CLK SCK
#define ILI9341_RST D2
#define ILI9341_MISO MISO

// Use hardware SPI (on Uno, #13, #12, #11) and the above for CS/DC
Adafruit_ILI9341 tft = Adafruit_ILI9341(ILI9341_CS, ILI9341_DC, ILI9341_RST);

float sx = 0, sy = 1, mx = 1, my = 0, hx = -1, hy = 0;    // Saved H, M, S x & y multipliers
float sdeg=0, mdeg=0, hdeg=0;
uint16_t osx=120, osy=120, omx=120, omy=120, ohx=120, ohy=120;  // Saved H, M, S x & y coords
uint16_t x0=0, x1=0, yy0=0, yy1=0;
uint8_t hh, mm, ss;
void setup() {
  Serial.begin(9600);
  Serial.println("ILI9341 Test!"); 
 
  tft.begin(2000000UL);


  tft.fillScreen(ILI9341_NAVY);
  
  tft.setTextColor(ILI9341_WHITE, ILI9341_DARKCYAN);  // Adding a background colour erases previous text automatically
  
  // Draw clock face
  tft.fillCircle(120, 120, 118, ILI9341_GREEN);
  tft.fillCircle(120, 120, 110, ILI9341_BLACK);

  // Draw 12 lines
  for(int i = 0; i<360; i+= 30) {
    sx = cos((i-90)*0.0174532925);
    sy = sin((i-90)*0.0174532925);
    x0 = sx*114+120;
    yy0 = sy*114+120;
    x1 = sx*100+120;
    yy1 = sy*100+120;

    tft.drawLine(x0, yy0, x1, yy1, ILI9341_GREEN);
  }

  // Draw 60 dots
  for(int i = 0; i<360; i+= 6) {
    sx = cos((i-90)*0.0174532925);
    sy = sin((i-90)*0.0174532925);
    x0 = sx*102+120;
    yy0 = sy*102+120;
    // Draw minute markers
    tft.drawPixel(x0, yy0, ILI9341_WHITE);
    
    // Draw main quadrant dots
    if(i==0 || i==180) tft.fillCircle(x0, yy0, 2, ILI9341_WHITE);
    if(i==90 || i==270) tft.fillCircle(x0, yy0, 2, ILI9341_WHITE);
  }

  tft.fillCircle(120, 121, 3, ILI9341_WHITE);
}

void loop(void) {
  for (hh=0;hh<12;hh++)
    for (mm=0;mm<60;mm++)
      for (ss=0;ss<60;ss++)
        {

    // Pre-compute hand degrees, x & y coords for a fast screen update
    sdeg = ss*6;                  // 0-59 -> 0-354
    mdeg = mm*6+sdeg*0.01666667;  // 0-59 -> 0-360 - includes seconds
    hdeg = hh*30+mdeg*0.0833333;  // 0-11 -> 0-360 - includes minutes and seconds
    hx = cos((hdeg-90)*0.0174532925);    
    hy = sin((hdeg-90)*0.0174532925);
    mx = cos((mdeg-90)*0.0174532925);    
    my = sin((mdeg-90)*0.0174532925);
    sx = cos((sdeg-90)*0.0174532925);    
    sy = sin((sdeg-90)*0.0174532925);

    if (ss==0) {
      // Erase hour and minute hand positions every minute
      tft.drawLine(ohx, ohy, 120, 121, ILI9341_BLACK);
      ohx = hx*62+121;    
      ohy = hy*62+121;
      tft.drawLine(omx, omy, 120, 121, ILI9341_BLACK);
      omx = mx*84+120;    
      omy = my*84+121;
    }

      // Redraw new hand positions, hour and minute hands not erased here to avoid flicker
      tft.drawLine(osx, osy, 120, 121, ILI9341_BLACK);
      osx = sx*90+121;    
      osy = sy*90+121;
      tft.drawLine(osx, osy, 120, 121, ILI9341_RED);
      tft.drawLine(ohx, ohy, 120, 121, ILI9341_WHITE);
      tft.drawLine(omx, omy, 120, 121, ILI9341_WHITE);
      tft.drawLine(osx, osy, 120, 121, ILI9341_RED);

      tft.fillCircle(120, 121, 3, ILI9341_RED);
      tft.setCursor(25, 245);
      if(hh <10) tft.print(0);
      tft.print(hh);
      tft.print(':');
      if(mm <10) tft.print(0);
      tft.print(mm);
      tft.print(':');
      if(ss <10) tft.print(0);
      tft.print(ss);
      tft.setCursor(65, 285);
//      tft.print(tzone);
    //tft.drawCentreString("Time flies",120,260,4);
 // delay(1000);
        }
} 

运行结果:

ILI9431 模拟时钟

文件下载:

Intel 平台减少 MRC Debug 信息的方法

默认情况下,当我们打开 Debug 功能编译代码后, MRC 部分会输出全部 Debug 信息会导致耗费很长时间才能启动。如果板子散热不好经常会在打印过程中直接断电和重启。为了避免这样的问题,我们需要尽量减少串口的 Debug 信息。作为输出大户,MRC 中的 Debug 信息非常多,所以需要关闭之。

在 MrcDebugPrint.h 中有如下代码,删除 define MRC_DEBUG_PRINT (1) 这一行即可。

#ifndef MDEPKG_NDEBUG
#ifndef MRC_DEBUG_PRINT
#define MRC_DEBUG_PRINT (1)
#endif
#endif // MDEPKG_NDEBUG

在软件工程上有一个特别重要的概念:Design for Debug。对于主板开发来说,同样需要从整体上来考虑。比如,主板需要预留烧写BIOS的接口,否则每次只能用夹子去夹起来刷。对于 Firmware 来说,要考虑准备Debug BIOS 还有 DCI 的配置,随时准备Debug。

另外,不要得罪 HW 工程师,否则他既不会给你预留少些口,也不会给你预留输出 Debug 信息的串口,就是这样。

Step to UEFI (222)BmpSupportLib

很早之前的文章介绍过如何在 Shell 下实实现 BMP 的显示【参考1】。从原理上来说就是读取 BMP 文件,然后进行解析,最后按照 BLT 要求的格式重新排列,最终用EfiBltBufferToVideo就可以显示出来。

最近在查看 EDK202008 的代码时,偶然发现了2个新增的函数在BmpSupportLib.h 文件中。从名称上看一个是将 BMP 转化为 BLT要求的GopBlt格式,另外一个是将 GopBlt 转为 BMP 的。

/**
  Translate a *.BMP graphics image to a GOP blt buffer. If a NULL Blt buffer
  is passed in a GopBlt buffer will be allocated by this routine using
  EFI_BOOT_SERVICES.AllocatePool(). If a GopBlt buffer is passed in it will be
  used if it is big enough.

  @param [in]      BmpImage      Pointer to BMP file.
  @param [in]      BmpImageSize  Number of bytes in BmpImage.
  @param [in, out] GopBlt        Buffer containing GOP version of BmpImage.
  @param [in, out] GopBltSize    Size of GopBlt in bytes.
  @param [out]     PixelHeight   Height of GopBlt/BmpImage in pixels.
  @param [out]     PixelWidth    Width of GopBlt/BmpImage in pixels.

  @retval RETURN_SUCCESS            GopBlt and GopBltSize are returned.
  @retval RETURN_INVALID_PARAMETER  BmpImage is NULL.
  @retval RETURN_INVALID_PARAMETER  GopBlt is NULL.
  @retval RETURN_INVALID_PARAMETER  GopBltSize is NULL.
  @retval RETURN_INVALID_PARAMETER  PixelHeight is NULL.
  @retval RETURN_INVALID_PARAMETER  PixelWidth is NULL.
  @retval RETURN_UNSUPPORTED        BmpImage is not a valid *.BMP image.
  @retval RETURN_BUFFER_TOO_SMALL   The passed in GopBlt buffer is not big
                                    enough.  The required size is returned in
                                    GopBltSize.
  @retval RETURN_OUT_OF_RESOURCES   The GopBlt buffer could not be allocated.

**/
RETURN_STATUS
EFIAPI
TranslateBmpToGopBlt (
  IN     VOID                           *BmpImage,
  IN     UINTN                          BmpImageSize,
  IN OUT EFI_GRAPHICS_OUTPUT_BLT_PIXEL  **GopBlt,
  IN OUT UINTN                          *GopBltSize,
  OUT    UINTN                          *PixelHeight,
  OUT    UINTN                          *PixelWidth
  );

/**
  Translate a GOP blt buffer to an uncompressed 24-bit per pixel BMP graphics
  image. If a NULL BmpImage is passed in a BmpImage buffer will be allocated by
  this routine using EFI_BOOT_SERVICES.AllocatePool(). If a BmpImage buffer is
  passed in it will be used if it is big enough.

  @param [in]      GopBlt        Pointer to GOP blt buffer.
  @param [in]      PixelHeight   Height of GopBlt/BmpImage in pixels.
  @param [in]      PixelWidth    Width of GopBlt/BmpImage in pixels.
  @param [in, out] BmpImage      Buffer containing BMP version of GopBlt.
  @param [in, out] BmpImageSize  Size of BmpImage in bytes.

  @retval RETURN_SUCCESS            BmpImage and BmpImageSize are returned.
  @retval RETURN_INVALID_PARAMETER  GopBlt is NULL.
  @retval RETURN_INVALID_PARAMETER  BmpImage is NULL.
  @retval RETURN_INVALID_PARAMETER  BmpImageSize is NULL.
  @retval RETURN_UNSUPPORTED        GopBlt cannot be converted to a *.BMP image.
  @retval RETURN_BUFFER_TOO_SMALL   The passed in BmpImage buffer is not big
                                    enough.  The required size is returned in
                                    BmpImageSize.
  @retval RETURN_OUT_OF_RESOURCES   The BmpImage buffer could not be allocated.

**/
RETURN_STATUS
EFIAPI
TranslateGopBltToBmp (
  IN     EFI_GRAPHICS_OUTPUT_BLT_PIXEL  *GopBlt,
  IN     UINT32                         PixelHeight,
  IN     UINT32                         PixelWidth,
  IN OUT VOID                           **BmpImage,
  IN OUT UINT32                         *BmpImageSize
  );

为此,编写一个测试程序进行测试,因为编译环境是 EDK201903 其中并没有对应的库,所以直接将上面提到的库从 EDK202008 中提取出来直接使用,同时还有一个SafeIntLib的库:

#include  <Uefi.h>
#include  <Library/BaseLib.h>
#include  <Library/UefiLib.h>
#include  <Library/ShellCEntryLib.h>

#include  <stdio.h>
#include  <stdlib.h>

#include "BmpSupportLib.h"

extern  EFI_BOOT_SERVICES   *gBS;

static EFI_GUID GraphicsOutputProtocolGuid = EFI_GRAPHICS_OUTPUT_PROTOCOL_GUID;

INTN
EFIAPI
main (
  IN UINTN Argc,
  IN CHAR8 **Argv
  )
{
        FILE            *fp;
        long            BmpSize;
        char            *pBmpImage;
        
        UINTN           BltSize;
        UINTN           Height;
        UINTN           Width;
        EFI_STATUS      Status;
        EFI_GRAPHICS_OUTPUT_BLT_PIXEL *Blt;
        EFI_GRAPHICS_OUTPUT_PROTOCOL *GraphicsOutput;
        
        // Check parameter
        if (Argc<2) {
                printf("Please input a file name\n");
        } else {
                // Open file
                fp=fopen(Argv[1],"rb");
                if (fp==NULL) {
                        printf("Can't open file [%s]\n",Argv[1]);
                        return EFI_SUCCESS;
                }
                
                // Get file size
                fseek(fp,0,SEEK_END);
                BmpSize=ftell(fp);
                printf("File size is [%d]\n",BmpSize);
                
                // Create a memory for BMP file
                pBmpImage=malloc(BmpSize);
                if (pBmpImage==NULL) {
                        printf("Memory allocate error\n");
                        fclose(fp);
                        return EFI_SUCCESS;
                }
                
                // Load BMP to memory
                fseek(fp,0,SEEK_SET);
                fread(pBmpImage, sizeof(char), BmpSize, fp);
                fclose(fp);
                
                Status = gBS->LocateProtocol(
                            &GraphicsOutputProtocolGuid, 
                            NULL,
                            (VOID **) &GraphicsOutput);
                if (EFI_ERROR(Status)) {
                    GraphicsOutput = NULL;
                    Print(L"Loading Graphics_Output_Protocol error!\n");
                    return EFI_SUCCESS;
                }
    
                // Translate BMP to  GopBlt
                Blt = NULL;
                Width = 0;
                Height = 0;
                Status = TranslateBmpToGopBlt (
                           pBmpImage,
                           BmpSize,
                           &Blt,
                           &BltSize,
                           &Height,
                           &Width
                           );
                if (EFI_ERROR (Status)) {
                  Print(L"TranslateBmpToGopBlt error!\n");
                  return Status;
                }

                // Show the GopBlt to screen
                Status = GraphicsOutput->Blt (
                             GraphicsOutput,
                             Blt,
                             EfiBltBufferToVideo,
                             0, // Source X
                             0, // Source Y
                             0x140, // Destination X
                             0, // Destination Y
                             Width,
                             Height,
                             Width * sizeof (EFI_GRAPHICS_OUTPUT_BLT_PIXEL)
                             );
                if (EFI_ERROR (Status)) {
                  Print(L"GraphicsOutput->Blt error! [%r]\n",Status);
                  return Status;
                }
                free(pBmpImage);
    }

    return EFI_SUCCESS;
}

测试结果(NT32虚拟机)

NT32 模拟环境下测试 BmpSupportLib

源代码和编译后的 X64 代码可以在这里下载:

参考:

1. https://www.lab-z.com/showbmp/

Boot Guard 简介

As defined by Wikipedia: “Intel Boot Guard is a processor feature that prevents the computer from running firmware images not released by the system manufacturer. When turned on, the processors verifies a signature contained in the firmware image before executing it, using the hash of the public half of the signing key, which is fused into the system’s Platform Controller Hub (PCH) by the system manufacturer (not by Intel). Intel Boot Guard is an optional processor feature, meaning that it does not need to be activated during the system manufacturing. As a result, Intel Boot Guard, when activated, makes it impossible for end users to install replacement firmware such as Coreboot.” 来自: https://firmwaresecurity.com/2015/08/12/intel-boot-guard/

这是一个安全相关的功能,能够阻止第三方 Firmware运行在你的主板上。具体是做法是使用私钥对于客户自己的 Firmware 签名,然后在主板的生产过程中将公钥的 hash 写入 PCH,写入之后就无法修改(Fused) 。 之后每次上电的时候,PCH 会首先校验 Firmware 的签名,如果不符合就不会加载。

老狼在《什么是Boot Guard?电脑启动中的信任链条解析》文章中对此做了更详细的介绍,有兴趣的朋友可以在下面看到:

https://zhuanlan.zhihu.com/p/116740555?from_voters_page=true