MRedef.c(20): error C2220: warning treated as error - no 'object' file generated
MRedef.c(20): warning C4005: 'SUM': macro redefinition
MRedef.c(19): note: see previous definition of 'SUM'
解决方法是在文件头部加入 Disable 这个 Warning 的指令如下:
#pragma warning (disable : 4005)
完整的代码如下:
#include <Uefi.h>
#include <Library/UefiLib.h>
#include <Library/ShellCEntryLib.h>
#pragma warning (disable : 4005)
/*
MRedef.c(20): error C2220: warning treated as error - no 'object' file generated
MRedef.c(20): warning C4005: 'SUM': macro redefinition
MRedef.c(19): note: see previous definition of 'SUM'
*/
#define SUM(a,b) a+b
#define SUM(a,b) a*b
/***
Print a welcoming message.
Establishes the main structure of the application.
@retval 0 The application exited normally.
@retval Other An error occurred.
***/
INTN
EFIAPI
ShellAppMain (
IN UINTN Argc,
IN CHAR16 **Argv
)
{
int c =3,d=4;
Print(L"Hello there fellow Programmer.\n");
Print(L"Welcome to the world of EDK II.\n");
Print(L"Macro test %d\n",SUM(c,d));
return(0);
}
//
//  Support for variable argument lists in freestanding edk2 modules.
//
//  For modules that use the ISO C library interfaces for variable
//  argument lists, refer to "StdLib/Include/stdarg.h".
//
//  VA_LIST  - typedef for argument list.
//  VA_START (VA_LIST Marker, argument before the ...) - Init Marker for use.
//  VA_END (VA_LIST Marker) - Clear Marker
//  VA_ARG (VA_LIST Marker, var arg type) - Use Marker to get an argument from
//    the ... list. You must know the type and pass it in this macro.  Type
//    must be compatible with the type of the actual next argument (as promoted
//    according to the default argument promotions.)
//  VA_COPY (VA_LIST Dest, VA_LIST Start) - Initialize Dest as a copy of Start.
//
//  Example:
//
//  UINTN
//  EFIAPI
//  ExampleVarArg (
//    IN UINTN  NumberOfArgs,
//    ...
//    )
//  {
//    VA_LIST Marker;
//    UINTN   Index;
//    UINTN   Result;
//
//    //
//    // Initialize the Marker
//    //
//    VA_START (Marker, NumberOfArgs);
//    for (Index = 0, Result = 0; Index < NumberOfArgs; Index++) {
//      //
//      // The ... list is a series of UINTN values, so sum them up.
//      //
//      Result += VA_ARG (Marker, UINTN);
//    }
//
//    VA_END (Marker);
//    return Result;
//  }
//
//  Notes:
//  - Functions that call VA_START() / VA_END() must have a variable
//    argument list and must be declared EFIAPI.
//  - Functions that call VA_COPY() / VA_END() must be declared EFIAPI.
//  - Functions that only use VA_LIST and VA_ARG() need not be EFIAPI.
//
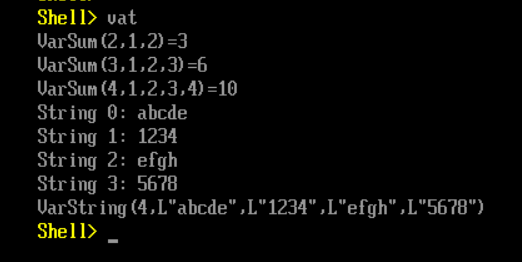
根据上面的代码,编写测试例子如下:
#include  <Uefi.h>
#include  <Library/UefiLib.h>
#include  <Library/ShellCEntryLib.h>

UINTN
EFIAPI
VarSum (
  IN UINTN  NumberOfArgs,
  ...
  )
{
  VA_LIST Marker;
  UINTN   Index;
  UINTN   Result;

  //
  // Initialize the Marker
  //
  VA_START (Marker, NumberOfArgs);
  for (Index = 0, Result = 0; Index < NumberOfArgs; Index++) {
    //
    // The ... list is a series of UINTN values, so sum them up.
    //
    Result += VA_ARG (Marker, UINTN);
  }

  VA_END (Marker);
  return Result;
}

UINTN
EFIAPI
VarString (
  IN UINTN  NumberOfArgs,
  ...
  )
{
  VA_LIST Marker;
  UINTN   Index;
  UINTN   Result;

  //
  // Initialize the Marker
  //
  VA_START (Marker, NumberOfArgs);
  for (Index = 0, Result = 0; Index < NumberOfArgs; Index++) {
    //
    // The ... list is a series of UINTN values, so sum them up.
    //
    //Result += VA_ARG (Marker, UINTN);
    Print(L"String %d: %s\n",Index,VA_ARG (Marker, CHAR16*));
  }

  VA_END (Marker);
  return Result;
}

/***
  Print a welcoming message.

  Establishes the main structure of the application.

  @retval  0         The application exited normally.
  @retval  Other     An error occurred.
***/
INTN
EFIAPI
ShellAppMain (
  IN UINTN Argc,
  IN CHAR16 **Argv
  )
{

  Print(L"VarSum(2,1,2)=%d\n",VarSum(2,1,2));
  Print(L"VarSum(3,1,2,3)=%d\n",VarSum(3,1,2,3));
  Print(L"VarSum(4,1,2,3,4)=%d\n",VarSum(4,1,2,3,4));

  Print(L"VarString(4,L\"abcde\",L\"1234\",L\"efgh\",L\"5678\")\n",
                VarString(4,L"abcde",L"1234",L"efgh",L"5678"));
  return(0);
}
using System;
using System.Collections.Generic;
using System.Linq;
using System.Text;
using System.Threading.Tasks;
using System.Management;
using System.Collections;
namespace ConsoleApplication29
{
class Program
{
private static void GatherUsbInformation()
{
var mos = new ManagementObjectSearcher("select DeviceID from Win32_PnPEntity");
var mbos = new ArrayList(mos.Get());
var data = new Dictionary<string, string[]>();
for (var i = 0; i < mbos.Count; i++)
{
var managementBaseObject = mbos[i] as ManagementBaseObject;
if (managementBaseObject == null)
{
continue;
}
var deviceId = managementBaseObject.Properties["DeviceID"].Value as string;
if (deviceId == null || !deviceId.StartsWith("USB"))
{
continue;
}
if (!data.ContainsKey(deviceId))
{
data.Add(deviceId, new string[8]);
}
else if (data.ContainsKey(deviceId))
{
continue;
}
var mo = managementBaseObject as ManagementObject;
var inParams = mo.GetMethodParameters("GetDeviceProperties");
var result = mo.InvokeMethod(
"GetDeviceProperties",
inParams,
new InvokeMethodOptions()
);
if (result?.Properties["deviceProperties"].Value == null)
{
continue;
}
foreach (var deviceProperties in result.Properties["deviceProperties"].Value as ManagementBaseObject[])
{
var keyName = deviceProperties.Properties["KeyName"].Value as string;
var value = deviceProperties.Properties["Data"].Value as string;
if (string.IsNullOrWhiteSpace(value) || string.IsNullOrWhiteSpace(keyName))
{
//MachineInformationGatherer.Logger.LogTrace(
// $"KeyName {keyName} or Value {value} was null or whitespace for device ID {deviceId}");
continue;
}
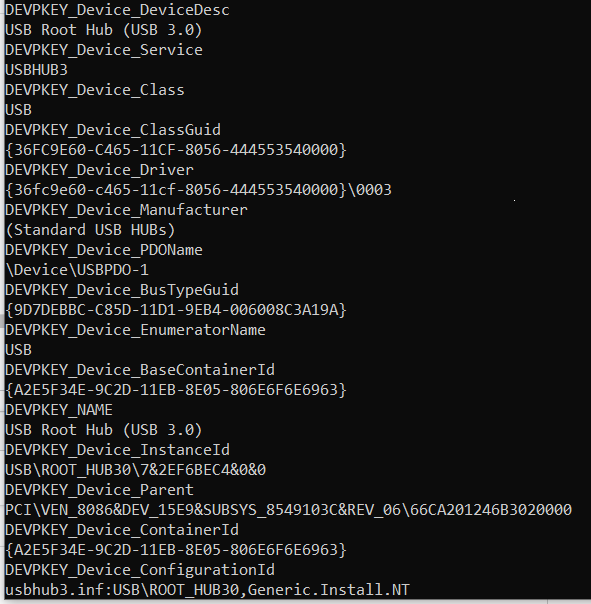
Console.WriteLine(keyName);
Console.WriteLine(value);
switch (keyName)
{
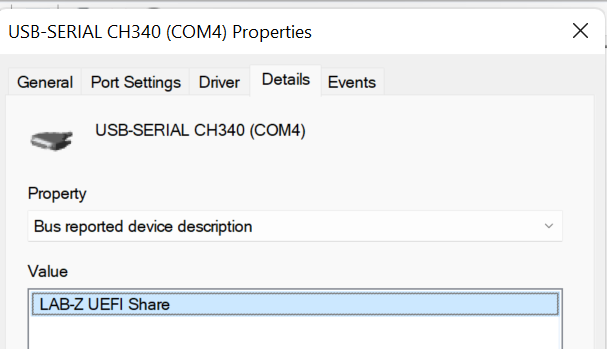
case "DEVPKEY_Device_BusReportedDeviceDesc":
{
data[deviceId][0] = value;
break;
}
case "DEVPKEY_Device_DriverDesc":
{
data[deviceId][1] = value;
break;
}
case "DEVPKEY_Device_DriverVersion":
{
data[deviceId][2] = value;
break;
}
case "DEVPKEY_Device_DriverDate":
{
var year = int.Parse(value.Substring(0, 4));
var month = int.Parse(value.Substring(4, 2));
var day = int.Parse(value.Substring(6, 2));
var hour = int.Parse(value.Substring(8, 2));
var minute = int.Parse(value.Substring(10, 2));
var second = int.Parse(value.Substring(12, 2));
data[deviceId][3] =
new DateTime(year, month, day, hour, minute, second).ToString();
break;
}
case "DEVPKEY_Device_Class":
{
data[deviceId][4] = value;
break;
}
case "DEVPKEY_Device_DriverProvider":
{
data[deviceId][5] = value;
break;
}
case "DEVPKEY_NAME":
{
data[deviceId][6] = value;
break;
}
case "DEVPKEY_Device_Manufacturer":
{
data[deviceId][7] = value;
break;
}
case "DEVPKEY_Device_Children":
{
var children = deviceProperties.Properties["DEVPKEY_Device_Children"];
if (children.Value != null)
{
if (children.IsArray)
{
foreach (var child in children.Value as string[])
{
mos.Query = new ObjectQuery(
$"select * from Win32_PnPEntity where DeviceID = {child}");
var childs = mos.Get();
foreach (var child1 in childs)
{
mbos.Add(child1);
}
}
}
}
break;
}
}
}
}
}
static void Main(string[] args)
{
GatherUsbInformation();
Console.ReadKey();
}
}
}
喜欢军事的朋友一定经常听过这句话,这就是“只要推力大,板砖也能飞上天”。实际上,这句话并非玩笑之语,确有出处。当年,F-22是从“先进战术战斗机”(简称ATF)计划发展而来的。早期,好几家公司一起竞标,分别是波音,通用动力,洛克希德,诺思罗普,和麦道公司。大家提概念设计方案。结果,可能是因为洛克希德曾经设计出F-117隐形飞机的缘故,走老路当然是最轻松的,所以,洛克希德最初提出的F-22前身方案,它就像是F-117的放大版。设计跟F-117这个怪胎一样,为了隐身性能,以牺牲空气动力学为代价,飞机设计总重36吨。后来,有个人是这么评价这种早期设计的,他就是洛克希德在ATF计划中的项目经理巴特·奥斯本(bart osborne),1998年,一家杂志对奥斯本进行采访【参考1】,而他是这样说的:“我们知道,这个设计将会存在严重的超音速问题,我们的设计当然可以超音速飞行,但肯定蠢得像猪。显然,只要推力大,板砖也能飞上天(With enough power, you can make a brick fly)”