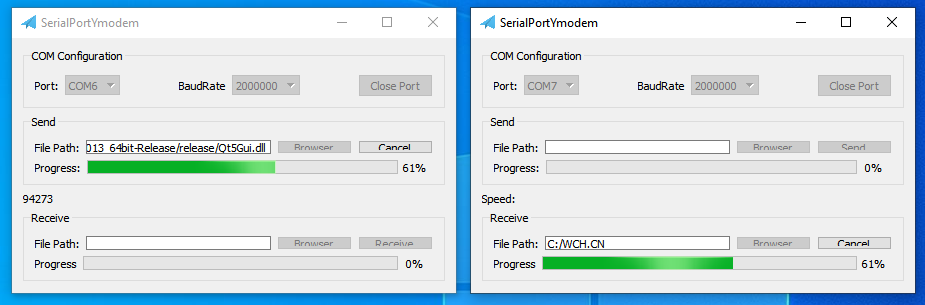
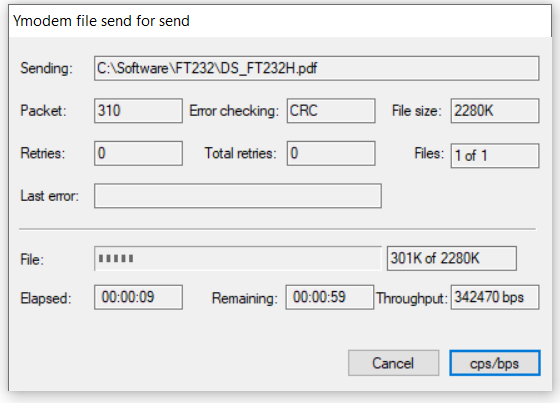
Step to UEFI (180)GetVbtData 取得 Vbt

之前的《Shell 下读取 VBT》【参考1】给出了一个读取VBT 的方法。Simon 留言表示可以使用 PLATFORM_GOP_POLICY_PROTOCOL提供的 GetVbtData 。可以在\Vlv2DeviceRefCodePkg\ValleyView2Soc\NorthCluster\Include\Protocol\PlatformGopPolicy.h 中看到如下定义:

#define EFI_PLATFORM_GOP_POLICY_PROTOCOL_GUID \
  { 0xec2e931b, 0x3281, 0x48a5, 0x81, 0x7, 0xdf, 0x8a, 0x8b, 0xed, 0x3c, 0x5d }
#define PLATFORM_GOP_POLICY_PROTOCOL_REVISION_01 0x01
#define PLATFORM_GOP_POLICY_PROTOCOL_REVISION_02 x0222
#pragma pack(1)

typedef enum {
  LidClosed,
  LidOpen,
  LidStatusMax
} LID_STATUS;

typedef enum {
  Docked,
  UnDocked,
  DockStatusMax
} DOCK_STATUS;

typedef
EFI_STATUS
(EFIAPI *GET_PLATFORM_LID_STATUS) (
  OUT LID_STATUS *CurrentLidStatus
  );

typedef
EFI_STATUS
(EFIAPI *GET_VBT_DATA) (
  OUT EFI_PHYSICAL_ADDRESS *VbtAddress,
  OUT UINT32 *VbtSize
  );

#pragma pack()

typedef struct _PLATFORM_GOP_POLICY_PROTOCOL {
  UINT32                             Revision;
  GET_PLATFORM_LID_STATUS            GetPlatformLidStatus;
  GET_VBT_DATA                       GetVbtData;
} PLATFORM_GOP_POLICY_PROTOCOL;

根据上述定义编写代码,首先搜索 PLATFORM_GOP_POLICY_PROTOCOL ,然后调用它提供的GetVbtData 函数。

/** @file
    A simple, basic, EDK II native, "hello" application to verify that
    we can build applications without LibC.

    Copyright (c) 2010 - 2011, Intel Corporation. All rights reserved.<BR>
    This program and the accompanying materials
    are licensed and made available under the terms and conditions of the BSD License
    which accompanies this distribution. The full text of the license may be found at
    http://opensource.org/licenses/bsd-license.

    THE PROGRAM IS DISTRIBUTED UNDER THE BSD LICENSE ON AN "AS IS" BASIS,
    WITHOUT WARRANTIES OR REPRESENTATIONS OF ANY KIND, EITHER EXPRESS OR IMPLIED.
**/
#include  <Uefi.h>
#include  <Library/UefiLib.h>
#include  <Library/ShellCEntryLib.h>
#include  <Protocol/SimpleFileSystem.h>
#include  <Library/UefiBootServicesTableLib.h> //global gST gBS gImageHandle
#include  <Library/ShellLib.h>
#include  <Library/IoLib.h>

#include  "PlatformGopPolicy.h"

EFI_GUID gPlatformGOPPolicyGuid      = 
        { 0xec2e931b, 0x3281, 0x48a5, 
                { 0x81, 0x07, 0xdf, 0x8a, 0x8b, 0xed, 0x3c, 0x5d } };

//                        
//Save memory address to a file                        
//
EFI_STATUS 
SaveToFile(
        IN UINT8 *FileData, 
        IN UINTN FileDataLength)
{
    EFI_STATUS          Status;
    EFI_FILE_PROTOCOL   *FileHandle;
    UINTN               BufferSize;
    EFI_FILE_PROTOCOL   *Root;
    EFI_SIMPLE_FILE_SYSTEM_PROTOCOL *SimpleFileSystem;

    Status = gBS->LocateProtocol(
                &gEfiSimpleFileSystemProtocolGuid, 
                NULL,
                (VOID **)&SimpleFileSystem);
                
    if (EFI_ERROR(Status)) {
            Print(L"Cannot find EFI_SIMPLE_FILE_SYSTEM_PROTOCOL \r\n");
            return Status;
    }

    Status = SimpleFileSystem->OpenVolume(SimpleFileSystem, &Root);
    if (EFI_ERROR(Status)) {
        Print(L"OpenVolume error \r\n");
        return Status;
    }
    Status = Root->Open(
                Root, 
                &FileHandle, 
                L"dumpvbt.bin",
                EFI_FILE_MODE_READ |
                EFI_FILE_MODE_WRITE | 
                EFI_FILE_MODE_CREATE, 
                0);
    if (EFI_ERROR(Status)){
        Print(L"Error Open NULL  [%r]\n",Status);
        return Status;
    }
    
    BufferSize = FileDataLength;
    Status = FileHandle->Write(FileHandle, &BufferSize, FileData);
    if (EFI_ERROR(Status)){
        Print(L"Error write [%r]\n",Status);
        return Status;
    }
    else Print(L"VBT has been saved to 'dumpvbt.bin' \n");
    
    FileHandle->Close(FileHandle);
    
    return Status;
}


/***
  Print a welcoming message.

  Establishes the main structure of the application.

  @retval  0         The application exited normally.
  @retval  Other     An error occurred.
***/
INTN
EFIAPI
ShellAppMain (
  IN UINTN Argc,
  IN CHAR16 **Argv
  )
{
        PLATFORM_GOP_POLICY_PROTOCOL    *mPlatformGopPolicyProtocl;
        EFI_STATUS              Status;
        EFI_PHYSICAL_ADDRESS    VbtAddress;
        UINT32                  VbtSize;
        
        Print(L"*************************************************\n");
        Print(L"* VBT dump tool By Platform GOP Policy Protocol *\n");
        Print(L"*                                 May 4th 2019  *\n");
        Print(L"*                      Powered by www.lab-z.com *\n");
        Print(L"*************************************************\n");
        
        //
        // Locate the Cpu Arch Protocol.
        //
        Status = gBS->LocateProtocol(
                        &gPlatformGOPPolicyGuid, 
                        NULL, 
                        &mPlatformGopPolicyProtocl);
        if (EFI_ERROR (Status)) {
                Print(L"Can't find EFI_PLATFORM_GOP_POLICY_PROTOCOL_\n");
                return Status;
        }        
        
        mPlatformGopPolicyProtocl->GetVbtData(&VbtAddress,&VbtSize);
        SaveToFile((UINT8 *)VbtAddress,VbtSize);
        
        return(0);
}

在 Shell 下运行之后会生成dumpvbt.bin ,内容就是当前使用的 VBT。

完整的代码和 EFI 文件下载:

这个方法和之前相比优点是避免了计算便宜之类的问题更加简单明确,可以在一定程度上克服不同Chipset之间的差别;缺点是:并非公开的 Protcol 在使用的时候可能存在一定风险。

最后,再次感谢 Simon 先生的建议。

参考:

1. http://www.lab-z.com/stu175vbt/  Step to UEFI (175)Shell 下读取 VBT

UEFI Tips: 嵌入 Asm 汇编需要特别注意的地方

之前介绍过,现在的 VS 不支持直接在代码中嵌入汇编,因此需要单独将汇编语句写在独立的 Asm 中然后在编译过程中会 Link 到生成的 EFI 文件中。最近碰到了一个奇怪的问题:明明写好的 Asm 在编译的 Link 过程中会提示无法找到对应的函数。经过研究最终确定是因为Asm 文件的名称导致的。

例如,之前的 “新指令 RDRAND”【参考1】文章中 INF 定义如下

[Sources.IA32]
  IA32/RdRandWord.c
  IA32/AsmRdRand.asm

[Sources.X64]
  X64/RdRandWord.c
  X64/AsmRdRand.asm

如果你手抖,命名成 X64/RdRandWord.asm 就会出现前面提到的问题。并且根据错误提示一直无法确定原因。

Intel CCA/DBC简介

本文根据《软件调试(第2版)》卷1:硬件基础“第七章 JTAG 调试”编写。建议有兴趣的朋友购买一本来学习。对于 Firmware 工程师来说,从底向上学习是一个很好的方向。

现在的X86变得日益复杂,如何进行有效的Debug 也日渐成为一个难题。为此 Intel 在芯片组或者 CPU 上预留了一个称作DCI (Intel® Direct Connect Interface)的Debug 接口。这个接口使用 USB 3.0一模一样的外部连接。CPU 内部有切换器,当Chipset 发现外部有设备和他握手,就将原本的USB信号切换为DCI 的信号。这样无需额外的预留就能实现Debug。

在DCI 出现之前,Intel 使用J-Tag 接口。当时的 Debug 盒子是下面这样,叫做 In-Target Proble,简称 ITP。  当年价格在 3000刀,现在好像没有这么贵了。之前我在的公司买了一个,老板恨不得把它供起来,一年也用不到几次。最后不知道什么原因它的适配器坏掉了。我去询问价格,得到的答案是适配器90刀,然后90天发货……..当然对方也很nice 的告诉我可以去中关村配一个电压相同功率差不多的也能用。后来回报上去之后老板左右不定,不想花钱和时间又怕损坏………最终这个设备束之高阁了。

图片来自【参考1】

为了Debug,主板上同时必须预留下面这样的 J Tag 接口。显而易见,说服HW工程师在主板上预留这样的接口需要花费极大的口舌,至于说服老板在量产板子上焊接这样的接口几乎是不可能的事情。因此,串口一直是BIOS工程师的最爱。

图片来自【参考2】

现在的Debug 盒子长得是下面这样,全称是“Intel SVT Closed Chassis Adapter”,缩写 “CCA”(Intel Silicon View Technology Closed Chassis Adapter),价格390刀。更通俗称作“DCI 蓝盒子”。通过这个设备可以绕开 CPU 直接和硬件打交道。这样,当 CPU 出现问题的时候,比如:CPU Hang了,工程师有机会来读取一些寄存器值…….

来自【参考3】

除此之外还有长得类似 WinDBG 线的 DbC( debug class ) 线,同样是插在 USB 3.0 口上就能进行Debug。

图片来自参考4

相比前面的 CCA ,可以看出 DBC 更见简单便宜,但是在Debug 的时候可能会出现无法连接的情况,比如停得太早或者 XHCI 出现问题直接死掉了。因此,如果有可能尽量首选 CCA。

上述设备的典型应用如下(来自文章开始提到的《软件调试》 7.4.7)

正如本章开头所说的,硬件调试工具通常用来解决软件调试器难以解决的问题,以下是使用 JTAG 方式调试的一些典型场景。

(1)调试系统固件代码,包括BIOS代码,EFI代码以及支持AMT技术的ME(Management Engine)代码。

(2)调试操作系统的启动加载程序(Boot Loader),以及系统临界状态的问题,比如进入睡眠和从睡眠状态恢复过程中发生的问题。

(3)软件调试器无法调试的其他情况,比如开发软件调试器时调试实现调试功能的代码(例如Windows的内核调试引擎),以及调试操作系统内核的中断处理函数,任务调度函数等。

(4)观察CPU的微状态,比如CPU的ACPI 状态(C State)。

作为BIOS工程师难得申请一些设备,所以如果有可能尽量申请一个。毕竟“工具善其事,必先利其器”,工具简单直观能省去很多麻烦。

参考:

  1. https://habrahabr.ru/company/pt/blog/341946/
  2. https://minnowboard.org/add-ons/debugger-lure
  3. https://designintools.intel.com/Silicon_View_Technology_Closed_Chassis_Adapter_p/itpxdpsvt.htm
  4. https://designintools.intel.com/product_p/itpdciamcm1mu.htm

C# 取得本机 IP

通常情况下,一台电脑不止一个 IP,因此需要考虑枚举出所有的 IP.

using System;
using System.Collections.Generic;
using System.Linq;
using System.Text;
using System.Threading.Tasks;
using System.Net;
using System.Net.Sockets;

namespace tmpshowip
{
    class Program
    {
        static void Main(string[] args)
        {
            string hostName = Dns.GetHostName(); // Retrive the Name of HOST  
            for (int i = 0; i < Dns.GetHostByName(hostName).AddressList.Length; i++)
            {
                // Get the IP  
                string myIP = Dns.GetHostByName(hostName).AddressList[i].ToString();
                Console.WriteLine("My IP Address is :" + myIP);
            }
            Console.ReadKey();
        }
    }
}

参考:

1.https://www.codeproject.com/questions/399318/how-to-get-user-ip-address-using-csharp

Step to UEFI (179)Shell下 EC Ram 读取工具

最近工作需要在 UEFI  Shell 下Check EC Ram 的设定,发现手上只有 Windows 下的读取工具(RW Everything)。于是研究了一下如何在Shell 读取 EC Ram。

 根据【参考1】读取的流程如下:

Port 66 Commands

There are also some EC commands that use ports 0x66 and 0x62. Some of these are standard ACPI commands as defined in the external ACPI spec, others are custom.

The port 66 protocol is essentially the standard ACPI EC interface protocol.

1. Wait for port66.IBF = 0

2. Write command byte to port 66.

3. For each outgoing data or address byte:

3a. Wait for port66.IBF = 0

3b. Write data or address byte to port 62.

4. For each incoming data byte:

4a. Wait for port66.OBF = 1

4b. Read data byte from port 62.

5. If the command requires no data or address bytes, you can determine when the command was accepted/executed by waiting for port66.IBF=0.

同时 ACPI 定义的通用 Command如下:

ACPI-defined port 66 commands

0x80 Read EC (write 0x80 to port 66, write address byte to port 62, read data byte from port 62)

0x81 Write EC (write 0x81 to port 66, write address byte to port 62, write data byte to port 62)

0x82 Burst Enable (write 0x82 to port 66, read data byte from port 62 – the data byte is “burst ACK”, value 0x90)

0x83 Burst Disable (write 0x83 to port 66, wait for port66.IBF=0)

0x84 Query EC (i.e. read SCI event queue) (write 0x84 to port 66, read data byte from port 62). When the data byte is 0, it means that the SCI event queue is empty.

最终根据上述资料,编写一个 Application 如下:

#include  <Uefi.h>
#include  <Library/UefiLib.h>
#include  <Library/ShellCEntryLib.h>
#include  <Library/IoLib.h>

extern  EFI_SYSTEM_TABLE    *gST;
extern  EFI_BOOT_SERVICES   *gBS;

#define TIMEOUT         0xFFFF
#define ECCOMMAND       0x66
#define ECSTATUS        0x66
#define ECDATA          0x62
#define EC_S_OBF           BIT0
#define EC_S_IBF           BIT1
#define ECREADCMD          0x80

UINT8   MemBuffer[16][16];

void   WaitIBF() {
  UINT32 Status;
  UINTN Count;

  Count = 0;
  Status = 0;

  Status = IoRead8 (ECSTATUS);
  while (((Status & EC_S_IBF) != 0)||(Count>TIMEOUT)) {
    Status = IoRead8 (ECSTATUS);
    Count++;
  }
}

void    WaitOBF() {
  UINT32 Status;
  UINTN Count;

  Count = 0;
  Status = 0;

  Status = IoRead8 (ECSTATUS);
  while (((Status & EC_S_OBF) == 0)||(Count>TIMEOUT)) {
    Status = IoRead8 (ECSTATUS);
    Count++;
  }
}

UINT8 ReadECRam(UINT8 Index) {
  WaitIBF();               //1
  IoWrite8(ECCOMMAND,0x80);//2
  WaitIBF();               //3a
  IoWrite8(ECDATA, Index); //3b
  WaitOBF();               //4a
  return IoRead8(ECDATA); //4b
}

void GetData()
{
        UINT8   i,j;
        for (i=0;i<16;i++)
          for (j=0;j<16;j++) {
             MemBuffer[i][j]=ReadECRam(i*16+j);
          }
}
void ShowData()
{
        UINT8   i,j;
        Print(L"    ");
        for (i=0;i<16;i++) Print(L"%02X ",i);
        Print(L"\n");
        for (i=0;i<16;i++) {
                Print(L"%02X: ",i);
           for (j=0;j<16;j++) {
                Print(L"%02X ",MemBuffer[i][j]);
           }
           Print(L"\n");
        }
        Print(L"\n");
}
/***
  Print a welcoming message.

  Establishes the main structure of the application.

  @retval  0         The application exited normally.
  @retval  Other     An error occurred.
***/
INTN
EFIAPI
ShellAppMain (
  IN UINTN Argc,
  IN CHAR16 **Argv
  )
{
  EFI_INPUT_KEY         Key;

  Key.ScanCode=SCAN_NULL;
  while (SCAN_UP!=Key.ScanCode)
    {
        gST->ConOut->ClearScreen(gST->ConOut);
        GetData();
        ShowData();
        gST -> ConIn -> ReadKeyStroke(gST->ConIn,&Key);   
        Print(L"Press Arrow-Up to exit\n");
        gBS->Stall(1000000UL);
    }

    return(0);
}

在实体机上运行结果如下(按向上键退出):

源代码和Application(X64)下载:

参考:

1. http://wiki.laptop.org/go/Ec_specification

Arduino Leonardo 自带的“显示屏

电子的巨大魅力在于无限的可能性。比如说用3个IO端口驱动6个 LED 或者用三极管、电感、电阻制作能榨干电池剩余电力的“焦耳小偷”。百思不得其解之后看到最终的解决方案总会有醍醐灌顶的感觉,也会非常钦佩第一个想到这样用法的人。和解决数学问题之后的快乐不同,因为电子和生活息息相关,学会了这样的招数转头也可以用在自己的设计上。

本文的起因是某天在网上看到有人用 Teensy 2.X 制作的摄像头【参考1】,2.0版本使用32u4也是Leonardo同款主控芯片,因此,这个项目完全可以使用在Leonardo上。

Arduino Leonardo 是很常见的Arduino开发板,它使用了 32U4 的主控芯片,其中带有了USB Device,因此我们有机会将视频直接投送到PC上,而具体的方法就是将设备报告为 USB Camera,再将要显示的内容生成视频发送出去。Windows 内置了 USB Mass Storage 驱动,因此用户可以直接使用 U盘而无需额外安装驱动。同样的,目前的 Win10 内置了 UVC(USB video device class)的驱动,对于符合这个协议定义的USB 设备可以直接在“摄像头”程序中显示出来。

上面介绍了基本原理,接下来就是具体的实验。为了能够更好的展现内容,实验的目标是滚动显示“祝新年快乐”字样。在实验验证上有很多经验之谈,比如:不要用4个字做实验,因为4刚好是2的2倍,同时也是2的平方。很多适用于此的技巧实际上只是巧合。因此,这次使用5个字。另外还有就是测试音频设备尽量不要使用纯音乐而要使用歌曲,后者更容易让测试人员得知当前的音调是否正常。

先研究一下字模的问题。为了将汉字的字形显示输出,汉字信息处理系统还需要配有汉字字模库,也称字形库,它集中了全部汉字的字形信息。需要显示汉字时,根据汉字内码向字模库检索出该汉字的字形信息,然后输出,再从输出设备得到汉字。汉字点阵字模有16*16点、24*24点、32*32点,48*48点几种,每个汉字字模分别需要32、72、128、288个字节存放,点数愈多,输出的汉字愈美观。从经验上来说,16×16是普通人能够接受的最小字形,虽然这个尺寸的字形信息也有缺少笔画的问题(比如:“量”字,在这个尺寸下会丢掉上面 “曰”的最下面一横),但是少于16X16的汉字字形信息会让观看者有明显的缺少笔画的的观感,有如“第二次简化字”死灰复燃。24×24 的字形信息则是完全不丢失笔画的最小尺寸。但是缺点很明显,每个汉字要比16×16的字形多花1倍的空间来进行存储。这对于内存和处理能力有限的单片机来说,着实是一个负担。因此,大多数情况下,单片机使用最多的是 16×16的自字形库HZK16。这个字库是符合GB2312国家标准的16×16点阵字库,HZK16的GB2312-80支持的汉字有6763个,符号682个。其中一级汉字有 3755个,按声序排列,二级汉字有3008个,按偏旁部首排列。取得字形的过程如下:

  1. 取得欲查询汉字的GB2312编码,每个汉字由2个Byte 进行编码,第一个字节被称作              “区码”;第二个字节被称作“位码”;
  2. 接下来计算汉字在HZK16中的绝对偏移位置:offset = (94*(区码-1)+(位码-1))*32
  3. 读取 HZK16 中 offset 给出的位置连续 32 Bytes 即可得到字形信息

例如:查询得到“奈”的区位码为3646,那么计算  offset=(94*(36-1)+(46-1))*32=106720(D)=0x1A0E0

○○○○○○○●○○○○○○○○   →   0x01,0x00
○○○○○○○●○○○○●○○○   →   0x01,0x08
○●●●●●●●●●●●●●○○   →   0x7F,0xFC
○○○○○○●○●○○○○○○○   →   0x02,0x80
○○○○○●○○○●○○○○○○   →   0x04,0x40
○○○○●○○○○○●●○○○○   →   0x08,0x30
○○○●○○○○○●○○●●●○   →   0x10,0x4E
●●●○●●●●●●●○○●○○   →   0xEF,0xE4
○○○○○○○○○○○○○○○○   →   0x00,0x00
○○○○○○○○○○○●○○○○   →   0x00,0x10
○○●●●●●●●●●●●○○○   →   0x3F,0xF8
○○○○○○○●○○○○○○○○   →   0x01,0x00
○○○○●○○●○○●○○○○○   →   0x09,0x20
○○○●○○○●○○○●●○○○   →   0x11,0x18
○●●○○●○●○○○○●○○○   →   0x65,0x08
○○○○○○●○○○○○○○○○   →   0x02,0x00

有了上面的知识,可以很容易的从字库中取得汉字的字形,比如,用程序取得”祝”字的字形信息:

其中的key[32] = {0x20,0x08,0x13,0xFC,0x12,0x08,0x02,0x08,0xFE,0x08,0x0A,0x08,0x12,0x08,0x3B,0xF8,0x56,0xA8,0x90,0xA0,0x10,0xA0,0x11,0x20,0x11,0x22,0x12,0x22,0x14,0x1E,0x18,0x00}; 就是我们需要的字形信息。

用同样的方法,可以依次取得“新年快乐”的字形信息。滚动的原理可以想象成一个窗户,不断在向右侧滑动。窗户的大小为  16 Bits ,落在这个里面的内容就是需要显示出来的内容。

出现在窗口中的数值有两种情况:

  1. 刚好是一个完整的字,那么直接输出这个字的信息即可;
  2. 介于第一个字和第二个字之间,需要取得第一个字形的高位信息,然后和第二个字的低位信息拼接即可;

上面解决了显示内容的问题,下面就是如何显示。模拟出来的摄像头将一帧帧的图像发送给PC,其中采用的是YV12的编码格式。通常我们接触到的都是 RGB 格式,每一个点由Red/Green/Blue 三个颜色信息组成,最常见的是每一个颜色各占1个字节。YV12 则使用的是另外的颜色表示方法,使用Y 命令度(Luminance),U色度(Chrominance)和 浓度(Chroma)。这种表示方法是 是历史原因导致的,它出现在Y’UV的发明是由于彩色电视与黑白电视的过渡时期。黑白视频只有Y(Luma,Luminance)视频,也就是灰阶值。到了彩色电视规格的制定,是以YUV的格式来处理彩色电视图像,把UV视作表示彩度的C(Chrominance或Chroma),如果忽略C信号,那么剩下的Y(Luma)信号就跟之前的黑白电视频号相同,这样一来便解决彩色电视机与黑白电视机的兼容问题。另外,这种编码方式也会使用视觉特性来节省空间。每一个点的 Y 信号是独立的,但是相邻的四个点会共享同一个U和同一个V信息。比如:之前空间上存在相邻的四个点 (Ri,Gi,Bi) 通过某种算法变换后得到 (Yi,U1,V1)这样的四个点信息。之前存放四个点需要 3*4=12Byte;变化之后只需要存储 Y1/Y2/Y3/Y4/U1/V1 6Byte的信息即可。减少了一半的数据量。

R1,G1,B1 R2,G2,B2 Y1,U1,V1 Y2,U1,V1
R3,G3,B3 R4,G4,B4 Y3,U1,V1 Y4,U1,V1

将上面的过程放在一个帧的图像上来看是下面这样

代码很长,但大部分都只是框架,send_yv12_frame() 是最关键的函数,具体的输出帧(借用计算机图形学的概念可以说是“渲染的过程”)是在其中完成计算的:

static inline void send_yv12_frame(void)
{
    uint16_t h,w,lastw;
    uint8_t write_hdr = 1;
    uint8_t hdr;
    uint8_t color, colcnt;
    //uint8_t br = LSB(brightness);
    uint8_t board[16][16];
    int c,low,high;
    char *p;
  
    usb_wait_in_ready();

    if (k==(sizeof(wordaddr)/2-1)*16) {k=0;}
    else k++;
    
    //显示一个完整的字形
    for (int i=0;i<16;i++)
    {
      //k给出当前要显示的窗口起始位置      
      if (k%16==0)  //如果当前指针刚好在一个字上,那么直接取出这个字进行显示
        {
          //指向要显示的汉字起始地址
          p=wordaddr[k/16];
          //取出这个字的一行信息
          c=((*(p+i*2)&0xFF)<<8)+(*(p+i*2+1)&0xFF);
        }
      else //指针不在一个字上,就要用两个字来拼成一个字进行显示
        {
          //指向要显示的第一个汉字
          p=wordaddr[k/16];
          //取出第一个汉字的一行
          low=(((*(p+i*2)&0xFF)<<8)+(*(p+i*2+1)&0xFF))&0xFFFF;           
          //指向要显示的第二个汉字
          p=wordaddr[(k/16+1)%sizeof(wordaddr)];
          //取出第二个汉字的一行
          high=(((*(p+i*2)&0xFF)<<8)+(*(p+i*2+1)&0xFF));
          //用取得的信息拼出来要显示的一行
          c=low<<(k%16)|(high&0xFFFF)>>(16-k%16);
        }

    for (int j=0;j<16;j++)
      {
        if ((c&0x8000)==0) {
              board[j][i]=0;//这个点位置有信息
          }
        else  board[j][i]=1;//这个点位无信息
        c=c<<1;
      }        
     }
     
    //下面发送一帧信息 
    /* Y plane (h*w bytes) */ 
    for(h=0; h < HEIGHT; h++) {
        w=0;
        color = cur_start_col;
        colcnt = COLUMN_WIDTH - cur_col_offset;
        do {
            if(!usb_rw_allowed()) {
                usb_ack_bank();                
                if(usb_wait_in_ready_timeo(10) < 0)                
                    return;                
                usb_ack_in();
                lastw = w;
                write_hdr = 1;
            } else {
                if(write_hdr) {
                    /* Write header */
                    hdr = UVC_PHI_EOH | (fid&1);
                    UEDATX = 2; // write header len
                    UEDATX = hdr;
                    write_hdr = 0;
                }
                //为了美观,上下各空出12
                if ((h<12)||(h>107)) {
                       UEDATX=0; 
                }
                else {
                   //检查当前的点阵信息输出黑或者白  
                   //Y:255 U:128 V:128 是白色
                   //Y:0   U:128 V:128 是黑色
                   if (board[w/10][(h-12)/6]==1) {UEDATX=0xFF;} // Y                
                   else {UEDATX=0;}
                }
                w++;
                if(--colcnt == 0) {
                    color = next_color(color);
                    colcnt = COLUMN_WIDTH;
                }
            }            
        } while(w < WIDTH);
    }

    /* U plane (h/2*w/2 bytes) */ 
    for(h=0; h < HEIGHT/2; h++) {
        w=0;
        color = cur_start_col;
        colcnt = COLUMN_WIDTH - cur_col_offset;
        do {
            if(!usb_rw_allowed()) {
                usb_ack_bank();                
                if(usb_wait_in_ready_timeo(10) < 0)                
                    return;                
                usb_ack_in();
                lastw = w;
                write_hdr = 1;
            } else {
                if(write_hdr) {
                    /* Write header */
                    hdr = UVC_PHI_EOH | (fid&1);
                    UEDATX = 2; // write header len
                    UEDATX = hdr;
                    write_hdr = 0;
                }
                UEDATX=128;                
                w++;
                if(colcnt <= 2) {
                    color = next_color(color);
                    colcnt = COLUMN_WIDTH;
                } else {
                   colcnt -= 2; 
                }

            }            
        } while(w < WIDTH/2);
    }

    /* V plane (h/2*w/2 bytes) */ 
    for(h=0; h < HEIGHT/2; h++) {
        w=0;
        color = cur_start_col;
        colcnt = COLUMN_WIDTH - cur_col_offset;
        do {
            if(!usb_rw_allowed()) {
                usb_ack_bank();                
                if(usb_wait_in_ready_timeo(10) < 0)                
                    return;                
                usb_ack_in();
                lastw = w;
                write_hdr = 1;
            } else {
                if(write_hdr) {
                    /* Write header */
                    hdr = UVC_PHI_EOH | (fid&1);
                    if(h==HEIGHT/2-1 && w < UVC_TX_SIZE)
                        hdr |= UVC_PHI_EOF; 
                    UEDATX = 2; // write header len
                    UEDATX = hdr;
                    write_hdr = 0;
                }
                UEDATX=128;
                w++;
                if(colcnt <= 2) {
                    color = next_color(color);
                    colcnt = COLUMN_WIDTH;
                } else {
                    colcnt-=2;
                }
            }            
        } while(w <WIDTH/2);
    }

    if(lastw != w) {
        usb_ack_bank();
    }
    fid = ~fid; // flip frame id bit
}

和之前的项目一样,这个需要基于 Lufa 库支持,使用  WinAvr 进行编译。使用 make 即可完成编译。

使用和Arduino刷新一样的的命令,要根据你的Arduino板子重启时占用的串口号调整 –PCOMn 参数。同时,每次刷新时,需要先按下 Arduino Reset键,然后运行刷写命令。

D: \arduino-1.8.4\hardware\tools\avr\bin\avrdude -v –d:\arduino-1.8.4\hardware\tools\avr\etc\avrdude.conf -patmega32u4 -cavr109 -PCOM7 -b57600 -D -V -Uflash:w:./uvc.hex:i

烧写成功后,运行 Camera 即可查看结果:

为了简单起见,只实现了黑白显示,有兴趣的朋友可以发挥想象力显示彩色的汉字,相信这只是一个开始,后面会有更多的玩法。

参考:

1. https://github.com/avivgr/teensy_uvc

Step to UEFI (178)UEFI 下面的 Openssl 签名

人类常用权威的话语来证明自己的观点,这种方式可以说是一种签名。当然,这种方式存在一个严重的缺陷:无法证明那个生成的名人确实说过这句话。


同样的,在互联网上,我们需要用一种方式来验证确认身份信息。其中的一个方法就是数字签名。

前面介绍过 RSA 算法,因为它能够实现非对称的加密所以还可以用来进行数字签名。比如:我在网站上公布了自己的公钥,然后每次发送消息的时候会附上使用私钥对这个消息签名结果。这样,别人就无法冒充我发布消息。这次展示使用 OpenSSL 实现UEFI下面的签名和验证。

第一步,生成RSA密钥对(我不清楚为什么文章都喜欢将这个直接称作“私钥”,实际上这样生成的结果是包括公钥部分的,索性这里我称之为密钥包)。

openssl genrsa -out rsa_private_key.pem 1024

生成的密钥包内容如下:

-----BEGIN RSA PRIVATE KEY-----
MIICXQIBAAKBgQDTiExu8F6X/VWPqPmzBc3mqUfMvOB0xtaTZAQbSfyt+uqxu7GN
aStGpdJvCuOFL7+FFXSFLJfmZsiYRaiOSpPDDuQLBkG0m/ABk8pLtobEy6UgJPpS
6Oiku1618+uwYKcZpPj2Ftu5d+FFMiS23SCI8zhLcF3fM2J7/IXudCOErQIDAQAB
AoGABbgtuOIu7JUg9x1ugvSpOI9jLZn9x6qIqruNkN9TQbEDH4Mfrd8mGGbrZa05
saQ03XhTCjbGdKhazCM2B4Lks9jb0ovA2CUvuX+sxUHXdgEFekEv/VVIzem3qt0F
kMV+lSX76F/CkV4XXOO4H1rYja7BObl/jFMjTpRgPh0g4AECQQD3MCGCwqqQvGBV
Lw8cJHj7E9bMK8NWauONJfYL0D+9/ylas+xS73iqLcSpWcchWDjbM3T2tYAeZLrf
i0VmHm4BAkEA2xLFKytC9dbIDJS+0316jZvK/AWsSDbKo+Fn+DnO9x6ZhstX062t
7WEDRHT3ZR0vQTS7f9SayxN3MMwSB88urQJBAOI2ofRQwleCjYZncqSGnFDqbwCa
bEGBwI1D2FAnXK47/VSMpBGiJgNXr0psZtgVLLMt/DRrFby64moBwpkZ8AECQQC3
7zWOfj81S8UhEw55YYQxO1odaeHxq9dN62Yw+tBzmcSLcVVnTA6ZHPfyVUaWJf/T
/qNiu63PzaMoXF7TIbftAkBcpDvw4T3kynR1mXyuC1jmvenYZGtfdhtCgqBRt4Z2
MFeMsqkFNDzuJbHdq1vdDUl2Oh4XyVyOGNc5hxiFrx8a
-----END RSA PRIVATE KEY-----

第二步,从这个密钥包分离出来公钥。

Openssl rsa -in rsa_private_key.pem -pubout -out rsa_public_key.pem

公钥文件名是rsa_public_key.pem,内容如下:

-----BEGIN PUBLIC KEY-----
MIGfMA0GCSqGSIb3DQEBAQUAA4GNADCBiQKBgQDTiExu8F6X/VWPqPmzBc3mqUfM
vOB0xtaTZAQbSfyt+uqxu7GNaStGpdJvCuOFL7+FFXSFLJfmZsiYRaiOSpPDDuQL
BkG0m/ABk8pLtobEy6UgJPpS6Oiku1618+uwYKcZpPj2Ftu5d+FFMiS23SCI8zhL
cF3fM2J7/IXudCOErQIDAQAB
-----END PUBLIC KEY-----

这个文件是可以公开的。前面提到的密钥包是需要保密的。

到这步,已经准备好了公钥和私钥,可以用

openssl rsa -in rsa_private_key.pem -text

解析出我们要定义在代码中的内容

Private-Key: (1024 bit)
modulus:   //这是公钥RsaN[]  需要特别注意,下面是 127 Byte,开头多了一个 00
    00:d3:88:4c:6e:f0:5e:97:fd:55:8f:a8:f9:b3:05:
    cd:e6:a9:47:cc:bc:e0:74:c6:d6:93:64:04:1b:49:
    fc:ad:fa:ea:b1:bb:b1:8d:69:2b:46:a5:d2:6f:0a:
    e3:85:2f:bf:85:15:74:85:2c:97:e6:66:c8:98:45:
    a8:8e:4a:93:c3:0e:e4:0b:06:41:b4:9b:f0:01:93:
    ca:4b:b6:86:c4:cb:a5:20:24:fa:52:e8:e8:a4:bb:
    5e:b5:f3:eb:b0:60:a7:19:a4:f8:f6:16:db:b9:77:
    e1:45:32:24:b6:dd:20:88:f3:38:4b:70:5d:df:33:
    62:7b:fc:85:ee:74:23:84:ad
publicExponent: 65537 (0x10001)  
privateExponent:  //这是私钥部分,RsaD[]
    05:b8:2d:b8:e2:2e:ec:95:20:f7:1d:6e:82:f4:a9:
    38:8f:63:2d:99:fd:c7:aa:88:aa:bb:8d:90:df:53:
    41:b1:03:1f:83:1f:ad:df:26:18:66:eb:65:ad:39:
    b1:a4:34:dd:78:53:0a:36:c6:74:a8:5a:cc:23:36:
    07:82:e4:b3:d8:db:d2:8b:c0:d8:25:2f:b9:7f:ac:
    c5:41:d7:76:01:05:7a:41:2f:fd:55:48:cd:e9:b7:
    aa:dd:05:90:c5:7e:95:25:fb:e8:5f:c2:91:5e:17:
    5c:e3:b8:1f:5a:d8:8d:ae:c1:39:b9:7f:8c:53:23:
4e:94:60:3e:1d:20:e0:01

第三步,有了上面的密钥包(其实是其中的私钥)即可对消息进行签名。例如,我们使用“This message from lab-z.com”作为被签名的字符串,将这一段存放在 string.txt 文件中。然后对其签名:

openssl dgst -sha1 -sign rsa_private_key.pem –out string.sign string.txt

签名结果如下:

第四步,签名的校验。使用下面的命令,这次用到的是公钥,然后针对 string.txt 校验签名结果是否和 string.sign内容相同。

openssl dgst -verify rsa_public_key.pem -sha1 -signature string.sign string.txt

如果结果相同,会输出Verified OK ,否则输出Verification Failure。

上面就是使用 OpenSSL.exe 来完成 RSA 签名校验的过程。接下来介绍使用 UEFI 完成这些操作。代码改编自 UDK2017 中的 CryptoPkg 下面 Application 的例子(但是从 UDK2018开始这部分代码被移除了)

/** @file
  Application for Cryptographic Primitives Validation.

Copyright (c) 2009 - 2016, Intel Corporation. All rights reserved.<BR>
This program and the accompanying materials
are licensed and made available under the terms and conditions of the BSD License
which accompanies this distribution.  The full text of the license may be found at
http://opensource.org/licenses/bsd-license.php

THE PROGRAM IS DISTRIBUTED UNDER THE BSD LICENSE ON AN "AS IS" BASIS,
WITHOUT WARRANTIES OR REPRESENTATIONS OF ANY KIND, EITHER EXPRESS OR IMPLIED.

**/
#include <Uefi.h>
#include <Library/BaseLib.h>
#include <Library/BaseMemoryLib.h>
#include <Library/MemoryAllocationLib.h>
#include <Library/UefiLib.h>
#include <Library/UefiApplicationEntryPoint.h>
#include <Library/DebugLib.h>
#include <Library/BaseCryptLib.h>

#define  RSA_MODULUS_LENGTH  1024

//
// Public Modulus of RSA Key
//
GLOBAL_REMOVE_IF_UNREFERENCED CONST UINT8 RsaN[] = {
    0xd3,0x88,0x4c,0x6e,0xf0,0x5e,0x97,0xfd,0x55,0x8f,0xa8,0xf9,0xb3,0x05,
    0xcd,0xe6,0xa9,0x47,0xcc,0xbc,0xe0,0x74,0xc6,0xd6,0x93,0x64,0x04,0x1b,0x49,
    0xfc,0xad,0xfa,0xea,0xb1,0xbb,0xb1,0x8d,0x69,0x2b,0x46,0xa5,0xd2,0x6f,0x0a,
    0xe3,0x85,0x2f,0xbf,0x85,0x15,0x74,0x85,0x2c,0x97,0xe6,0x66,0xc8,0x98,0x45,
    0xa8,0x8e,0x4a,0x93,0xc3,0x0e,0xe4,0x0b,0x06,0x41,0xb4,0x9b,0xf0,0x01,0x93,
    0xca,0x4b,0xb6,0x86,0xc4,0xcb,0xa5,0x20,0x24,0xfa,0x52,0xe8,0xe8,0xa4,0xbb,
    0x5e,0xb5,0xf3,0xeb,0xb0,0x60,0xa7,0x19,0xa4,0xf8,0xf6,0x16,0xdb,0xb9,0x77,
    0xe1,0x45,0x32,0x24,0xb6,0xdd,0x20,0x88,0xf3,0x38,0x4b,0x70,0x5d,0xdf,0x33,
    0x62,0x7b,0xfc,0x85,0xee,0x74,0x23,0x84,0xad
  };

//
// Public Exponent of RSA Key

GLOBAL_REMOVE_IF_UNREFERENCED CONST UINT8 RsaE[] = { 0x01, 0x00,0x01 };

//
// Private Exponent of RSA Key
//
GLOBAL_REMOVE_IF_UNREFERENCED CONST UINT8 RsaD[] = {
    0x05,0xb8,0x2d,0xb8,0xe2,0x2e,0xec,0x95,0x20,0xf7,0x1d,0x6e,0x82,0xf4,0xa9,
    0x38,0x8f,0x63,0x2d,0x99,0xfd,0xc7,0xaa,0x88,0xaa,0xbb,0x8d,0x90,0xdf,0x53,
    0x41,0xb1,0x03,0x1f,0x83,0x1f,0xad,0xdf,0x26,0x18,0x66,0xeb,0x65,0xad,0x39,
    0xb1,0xa4,0x34,0xdd,0x78,0x53,0x0a,0x36,0xc6,0x74,0xa8,0x5a,0xcc,0x23,0x36,
    0x07,0x82,0xe4,0xb3,0xd8,0xdb,0xd2,0x8b,0xc0,0xd8,0x25,0x2f,0xb9,0x7f,0xac,
    0xc5,0x41,0xd7,0x76,0x01,0x05,0x7a,0x41,0x2f,0xfd,0x55,0x48,0xcd,0xe9,0xb7,
    0xaa,0xdd,0x05,0x90,0xc5,0x7e,0x95,0x25,0xfb,0xe8,0x5f,0xc2,0x91,0x5e,0x17,
    0x5c,0xe3,0xb8,0x1f,0x5a,0xd8,0x8d,0xae,0xc1,0x39,0xb9,0x7f,0x8c,0x53,0x23,
    0x4e,0x94,0x60,0x3e,0x1d,0x20,0xe0,0x01
  };

//
// Known Answer Test (KAT) Data for RSA PKCS#1 Signing
//
GLOBAL_REMOVE_IF_UNREFERENCED CONST CHAR8 RsaSignData[] = "This message from lab-z.com";

//
// Known Signature for the above message, under SHA-1 Digest
//
GLOBAL_REMOVE_IF_UNREFERENCED CONST UINT8 RsaPkcs1Signature[] = {
0x61,0xA2,0xDD,0x93,0x1A,0xA6,0x1B,0x46,0x2A,0x84,0xC8,0x7A,0x74,0xBB,0x23,0x44,
0x43,0xD6,0xE9,0x2A,0x30,0xAF,0x2D,0x13,0x0A,0x74,0x26,0x78,0xF6,0x42,0x23,0x4D,
0x55,0x85,0xC9,0x42,0xA8,0x4A,0xAC,0x2C,0x46,0x76,0xF5,0x34,0xC7,0x57,0x3B,0x2F,
0x4B,0xF9,0x42,0x03,0x1F,0x80,0xCE,0xF2,0xD7,0xA4,0x8C,0xBB,0xBF,0x37,0x60,0x4A,
0x32,0x3A,0xF2,0x82,0x95,0xF3,0x11,0x40,0x2E,0x45,0x4B,0x2E,0x02,0xBA,0xAA,0xFC,
0x29,0x8D,0xEC,0x56,0xC6,0xCD,0x97,0x06,0xDE,0x52,0x85,0xDB,0x1B,0x17,0xF1,0x39,
0xBB,0x6B,0x8C,0xAA,0xFE,0xEC,0xD4,0xA7,0x96,0x6F,0x22,0xCD,0x4B,0x6D,0x01,0x0B,
0x00,0xA1,0xDF,0x7F,0xA4,0xA0,0xD2,0xC4,0x09,0x0C,0xB0,0x4A,0x7A,0xA2,0xE2,0x93
};

/**
  Entry Point of Cryptographic Validation Utility.

  @param  ImageHandle  The image handle of the UEFI Application.
  @param  SystemTable  A pointer to the EFI System Table.

  @retval EFI_SUCCESS       The entry point is executed successfully.
  @retval other             Some error occurs when executing this entry point.

**/
EFI_STATUS
EFIAPI
CryptestMain (
  IN     EFI_HANDLE                 ImageHandle,
  IN     EFI_SYSTEM_TABLE           *SystemTable
  )
{
  VOID     *Rsa;
  UINT8    HashValue[SHA1_DIGEST_SIZE];
  UINTN    HashSize;
  UINTN    CtxSize;
  VOID     *Sha1Ctx;
  UINT8    *Signature;
  UINTN    SigSize;
  BOOLEAN  Status;
  UINTN i;
  UINT8    sign[SHA1_DIGEST_SIZE];

  RandomSeed (NULL, 0);

  //
  // SHA-1 Digest Message for PKCS#1 Signature 
  //
  Print (L"Hash Original Message ...\n");
  HashSize = SHA1_DIGEST_SIZE;
  ZeroMem (HashValue, HashSize);
  CtxSize = Sha1GetContextSize ();
  Sha1Ctx = AllocatePool (CtxSize);

  Status  = Sha1Init (Sha1Ctx);
  if (!Status) {
    Print (L"[Fail]");
    return EFI_ABORTED;
  }

  Status  = Sha1Update (Sha1Ctx, RsaSignData, AsciiStrLen (RsaSignData));
  if (!Status) {
    Print (L"[Fail]");
    return EFI_ABORTED;
  }

  Status  = Sha1Final (Sha1Ctx, HashValue);
  if (!Status) {
    Print (L"[Fail]");
    return EFI_ABORTED;
  }
  
  for (i=0;i<HashSize;i++) {Print (L"%02X  ",HashValue[i]);}
  
  FreePool (Sha1Ctx);

  //
  // Sign RSA PKCS#1-encoded Signature
  //
  Print (L"PKCS#1 Signature ...\n");

  Rsa = RsaNew ();
  if (Rsa == NULL) {
    Print (L"[Fail]t\n");
    return EFI_ABORTED;
  }

  Status = RsaSetKey (Rsa, RsaKeyN, RsaN, sizeof (RsaN));
  if (!Status) {
    Print (L"[Fail]p\n");
    return EFI_ABORTED;
  }

  Status = RsaSetKey (Rsa, RsaKeyE, RsaE, sizeof (RsaE));
  if (!Status) {
    Print (L"[Fail]h\n");
    return EFI_ABORTED;
  }
  //Private Key
  Status = RsaSetKey (Rsa, RsaKeyD, RsaD, sizeof (RsaD));
  if (!Status) {
    Print (L"[Fail]q\n");
    return EFI_ABORTED;
  }

  SigSize = 0;
  Status  = RsaPkcs1Sign (Rsa, HashValue, HashSize, sign, &SigSize);
  if (Status || SigSize == 0) {
    return EFI_ABORTED;
  }
  Signature = AllocatePool (SigSize);
  Status  = RsaPkcs1Sign (Rsa, HashValue, HashSize, Signature, &SigSize);
  if (!Status) {
    Print (L"[Fail]y\n");
    return EFI_ABORTED;
  }

  for (i=0;i<SigSize;i++) { Print(L"%02X  ",Signature[i]);} Print(L" \n");
  
  if (SigSize != sizeof (RsaPkcs1Signature)) {
    Print (L"[Fail]\n");
    return EFI_ABORTED;
  }

  if (CompareMem (Signature, RsaPkcs1Signature, SigSize) != 0) {
    Print (L"[Fail]a2\n");
    return EFI_ABORTED;
  }

  //
  // Release Resources
  //
  RsaFree (Rsa);
  Print (L"Release RSA Context ... [Pass]");

  Print (L"\n");

  return EFI_SUCCESS;
}

运行结果如下:

可以看到代码是先进行了一次 SHA1 运算,然后再用私钥进行签名的。我猜测这样操作的原因是为了避免 RSA运算缓慢和安全性方面的考虑。

完整的代码下载

参考:

  1. https://www.cnblogs.com/gordon0918/p/5382541.html openssl 摘要和签名验证指令dgst使用详解
  2. https://www.cnblogs.com/liliyang/p/9738964.html (4) openssl rsa/pkey(查看私钥、从私钥中提取公钥、查看公钥)

Step to UEFI (177)Setup String ITEM 的 Default Value

有时候,我们需要在Setup 中指定 String 的 Default值,例如:

如果你想直接给他指定一个字符串作为Default,需要添加如下的代码:

1. \MdeModulePkg\Universal\DriverSampleDxe\Vfr.vfr

    //
    // Define a string (EFI_IFR_STRING)
    //
    string    varid    = MyIfrNVData.MyStringData,
              prompt   = STRING_TOKEN(STR_MY_STRING_PROMPT2),
              help     = STRING_TOKEN(STR_MY_STRING_HELP2),
              
              flags    = INTERACTIVE,
              key      = 0x1236,
              minsize  = 6,
              maxsize  = 40,
              inconsistentif prompt = STRING_TOKEN(STR_STRING_CHECK_ERROR_POPUP),
                pushthis != stringref(STRING_TOKEN(STR_STRING_CHECK))
              endif;
              default  = STRING_TOKEN(STR_STRING_CHECK),
endstring;

2. \MdeModulePkg\Universal\DriverSampleDxe\VfrStrings.uni

#string STR_TEST        #language en-US  "LAB-Z"
                        #language fr-FR  "LAB-Z"

编译结果:

比较诡异的是default  = STRING_TOKEN(STR_TEST), 只能放在这个定义的末尾,如果放在中间,比如:

              help     = STRING_TOKEN(STR_MY_STRING_HELP2),
              default  = STRING_TOKEN(STR_TEST),
              flags    = INTERACTIVE,

     在编译的时候会出现下面的错误,不得不不说非常诡异。也正是因为这个原因,这个功能我研究了很久很久…….

Teensy 3.X 使用 UcgLib 的问题

最近在 Teensy 3.2 上使用 ILI9341 的液晶屏,在编译的时候会出现两个错误导致无法完成编译。

1.关于 _NOP 的错误。经过搜索,在 https://github.com/olikraus/ucglib/issues/65 找到有人解决过这样的问题。原帖写的是:

Ucglib.cpp, line 786 – change the …defined(__arm__)… to …defined(__NOT_arm__)
Ucglib.cpp, line 833, add the following:

#ifndef __NOP
#define __NOP __asm__ __volatile__("NOP");
#endif

有可能是因为版本的差别,我在Ucglib.cpp 中修改如下:

Line783:

#if defined(__PIC32MX) || defined(__NOT_arm__) || defined(ESP8266) || defined(ARDUINO_ARCH_ESP8266) || defined(ESP_PLATFORM) || defined(ARDUINO_ARCH_ESP32)

Line 830:

#ifndef __NOP
#define __NOP __asm__ __volatile__("NOP");
#endif

之后即可解决这个问题。

2. u8g_data_port 的错误。修改方法是将 Ucglib.cpp

#if defined(__PIC32MX) || defined(__arm__) || defined(ESP8266) || defined(ARDUINO_ARCH_ESP8266) || defined(ESP_PLATFORM) || defined(ARDUINO_ARCH_ESP32)
/* CHIPKIT PIC32 */
static volatile uint32_t *u8g_data_port[9];
static uint32_t u8g_data_mask[9];
#else

中的 static volatile uint32_t *u8g_data_port[9]; 修改为 static volatile uint8_t *u8g_data_port[9]; 。 这样有可能降低 UcgLib 的通用性,但是编译没问题。

代码中按照下面两种接线和定义都是能够工作正常的

Ucglib_ILI9341_18x240x320_SWSPI ucg(/*sclk=*/ 13, /*data=*/ 11, /*cd=*/ 9, /*cs=*/ 10, /*reset=*/ 8);

Ucglib_ILI9341_18x240x320_HWSPI ucg(/*cd=*/ 9, /*cs=*/ 10, /*reset=*/ 8);

推荐 HWSPI,速度快很多。

Step to UEFI (176)memset的实现方法

之前的文章“哪里来的的 memset”【参考1】提到过因为编译器擅作主张使用memset优化引起了很诡异的问题。可以通过关闭编译优化来避免错误,这里从代码的角度分析 EDK2 是如何实现 memset 功能的。

  1. \MdePkg\Library\BaseMemoryLib\MemLibGeneric.c 提供了三个函数

InternalMemSetMem16

 InternalMemSetMem32

InternalMemSetMem64

以 InternalMemSetMem16  为例:

/**
  Fills a target buffer with a 16-bit value, and returns the target buffer.

  @param  Buffer  The pointer to the target buffer to fill.
  @param  Length  The count of 16-bit value to fill.
  @param  Value   The value with which to fill Length bytes of Buffer.

  @return Buffer

**/
VOID *
EFIAPI
InternalMemSetMem16 (
  OUT     VOID                      *Buffer,
  IN      UINTN                     Length,
  IN      UINT16                    Value
  )
{
  for (; Length != 0; Length--) {
    ((UINT16*)Buffer)[Length - 1] = Value;
  }
  return Buffer;
}

看起来for (; Length != 0; Length–) 这样的定义足够“迷惑”编译器避免优化。

2. \MdePkg\Library\BaseMemoryLib\SetMem.c 提供了InternalMemSetMem()

/**
  Set Buffer to Value for Size bytes.

  @param  Buffer   The memory to set.
  @param  Length   The number of bytes to set.
  @param  Value    The value of the set operation.

  @return Buffer

**/
VOID *
EFIAPI
InternalMemSetMem (
  OUT     VOID                      *Buffer,
  IN      UINTN                     Length,
  IN      UINT8                     Value
  )
{
  //
  // Declare the local variables that actually move the data elements as
  // volatile to prevent the optimizer from replacing this function with
  // the intrinsic memset()
  //
  volatile UINT8                    *Pointer8;
  volatile UINT32                   *Pointer32;
  volatile UINT64                   *Pointer64;
  UINT32                            Value32;
  UINT64                            Value64;

  if ((((UINTN)Buffer & 0x7) == 0) && (Length >= 8)) {
    // Generate the 64bit value
    Value32 = (Value << 24) | (Value << 16) | (Value << 8) | Value;
    Value64 = LShiftU64 (Value32, 32) | Value32;

    Pointer64 = (UINT64*)Buffer;
    while (Length >= 8) {
      *(Pointer64++) = Value64;
      Length -= 8;
    }

    // Finish with bytes if needed
    Pointer8 = (UINT8*)Pointer64;
  } else if ((((UINTN)Buffer & 0x3) == 0) && (Length >= 4)) {
    // Generate the 32bit value
    Value32 = (Value << 24) | (Value << 16) | (Value << 8) | Value;

    Pointer32 = (UINT32*)Buffer;
    while (Length >= 4) {
      *(Pointer32++) = Value32;
      Length -= 4;
    }

    // Finish with bytes if needed
    Pointer8 = (UINT8*)Pointer32;
  } else {
    Pointer8 = (UINT8*)Buffer;
  }
  while (Length-- > 0) {
    *(Pointer8++) = Value;
  }
  return Buffer;
}

避免被编译器优化的方法和上面的类似,此外还可以看出这个函数特地用 8 bytes填充提升效率。

3. \MdePkg\Library\UefiMemoryLib\MemLib.c 中的InternalMemSetMem 函数直接调用 gBS 提供的服务

/**
  Fills a target buffer with a byte value, and returns the target buffer.

  This function wraps the gBS->SetMem().

  @param  Buffer    Memory to set.
  @param  Size      The number of bytes to set.
  @param  Value     Value of the set operation.

  @return Buffer.

**/
VOID *
EFIAPI
InternalMemSetMem (
  OUT     VOID                      *Buffer,
  IN      UINTN                     Size,
  IN      UINT8                     Value
  )
{
  gBS->SetMem (Buffer, Size, Value);
  return Buffer;
}

4. 通过volatile 申明变量避免编译器的优化,简单粗暴,很前面2提到的没有本质差别。volatile是一个类型修饰符(type specifier).volatile的作用是作为指令关键字,确保本条指令不会因编译器的优化而省略,且要求每次直接读值。volatile的变量是说这变量可能会被意想不到地改变,这样,编译器就不会去假设这个变量的值了。【参考2】

 \EdkCompatibilityPkg\Foundation\Library\EdkIIGlueLib\Library\BaseMemoryLib\Ebc\SetMem.c

/**
  Set Buffer to Value for Size bytes.

  @param  Buffer Memory to set.
  @param  Size Number of bytes to set
  @param  Value Value of the set operation.

  @return Buffer

**/
VOID *
EFIAPI
InternalMemSetMem (
  IN      VOID                      *Buffer,
  IN      UINTN                     Size,
  IN      UINT8                     Value
  )
{
  //
  // Declare the local variables that actually move the data elements as
  // volatile to prevent the optimizer from replacing this function with
  // the intrinsic memset()
  //
  volatile UINT8                    *Pointer;

  Pointer = (UINT8*)Buffer;
  while (Size-- != 0) {
    *(Pointer++) = Value;
  }
  return Buffer;
}

5.汇编语言实现

\EdkCompatibilityPkg\Foundation\Library\CompilerStub\X64\memset.asm

\EdkCompatibilityPkg\Foundation\Library\CompilerStub\Ia32\memset.asm

IA32汇编的实现

    .686
    .model  flat,C
    .mmx
    .code

;------------------------------------------------------------------------------
;  VOID *
;  memset (
;    OUT VOID   *Buffer,
;    IN  UINT8  Value,
;    IN  UINTN  Count
;    )
;------------------------------------------------------------------------------
memset   PROC    USES    edi
    mov     al, [esp + 12]
    mov     ah, al
    shrd    edx, eax, 16
    shld    eax, edx, 16
    mov     ecx, [esp + 16]             ; ecx <- Count
    cmp     ecx, 0                      ; if Count == 0, do nothing
    je      @SetDone
    mov     edi, [esp + 8]              ; edi <- Buffer
    mov     edx, ecx
    and     edx, 7
    shr     ecx, 3                      ; # of Qwords to set
    jz      @SetBytes
    add     esp, -10h
    movq    [esp], mm0                  ; save mm0
    movq    [esp + 8], mm1              ; save mm1
    movd    mm0, eax
    movd    mm1, eax
    psllq   mm0, 32
    por     mm0, mm1                    ; fill mm0 with 8 Value's
@@:
    movq    [edi], mm0
    add     edi, 8
    loop    @B
    movq    mm0, [esp]                  ; restore mm0
    movq    mm1, [esp + 8]              ; restore mm1
    add     esp, 10h                    ; stack cleanup
@SetBytes:
    mov     ecx, edx
    rep     stosb
@SetDone:    
    mov     eax, [esp + 8]              ; eax <- Buffer as return value
    ret
memset   ENDP

    END

上面就是实现 SetMem 函数的基本方法,如果在 Porting 代码到 UEFI时遇到 MemSet 的错误,不妨试试直接将上面的代码搬迁到程序中。

参考:

  1. http://www.lab-z.com/stu136/  Step to UEFI (136)哪里来的的 memset 
  2. https://baike.baidu.com/item/volatile/10606957?fr=aladdin volatile