最近在台式机(Windows7 X64)上使用 WinAVR 编写程序,后来迁移到笔记本上(Windows 10, X64)继续,但是发现WinAVR 在编译过程中会报错。
经过研究发现,在 http://bbs.21ic.com/icview-1073342-1-1.html 提供了 msys-1.0.dll 问题,替换掉 \utils\bin 目录下的同名文件即可正常工作。
最近在台式机(Windows7 X64)上使用 WinAVR 编写程序,后来迁移到笔记本上(Windows 10, X64)继续,但是发现WinAVR 在编译过程中会报错。
经过研究发现,在 http://bbs.21ic.com/icview-1073342-1-1.html 提供了 msys-1.0.dll 问题,替换掉 \utils\bin 目录下的同名文件即可正常工作。
可以使用 CPANEL 的数据库工具恢复备份,但是如果数据库太大,这个工具无法正常工作(据说只支持<8MB的大小),这在大多数情况下太小了。 这时候,需要先用 FTP 工具将数据库上传到空间上,然后使用 SSH 登录服务器: 1. 命令 mysql -u username -p, 其中 username 是你的空间名称 2.根据提示输入密码 3.输入 SOURCE file.sql 回车之后等待几分钟即可。 参考: 1.https://ae.godaddy.com/help/importing-mysql-databases-via-ssh-7588
很早之前,PCX 图片是Windows 3.1默认支持的图像格式,加之它自带无损压缩算法,所以很长一段时间,这种格式是分享和传播图片的首选。从XP 开始,Microsoft取消了默认的支持,并且随着硬件性能的提升,解码和存储完全不是问题,逐渐JPG和PNG成为了图片的首选。时至今日,想找一个免费的PCX查看软件竟然花费了一番功夫(推荐XnView,免费小巧)。
最近网上找到了一个 PCX 的解码代码【参考1】,在 Shell 下写了一个实例文件。特别注意的是PCX解码之后的格式为 RGBRGB…RGB 这样的形式,但是 GraphicsOutput->Blt 显示的格式要求为 RGB0RGB0…….RGB0【参考2】。因此,还需要一个将RGB 转为 RGB0 的动作,简单的说之前一个点是3Bytes,现在需要扩展为4Bytes。
下面是调用该库的示例代码:
#define DR_PCX_IMPLEMENTATION
#include "dr_pcx.h"
#include <stdlib.h>
#include <stdio.h>
#include <Protocol/GraphicsOutput.h>
#include <Library/MemoryAllocationLib.h>
#include <Library/BaseMemoryLib.h>

extern EFI_BOOT_SERVICES         *gBS;
extern EFI_SYSTEM_TABLE			 *gST;
extern EFI_RUNTIME_SERVICES 	 *gRT;

#define EFI_GRAPHICS_OUTPUT_PROTOCOL_GUID \
  { \
    0x9042a9de, 0x23dc, 0x4a38, {0x96, 0xfb, 0x7a, 0xde, 0xd0, 0x80, 0x51, 0x6a } \
  }

static EFI_GUID GraphicsOutputProtocolGuid = EFI_GRAPHICS_OUTPUT_PROTOCOL_GUID;

int
main (
  IN int Argc,
  IN char *Argv[]
  )
{
    int width;
    int height;
    int components;
    int i,j;
    EFI_STATUS    Status;
    EFI_GRAPHICS_OUTPUT_PROTOCOL *GraphicsOutput;
    UINT8* RGB32;

    if (Argc<2) {
            printf("Please input file name\n");
            return 0;
    }

    uint8_t* pImageData   = drpcx_load_file(Argv[1], FALSE, &width, &height, &components, 0);

    if (pImageData == NULL) {
        printf("Open file Error\n");
        return -1;
    }
    printf("width %d height %d",width,height);
    RGB32 = (UINT8*)AllocatePool(width*height*4);
    for (j=0;j<height;j++) {
            for (i=0;i<width;i++) {
                //RGBARGBARGBA...RGBA
                RGB32[(j*width+i)*4]  = pImageData[(j*width+i)*3+2]; //Blue
                RGB32[(j*width+i)*4+1]= pImageData[(j*width+i)*3+1]; //Green
                RGB32[(j*width+i)*4+2]= pImageData[(j*width+i)*3]; //Red
                RGB32[(j*width+i)*4+3]=0;
            }
    }

    Status = gBS->LocateProtocol(&GraphicsOutputProtocolGuid, NULL, (VOID **) &GraphicsOutput);
    if (EFI_ERROR(Status)) {
                GraphicsOutput = NULL;
                printf("Loading Graphics_Output_Protocol error!\n");
                return EFI_SUCCESS;}


    GraphicsOutput->Blt(
                GraphicsOutput,
                (EFI_GRAPHICS_OUTPUT_BLT_PIXEL *) RGB32,
                EfiBltBufferToVideo,
                0, 0,
                0, 0,
                width, height, 0);

    free(RGB32);

    // At this point pImageData contains the raw decoded image data as tightly
    // packed RGB or RGBA, depending on on the value of "components".
    drpcx_free(pImageData);

    return 0;
}
这个代码可以直接在NT32 模拟环境下运行,测试结果:
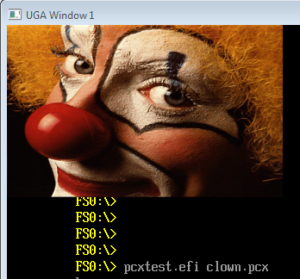
这里只是简单展示解码库的使用,只测试了几张PCX图片,有兴趣的的朋友可以进行更深入的研究。
完整代码和图片
参考:
1.https://mackron.github.io/dr_pcx.html PCX 解码库
2.具体请参考 UEFI Spec Blt Buffer 章节
3.例子的PCX图片 来源 https://github.com/warpdesign/pcx-js
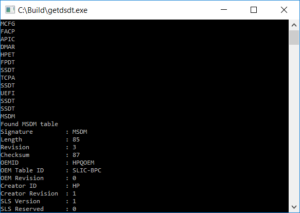
Windows下读取 ACPI Table 的正经做法是使用EnumSystemFirmwareTables和GetSystemFirmwareTable。下面是一个来自【参考1】的例子,读取系统中的 MSDM Table 并且显示出来。读取结果可以和之前介绍过的 FirmwareTablesView 读取结果结合起来对照,二者是相同的。
// getdsdt.cpp : Defines the entry point for the console application.
//

#include "stdafx.h"
#include "Windows.h"

int main()
{
	DWORD FirmwareTableProviderSignature;
	PVOID pFirmwareTableBuffer;
	DWORD BufferSize;
	UINT  BytesWritten;
	DWORD FirmwareTableID;
	DWORD *pFirmwareTableID;
	BOOL  foundTable = FALSE;
	BOOL  verbose = TRUE;


	FirmwareTableProviderSignature = 'ACPI';
	pFirmwareTableBuffer = NULL;
	BufferSize = NULL;

	// get buffer size, call with null values
	BufferSize = EnumSystemFirmwareTables(FirmwareTableProviderSignature,
		NULL,
		NULL);

	// alloc memory
	pFirmwareTableBuffer = malloc(BufferSize);

	// enum acpi tables
	BytesWritten = EnumSystemFirmwareTables(FirmwareTableProviderSignature,
		pFirmwareTableBuffer,
		BufferSize);

	// enumerate ACPI tables, look for MSDM table
	pFirmwareTableID = (DWORD*)pFirmwareTableBuffer;
	for (DWORD i = 0; i < BytesWritten / 4; i++)
	{
		FirmwareTableID = *pFirmwareTableID;
		if (verbose) printf("%.*s\n", 4, pFirmwareTableID);
		if (FirmwareTableID == _byteswap_ulong('MSDM')) {
			if (verbose) printf("Found MSDM table\n");
			foundTable = TRUE;
			break;
		}
		pFirmwareTableID++;
	}


	if (foundTable) {
		// get buffer size, call with null values
		BufferSize = GetSystemFirmwareTable(FirmwareTableProviderSignature,
			FirmwareTableID,
			NULL,
			NULL);
		// alloc memory
		pFirmwareTableBuffer = malloc(BufferSize);

		BytesWritten = GetSystemFirmwareTable(FirmwareTableProviderSignature,
			FirmwareTableID,
			pFirmwareTableBuffer,
			BufferSize);

		/*
		Table description form Miocrosoft at: http://go.microsoft.com/fwlink/p/?LinkId=234834

		Microsoft Software Licensing Tables (SLIC and MSDM)
		http://msdn.microsoft.com/library/windows/hardware/hh673514
		Byte 			Byte
		Field							Lenght			Offset	Description
		======							=====			======	===========
		Signature						4				0		MSDM
		Length							4				4		Length, in bytes, of the entire table.
		Revision						1				8		0x01
		Checksum						1				9		Checksum of the entire table.
		OEMID							6				10		An OEM-supplied string that identifies the OEM.
		OEM Table ID					8				16		Optional motherboard/BIOS logical identifier.
		OEM Revision					4				24		OEM revision number of the table for the supplied OEM Table ID.
		Creator ID						4				28		Vendor ID of the utility that created the table.
		Creator Revision				4				32		Revision of the utility that created the table.
		Software Licensing Structure	Variable length	36		Proprietary data structure that contains all the licensing
		data necessary to enable Windows activation.
		Details can be found in the appropriate Microsoft OEM
		licensing kit by first visiting the Microsoft OEM website
		(http://www.microsoft.com/oem/pages/index.aspx).
		*/

		BYTE *Signature = (BYTE*)memset(malloc(4 + 1), NULL, 4 + 1);
		UINT Length;
		BYTE Revision;
		BYTE Checksum;
		BYTE *OEMID = (BYTE*)memset(malloc(6 + 1), NULL, 6 + 1);
		BYTE *OEMTbleID = (BYTE*)memset(malloc(8 + 1), NULL, 8 + 1);
		BYTE OEMRev;
		BYTE *CreatorID = (BYTE*)memset(malloc(4 + 1), NULL, 4 + 1);
		UINT CreatorRev;
		UINT SLS_Size = BytesWritten - 36;
		BYTE *SLS = (BYTE*)memset(malloc(SLS_Size), NULL, SLS_Size);
		UINT SLS_Version;
		UINT SLS_Reserved;
		UINT SLS_DataType;
		UINT SLS_DataReserved;
		UINT SLS_DataLenght;
		BYTE *ProductKey = (BYTE*)memset(malloc(30 + 1), NULL, 30 + 1);


		memcpy_s(Signature, 4 + 1, (BYTE*)pFirmwareTableBuffer + 0, 4);
		Length = *(DWORD*)((BYTE*)pFirmwareTableBuffer + 4);
		Revision = *((BYTE*)pFirmwareTableBuffer + 8);
		Checksum = *((BYTE*)pFirmwareTableBuffer + 9);
		memcpy_s(OEMID, 6 + 1, (BYTE*)pFirmwareTableBuffer + 10, 6);
		memcpy_s(OEMTbleID, 8 + 1, (BYTE*)pFirmwareTableBuffer + 16, 8);
		OEMRev = *(DWORD*)((BYTE*)pFirmwareTableBuffer + 24);
		memcpy_s(CreatorID, 4 + 1, (BYTE*)pFirmwareTableBuffer + 28, 4);
		CreatorRev = *(DWORD*)((BYTE*)pFirmwareTableBuffer + 32);
		memcpy_s(SLS, SLS_Size, (BYTE*)pFirmwareTableBuffer + 36, SLS_Size);
		SLS_Version = *(DWORD*)((BYTE*)SLS);
		SLS_Reserved = *(DWORD*)((BYTE*)SLS + 4);
		SLS_DataType = *(DWORD*)((BYTE*)SLS + 8);
		SLS_DataReserved = *(DWORD*)((BYTE*)SLS + 12);
		SLS_DataLenght = *(DWORD*)((BYTE*)SLS + 16);
		memcpy_s(ProductKey, SLS_DataLenght, (BYTE*)SLS + 20, SLS_DataLenght);

		if (verbose) {
			printf("Signature         : %s\n", Signature);
			printf("Length            : %d\n", Length);
			printf("Revision          : %d\n", Revision);
			printf("Checksum          : %d\n", Checksum);
			printf("OEMID             : %s\n", OEMID);
			printf("OEM Table ID      : %s\n", OEMTbleID);
			printf("OEM Revision      : %d\n", OEMRev);
			printf("Creator ID        : %s\n", CreatorID);
			printf("Creator Revision  : %d\n", CreatorRev);
			printf("SLS Version       : %d\n", SLS_Version);
			printf("SLS Reserved      : %d\n", SLS_Reserved);
			printf("SLS Data Type     : %d\n", SLS_DataType);
			printf("SLS Data Reserved : %d\n", SLS_DataReserved);
			printf("SLS Data Lenght   : %d\n", SLS_DataLenght);
			printf("Key               : %s\n", ProductKey);
			/*printf ("\n\nPress [Enter] to continue . . .");
			fflush (stdout);
			getchar();*/
		}
		else {
			printf("%s", ProductKey);
		}
	}


	getchar();
    return 0;
}
运行结果:
参考:
1. https://pastebin.com/d7WFJ5ce
如果你的代码在编译过程中出现稀奇古怪的问题,比如:VFR 编译不过,不妨考虑一下是否是编译工具导致的问题。
可以在下面的链接下载最新版本的工具试试:
https://github.com/tianocore/edk2-BaseTools-win32
最近在 Porting 一段代码的时候有使用到 fread(),但是非常奇怪的是一直无法正常工作,得到的错误返回值一直为0。后来在网上找到Robins_Lee 的文章提到了这个问题https://blog.csdn.net/mini92/article/details/79274823。原来新的EDK2中,需要在INF [LibraryClasses] 中加入 DevShell 才行。
对于这个要求在 \StdLib\ReadMe.txt 有描述如下:
Figure 5: Package Build Options
===============================
INF Files
=========
The INF files for most modules will not require special directives in order to
support the Standard Libraries. The two sections which require attention: LibraryClasses
and BuildOptions, are described below.
[LibraryClasses]
UefiLib
LibC
LibString
LibStdio
DevShell
Figure 6: Module Library Classes
================================
Modules of type UEFI_APPLICATION that perform file I/O must include library
class DevShell. Including this library class will allow file operations to be
handled by the UEFI Shell. Without this class, only Console I/O is supported.
An application’s INF file might need to include a [BuildOptions] section
specifying additional compiler and linker flags necessary to allow the
application to be built. Usually, this section is not needed. When building
code from external sources, though, it may be necessary to disable some
warnings or enable/disable some compiler features.
[BuildOptions]
INTEL:*_*_*_CC_FLAGS = /Qdiag-disable:181,186
MSFT:*_*_*_CC_FLAGS = /Oi- /wd4018 /wd4131
GCC:*_*_IPF_SYMRENAME_FLAGS = –redefine-syms=Rename.txt
编写测试代码:
#include <uefi.h>
#include <Library/UefiLib.h>

#include<stdio.h>
#include<string.h>
#include<stdlib.h>
#include <errno.h>
#include<wchar.h>

int
main (
  IN int Argc,
  IN char *Argv[]
  )
{
	FILE *fd;
	char text[100];

	if (Argc<2) {
		printf("Please input filename\n");
		exit(1);
	}
	if ((fd = fopen(Argv[1], "rb")) == NULL)
	{
		printf("open file failed. %s\n", strerror(errno));
		exit(1);
	}
	memset(text,0,sizeof(text));
	fread(text, sizeof(char), 100, fd);
	printf("%s\n", text);
	fclose(fd);

	return 0;
}
[Defines]
  INF_VERSION                    = 0x00010006
  BASE_NAME                      = fot
  FILE_GUID                      = 4ea97c46-0995-4dfd-b442-747010f3ce5f
  MODULE_TYPE                    = UEFI_APPLICATION
  VERSION_STRING                 = 0.1
  ENTRY_POINT                    = ShellCEntryLib

#
#  VALID_ARCHITECTURES           = IA32 X64
#

[Sources]
  fopentest.c

[Packages]
  StdLib/StdLib.dec
  MdePkg/MdePkg.dec
  ShellPkg/ShellPkg.dec

[LibraryClasses]
  LibC
  LibStdio
  UefiLib
  DevShell
运行结果:
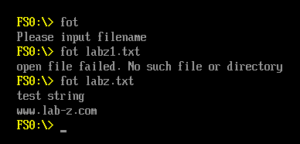
完整代码:
fopentest
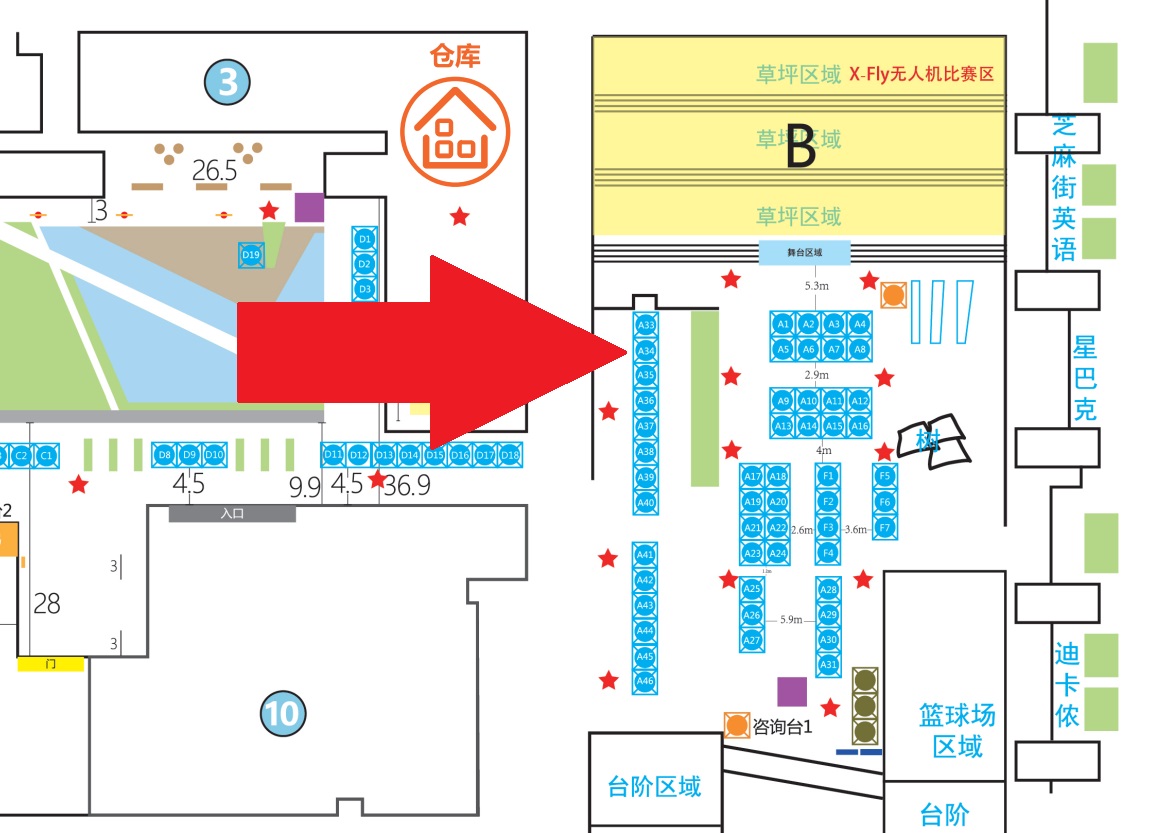
2018年10月13日,本站会参加位于上海市淞沪路388号创智天地广场7号楼1楼举办的创客嘉年华活动,展位编号 A34。主要展示 Arduino 设计相关内容。
展览中出售的模块如下:
1. USB Host Mini http://www.lab-z.com/cuhm/
2. USB Host Shield http://www.lab-z.com/arduinousb1/
3. Leonardo2UNO Shield http://www.lab-z.com/l2u/
4. ProtoShield V1 http://www.lab-z.com/prototype-shield-v3/
5. ProtoShield V3 http://www.lab-z.com/prototype-shield-v3/
欢迎新老朋友前来捧场。
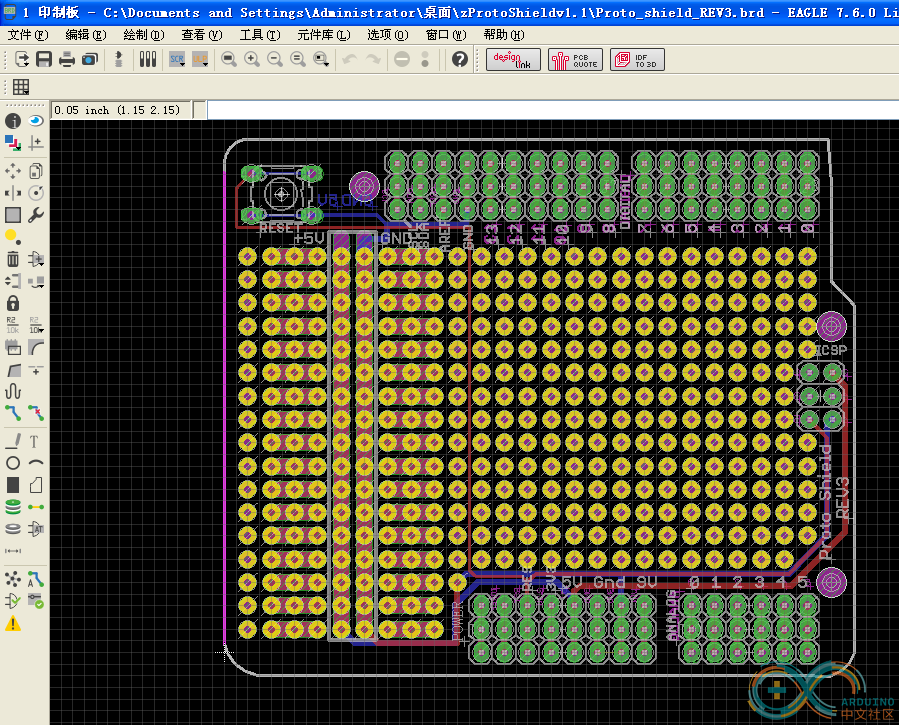
很多时候,我们需要制作自己的 Shield板,这时候可以选用 Prototype Shield,可以理解为就是形状为Shield 的洞洞板。
这样做的好处是:方便使用,即插即用;成本比较低。
淘宝上也有做好的这样的 Shield 板, 价格为 6元
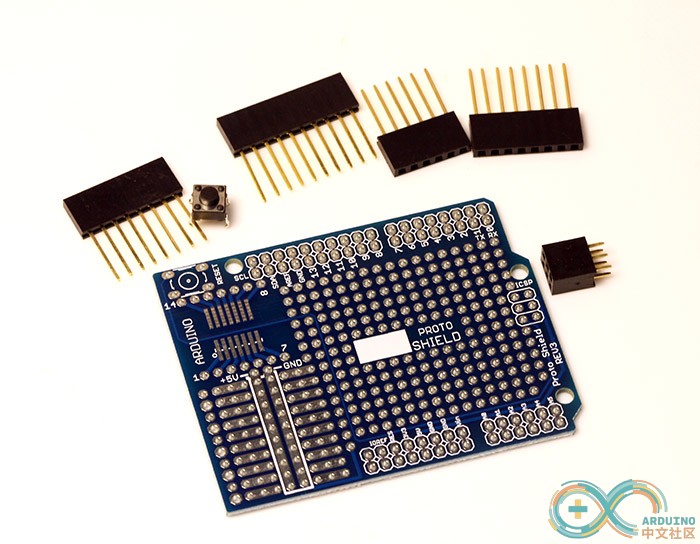
相比之下,我的设计的好处是:可以使用排针+排母的方式进行扩展。这样就避免购买长脚排母的麻烦。同时Taobao上找不到足够硬的排母,这意味着安装好的排母经不起几次插拔。
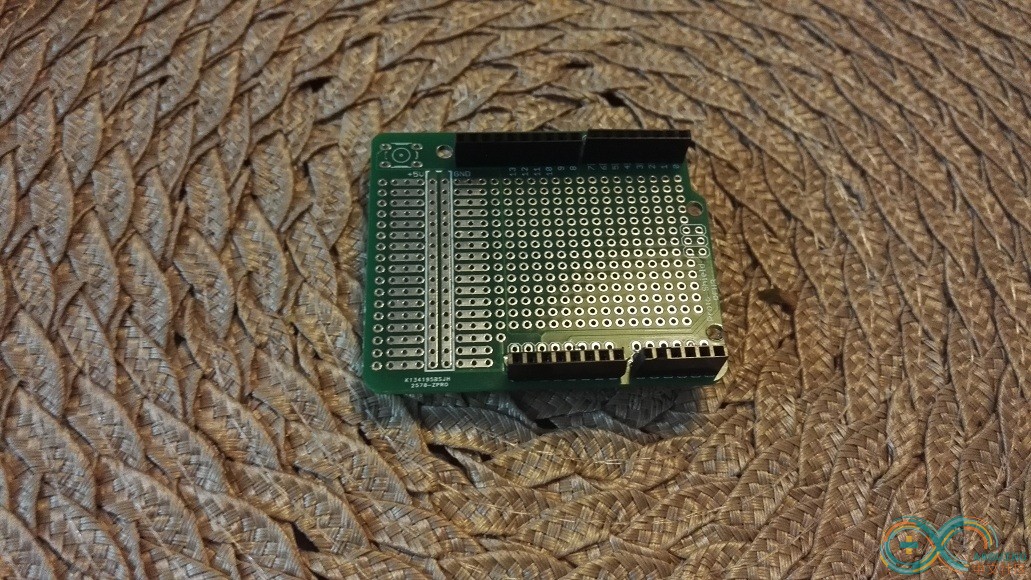
下面是焊接好的样子:
附件是 Eagle版的电路图。
zProtoShieldv1.1
此外,存在的问题:
1.在 leonrado上用力下压会顶到9V电源,没有短路之虞但是对于追求完美的人可能无法忍受;
2.在Uno 上,左上角会接触到 USB口,可能会短路,在使用的时候我都是贴上胶带的.
第一, 我们淘宝上能买到的,不是原本的设计,有一些修改,这样的修改会导致USB设备的供电问题。下面是原版的设计,在绿色圈标记的位置,有一个焊接的跳线还有一个排针的位置。当焊接跳线接起来的时候,USB设备收到的是3.3V的电压(我不清楚有什么设备可以在3.3V供电的情况下工作,所以这个设计让我觉得莫名其妙)。
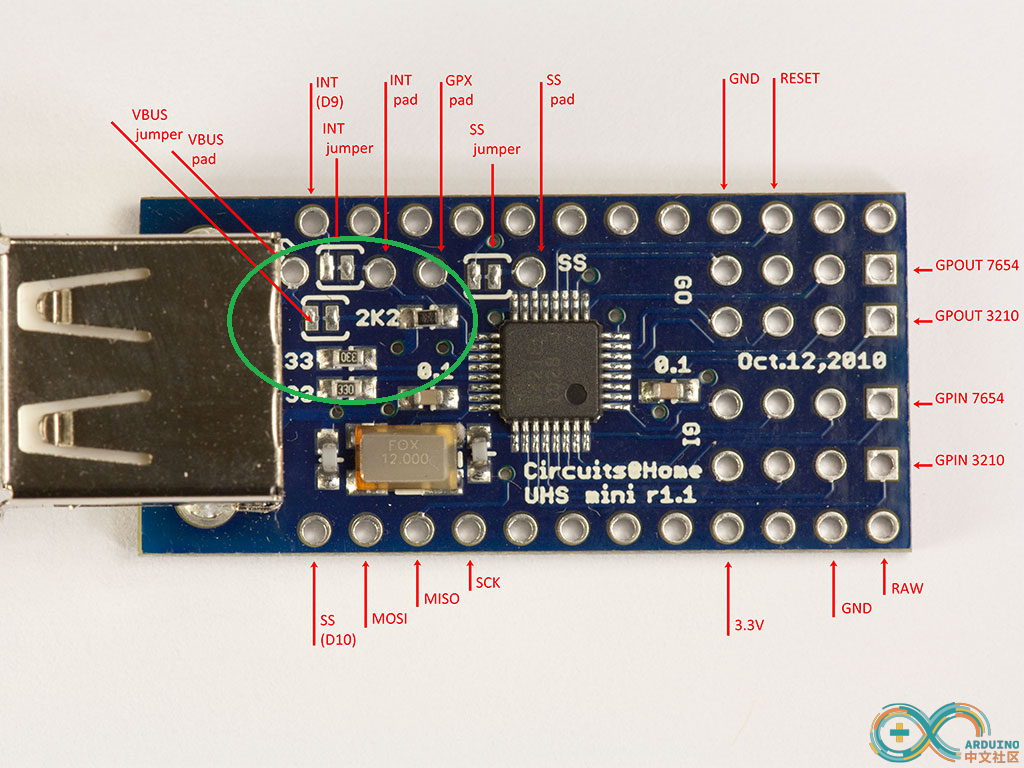
下面是我们能买到的祖国版
可以看出标记的位置是有差别的。对于我们来说,需要切开上面的连接,然后在排针上送入5V即可正常驱动 USB 设备工作。
第二, 模块有一个 USB Host Reset Pin,在正常使用的时候需要设置为High。为了简单起见,可以将这个 Pin 直接连接到3.3v。
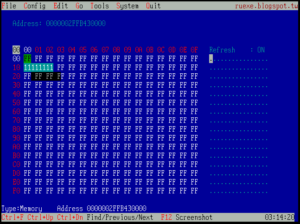
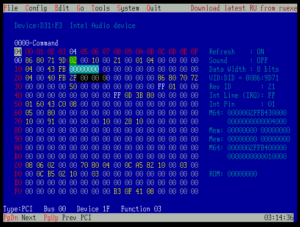
最近在研究 Audio ,目前使用最广泛的是 Intel 的 HD Audio,和之前的 AC97 相比复杂多了,网上也少有关于如何驱动这个 Audio 的文章,看起来很痛苦。因为音频的数据量通常很大,所以通讯方面都是以 DMA 为主。好在除此之外设计上还提供了一套简单发送命令的机制。下面就是我在 Kabylake-R 的平台上实验直接发送 command 读取 codec 的 VID 和 PID的实验。
1. 找到 audio pci 设备,在 KBL-R 上是 D32:F2
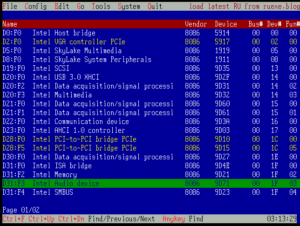
我们需要的 Memory Mapped I/O 在 Offset 10 和 14 (一共是8 Bytes)
但是这时,对应的内存位置全都为0xFF:
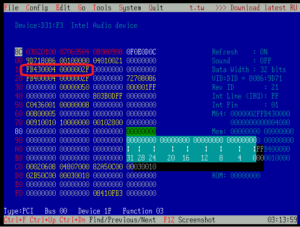
2. 对 PCI_COMMAND_OFFSET(0x04)发送 EFI_PCI_COMMAND_MEMORY_SPACE (0x02) command:
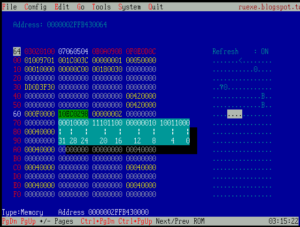
3. 再打开 Memory Mapped I/O Register,在 0x2F FB43 0000,可以正常工作;
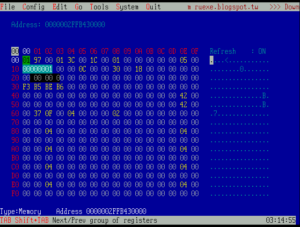
4. 根据 HD Audio Spec, ICW(0x60) IR(0x64) ICS(68h)。在 ICW 中写入NID=0,Verb ID=0xF00,Parameter ID=0x0的Verb Command
然后在ICS(68h) 写入 0x3

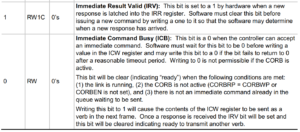
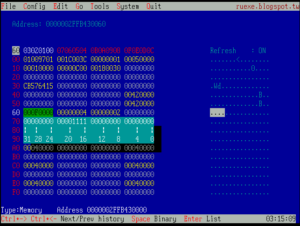
5. 很快,我们就能在IR(0x64) 看到返回值。这里我们用的是 Realtek 的 codec ,所以给出的VID 是 Realtek的,也证明方法的正确性。
如果细心观察BIOS中使用的 Verb Table 会发现在头部有一个 VID 和 PID,每次在Load 这个 Table 之前是有一个上述获取然后比较的动作的,因此,不用担心型号上的错误。比如:Realtek 298 和 798 的 PID 不同,如果使用错误会通过 Debug 口输出信息。