Step to UEFI (151)GetVariable 的追踪 补遗

前面分析过GetVariable,这里继续证明“Windows 下GetFirmwareEnvironmentVariable 具体的实现代码是gRT->GetVariable ”。
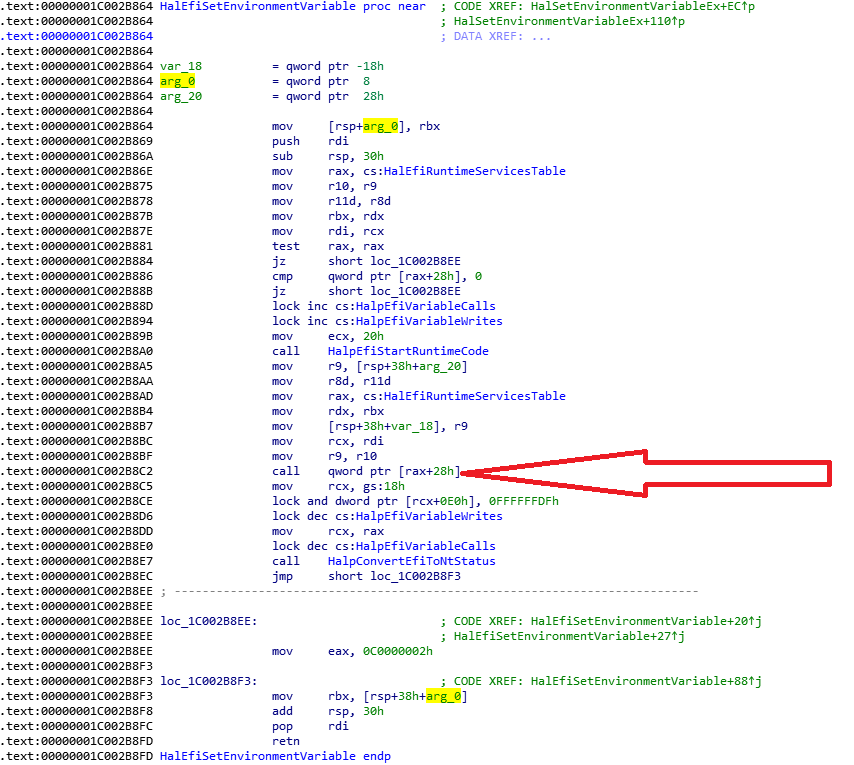
方法一,利用 WinDBG动态分析。首先使用 bp hal!HalEfiSetEnvironmentVariable 下断点。根据我们之前的分析结果,关注红色箭头指向的位置

在 WinDBG 中操作,触发函数断点:

2: kd> g
Breakpoint 1 hit
hal!HalEfiGetEnvironmentVariable:
fffff800`7b02d50c 48895c2408 mov qword ptr [rsp+8],rbx

0: kd> u
hal!HalEfiGetEnvironmentVariable:
fffff800`7b02d50c 48895c2408 mov qword ptr [rsp+8],rbx
fffff800`7b02d511 57 push rdi
fffff800`7b02d512 4883ec30 sub rsp,30h
fffff800`7b02d516 488b05e35a0300 mov rax,qword ptr [hal!HalEfiRuntimeServicesTable (fffff800`7b063000)]
fffff800`7b02d51d 4d8bd1 mov r10,r9
fffff800`7b02d520 4d8bd8 mov r11,r8
fffff800`7b02d523 488bda mov rbx,rdx
fffff800`7b02d526 488bf9 mov rdi,rcx
0: kd> u
hal!HalEfiGetEnvironmentVariable+0x1d:
fffff800`7b02d529 4885c0 test rax,rax
fffff800`7b02d52c 745a je hal!HalEfiGetEnvironmentVariable+0x7c (fffff800`7b02d588)
fffff800`7b02d52e 4883781800 cmp qword ptr [rax+18h],0
fffff800`7b02d533 7453 je hal!HalEfiGetEnvironmentVariable+0x7c (fffff800`7b02d588)
fffff800`7b02d535 f0ff05249d0200 lock inc dword ptr [hal!HalpEfiVariableCalls (fffff800`7b057260)]
fffff800`7b02d53c b908000000 mov ecx,8
fffff800`7b02d541 e876060000 call hal!HalpEfiStartRuntimeCode (fffff800`7b02dbbc)
fffff800`7b02d546 4c8b4c2460 mov r9,qword ptr [rsp+60h]
0: kd> u
hal!HalEfiGetEnvironmentVariable+0x3f:
fffff800`7b02d54b 4d8bc3 mov r8,r11
fffff800`7b02d54e 488b05ab5a0300 mov rax,qword ptr [hal!HalEfiRuntimeServicesTable (fffff800`7b063000)]
fffff800`7b02d555 488bd3 mov rdx,rbx
fffff800`7b02d558 4c894c2420 mov qword ptr [rsp+20h],r9
fffff800`7b02d55d 488bcf mov rcx,rdi
fffff800`7b02d560 4d8bca mov r9,r10
fffff800`7b02d563 ff5018 call qword ptr [rax+18h]
fffff800`7b02d566 65488b0c2518000000 mov rcx,qword ptr gs:[18h]
0: kd> u
hal!HalEfiGetEnvironmentVariable+0x63:
fffff800`7b02d56f f083a1e0000000f7 lock and dword ptr [rcx+0E0h],0FFFFFFF7h
fffff800`7b02d577 f0ff0de29c0200 lock dec dword ptr [hal!HalpEfiVariableCalls (fffff800`7b057260)]
fffff800`7b02d57e 488bc8 mov rcx,rax
fffff800`7b02d581 e802060000 call hal!HalpConvertEfiToNtStatus (fffff800`7b02db88)
fffff800`7b02d586 eb05 jmp hal!HalEfiGetEnvironmentVariable+0x81 (fffff800`7b02d58d)
fffff800`7b02d588 b8020000c0 mov eax,0C0000002h
fffff800`7b02d58d 488b5c2440 mov rbx,qword ptr [rsp+40h]
fffff800`7b02d592 4883c430 add rsp,30h
0: kd> u
hal!HalEfiGetEnvironmentVariable+0x8a:
fffff800`7b02d596 5f pop rdi

其中call qword ptr [rax+18h] 就是跳转到UEFI 的 GetVariable。在此下断点,动态运行可以看到函数执行的代码。这里还没有进入SMM Mode所以 WinDBG 是能够正常工作的。

Breakpoint 2 hit
hal!HalEfiGetEnvironmentVariable+0x57:
fffff800`7b02d563 ff5018 call qword ptr [rax+18h]
0: kd> t
fffff800`7e17ea2c 4c894c2420 mov qword ptr [rsp+20h],r9
0: kd> t
fffff800`7e17ea31 4c89442418 mov qword ptr [rsp+18h],r8
0: kd> t
fffff800`7e17ea36 4889542410 mov qword ptr [rsp+10h],rdx
0: kd> t
fffff800`7e17ea3b 48894c2408 mov qword ptr [rsp+8],rcx
0: kd> t
fffff800`7e17ea40 4881ece8080000 sub rsp,8E8h
0: kd> t
fffff800`7e17ea47 488d15b2160000 lea rdx,[fffff800`7e180100]
0: kd> t
fffff800`7e17ea4e 488b8c24f8080000 mov rcx,qword ptr [rsp+8F8h]
0: kd> t
fffff800`7e17ea56 e8290c0000 call fffff800`7e17f684

接下来在BIOS 的Source Code \MdeModulePkg\Universal\Variable\RuntimeDxe\VariableSmmRuntimeDxe.inf 添加如下编译指令:

[BuildOptions]
  MSFT:*_*_X64_CC_FLAGS = /Oi- /FAcs /Od


这样,在编译过程中会生成对应的 COD 文件。
\Build\KabylakePlatSamplePkg\RELEASE_VS2013x86\X64\MdeModulePkg\Universal\Variable\RuntimeDxe\VariableSmmRuntimeDxe\VariableSmmRuntimeDxe.cod
打开这个文件,可以看到源代码和上面 WinDBG 反编译后的结果相同(机器码相同同),因此,确定 Windows call 到了RuntimeServiceGetVariable 函数中

RuntimeServiceGetVariable PROC				; COMDAT
; 677  : {
$LN18:
  00000	4c 89 4c 24 20	 mov	 QWORD PTR [rsp+32], r9
  00005	4c 89 44 24 18	 mov	 QWORD PTR [rsp+24], r8
  0000a	48 89 54 24 10	 mov	 QWORD PTR [rsp+16], rdx
  0000f	48 89 4c 24 08	 mov	 QWORD PTR [rsp+8], rcx
  00014	48 81 ec e8 08
	00 00		 sub	 rsp, 2280		; 000008e8H

; 678  :   EFI_STATUS                                Status;
; 679  :   UINTN                                     PayloadSize;
; 680  :   SMM_VARIABLE_COMMUNICATE_ACCESS_VARIABLE  *SmmVariableHeader;
; 681  :   UINTN                                     TempDataSize;
; 682  :   UINTN                                     VariableNameSize;


因此,结论得证。

第二种方法,同样的生成对应的 COD文件。
在 Shell 下面运行之前Application显示当前系统中的gRT->GetVariable 的地址,结果为 3C9B9A2C;接下来启动到 Windows中使用 WinDBG 查看这个地址上的数值

kd> dd 3C9B9A2C
00000000`3c9b9a2c 244c894c 44894c20 89481824 48102454
00000000`3c9b9a3c 08244c89 e8ec8148 48000008 16b2158d
00000000`3c9b9a4c 8b480000 08f8248c 29e80000 0f00000c
00000000`3c9b9a5c c085c0b6 0083840f c7480000 66582444
00000000`3c9b9a6c 48000008 7024448d 24448948 4c8d4c20
00000000`3c9b9a7c 8d4c5824 48502444 1686158d 8d480000
00000000`3c9b9a8c 0016e70d ff96e800 8948ffff 48382444
00000000`3c9b9a9c 38247c83 480a7d00 3824448b 000265e9

这个值是可以和UEFI 代码中的RuntimeServiceGetVariable 函数对应起来的,因此可以确定gRT->GetVariable指向的就是这个函数。
结合之前的文章,我们可以明确“Windows API GetFirmwareEnvironmentVariable” 最终会使用 UEFI 的 gRT->GetVariable 来完成实际操作。
Step to UEFI (150)GetVariable 的追踪

继续研究 Runtime Service Table 中的GetVariable 函数。本文讲述Runtime Service Table 中的GetVariable是如何实现的,因为 codebase 之间可能存在的差异,建议有兴趣的朋友按照文章提到的方法在实体平台上进行实验验证。也欢迎遇到不同情况的朋友在网站留言。

首先,GetVariable 函数处于 Runtime Service Table 中,因此有必要研究一下这个 Table 的由来。根据【参考1】,这个 Table 的初始化代码在 \UDK2017\MdeModulePkg\Core\Dxe\DxeMain\DxeMain.c 中。 同一个文件中还有Table 的结构体定义:

EFI_RUNTIME_SERVICES mEfiRuntimeServicesTableTemplate = {
{
EFI_RUNTIME_SERVICES_SIGNATURE, // Signature
EFI_RUNTIME_SERVICES_REVISION, // Revision
sizeof (EFI_RUNTIME_SERVICES), // HeaderSize
0, // CRC32
0 // Reserved
},
(EFI_GET_TIME) CoreEfiNotAvailableYetArg2, // GetTime
(EFI_SET_TIME) CoreEfiNotAvailableYetArg1, // SetTime
(EFI_GET_WAKEUP_TIME) CoreEfiNotAvailableYetArg3, // GetWakeupTime
(EFI_SET_WAKEUP_TIME) CoreEfiNotAvailableYetArg2, // SetWakeupTime
(EFI_SET_VIRTUAL_ADDRESS_MAP) CoreEfiNotAvailableYetArg4, // SetVirtualAddressMap
(EFI_CONVERT_POINTER) CoreEfiNotAvailableYetArg2, // ConvertPointer
(EFI_GET_VARIABLE) CoreEfiNotAvailableYetArg5, // GetVariable
(EFI_GET_NEXT_VARIABLE_NAME) CoreEfiNotAvailableYetArg3, // GetNextVariableName
(EFI_SET_VARIABLE) CoreEfiNotAvailableYetArg5, // SetVariable
(EFI_GET_NEXT_HIGH_MONO_COUNT) CoreEfiNotAvailableYetArg1, // GetNextHighMonotonicCount
(EFI_RESET_SYSTEM) CoreEfiNotAvailableYetArg4, // ResetSystem
(EFI_UPDATE_CAPSULE) CoreEfiNotAvailableYetArg3, // UpdateCapsule
(EFI_QUERY_CAPSULE_CAPABILITIES) CoreEfiNotAvailableYetArg4, // QueryCapsuleCapabilities
(EFI_QUERY_VARIABLE_INFO) CoreEfiNotAvailableYetArg4 // QueryVariableInfo
};


初始化之后,整个Table大部分内容都是空的,在BIOS运行的过程中会逐步填充值。
为了确认Runtime Service Table是在这里初始化,采用在DxeMain() 函数中下面位置加入 Debug 信息标记的方法:

  //
  // Allocate the EFI System Table and EFI Runtime Service Table from EfiRuntimeServicesData
  // Use the templates to initialize the contents of the EFI System Table and EFI Runtime Services Table
  //
  gDxeCoreST = AllocateRuntimeCopyPool (sizeof (EFI_SYSTEM_TABLE), &mEfiSystemTableTemplate);
  ASSERT (gDxeCoreST != NULL);

  gDxeCoreRT = AllocateRuntimeCopyPool (sizeof (EFI_RUNTIME_SERVICES), &mEfiRuntimeServicesTableTemplate);
  ASSERT (gDxeCoreRT != NULL);

  gDxeCoreST->RuntimeServices = gDxeCoreRT;


检查 Log 可以看到,这里分配给 Runtime Service Table的内存地址是0x3B954B98:

CoreInitializeMemoryServices:
AllocatePoolPages: failed to allocate 1 pages
AllocatePool: failed to allocate 144 bytes
AllocatePoolPages: failed to allocate 1 pages
AllocatePool: failed to allocate 160 bytes
BaseAddress – 0x3B8A1000 Length – 0x75E000 MinimalMemorySizeNeeded – 0x75E000
LABZ0 [3B953B98]
InstallProtocolInterface: 5B1B31A1-9562-11D2-8E3F-00A0C969723B 39902EB8
InstallProtocolInterface: 5CB5C776-60D5-45EE-883C-452708CD743F 39903028
HOBLIST address in DXE = 0x3689A018

在 Shell 下使用 mm 命令能看到相同的地址:

Valid EFI Header at Address 000000003B953018
———————————————
System: Table Structure size 00000078 revision 00020032
ConIn (0000000037D37AE0) ConOut (0000000036A94218) StdErr (0000000037D37C50)
Runtime Services 000000003B953B98
Boot Services 0000000039902D00
SAL System Table 0000000000000000
ACPI Table 000000003BFFD000
ACPI 2.0 Table 000000003BFFD014
MPS Table 0000000000000000
SMBIOS Table 000000003B94F000

因此,确定这里是Runtime Service Table 初始化的位置。

接下来研究 EFI_GET_VARIABLE具体实现的代码。在MdeModulePkg\Universal\Variable\RuntimeDxe\VariableSmmRuntimeDxe.c 的 SmmVariableReady() 函数中添加 Debug 信息

  //
  // Save the buffer physical address used for SMM conmunication.
  //
  mVariableBufferPhysical = mVariableBuffer;

  gRT->GetVariable         = RuntimeServiceGetVariable;
  gRT->GetNextVariableName = RuntimeServiceGetNextVariableName;
  gRT->SetVariable         = RuntimeServiceSetVariable;
  gRT->QueryVariableInfo   = RuntimeServiceQueryVariableInfo;
DEBUG ((EFI_D_INFO, "LABZ2 GetVariable[%X]\n",RuntimeServiceGetVariable)); 
  //
  // Install the Variable Architectural Protocol on a new handle.
  //
  Status = gBS->InstallProtocolInterface (
                  &mHandle,
                  &gEfiVariableArchProtocolGuid,
                  EFI_NATIVE_INTERFACE,
                  NULL
                  );
  ASSERT_EFI_ERROR (Status);


查看 Log 输出结果:

InstallProtocolInterface: 5B1B31A1-9562-11D2-8E3F-00A0C969723B 3845B4C0
Loading driver at 0x0003B8D4000 EntryPoint=0x0003B8D5000 VariableSmmRuntimeDxe.efi
InstallProtocolInterface: BC62157E-3E33-4FEC-9920-2D3B36D750DF 3845C818
PROGRESS CODE: V03040002 I0
LABZ2 GetVariable[3B8D5B00]
InstallProtocolInterface: 1E5668E2-8481-11D4-BCF1-0080C73C8881 0
InstallProtocolInterface: CD3D0A05-9E24-437C-A891-1EE053DB7638 3B8D9400
InstallProtocolInterface: AF23B340-97B4-4685-8D4F-A3F28169B21D 3B8D93E0

为了更方便的观察 Runtime Service Table 中的各项值,专门编写了一个简单的 EFI Application,在屏幕上输出各个函数的地址【参考2】。从结果上看,这次启动(每次启动函数地址会发生变化)后,GetVariable 的地址是0x3B8D5B00。
Runtime Service at [3B953B98]
GetTime [3B8C3478]
SetTime [3B8C3484]
GetWakeupTime [3B8C34A0]
SetWakeupTime [3B8C34AC]
ResetSystem [3B8E8730]
GetNextHighMonotonicCount [3B8BC67C]
GetVariable [3B8D5B00]
SetVariable [3B8D5E10]
GetNextVariableName [3B8D5C90]
QueryVariableInfo [3B8D5F6C]
UpdateCapsule [3B8B45BC]
QueryCapsuleCapabilities [3B8B47B8]

就是说在这个函数中,SetVariable 指向了 RuntimeServiceGetVariable 函数可以在\UDK2017\MdeModulePkg\Universal\Variable\RuntimeDxe\VariableSmmRuntimeDxe.c 中看到:

/**
  This code finds variable in storage blocks (Volatile or Non-Volatile).

  Caution: This function may receive untrusted input.
  The data size is external input, so this function will validate it carefully to avoid buffer overflow.

  @param[in]      VariableName       Name of Variable to be found.
  @param[in]      VendorGuid         Variable vendor GUID.
  @param[out]     Attributes         Attribute value of the variable found.
  @param[in, out] DataSize           Size of Data found. If size is less than the
                                     data, this value contains the required size.
  @param[out]     Data               Data pointer.

  @retval EFI_INVALID_PARAMETER      Invalid parameter.
  @retval EFI_SUCCESS                Find the specified variable.
  @retval EFI_NOT_FOUND              Not found.
  @retval EFI_BUFFER_TO_SMALL        DataSize is too small for the result.

**/
EFI_STATUS
EFIAPI
RuntimeServiceGetVariable (
  IN      CHAR16                            *VariableName,
  IN      EFI_GUID                          *VendorGuid,
  OUT     UINT32                            *Attributes OPTIONAL,
  IN OUT  UINTN                             *DataSize,
  OUT     VOID                              *Data
  )


在 Kabylake-R 的平台上实验,先用 RW Everything 修改80 Port 显示值,之后运行我们前面文章中提到的调用 GetEnvironmentVariable API 的函数,每次调用之后80 Port就会变成 89,因此可以确认这部分代码执行到了。完整的例子可以在附件中看到(来自 UDK2017)。

Variable

总结:调gRT->GetVariable 最终是通过SMI 来实现的,也正是因为这个原因,所以在 Windows 下能够实现访问。

参考:
1. https://blog.csdn.net/jiangwei0512/article/details/51627562?locationNum=4&fps=1
2. Shell 下显示 gRT 函数地址的小程序

#include <Library/BaseLib.h>
#include <Uefi.h>
#include <Library/UefiLib.h>
#include <Library/PrintLib.h>
#include <Library/ShellCEntryLib.h>
#include <Protocol/EfiShell.h>
#include <Library/ShellLib.h>

extern EFI_RUNTIME_SERVICES      *gRT;

INTN
EFIAPI
ShellAppMain (
  IN UINTN Argc,
  IN CHAR16 **Argv
  )
{
        Print(L"UEFI Runtime Serivice Table @[%x]\n",gRT);
        Print(L"       GetTime            @[%X]\n",gRT->GetTime);
        Print(L"       SetTime            @[%X]\n",gRT->SetTime);
        Print(L"       GetWakeupTime      @[%X]\n",gRT->GetWakeupTime);
        Print(L"       SetWakeupTime      @[%X]\n",gRT->SetWakeupTime);
        Print(L"       ConvertPointer     @[%X]\n",gRT->ConvertPointer);
        Print(L"       GetVariable        @[%X]\n",gRT->GetVariable);
        Print(L"  GetNextVariableName     @[%X]\n",gRT->GetNextVariableName);
        Print(L"       SetVariable        @[%X]\n",gRT->SetVariable);
        Print(L"       ResetSystem        @[%X]\n",gRT->ResetSystem);
        Print(L"       UpdateCapsule      @[%X]\n",gRT->UpdateCapsule);        
        Print(L"       QueryVariableInfo  @[%X]\n",gRT->QueryVariableInfo);        
        Print(L" QueryCapsuleCapabilities @[%X]\n",gRT->QueryCapsuleCapabilities);
        Print(L"GetNextHighMonotonicCount @[%X]\n",gRT->GetNextHighMonotonicCount);
        Print(L"     SetVirtualAddressMap @[%X]\n",gRT->SetVirtualAddressMap);        
        
        return EFI_SUCCESS;
}


Windows 下面控制CPU 频率的方法

CPU 的功耗和频率是直接相关的,进入 Windows 后,IntelPPM 会接管频率控制,所以目前我还没有找到能够直接控制的方法,需要和 BIOS 进行配合才能完成。

在KBL-R HDK Windows 10  16299发现下面一个可行的方法:

  1. BIOS中设置 Speed Shift 为Disabled, EIST需要设置为 Enabled;
  2. 在进入Windows之前,设置 MSR 0x1A0 Bit16 为0。这个位置是 EIST 功能的开关,在进入 Windows之前,将这个位置关闭,对BIOS来说,EIST的准备已经完成,对于Windows来说,EIST是关闭的,因此他不会让驱动接管这个功能,这样才能让我们有设定CPU 频率的机会:

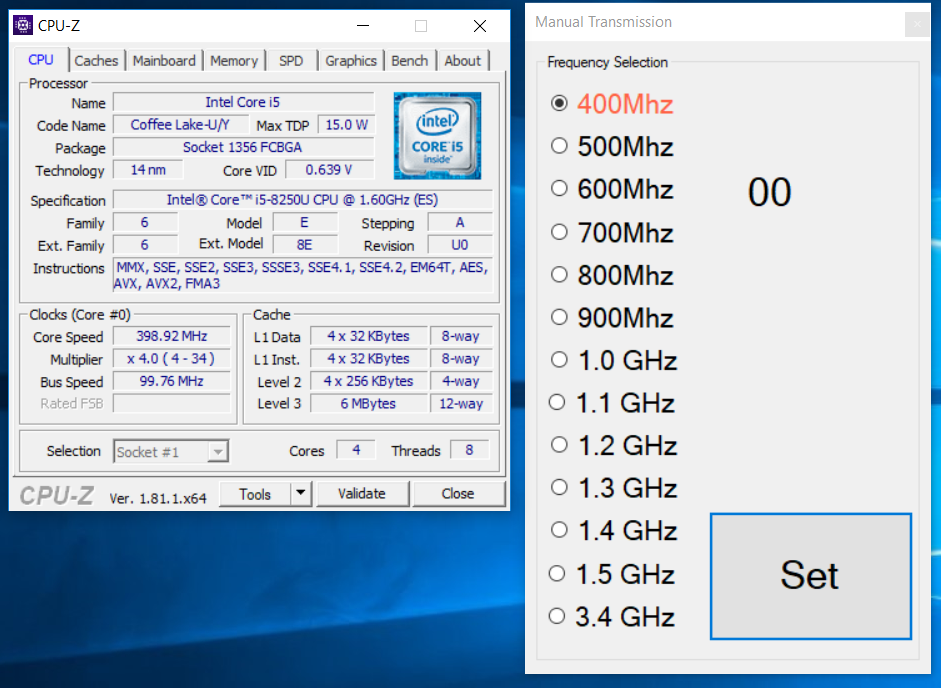
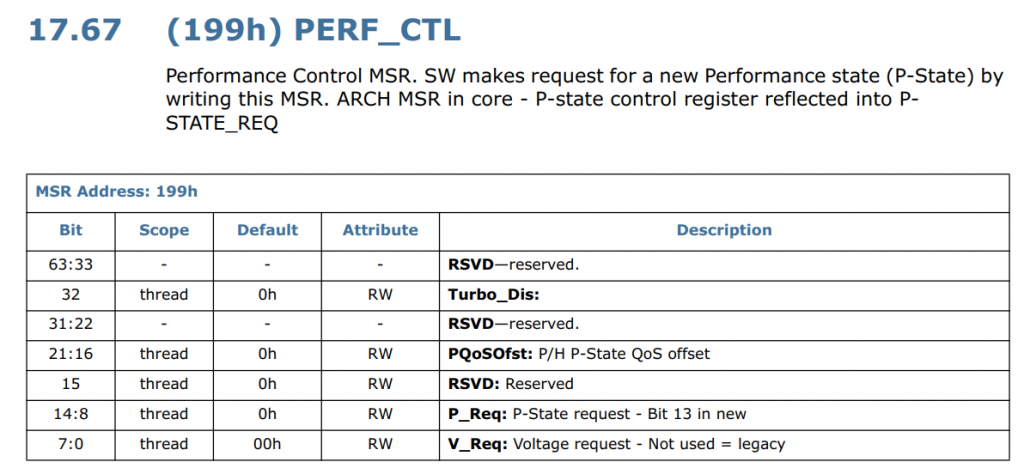
  1. 进入系统之后,使用 RW-Everything 修改 MSR , 首先将 MSR 0x1A0 Bit16 设置为 1,重新打开 EIST 功能,然后通过 MSR 0x199 BIT[14:8]来写入 Ratio。比如,写入 8 就是 800Mhz。

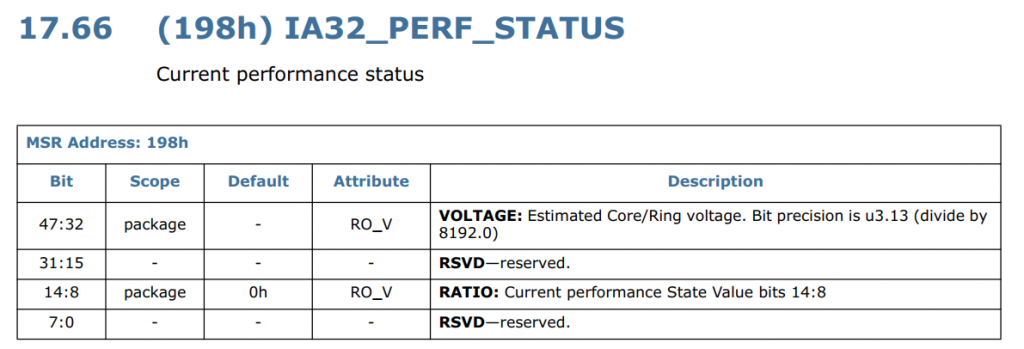
写入之后,可以通过 MSR  198h 来读取当前的 Ratio。

上述设置完成之后,你会发现最低频率可以设置为 800Mhz,但是如果直接在BIOS中设定固定的频率,可以低到400Mhz;经过研究最终找到Root Cause: Race to halt 功能,这个功能大概的思想就是让CPU 超频一点点尽快完成操作然后休息节能。关闭这个功能之后可以设置最低到 400Mhz。

使用上述的方法再编写程序直接对 MSR 编程,在 Windows下工作正常。测试 400Mhz时播放视频感觉比较流畅,回想当年还要特意购买硬件解压卡才能在486DX2 66Mhz上观看VCD,CPU 运算能力真是不可同日而语了。

上述方法只在 Kabylake-R U42 Windows  16299 X64 上验证过,可以看出操作和 OS 有一定关系,笔者未能在其他版本上实验,有兴趣的朋友不妨试试然后给我留言交流。


MAX9814 高性能麦克风 AGC 放大器模块

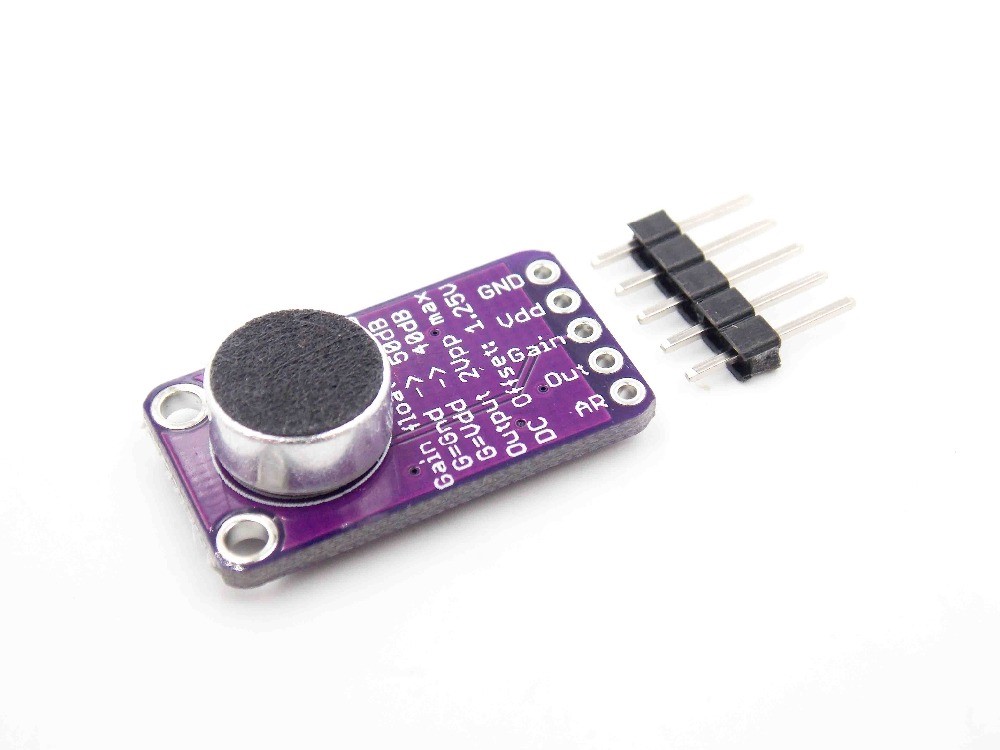
MAX9814 IC包含低噪声放大器、输出放大器、麦克风偏置电压发生器和自动增益控制(AGC)等内部电路。麦克风放大器的总增益可选择40dB、50dB或60dB而无压缩。MAX9814利用压缩/限幅电路将麦克风输出限制为设定电压。

MAX9814评估板工作于2.7V至5.5V电源范围。评估板还具备低静态电流,提供关断控制以使功耗最小化。MAX9814 IC提供带裸焊盘的14引脚TDFN (3mm x 3mm x 0.8mm)封装。

关键特性

  • 7V至5.5V单电源工作
  • 20dB动态增益压缩
  • 可选的增益控制
  • 可编程动作时间
  • 可选择动作/释放比
  • 低功耗关断模式
  • 经过完全安装与测试 [参考1]

max1

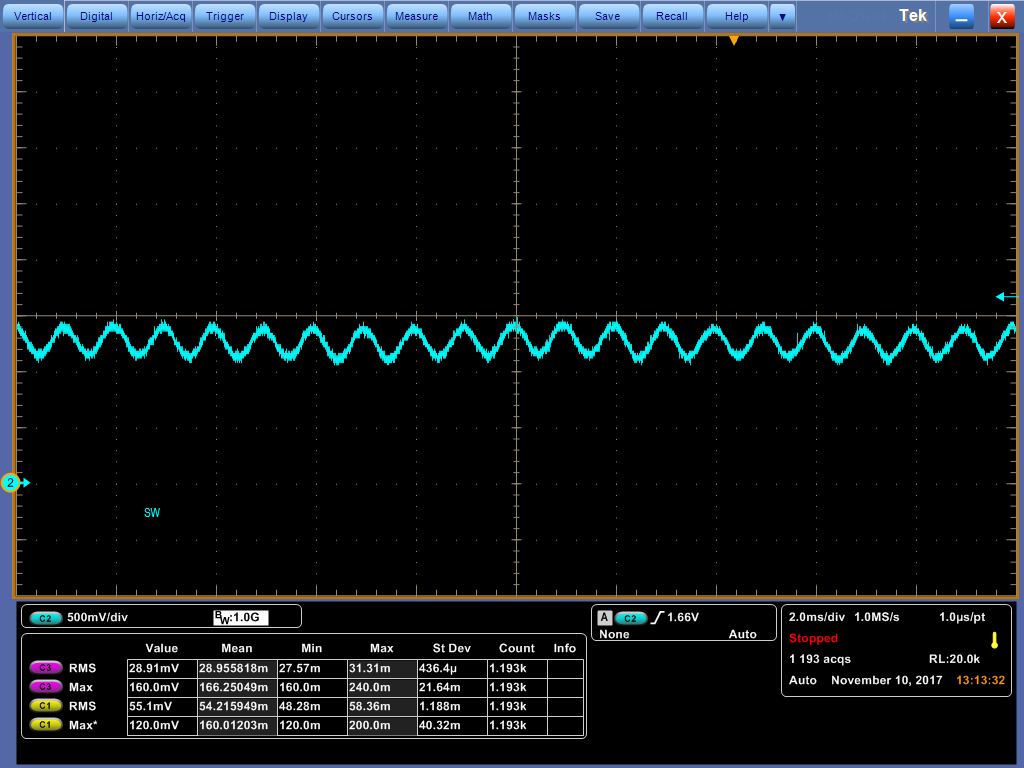
使用示波器测试一下这个模块,当 Gain Pin 处于不同模式下放大结果:

Gain -> Float

max2

Gain -> GND
max3

Gain -> VCC
max4

参考:
1.https://www.maximintegrated.com/cn/products/analog/audio/MAX9814EVKIT.html

HAL.DLL 中的 HalEfiGetEnvironmentVariable

之前研究 Runtime Service 提到了 Windows 下可以使用 GetFirmwareEnvironmentVariable 获得 Variable,最近请天杀帮忙研究 Windows 层面的具体实现。结论是:在hal.dll中有下面这样的代码

mov _HalEfiRuntimeServicesTable, offset _HalEfiRuntimeServicesBlock

结构体  _HalEfiRuntimeServicesBlock RuntimeTable <?> 成员如下

00000000 RuntimeTable struc ; (sizeof=0x24, align=0x4, mappedto_402)
00000000 GetTime dd ? ; XREF: HalEfiGetTime(x)+5C/r
00000004 SetTime dd ? ; XREF: HalEfiSetTime(x)+153/r
00000008 ResetSystem dd ? ; XREF: HalEfiResetSystem(x)+3F/r
0000000C GetVariable dd ? ; XREF: HalEnumerateEnvironmentVariablesEx(x,x,x)+252/r
00000010 GetNextVariableName dd ? ; XREF: HalEnumerateEnvironmentVariablesEx(x,x,x)+10C/r
00000014 SetVariable dd ? ; XREF: HalEfiSetEnvironmentVariable(x,x,x,x,x)+43/r
00000018 UpdateCapsule dd ? ; XREF: HalEfiUpdateCapsule(x,x,x,x)+40/r
0000001C QueryCapsuleCapabilities dd ? ; XREF: HalEfiQueryCapsuleCapabilities(x,x,x,x)+3C/r
00000020 QueryVariableInfo dd ? ; XREF: HalEfiQueryVariableInfo(x,x,x,x)+32/r
00000024 RuntimeTable ends

这次使用 WinDBG 进行调试实验。

实验的平台是 KBL-R ,USB3.0 调试。

1.查看当前系统中的模块

0: kd> lm
start end module name
00000001`c0000000 00000001`c000e000 kdcom_0 (pdb symbols) C:\ProgramData\Dbg\sym\kdcom.pdb\DDE6FDAD8C7544FEB91485DD8E1832511\kdcom.pdb
ffffa11b`77600000 ffffa11b`77994000 win32kfull (deferred)
ffffa11b`779a0000 ffffa11b`77bb2000 win32kbase (deferred)
ffffa11b`77bd0000 ffffa11b`77bda000 TSDDD (deferred)
ffffa11b`77be0000 ffffa11b`77c21000 cdd (deferred)
ffffa11b`780a0000 ffffa11b`78117000 win32k (deferred)
fffff803`b6c1d000 fffff803`b74ef000 nt (pdb symbols) C:\ProgramData\Dbg\sym\ntkrnlmp.pdb\83DB42404EFD4AB6AFB6FA864B700CB31\ntkrnlmp.pdb
fffff803`b74ef000 fffff803`b756e000 hal (deferred)
fffff803`b7600000 fffff803`b7613000 kdcom (pdb symbols) C:\ProgramData\Dbg\sym\kdusb.pdb\619D7C9237D81A5C017DD6813BE76D7F1\kdusb.pdb
fffff803`ca600000 fffff803`ca637000 ndiswan (deferred)

…………..

我们要研究的是 HAL

2.检查 HAL 的 symbol

0: kd> !lmi hal
Loaded Module Info: [hal]
Module: hal
Base Address: fffff803b74ef000
Image Name: hal.dll
Machine Type: 34404 (X64)
Time Stamp: 869c055b (This is a reproducible build file hash, not a true timestamp)
Size: 7f000
CheckSum: 7cfc7
Characteristics: 2022
Debug Data Dirs: Type Size VA Pointer
CODEVIEW 20, 49db0, 475b0 RSDS – GUID: {B19D905A-E342-5D59-DE73-FDE2055F8636}
Age: 1, Pdb: hal.pdb
POGO 9f0, 49dd0, 475d0 [Data not mapped]
REPRO 0, 0, 0 [Debug data not mapped]
Symbol Type: DEFERRED – No error – symbol load deferred
Load Report: no symbols loaded

结论是 HAL  的  symbol 没有正常加载

3. 加载 symbol

0: kd> ld hal
Symbols loaded for hal

4.再次检查

0: kd> !lmi hal
Loaded Module Info: [hal]
Module: hal
Base Address: fffff803b74ef000
Image Name: hal.dll
Machine Type: 34404 (X64)
Time Stamp: 869c055b (This is a reproducible build file hash, not a true timestamp)
Size: 7f000
CheckSum: 7cfc7
Characteristics: 2022
Debug Data Dirs: Type Size VA Pointer
CODEVIEW 20, 49db0, 475b0 RSDS – GUID: {B19D905A-E342-5D59-DE73-FDE2055F8636}
Age: 1, Pdb: hal.pdb
POGO 9f0, 49dd0, 475d0 [Data not mapped]
REPRO 0, 0, 0 [Debug data not mapped]
Image Type: MEMORY – Image read successfully from loaded memory.
Symbol Type: PDB – Symbols loaded successfully from image header.
C:\ProgramData\Dbg\sym\hal.pdb\B19D905AE3425D59DE73FDE2055F86361\hal.pdb
Load Report: public symbols , not source indexed
C:\ProgramData\Dbg\sym\hal.pdb\B19D905AE3425D59DE73FDE2055F86361\hal.pdb

模块的 Symbol 已经正确加载了,下面可以继续

5.列出 hal 中的相关函数

0: kd> x hal!HalEfi*
fffff803`b751ab04 hal!HalEfiUpdateCapsule ()
fffff803`b751a774 hal!HalEfiQueryVariableInfo ()
fffff803`b751a864 hal!HalEfiSetEnvironmentVariable ()
fffff803`b751a50c hal!HalEfiGetEnvironmentVariable ()
fffff803`b7550000 hal!HalEfiRuntimeServicesTable =
fffff803`b7544240 hal!HalEfiMissedMappingsCount =
fffff803`b7544244 hal!HalEfiSetVirtualAddressMapStatus =
fffff803`b7535b10 hal!HalEfiToNtStatusMappings =
fffff803`b751a5a0 hal!HalEfiGetTime ()
fffff803`b7550010 hal!HalEfiRuntimeServicesBlock =
fffff803`b751a6f8 hal!HalEfiQueryCapsuleCapabilities ()
fffff803`b751a904 hal!HalEfiSetTime ()
fffff803`b751a7e0 hal!HalEfiResetSystem ()

6.对hal!HalEfiSetEnvironmentVariable 和 hal!HalEfiGetEnvironmentVariable下端点(bp)。然后在被测机上运行取得 Variable 的 application, Wndbg 会停下来:

0: kd> bl
0 e Disable Clear fffff803`b751a864 0001 (0001) hal!HalEfiSetEnvironmentVariable
1 e Disable Clear fffff803`b751a50c 0001 (0001) hal!HalEfiGetEnvironmentVariable

0: kd> g
Breakpoint 1 hit //这里会自动停下来
hal!HalEfiGetEnvironmentVariable:
fffff803`b751a50c 48895c2408 mov qword ptr [rsp+8],rbx
6: kd> g
Breakpoint 1 hit //这里会自动停下来
hal!HalEfiGetEnvironmentVariable:
fffff803`b751a50c 48895c2408 mov qword ptr [rsp+8],rbx
6: kd> g

因此,GetFirmwareEnvironmentVariable 这样的 API 最终会 call 到 HAL 中的 HalEfiGetEnvironmentVariable 来实现。

============================================================

2018年6月2日

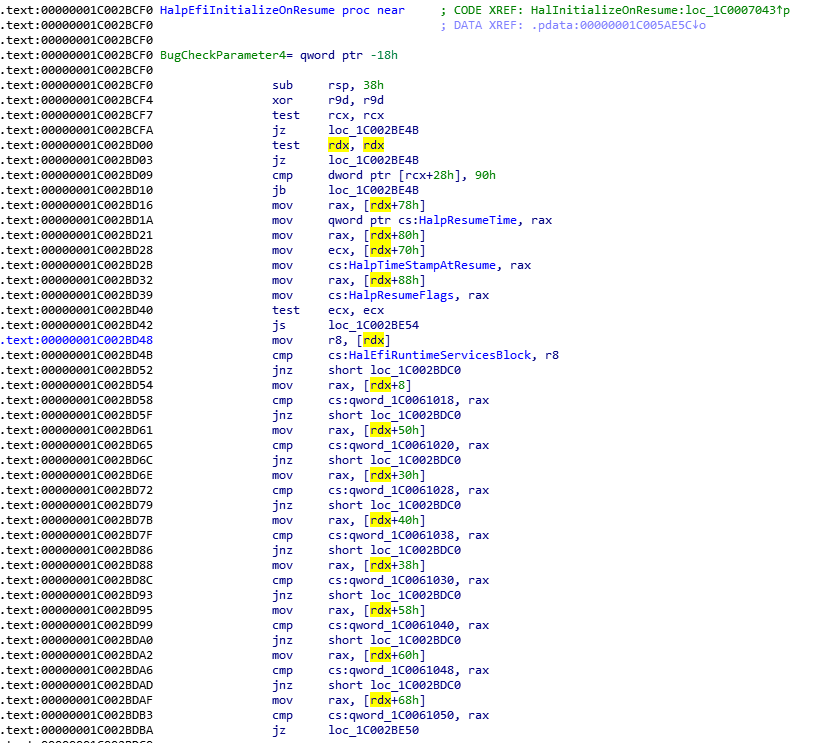
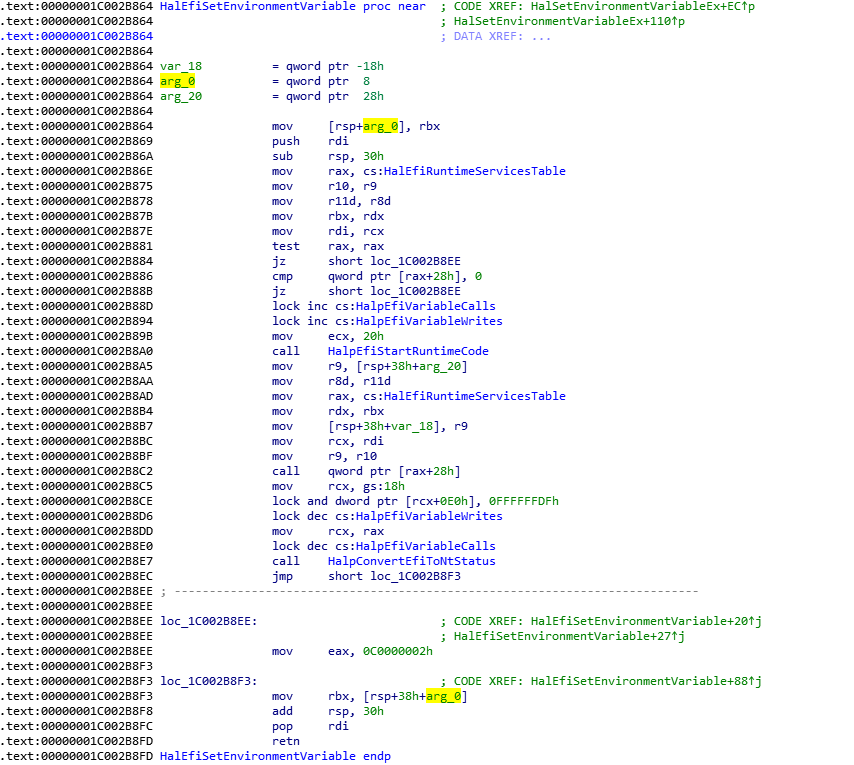
补充两张 IDA 分析 HAL.DLL(X64 Windows) 的图片:

这里的rdx是地址转换后的EFI_RUNTIME_SERVICES表,去掉表头后的结构
这个函数就会将HalEfiRuntimeServicesBlock这张表填好,其实这张表就是EFI_RUNTIME_SERVICES表重新组织了一下

HalEfiRuntimeServicesTable这个指针是指向HalEfiRuntimeServicesBlock的
然后像HalEfiGetEnvironmentVariable、HalEfiSetEnvironmentVariable这些函数都是用HalEfiRuntimeServicesTable加函数偏移来调用的


Step to UEFI (149)大数运算

在我开始学习计算机的时候有一种观点:数论是被看作有趣而无用的学问。 譬如说,概率论可以用来赌博,华罗庚的优选法可以用来蒸馒头,而数论在当时的认识中,只有类似数学体操的作用。后来随着计算机的发展,或者说自从有了互联网,眼界大开之后,惊奇的发现数论简直是现代计算机和互联网的基石,没有数论就没有办法发展出来压缩算法,同样也没有办法发展出各种加密方法。

OpenSSL 库中提供的大数运算功能,这次我们就使用 CryptoPkg进行实验。

本文调用的 OpenSSL 函数可以在 【参考1】和【参考2】中看到,非常感谢作者用通俗的语言展示了他们的使用方法。

本次的代码需要放置在CryptoPkg中进行编译,编译后的 Application可以直接在 Nt32环境下运行。

代码如下:

#include <Uefi.h>
#include <Library/UefiLib.h>
#include <Library/MemoryAllocationLib.h>
#include <Library/BaseMemoryLib.h>
#include <stdlib.h>
#include <Library/BaseLib.h>
#include <Library/BaseCryptLib.h>
#include <Library/OpensslLib/openssl/crypto/bn/bn_lcl.h>
#include <Library/OpensslLib/openssl/include/openssl/err.h>
#include <Library/OpensslLib/openssl/include/openssl/rand.h>
extern EFI_BOOT_SERVICES         *gBS;

CONST CHAR8  str[]="0x1234567890ABCDEF1234567890ABCDEF";
      CHAR16 strCH16[]=L"0x1234567890ABCDEF1234567890ABCDEF1234567890ABCDEF1234567890ABCDEF";

CONST CHAR8  aStr[]="193707721";
CONST CHAR8  bStr[]="761838257287";

EFI_STATUS
EFIAPI
main (
  IN     EFI_HANDLE                 ImageHandle,
  IN     EFI_SYSTEM_TABLE           *SystemTable
  )
{
        BIGNUM  *a,*b;
        CHAR8   *show;
        BN_CTX  *ctx;
        
        // New a big munber
        a=BN_new();
        
        // Set a as 1
        BN_one(a);
        
        // Show a as DEC
        show = BN_bn2dec(a);
        AsciiStrToUnicodeStr(show,strCH16);
        Print(L"BN_bn2dec %s\n",strCH16);    
        OPENSSL_free(show);
        
        // Show a as HEX
        show = BN_bn2hex(a);
        AsciiStrToUnicodeStr(show,strCH16);
        Print(L"BN_bn2hex %s \n",strCH16);    
        OPENSSL_free(show);

        b=BN_new();
        
        // Assign aStr to a
        BN_dec2bn(&a,aStr);
        // Assign aStr to b
        BN_dec2bn(&b,bStr);
        ctx=BN_CTX_new();
        // Mul a with b, result in a
        BN_mul(a,a,b,ctx);
        // add a with 1
        BN_add_word(a,1);
        BN_CTX_free(ctx);
        
        // Show a in Hex
        show = BN_bn2hex(a);
        AsciiStrToUnicodeStr(show,strCH16);
        Print(L"BN_bn2hex %s \n",strCH16);    
        OPENSSL_free(show);
        
        
        return EFI_SUCCESS;
}


INF 文件

## @file
#   A simple, basic, application showing how the Hello application could be
#   built using the "Standard C Libraries" from StdLib.
#
#  Copyright (c) 2010 - 2011, Intel Corporation. All rights reserved.<BR>
#  This program and the accompanying materials
#  are licensed and made available under the terms and conditions of the BSD License
#  which accompanies this distribution. The full text of the license may be found at
#  http://opensource.org/licenses/bsd-license.
#
#  THE PROGRAM IS DISTRIBUTED UNDER THE BSD LICENSE ON AN "AS IS" BASIS,
#  WITHOUT WARRANTIES OR REPRESENTATIONS OF ANY KIND, EITHER EXPRESS OR IMPLIED.
##

[Defines]
  INF_VERSION                    = 0x00010006
  BASE_NAME                      = bignumtest
  FILE_GUID                      = 4ea97c46-7491-4dfd-0082-747010f3ce5f
  MODULE_TYPE                    = UEFI_APPLICATION
  VERSION_STRING                 = 0.1
  ENTRY_POINT                    = main

#   
#  VALID_ARCHITECTURES           = IA32 X64 IPF
#

[Sources]
  BigNumTest.c

[Packages] 
  MdePkg/MdePkg.dec
  CryptoPkg/CryptoPkg.dec

[LibraryClasses]
  UefiApplicationEntryPoint
  UefiLib
  BaseCryptLib


运行结果:

bigtest

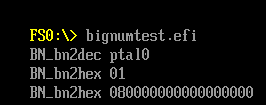
结果的第一行,展示的是 BN_bn2dec 函数将 a (值为1)转化为 string 显示的结果。非常遗憾,这个结果明显不正确。我尝试使用最新的 OpenSSL Source ,仍然是这样的结果,不知道是什么地方出现的问题。

结果的第二行,显示的是使用 BN_bn2hex函数显示a的十六进制结果,是正确的。

接下来代码使用 BN_dec2bn 函数将自定义的十进制字符串转换为一个大数,经过计算最终显示193707721*761838257287 + 1 的十六进制结果,是 0x8 0000 0000 0000 0000,也就是 2^67。关于这个数字,有下面的典故:

17世纪有位法国数学家叫梅森(Marin Mersenne,1588–1648),他曾经做过一个猜想:2^p-1 ,当p是质数时,2^p-1是质数。他验算出了:当p=2、3、5、7、17、19时,所得代数式的值都是质数,后来,欧拉证明p=31时,2^p-1是质数。 p=2,3,5,7时,2^p-1都是素数,但p=11时,所得2047=23×89却不是素数。还剩下p=67、127、257三个梅森数,由于太大,长期没有人去验证。
1903年10月,在美国纽约举行的世界数学年会上,一个叫科尔的数学家(Frank Nelson Cole),面对满场等待他学术报告的听众,一言不发,径直走向黑板,写下了一个等式:
2^67 – 1 = 193707721×767838257287 = 147,573,952,589,676,412,927
在一阵寂静之后,台下突然爆发出热烈的掌声。更令人惊奇的是,科尔并不是专门研究数论的数学家,这只是他的业余爱好。
后来有人问他:“您论证这道题目花了多长时间?”
他回答说:“3年来的全部星期天。”

和很多哲理小故事一样,上面的写的如同段子一样。不过也许 WIKI 上面的一句话可以作为上面小故事结尾的佐证吧:“Cole died alone in New York City, aged 64.”【参考3】

参考:
1. http://www.qmailer.net/archives/216.html
2. https://blog.csdn.net/qq_30866297/article/details/51470991
3. https://en.wikipedia.org/wiki/Frank_Nelson_Cole
4. https://www.mobilefish.com/services/big_number_equation/big_number_equation.php#equation_output 一个在线进行大数运算的网页,可以用来验证结果是否正确

AMT 的 WebUI

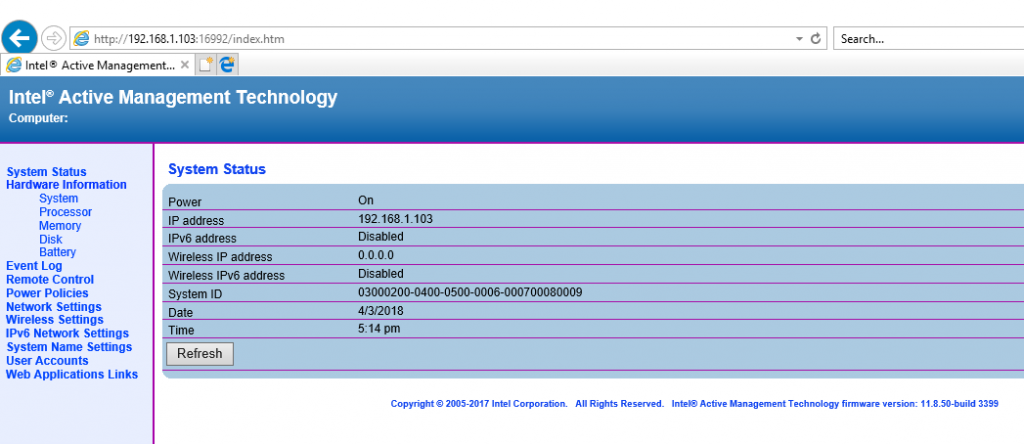
可以通过 Web 来进行远程的 AMT 访问,方式是:

16992 – 在未配置 TLS 时使用(使用 HTTP)
16993 – 在配置 TLS 时使用 (使用 HTTPS)

简单的说就是在 AMT 联网的机器上, 使用浏览器访问

http://ME的IP:16992 或者 https://ME的IP:16992

需要注意的是: ME 的IP 可能和系统的 IP 不同.

amtwebui

PS: AMT 测试起来问题很多, 基本上都是坑. 在选用之前必须联系好 Intel, 以便遇到问题及时解决.

参考:
1.http://www.doc88.com/p-9377127498146.html

Step to UEFI (148)UnicodeValueToString() 和 AsciiValueToString() 已经退休了

最近编写一段代码,调用AsciiValueToString()一直出现错误提示。经过一番研究发现,这个函数已经“退休了”。在官方文档【参考1】有如下描述:

16. PrintLib APIs UnicodeValueToString() and AsciiValueToString() are deprecated. And their safe counterparts UnicodeValueToStringS() and AsciiValueToStringS() are added. If the macro “DISABLE_NEW_DEPRECATED_INTERFACES” is defined in platform, then
UnicodeValueToString() and AsciiValueToString() should be replaced with UnicodeValueToStringS() and AsciiValueToStringS() respectively.

简单的说,因为安全原因,所以这些函数退休了。取而代之的是后面带有S的安全函数,相比原来的函数,新的函数需要多加一个传递长度的函数,这样可以有效的对抗缓冲区溢出这样的攻击方式。

具体函数定义可以在 \MdePkg\Include\Library\BaseLib.h 看到

#ifndef DISABLE_NEW_DEPRECATED_INTERFACES

/**
  [ATTENTION] This function is deprecated for security reason.

  Convert one Null-terminated ASCII string to a Null-terminated
  Unicode string and returns the Unicode string.

  This function converts the contents of the ASCII string Source to the Unicode
  string Destination, and returns Destination.  The function terminates the
  Unicode string Destination by appending a Null-terminator character at the end.
  The caller is responsible to make sure Destination points to a buffer with size
  equal or greater than ((AsciiStrLen (Source) + 1) * sizeof (CHAR16)) in bytes.

  If Destination is NULL, then ASSERT().
  If Destination is not aligned on a 16-bit boundary, then ASSERT().
  If Source is NULL, then ASSERT().
  If Source and Destination overlap, then ASSERT().
  If PcdMaximumAsciiStringLength is not zero, and Source contains more than
  PcdMaximumAsciiStringLength ASCII characters not including the Null-terminator,
  then ASSERT().
  If PcdMaximumUnicodeStringLength is not zero, and Source contains more than
  PcdMaximumUnicodeStringLength ASCII characters not including the
  Null-terminator, then ASSERT().

  @param  Source        The pointer to a Null-terminated ASCII string.
  @param  Destination   The pointer to a Null-terminated Unicode string.

  @return Destination.

**/
CHAR16 *
EFIAPI
AsciiStrToUnicodeStr (
  IN      CONST CHAR8               *Source,
  OUT     CHAR16                    *Destination
  );

#endif


整个函数被DISABLE_NEW_DEPRECATED_INTERFACES 编译条件包裹起来。如果不想做太大的改动,直接在你项目的 DSC中查找下面这句话,注释掉即可编译通过。

[BuildOptions]
  *_*_*_CC_FLAGS = -D DISABLE_NEW_DEPRECATED_INTERFACES


参考:
1. https://github.com/tianocore/tianocore.github.io/wiki/UDK2017-Core-Update-Notes

VC 程序要求 Admin 权限的实现

很多时候我们编写的工具软件需要管理员权限才能运行。这时候,在启动的时候提示需要管理员权限远比启动之后发现自己没有足够的权限无法运行要好。比如,我经常使用的 RW Everything 就是这样的。

vcadm1

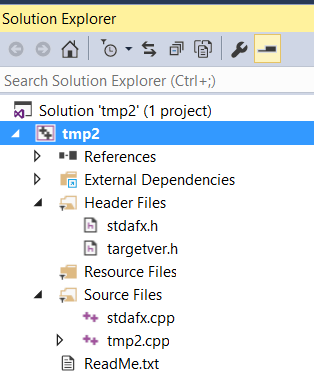
本文以VS2015为例介绍一下如何给 VC 的程序添加这个功能。
1.在 “Project Properties”上点右键

vcadm2

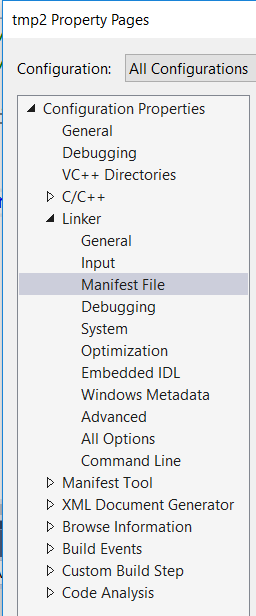
2.在 “Configuration Properties”中的“Linker”“Manifest File”进行设置

vcadm3

3.在 UAC Execution Level 中选择“requireAdministrator(/level=’requireAdministrator’)”

vcadm4

4.重新编译代码即可,最明显的就是程序右下角出现盾牌图标。

vcadm5

运行这样的 Application 会出现需要管理员权限的对话框了。

UDK2018 来了—-常见编译问题

UDK2018 前一段时间正式 release 了:

https://github.com/tianocore/tianocore.github.io/wiki/UDK2018

编译方法可以在下面的页面找到

https://github.com/tianocore/tianocore.github.io/wiki/UDK2018-How-to-Build

要求 VS2015(我实验用VS2013编译没问题,但是为了避免后续碰到奇怪的问题,建议老老实实用 VS2015)、NASM 2.12.01、Python2.7.x、Openssl (这个应该是第一次正式提出来作为要求,但是实验表明如果只使用 Nt32那么是完全无需安装的)
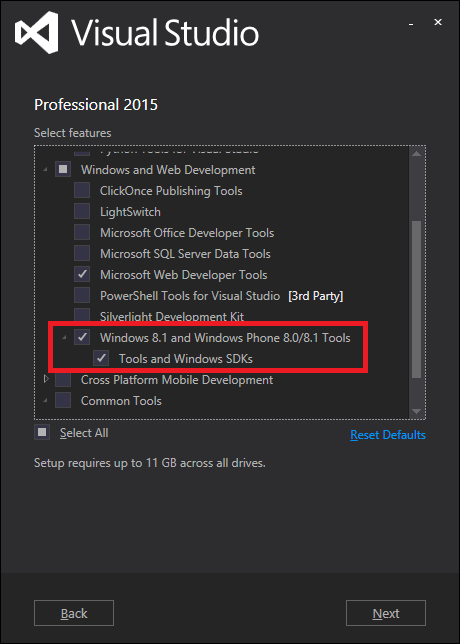
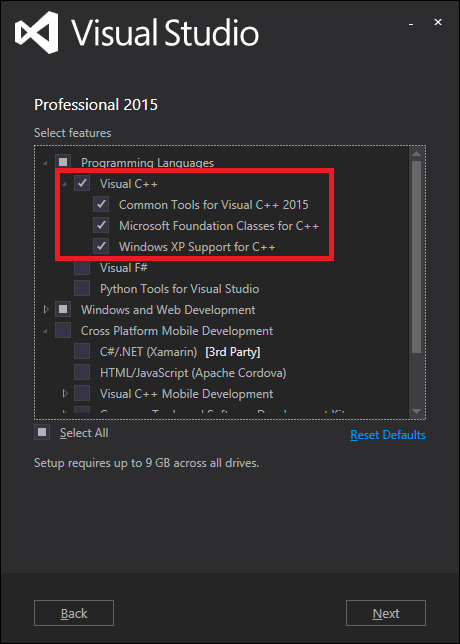
1. 需要安装 VS2015(特别注意要勾选安装 VC 编译器和 WDK)
2. 安装 Python2.7.14(特别注意在安装界面选择将 Python 加入 Path)
3. 安装 Nasm(特别注意他默认的安装路径不是 c:\Nasm, 需要安装之后手工拷贝到这个目录下)
4. 解压edk2-vUDK2018.tar到 c:\UDK2018
5. 在 edksetup.bat 中加入下面的语句
a. Path c:\nasm;%path%
b. Set PYTHON_HOME=c:\python27
6. 解压edk2-BaseTools-win32-master到 BaseTools\Win32下面
7. 打开“VS2015 x64 Native Tools Command Prompt”。运行一次 edksetup.bat 之后运行 build。这样的编译会导致错误,但是能够在 conf\下面生成我们需要的 Target.bat 在这个文件中找到 TOOL_CHAIN_TAG = MYTOOLS ,修改为TOOL_CHAIN_TAG = VS2018x86,接下来就可使用下面的方法开始编译
a. 输入 edksetup.bat – -nt32
b. Build –a X64 或者 build –a IA32
c. Build run 即可运行 NT32 模拟环境

如果你的运气好,那么上述配置完成之后就可以正常使用 UDK2018 了。如果你的运气不好,还可能像我这样碰到下面的错误:
GenFds…
: error C0DE: Tools code failure
Please send email to edk2-devel@lists.01.org for help, attaching following call stack trace!

Traceback (most recent call last):
File “GenFds\GenFds.py”, line 228, in main
File “c:\Users\Public\Documents\BuildPool\BaseTools\build\Source\Python\Workspace\WorkspaceDatabase.py”, line 164, in __init__
File “c:\Users\Public\Documents\BuildPool\BaseTools\build\Source\Python\Common\LongFilePathOs.py”, line 25, in remove
WindowsError: [Error 32] The process cannot access the file because it is being used by another process: ‘\\\\?\\c:\\edk2-vudk2018\\conf\\.cache\\build.db’

Exception AttributeError: “‘WorkspaceDatabase’ object has no attribute ‘Conn'” in > ignored
build…
: error 7000: Failed to execute command
GenFds -f c:\edk2-vudk2018\Nt32Pkg\Nt32Pkg.fdf –conf=c:\edk2-vudk2018\conf -o c:\edk2-vudk2018\Build\NT32IA32\DEBUG_VS2015x86 -t VS2015x86 -b DEBUG -p c:\edk2-vudk2018\Nt32Pkg\Nt32Pkg.dsc -a IA32 -D “EFI_SOURCE=c:\\edk2-vudk2018\\edkcompatibilitypkg” -D “EDK_SOURCE=c:\\edk2-vudk2018\\edkcompatibilitypkg” -D “TOOL_CHAIN_TAG=VS2015x86” -D “TOOLCHAIN=VS2015x86” -D “TARGET=DEBUG” -D “FAMILY=MSFT” -D “WORKSPACE=c:\\edk2-vudk2018” -D “EDK_TOOLS_PATH=c:\\edk2-vudk2018\\basetools” -D “ARCH=IA32” -D “ECP_SOURCE=c:\\edk2-vudk2018\\edkcompatibilitypkg” [C:\edk2-vUDK2018]

直接执行最后那一段出现问题的批处理是没问题的。就是说,在编译过程中 GenFds在访问 build.db 的时候会出现问题。顺便多说一句,很多年前我碰到过UEFI编译环境中的这支文件和公司杀毒软件冲突的情况。编译过程需要访问的这个文件被杀毒软件锁定导致编译无法继续。最诡异的是这个错误是随机出现的。最终只能更换到未安装杀毒软件的机器上编译,最终和杀毒软件厂商沟通,前后花了6个月才解决。因此,出现这样的问题非常令人头痛。
仔细观察得知执行的 GenFds 是位于\BaseTools\Bin\Win32下面的GenFds.exe,这是Python编译生成的 EXE。此外在\BaseTools\BinWrappers\WindowsLike 下面还存在GenFds.bat。它内容如下:

@setlocal
@set ToolName=%~n0%
@%PYTHON_HOME%\python.exe %BASE_TOOLS_PATH%\Source\Python\%ToolName%\%ToolName%.py %*

意思就是说,直接调用 Python去执行 GenFds.py。因此,可以将\BaseTools\Bin\Win32\GenFds.exe改名为GenFds.LABZ。然后把\BaseTools\BinWrappers\WindowsLike加入Path路径。编译过程中调用 GenFds指令实际执行的是 GenFds.bat。具体修改方法是在 Edksetup.bat 中加入下面的语句

path c:\nasm;BaseTools\BinWrappers\WindowsLike;%path%
set PYTHON_HOME=c:\python27;

最终可以保证编译正常。如果你在使用过程中碰到了 UDK2018 的问题,不妨在下面给我留言。

=============================================================

2018年6月11日

前面提到的“需要安装 VS2015(特别注意要勾选安装 VC 编译器和 WDK)” 其中应该是 SDK

2019年1月24日

最近在编译 AppPkg 的时候(Build NTPkg 无问题)遇到如下错误

c:\buildbs\UDK\StdLib\Include\sys/EfiCdefs.h(342): error C2220: warning treated as error – no ‘object’ file generated
c:\buildbs\UDK \StdLib\Include\sys/EfiCdefs.h(342): warning C4117: macro name ‘STDC_HOSTED‘ is reserved, ‘#define’ ignored

检查代码 \StdLib\Include\sys\EfiCdefs.h 有如下定义

// Keep compiler quiet about casting from smaller to larger types
#pragma warning ( disable : 4306 )

#define STDC 1
#define STDC_VERSION 199409L
#define STDC_HOSTED 1 //这个定义导致问题

删除 STDC_HOSTED 定义,或者添加如下编译指令都可以修复这个问题

// Keep compiler quiet about casting from smaller to larger types
#pragma warning ( disable : 4306 )
#pragma warning ( disable : 4117 )

#define STDC 1
#define STDC_VERSION 199409L
#define STDC_HOSTED 1