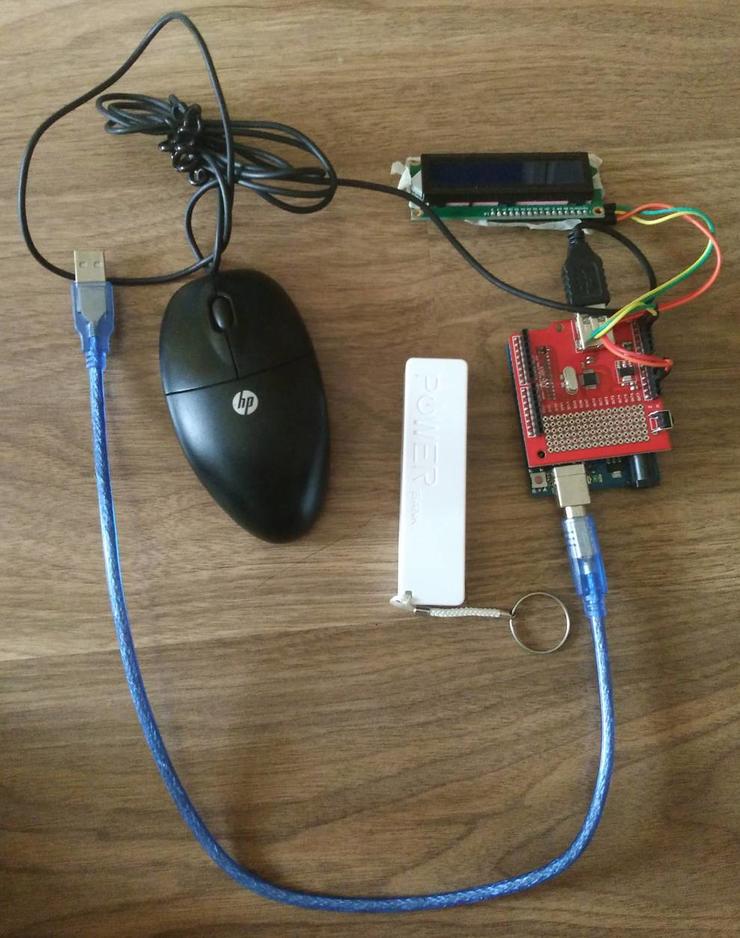
前面介绍了USB键盘的使用,这里介绍一下USB鼠标的调用。根据【参考1】的文章进行实验,这次我们的目标是:获得鼠标移动按键信息,串口输出之。
首先运行一下之前的取得描述符的工具抓取一下描述符:
Descriptor of HP Mouse
Start
Device addressed… Requesting device descriptor.
Device descriptor:
Descriptor Length: 12
USB version: 2.0
Class: 00 Use class information in the Interface Descriptor
Subclass: 00
Protocol: 00
Max.packet size: 08
Vendor ID: 046D
Product ID: C077
Revision ID: 6700
Mfg.string index: 01 Length: 18 Contents: Logitech
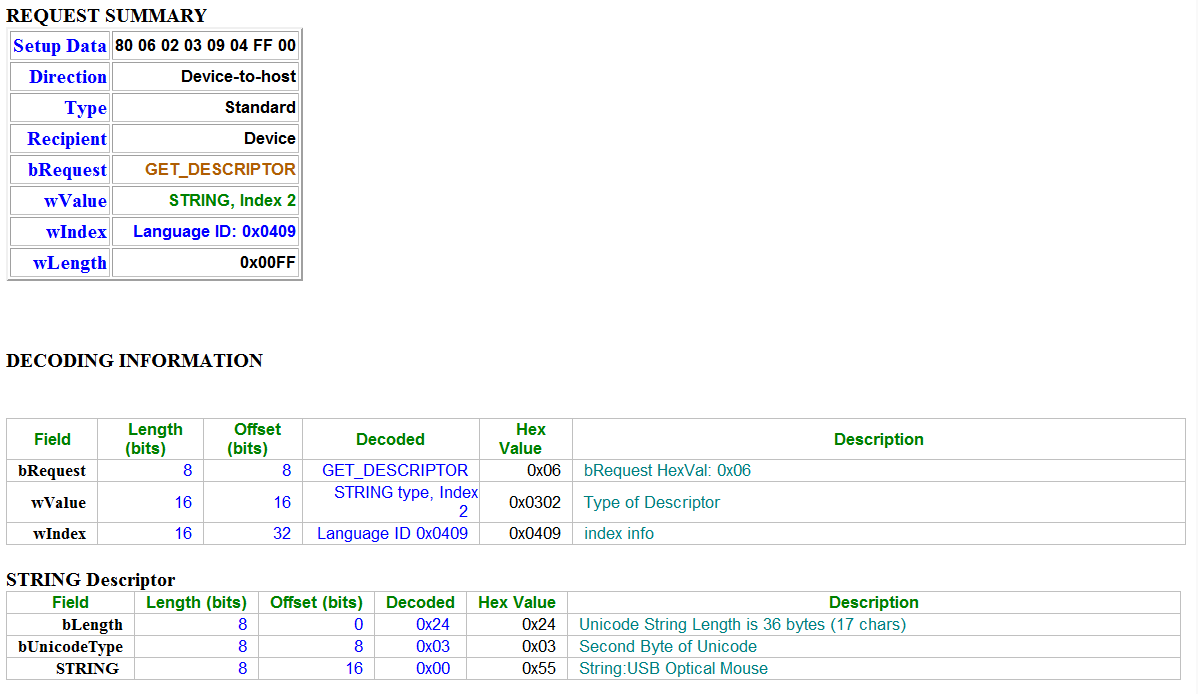
Prod.string index: 02 Length: 36 Contents: USB Optical Mouse
Serial number index: 00
Number of conf.: 01
Configuration number 0
Total configuration length: 34 bytes
Configuration descriptor:
Total length: 0022
Number of interfaces: 01
Configuration value: 01
Configuration string: 00
Attributes: A0 Remote Wakeup
Max.power: 31 98ma
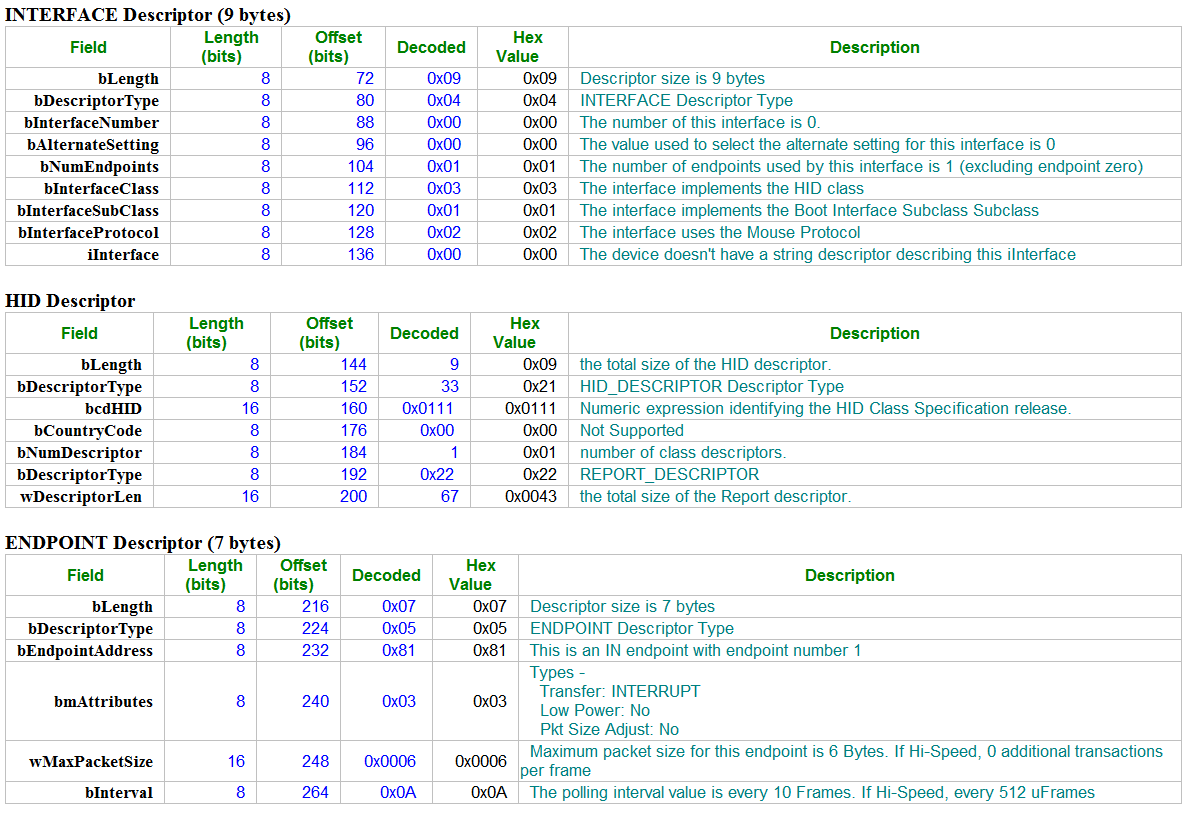
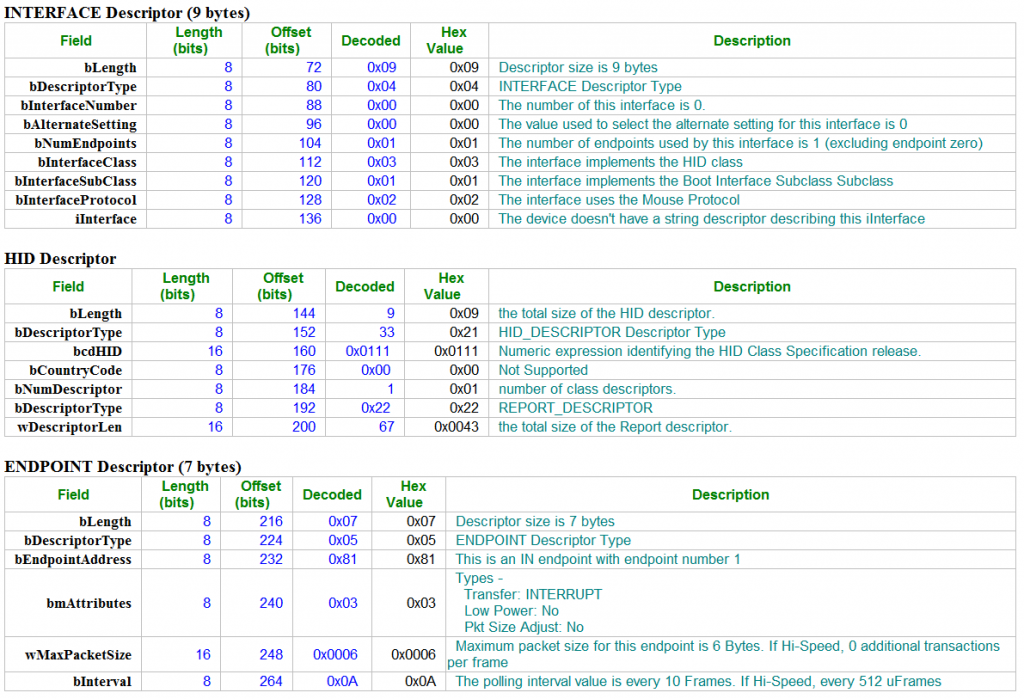
Interface descriptor:
Interface number: 00
Alternate setting: 00
Endpoints: 01
Class: 03 HID (Human Interface Device)
Subclass: 01
Protocol: 02
Interface string: 00
HID descriptor:
Descriptor length: 09 9 bytes
HID version: 1.11
Country Code: 0 Not Supported
Class Descriptors: 1
Class Descriptor Type: 22 Report
Class Descriptor Length:67 bytes
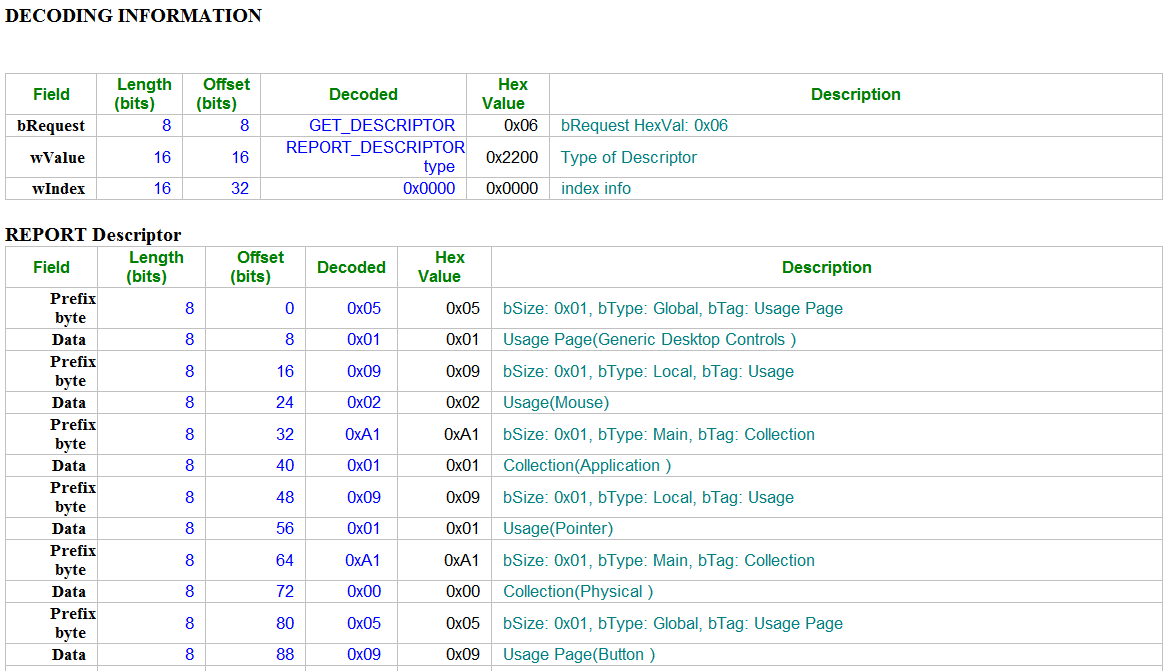
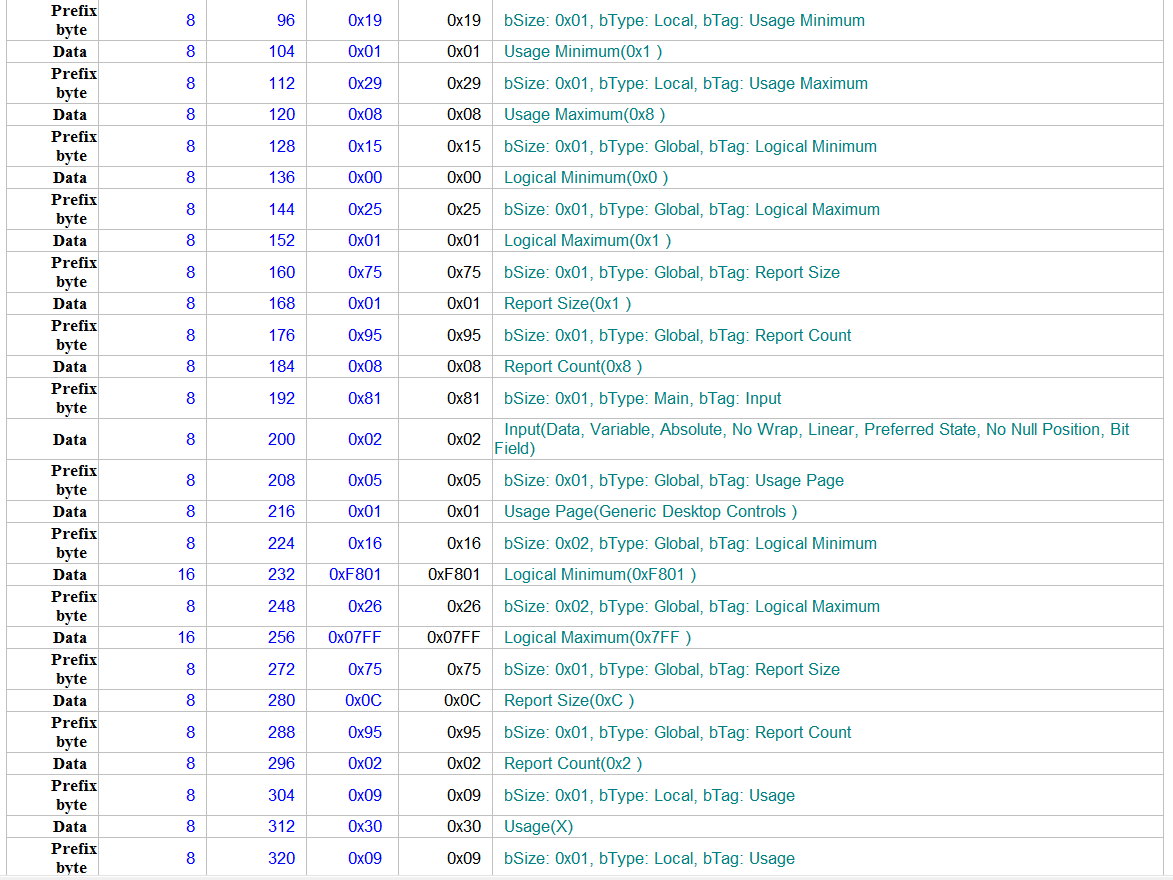
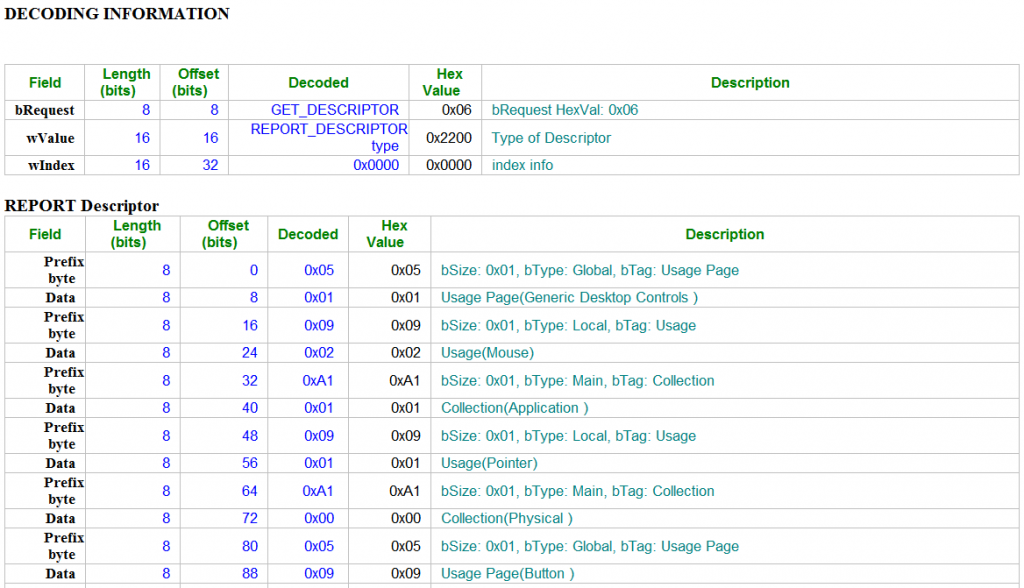
HID report descriptor:
Length: 1 Type: Global Tag: Usage Page Generic Desktop Controls Data: 01
Length: 1 Type: Local Tag: Usage Data: 02
Length: 1 Type: Main Tag: Collection Application (mouse, keyboard) Data: 01
Length: 1 Type: Local Tag: Usage Data: 01
Length: 1 Type: Main Tag: Collection Physical (group of axes) Data: 00
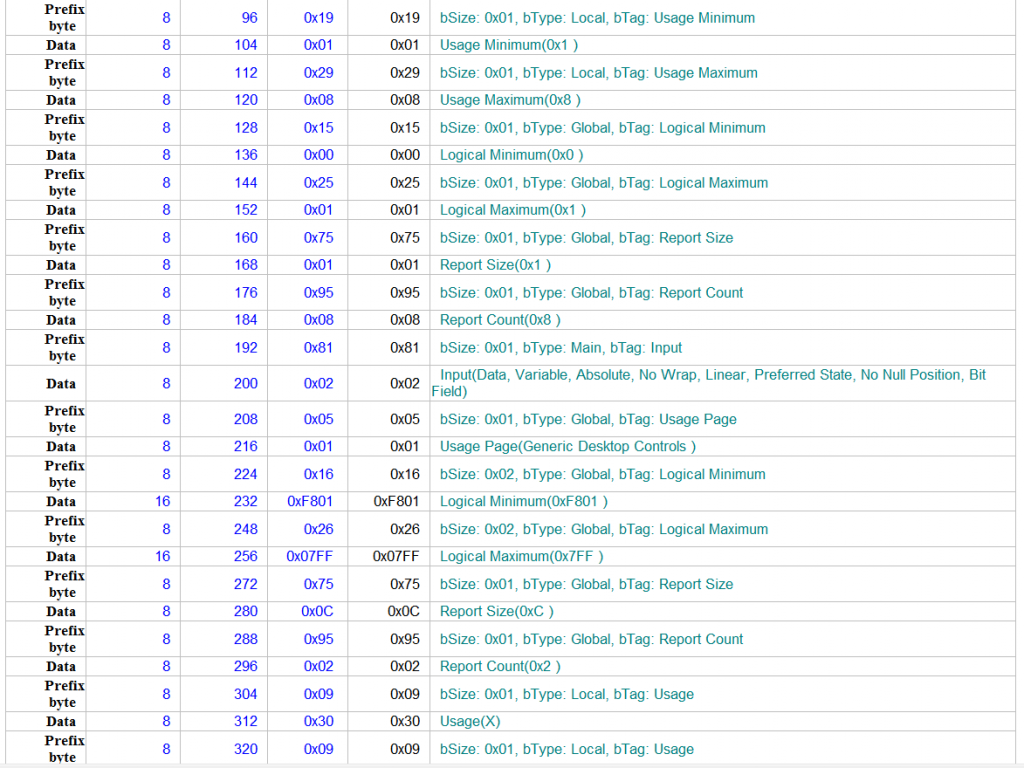
Length: 1 Type: Global Tag: Usage Page Button Data: 09
Length: 1 Type: Local Tag: Usage Minimum Data: 01
Length: 1 Type: Local Tag: Usage Maximum Data: 08
Length: 1 Type: Global Tag: Logical Minimum Data: 00
Length: 1 Type: Global Tag: Logical Maximum Data: 01
Length: 1 Type: Global Tag: Report Size Data: 01
Length: 1 Type: Global Tag: Report Count Data: 08
Length: 1 Type: Main Tag: Input Data,Variable,Absolute………
Length: 1 Type: Global Tag: Usage Page Generic Desktop Controls Data: 01
Length: 2 Type: Global Tag: Logical Minimum Data: 01 Data: F8
Length: 2 Type: Global Tag: Logical Maximum Data: FF Data: 07
Length: 1 Type: Global Tag: Report Size Data: 0C
Length: 1 Type: Global Tag: Report Count Data: 02
Length: 1 Type: Local Tag: Usage Data: 30
Length: 1 Type: Local Tag: Usage Data: 31
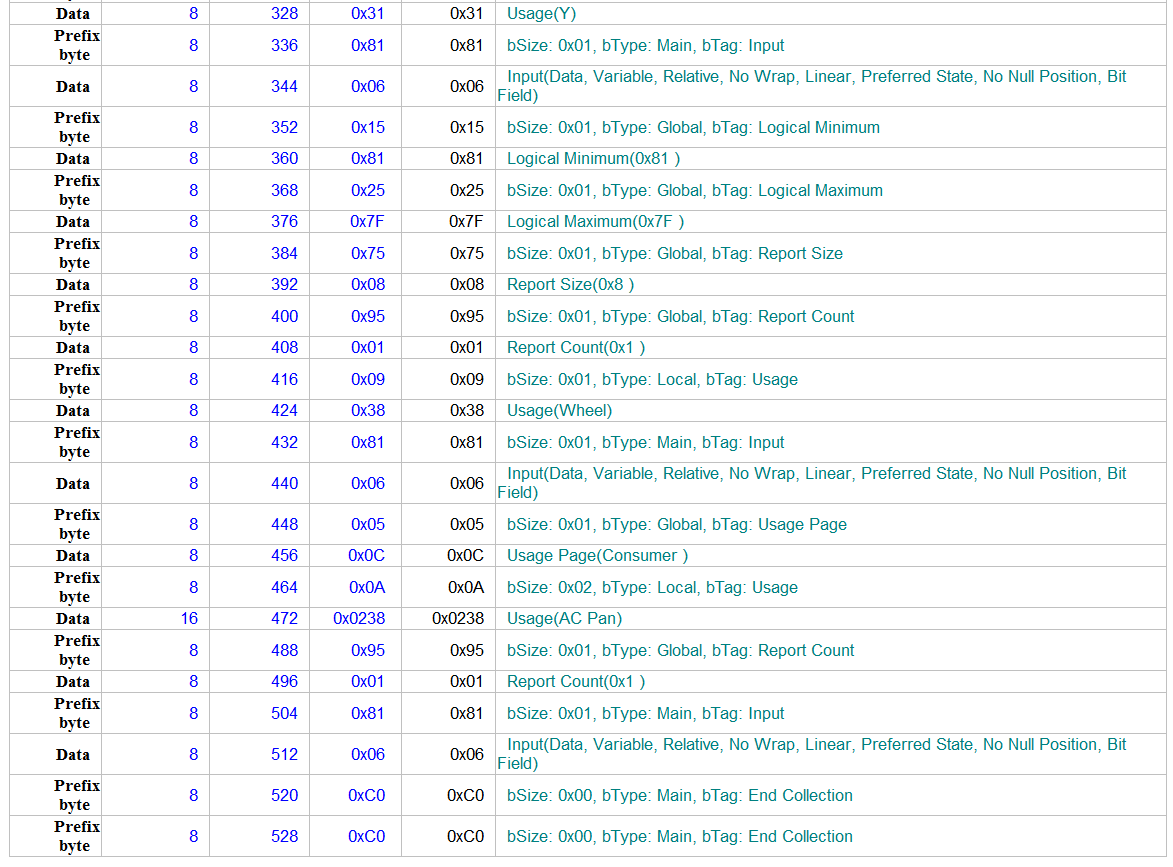
Length: 1 Type: Main Tag: Input Data,Variable,Relative………
Length: 1 Type: Global Tag: Logical Minimum Data: 81
Length: 1 Type: Global Tag: Logical Maximum Data: 7F
Length: 1 Type: Global Tag: Report Size Data: 08
Length: 1 Type: Global Tag: Report Count Data: 01
Length: 1 Type: Local Tag: Usage Data: 38
Length: 1 Type: Main Tag: Input Data,Variable,Relative………
Length: 1 Type: Global Tag: Usage Page Consumer Data: 0C
Length: 2 Type: Local Tag: Usage Data: 38 Data: 02
Length: 1 Type: Global Tag: Report Count Data: 01
Length: 1 Type: Main Tag: Input Data,Variable,Relative………
Length: 0 Type: Main Tag: End Collection
Length: 0 Type: Main Tag: End Collection
Endpoint descriptor:
Endpoint address: 01 Direction: IN
Attributes: 03 Transfer type: Interrupt
Max.packet size: 0006
Polling interval: 0A 10 ms
根据上面的结果,计算长度应该是1×8+Cx2+8×1=40 bits= 5 bytes ,修改【参考1】的代码如下:
#include "Max3421e.h"
#include "Usb.h"


#define DEVADDR 1
#define CONFVALUE 1

void setup();
void loop();

MAX3421E Max;
USB Usb;

void setup()
{
    Serial.begin( 115200 );
    Serial.println("Start");
    Max.powerOn();
    delay( 200 );
}

void loop()
{
 byte rcode;
    Max.Task();
    Usb.Task();
    if( Usb.getUsbTaskState() == USB_STATE_CONFIGURING ) {
        mouse0_init();
    }//if( Usb.getUsbTaskState() == USB_STATE_CONFIGURING...
    if( Usb.getUsbTaskState() == USB_STATE_RUNNING ) {  //poll the keyboard
        rcode = mouse0_poll();
        if( rcode ) {
          Serial.print("Mouse Poll Error: ");
          Serial.println( rcode, HEX );
        }//if( rcode...
    }//if( Usb.getUsbTaskState() == USB_STATE_RUNNING...
}
/* Initialize mouse */
void mouse0_init( void )
{
 byte rcode = 0;  //return code
  /**/
  Usb.setDevTableEntry( 1, Usb.getDevTableEntry( 0,0 ) );              //copy device 0 endpoint information to device 1
  /* Configure device */
  rcode = Usb.setConf( DEVADDR, 0, CONFVALUE );
  if( rcode ) {
    Serial.print("Error configuring mouse. Return code : ");
    Serial.println( rcode, HEX );
    while(1);  //stop
  }//if( rcode...

  Usb.setUsbTaskState( USB_STATE_RUNNING );
  return;
}
/* Poll mouse using Get Report and print result */
byte mouse0_poll( void )
{
  byte rcode,i;
  char buf[ 4 ] = { 0 };      //mouse buffer
  static char old_buf[ 4 ] = { 0 };  //last poll
    /* poll mouse */
    rcode = Usb.getReport( DEVADDR, 0, 4, 0, 1, 0, buf );
    if( rcode ) {  //error
      return( rcode );
    }
    for( i = 0; i < 4; i++) {  //check for new information
      if( buf[ i ] != old_buf[ i ] ) { //new info in buffer
        break;
      }
    }
    if( i == 4 ) {
      return( 0 );  //all bytes are the same
    }
    /* print buffer */
    if( buf[ 0 ] & 0x01 ) {
      Serial.print("Button1 pressed ");
    }
    if( buf[ 0 ] & 0x02 ) {
      Serial.print("Button2 pressed ");
    }
    if( buf[ 0 ] & 0x04 ) {
      Serial.print("Button3 pressed ");
    }
    Serial.println("");
    Serial.print("X-axis: ");
    Serial.println( buf[ 1 ], DEC);
    Serial.print("Y-axis: ");
    Serial.println( buf[ 2 ], DEC);
    Serial.print("Wheel: ");
    Serial.println( buf[ 3 ], DEC);

    for( i = 0; i < 4; i++ ) {
      old_buf[ i ] = buf[ i ];  //copy buffer
    }
    Serial.println("");
    return( rcode );
}
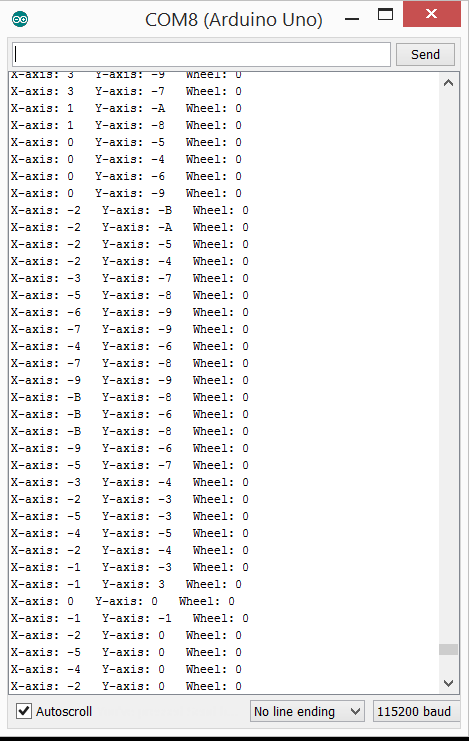
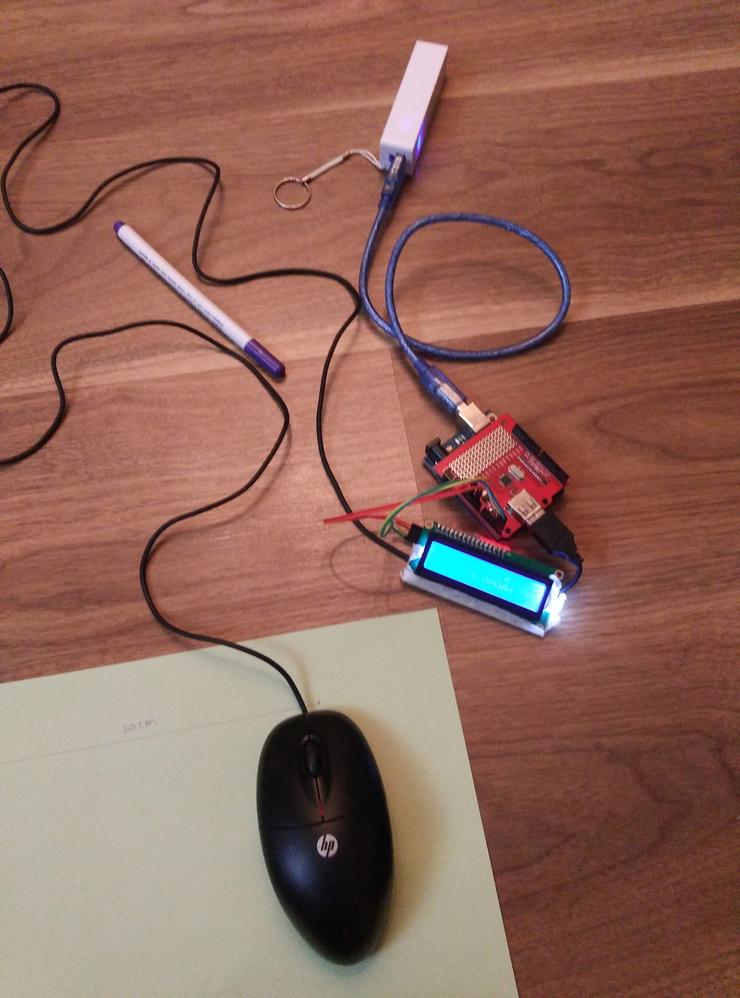
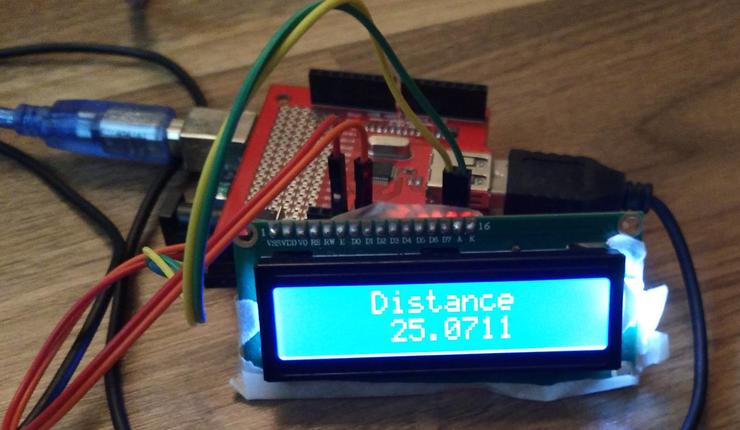
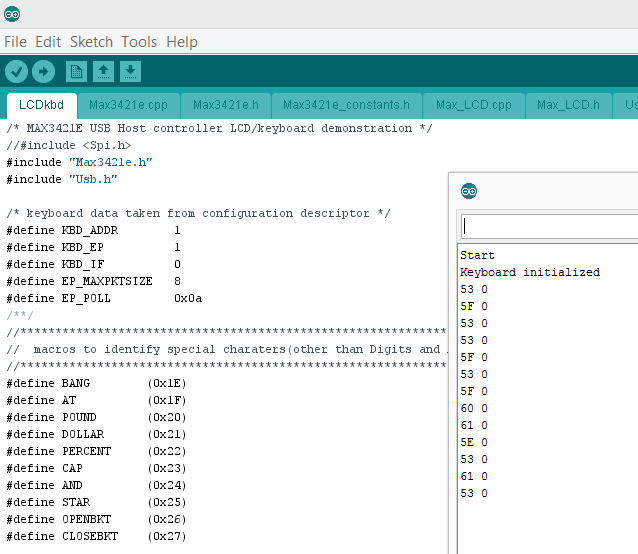
运行结果
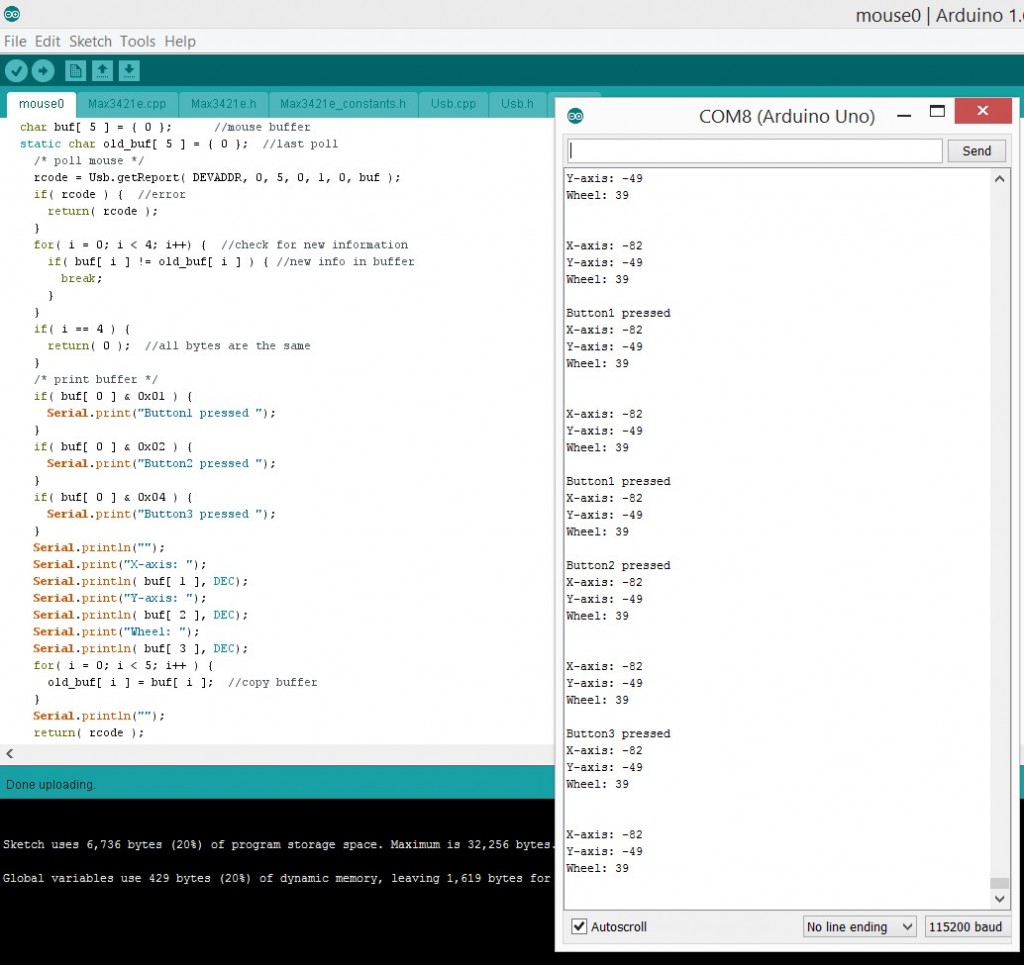
完整代码下载
mouse0
看起来按键和X Y都已经正确,但是 wheel 并不正常。再仔细研究代码,取出来的信息长度和描述符中的不一致。就是说,程序虽然能够运行也能够取到变化的值,但是解读有误。
再进一步研读 Descriptor
Length: 1 Type: Global Tag: Usage Page Generic Desktop Controls Data: 01
Length: 2 Type: Global Tag: Logical Minimum Data: 01 Data: F8 //最小 F801 = 1111 1000 0000 0001 = -2047
Length: 2 Type: Global Tag: Logical Maximum Data: FF Data: 07//最大 07FF = 0000 0111 1111 1111 = 2047
Length: 1 Type: Global Tag: Report Size Data: 0C //这里指出了上面数值的大小是 12位
Length: 1 Type: Global Tag: Report Count Data: 02
Length: 1 Type: Local Tag: Usage Data: 30 // X
Length: 1 Type: Local Tag: Usage Data: 31 // Y
应该是意味着2个12bits长度的数值,对应X Y 分配如下,其中 X[B] 和Y[B]应该是最高的符号位

根据这个改写程序,按照上面的表格取值再拼接起来,特别需要注意的是,我发现Arduino在不同尺寸的数据转换上似乎有一些bug,我只能把值放在 unsigned long int中然后才能进行拼接和输出的动作。
    Serial.print("X-axis: ");
    x=((libuf[2] & 0xF)<<8)+(libuf[1] & 0xFF );
    if (x & 0x800) {
      Serial.print("-");
      x = ((~x) & 0x7FF) +1;
    }

    Serial.println(x, HEX);

    Serial.print("Y-axis: ");
    y=(((libuf[2]>>4) & 0xF) +((libuf[3] & 0xFF )<<4));
    if (y & 0x800) {
      Serial.print("-");
      y = ((~y) & 0x7FF) +1;
    }
Serial.println(y, HEX);
最终,程序可以正常执行。
工作正常的程序如下:
#include "Max3421e.h"
#include "Usb.h"


#define DEVADDR 1
#define CONFVALUE 1

void setup();
void loop();

MAX3421E Max;
USB Usb;

void setup()
{
    Serial.begin( 115200 );
    Serial.println("Start");
    Max.powerOn();
    delay( 200 );
}

void loop()
{
 byte rcode;
    Max.Task();
    Usb.Task();
    if( Usb.getUsbTaskState() == USB_STATE_CONFIGURING ) {
        mouse0_init();
    }//if( Usb.getUsbTaskState() == USB_STATE_CONFIGURING...
    if( Usb.getUsbTaskState() == USB_STATE_RUNNING ) {  //poll the keyboard
        rcode = mouse0_poll();
        if( rcode ) {
          Serial.print("Mouse Poll Error: ");
          Serial.println( rcode, HEX );
        }//if( rcode...
    }//if( Usb.getUsbTaskState() == USB_STATE_RUNNING...
}
/* Initialize mouse */
void mouse0_init( void )
{
 byte rcode = 0;  //return code
  /**/
  Usb.setDevTableEntry( 1, Usb.getDevTableEntry( 0,0 ) );              //copy device 0 endpoint information to device 1
  /* Configure device */
  rcode = Usb.setConf( DEVADDR, 0, CONFVALUE );
  if( rcode ) {
    Serial.print("Error configuring mouse. Return code : ");
    Serial.println( rcode, HEX );
    while(1);  //stop
  }//if( rcode...

  Usb.setUsbTaskState( USB_STATE_RUNNING );
  return;
}
/* Poll mouse using Get Report and print result */
byte mouse0_poll( void )
{
  byte rcode,i;
  char buf[ 5 ] = { 0 };      //mouse buffer
  static char old_buf[ sizeof(buf) ] = { 0 };  //last poll
  unsigned long int libuf[ sizeof(buf) ];
  unsigned long int x;
  unsigned long int y;

    /* poll mouse */
    rcode = Usb.getReport( DEVADDR, 0, sizeof(buf), 0, 1, 0, buf );
    if( rcode ) {  //error
      return( rcode );
    }
    for( i = 0; i < sizeof(buf); i++) {  //check for new information
      if( buf[ i ] != old_buf[ i ] ) { //new info in buffer
        break;
      }
    }
    if( i == sizeof(buf)) {
      return( 0 );  //all bytes are the same
    }
    /* print buffer */
    if( buf[ 0 ] & 0x01 ) {
      Serial.print("Button1 pressed ");
    }
    if( buf[ 0 ] & 0x02 ) {
      Serial.print("Button2 pressed ");
    }
    if( buf[ 0 ] & 0x04 ) {
      Serial.print("Button3 pressed ");
    }

    for( i = 0; i < sizeof(buf); i++ ) {
      old_buf[ i ] = buf[ i ];  //copy buffer
      libuf[ i] = buf[i];
    }

    //Serial.print(libuf[0],HEX); Serial.print("  ");
    //Serial.print(libuf[1],HEX); Serial.print("  ");
    //Serial.print(libuf[2],HEX); Serial.print("  ");
    //Serial.print(libuf[3],HEX); Serial.print("  ");
    //Serial.println("");

    Serial.print("X-axis: ");
    x=((libuf[2] & 0xF)<<8)+(libuf[1] & 0xFF );
    if (x & 0x800) {
      Serial.print("-");
      x = ((~x) & 0x7FF) +1;
    }

    Serial.println(x, HEX);

    Serial.print("Y-axis: ");
    y=(((libuf[2]>>4) & 0xF) +((libuf[3] & 0xFF )<<4));
    if (y & 0x800) {
      Serial.print("-");
      y = ((~y) & 0x7FF) +1;
    }
    Serial.println(y, HEX);

    Serial.print("Wheel: ");
    Serial.println(buf [4] & 0xFF, HEX);
    return( rcode );
}
完整代码下载:
mousea
补遗:在运行中,我还发现了一个奇怪的问题:当使用 Get_Report取得数据时,鼠标向一个方向移动,会出现最大值。意思是:比如,向右一直移动鼠标,输出达到 7FF 之后,继续右移,输出值会维持在 7FF 而不会变化。没有找到直接描述这个问题的资料,不过有一些类似的介绍【参考2】,上面提到USB鼠标在送出数据的时候,会有两种方式,一种是Relative ,一种是Absolute。差别在于,比如前者输出 (1,1),意思是告诉系统鼠标移动了(1,1);而后者如果输出 (1,1)则是告诉系统,鼠标移动到(1,1)。看起来,我这个鼠标描述符中提到的是Relative,但是实际输出是 Absolute。
Length: 1 Type: Global Tag: Report Size Data: 0C
Length: 1 Type: Global Tag: Report Count Data: 02
Length: 1 Type: Local Tag: Usage Data: 30
Length: 1 Type: Local Tag: Usage Data: 31
Length: 1 Type: Main Tag: Input Data,Variable,Relative………
于此可以形成对照的是 Wheel,每次滚动之后,很快会再次输出一个 0 的位置,下次再给出新的滚动值。
至于Windows 下,根据资料,系统会自动根据鼠标信息计算出一个大概范围方便使用(比如,屏幕是 1024×768,鼠标是Relative -100到+100的话,如果不做优化,从左上到右下需要做几次才行)。而我用的这个鼠标,声明自己是Relative,但是实际上发出Absolute,只是因为自己的范围很大(-7FF到+7FF),所以也不会有什么感觉。
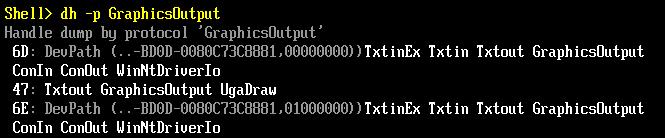
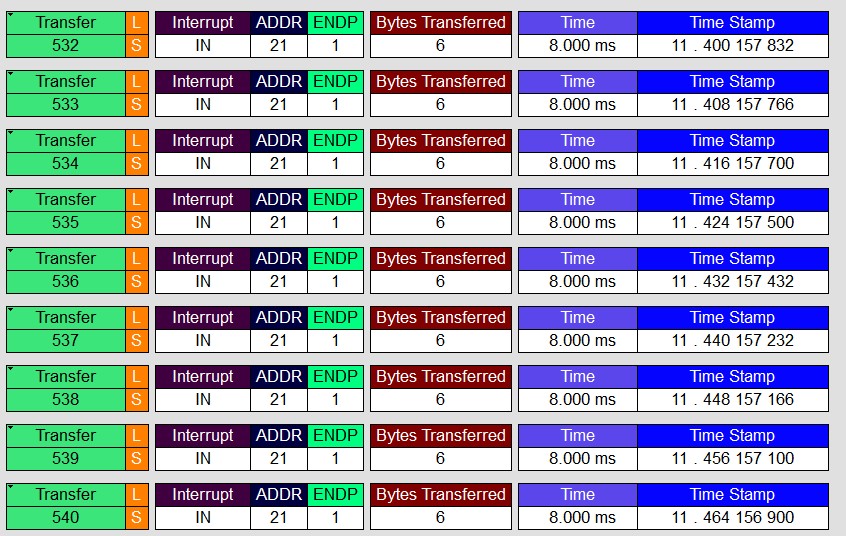
上述只是猜测,是目前已知的最合理的解释而已。使用逻辑分析仪分析USB鼠标信息得到的结果相同。
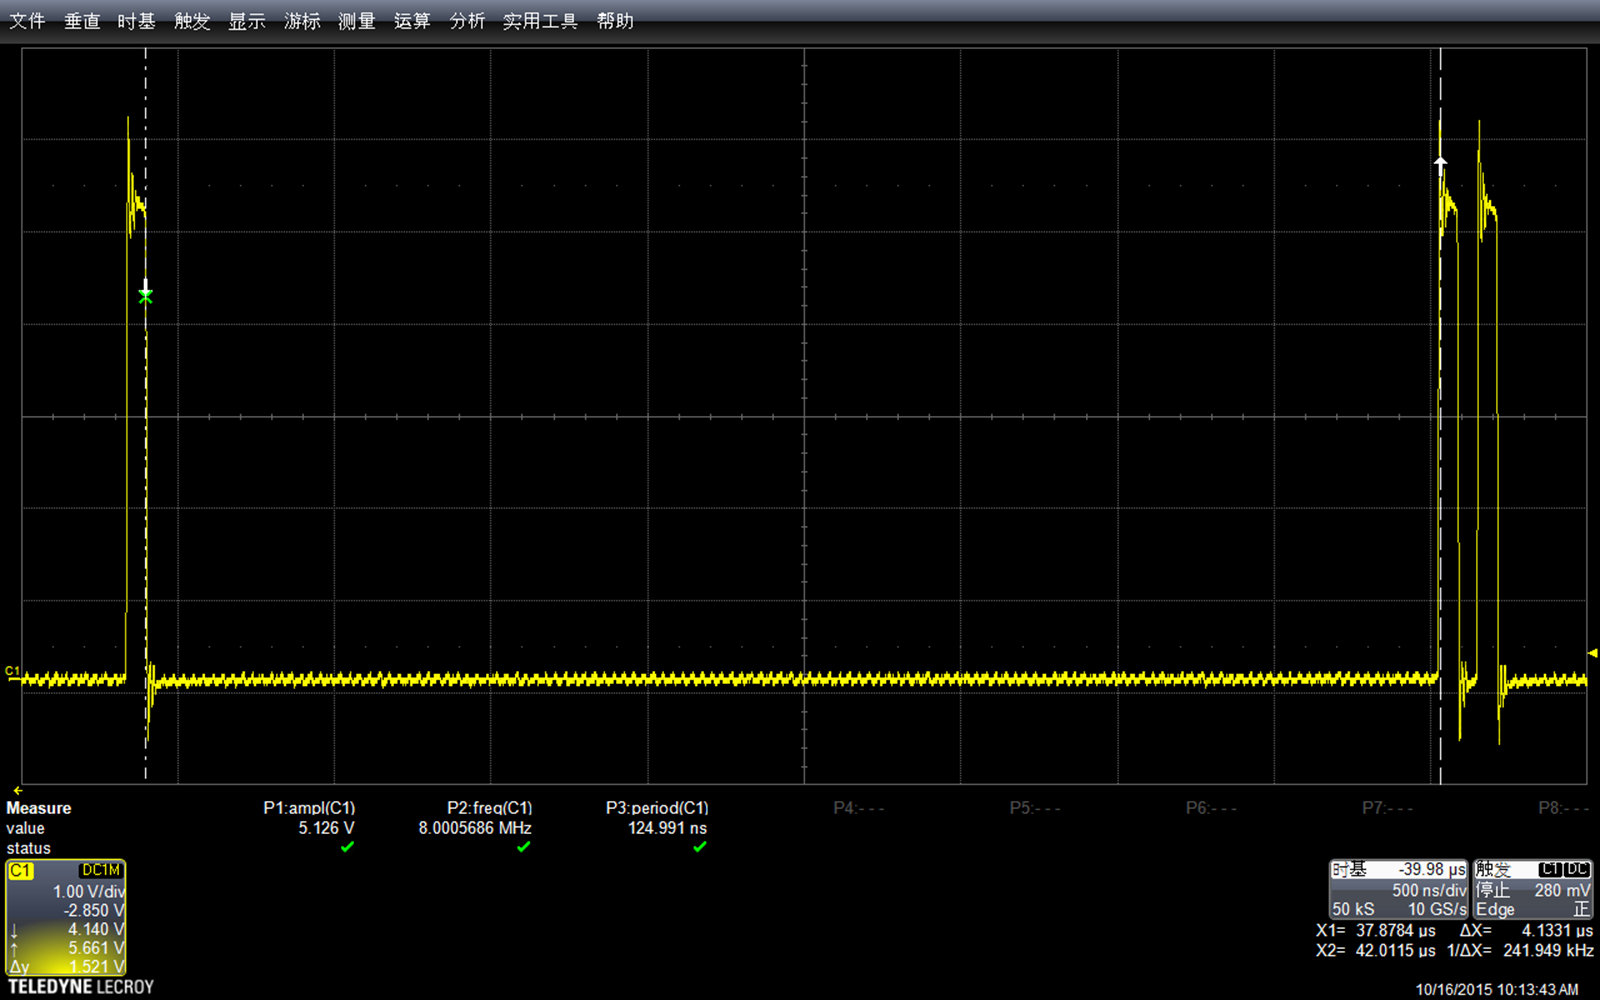
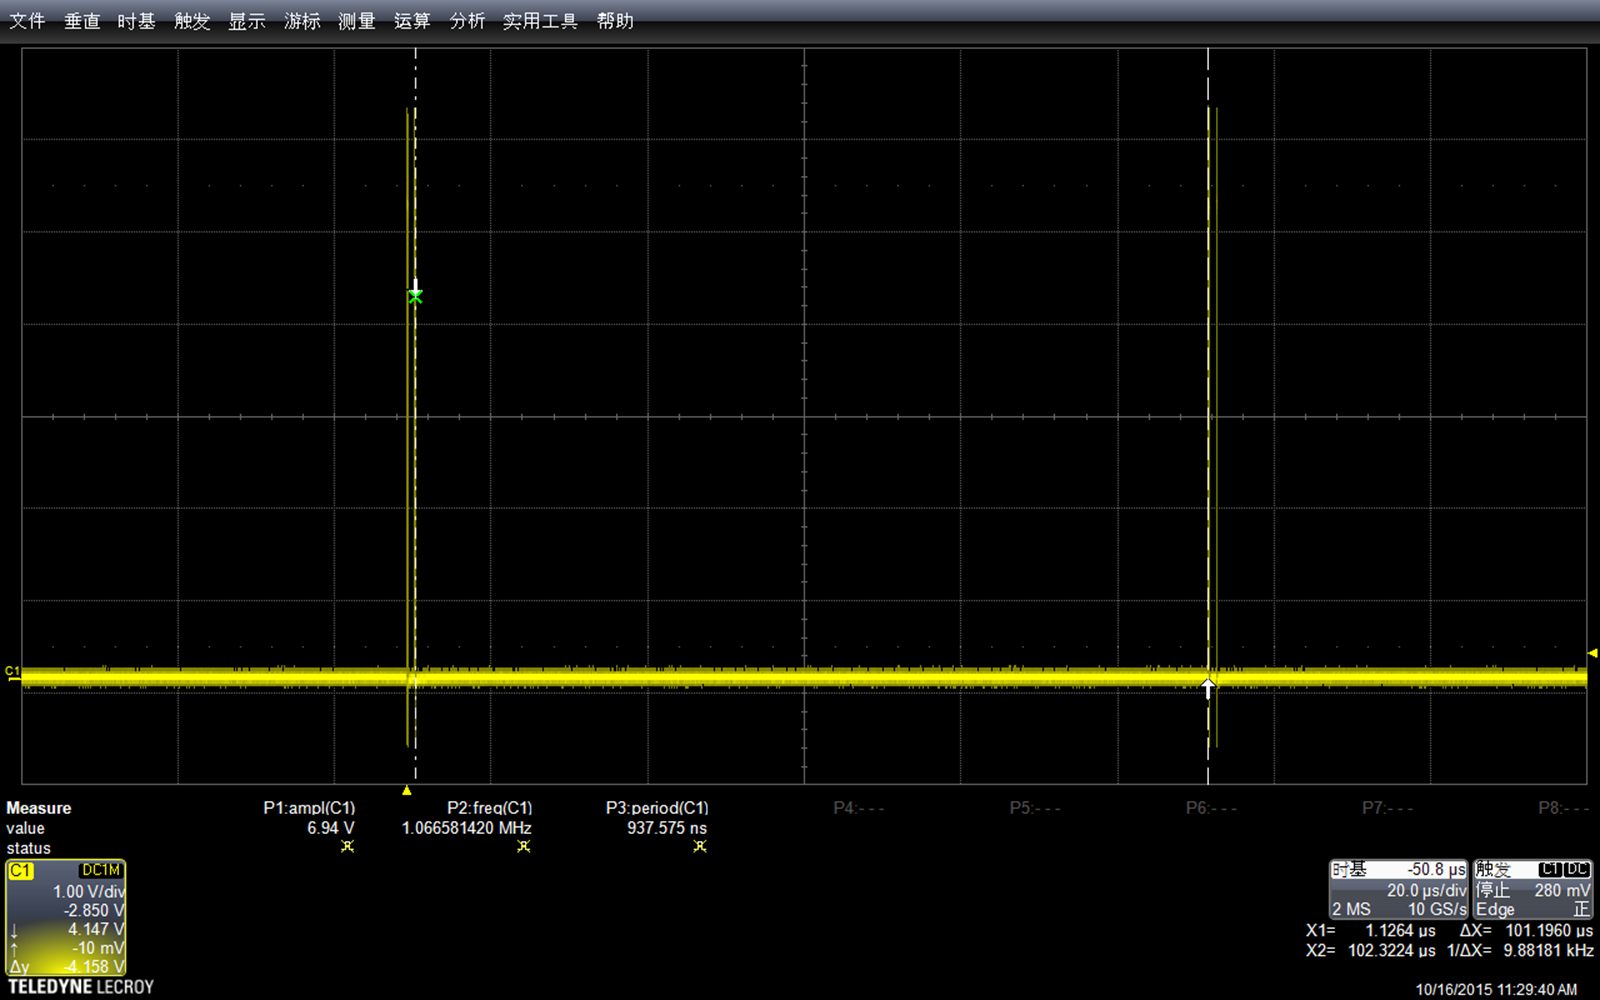
逻辑分析仪抓取的结果,Windows使用 Interrupt 方式来和鼠标通讯
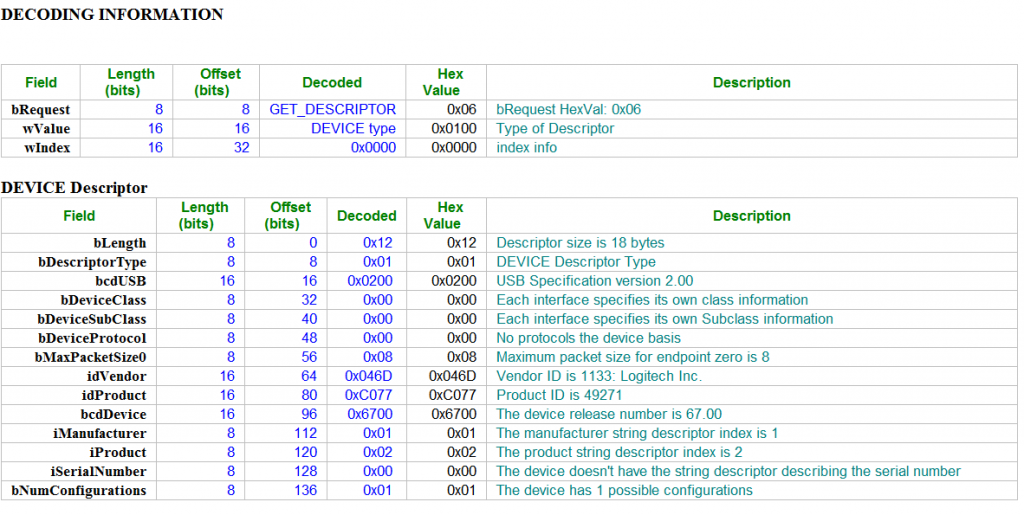
下面展示一下USB逻辑分析仪抓到的启动时的一些信息,首先是 Overview
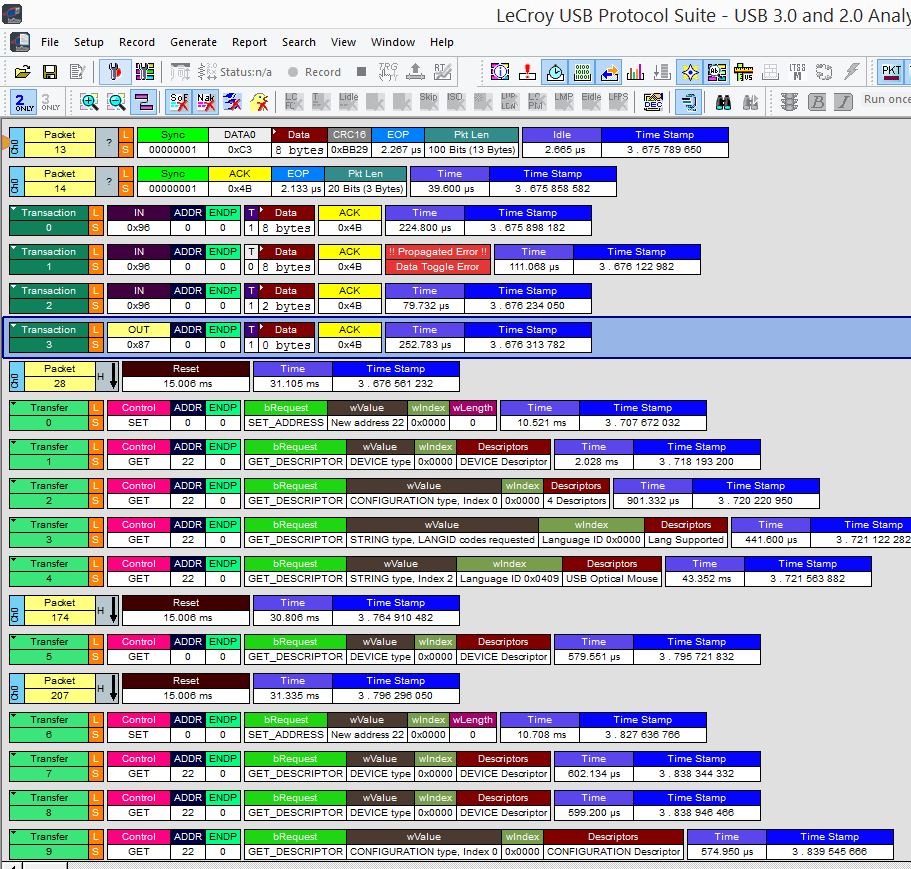
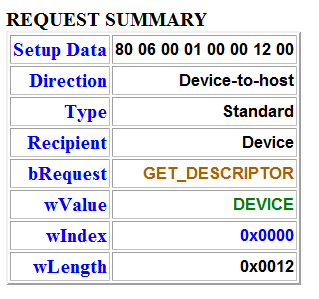
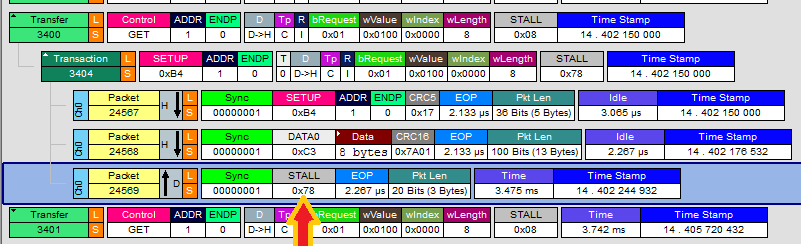
不清楚为什么VendorID 居然是罗技的,一种可能是因为这个是假的HP鼠标,乱写一个ID;另外的可能是HP 找罗技代工的。
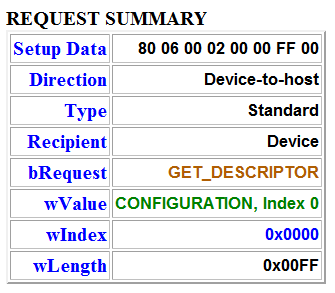
可以看到,MaxPower确实是一个很古怪的数值:98ma


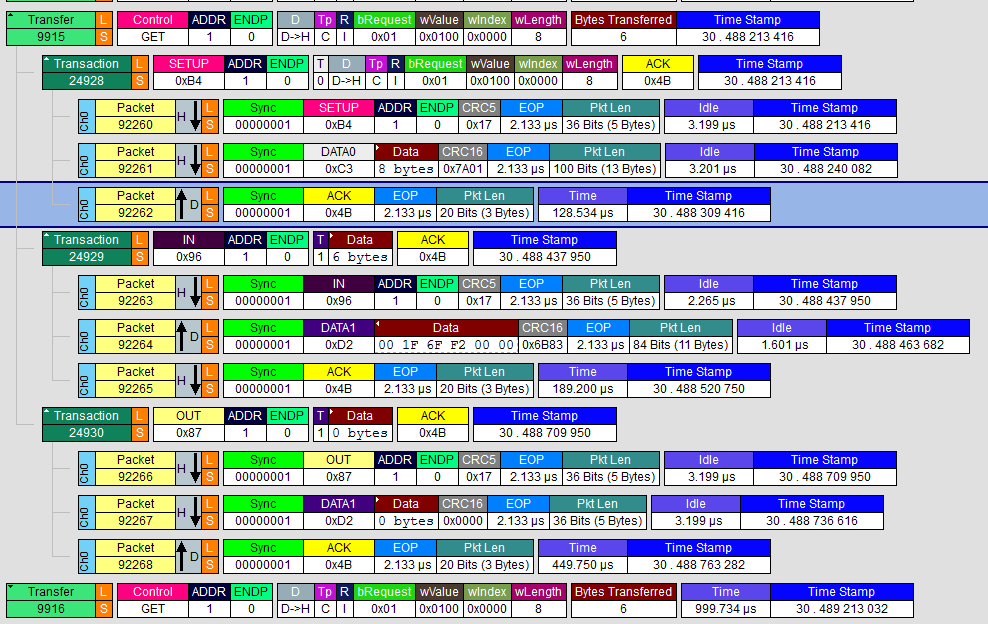
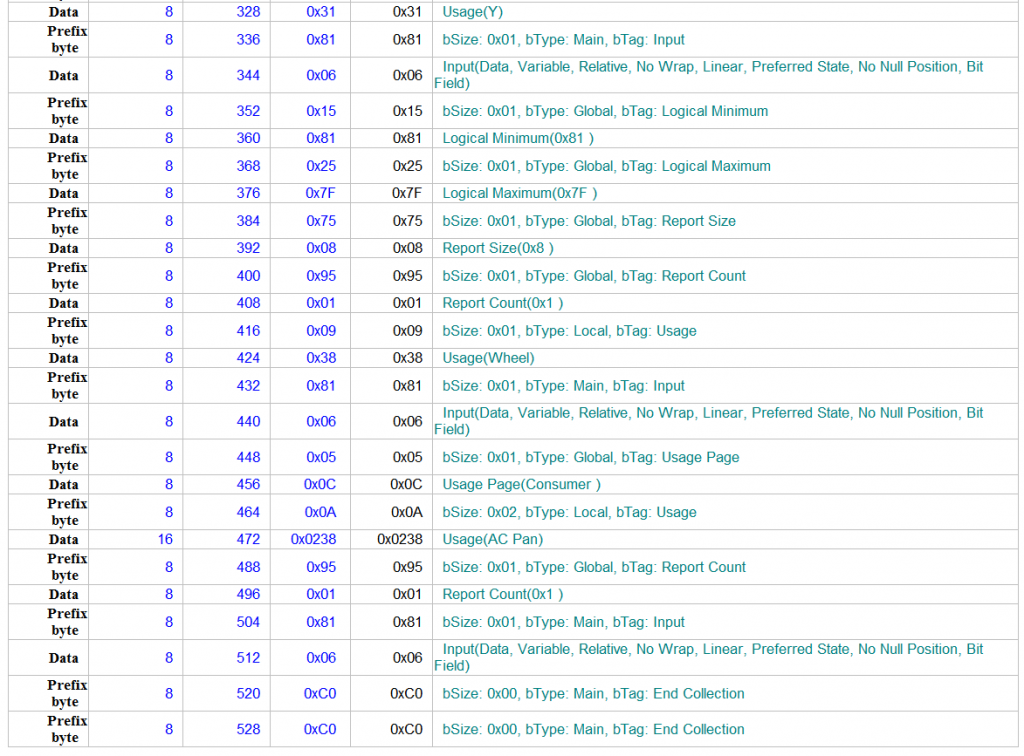
接下来是最重要的HID 描述符
参考:
1.https://www.circuitsathome.com/communicating-arduino-with-hid-devices-part-1
2.http://www.microchip.com/forums/m482197.aspx MOUSE HID / Resolution problem