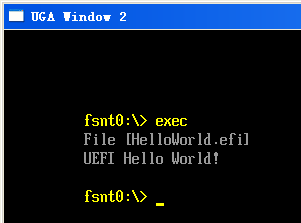
Step to UEFI (52) —– EFI_Graphics_Output_Protocol 清屏幕

EFI_Graphics_Output_Protocol 中的 Blt 可以实现在屏幕上绘制图形的功能。

bvf

其中的一个参数 EfiBltVideoFill 可以用来填充整个屏幕的颜色,从而实现清屏的目的。

#include  <Uefi.h>
#include  <Library/UefiLib.h>
#include  <Library/ShellCEntryLib.h>

#include  <stdio.h>
#include  <stdlib.h>
#include  <wchar.h>
#include  <time.h>
#include <Protocol/EfiShell.h>
#include <Library/ShellLib.h>

#include <Protocol/SimpleFileSystem.h>
#include <Protocol/BlockIo.h>
#include <Library/DevicePathLib.h>
#include <Library/HandleParsingLib.h>
#include <Library/SortLib.h>
#include <Library/MemoryAllocationLib.h>
#include <Library/BaseMemoryLib.h>

#include <Protocol/LoadedImage.h>


extern EFI_BOOT_SERVICES         *gBS;
extern EFI_SYSTEM_TABLE			 *gST;
extern EFI_RUNTIME_SERVICES 	 *gRT;

extern EFI_SHELL_ENVIRONMENT2    *mEfiShellEnvironment2;
extern EFI_HANDLE				 gImageHandle;

static EFI_GUID GraphicsOutputProtocolGuid = EFI_GRAPHICS_OUTPUT_PROTOCOL_GUID;
static EFI_GRAPHICS_OUTPUT_PROTOCOL *GraphicsOutput = NULL;

//Copied from  C\MdePkg\Include\Protocol\UgaDraw.h
typedef struct {
  UINT8 Blue;
  UINT8 Green;
  UINT8 Red;
  UINT8 Reserved;
} EFI_UGA_PIXEL;

//
// Drawing to the screen
//
VOID egClearScreen(IN EFI_UGA_PIXEL *FillColor)
{
    
    if (GraphicsOutput != NULL) {
        // EFI_GRAPHICS_OUTPUT_BLT_PIXEL and EFI_UGA_PIXEL have the same
        // layout, and the header from TianoCore actually defines them
        // to be the same type.
       GraphicsOutput->Blt(GraphicsOutput, (EFI_GRAPHICS_OUTPUT_BLT_PIXEL *)FillColor, EfiBltVideoFill,
                           0, 0, 0, 0, GraphicsOutput->Mode->Info->HorizontalResolution, 
						   GraphicsOutput->Mode->Info->VerticalResolution, 0);
    }
}

int
EFIAPI
main (                                         
  IN int Argc,
  IN char **Argv
  )
{
    EFI_STATUS    Status;
    EFI_UGA_PIXEL color;
	UINTN i;
	
    Status = gBS->LocateProtocol(&GraphicsOutputProtocolGuid, NULL, (VOID **) &GraphicsOutput);
    if (EFI_ERROR(Status)) {
        GraphicsOutput = NULL;
		Print(L"Loading Graphics_Output_Protocol error!\n");
		return EFI_SUCCESS;
	}	

	for (i=0;i<255;i++)
	  {
		color.Blue  = i & 0xFF;	
		color.Green = i & 0xFF;
		color.Red   = i & 0xFF;
	
		egClearScreen(&color);
		gBS->Stall(5000);
	  }
  return EFI_SUCCESS;
  
}


工作视频:

http://www.tudou.com/programs/view/W6lvKHdeMX8/?resourceId=414535982_06_02_99

完整代码下载

GFXTest2

参考:

1. 本文参考 https://github.com/chengs 的代码 在此表示感谢!

Step to UEFI (51) —– EFI_Graphics_Output_Protocol获得基本信息

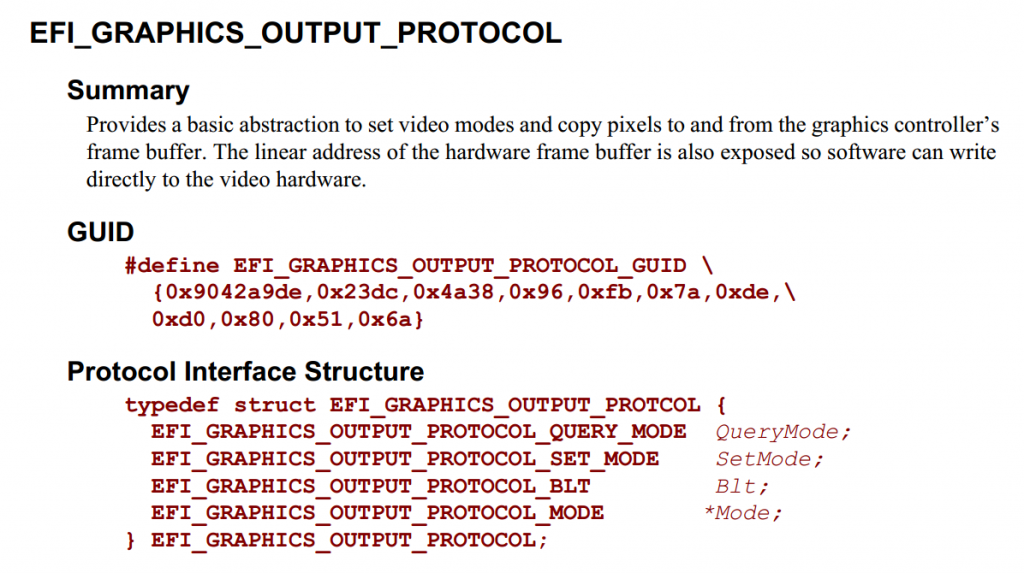
学习了一下如何获得 Shell 下当前的显示信息。通过 GraphicsOutputProtocol 来完成这个功能。这个 Protocol 在【参考1】 中有描述。

Capture

头定义在 \MdePkg\Include\Protocol\GraphicsOutput.h

typedef struct _EFI_GRAPHICS_OUTPUT_PROTOCOL EFI_GRAPHICS_OUTPUT_PROTOCOL;

///
/// Provides a basic abstraction to set video modes and copy pixels to and from 
/// the graphics controller's frame buffer. The linear address of the hardware 
/// frame buffer is also exposed so software can write directly to the video hardware.
///
struct _EFI_GRAPHICS_OUTPUT_PROTOCOL {
  EFI_GRAPHICS_OUTPUT_PROTOCOL_QUERY_MODE  QueryMode;
  EFI_GRAPHICS_OUTPUT_PROTOCOL_SET_MODE    SetMode;
  EFI_GRAPHICS_OUTPUT_PROTOCOL_BLT         Blt;
  ///
  /// Pointer to EFI_GRAPHICS_OUTPUT_PROTOCOL_MODE data.
  ///
  EFI_GRAPHICS_OUTPUT_PROTOCOL_MODE        *Mode;
};


从名称上来看,这个 Protocol 能够实现的功能是:查询/设置当前显示模式,将屏幕内容和内存互copy等。

这次实验的是查询功能。

查询的结果输出是 EFI_GRAPHICS_OUTPUT_PROTOCOL_MODE 结构体

typedef struct {
  ///
  /// The number of modes supported by QueryMode() and SetMode().
  ///
  UINT32                                 MaxMode;
  ///
  /// Current Mode of the graphics device. Valid mode numbers are 0 to MaxMode -1.
  ///
  UINT32                                 Mode;
  ///
  /// Pointer to read-only EFI_GRAPHICS_OUTPUT_MODE_INFORMATION data.
  ///
  EFI_GRAPHICS_OUTPUT_MODE_INFORMATION   *Info;
  ///
  /// Size of Info structure in bytes.
  ///
  UINTN                                  SizeOfInfo;
  ///
  /// Base address of graphics linear frame buffer.
  /// Offset zero in FrameBufferBase represents the upper left pixel of the display.
  ///
  EFI_PHYSICAL_ADDRESS                   FrameBufferBase;
  ///
  /// Amount of frame buffer needed to support the active mode as defined by 
  /// PixelsPerScanLine xVerticalResolution x PixelElementSize.
  ///
  UINTN                                  FrameBufferSize;
} EFI_GRAPHICS_OUTPUT_PROTOCOL_MODE;


可以看到能够获得当前显示模式,屏幕分辨率和格式信息等。根据上面的信息,编写程序如下

#include  <Uefi.h>
#include  <Library/UefiLib.h>
#include  <Library/ShellCEntryLib.h>

#include  <stdio.h>
#include  <stdlib.h>
#include  <wchar.h>
#include  <time.h>
#include <Protocol/EfiShell.h>
#include <Library/ShellLib.h>

#include <Protocol/SimpleFileSystem.h>
#include <Protocol/BlockIo.h>
#include <Library/DevicePathLib.h>
#include <Library/HandleParsingLib.h>
#include <Library/SortLib.h>
#include <Library/MemoryAllocationLib.h>
#include <Library/BaseMemoryLib.h>

#include <Protocol/LoadedImage.h>


extern EFI_BOOT_SERVICES         *gBS;
extern EFI_SYSTEM_TABLE			 *gST;
extern EFI_RUNTIME_SERVICES 	 *gRT;

extern EFI_SHELL_ENVIRONMENT2    *mEfiShellEnvironment2;
extern EFI_HANDLE				 gImageHandle;

static EFI_GUID GraphicsOutputProtocolGuid = EFI_GRAPHICS_OUTPUT_PROTOCOL_GUID;
static EFI_GRAPHICS_OUTPUT_PROTOCOL *GraphicsOutput = NULL;

int
EFIAPI
main (                                         
  IN int Argc,
  IN char **Argv
  )
{
    EFI_STATUS Status;

    Status = gBS->LocateProtocol(&GraphicsOutputProtocolGuid, NULL, (VOID **) &GraphicsOutput);
    if (EFI_ERROR(Status)) {
        GraphicsOutput = NULL;
		Print(L"Loading Graphics_Output_Protocol error!\n");
		return EFI_SUCCESS;
	}	

	Print(L"Max mode     =[%d] \n",GraphicsOutput->Mode->MaxMode);
	Print(L"Current mode =[%d] \n",GraphicsOutput->Mode->Mode);
	Print(L"Version      =[%d] \n",GraphicsOutput->Mode->Info->Version);
	Print(L"Screen Width =[%d] \n",GraphicsOutput->Mode->Info->HorizontalResolution);
	Print(L"Screen height=[%d] \n",GraphicsOutput->Mode->Info->VerticalResolution);
	Print(L"Format       =[%d] \n",GraphicsOutput->Mode->Info->PixelFormat);
	Print(L"Num of pixel =[%d] \n",GraphicsOutput->Mode->Info->PixelsPerScanLine);
		
  return EFI_SUCCESS;
  
}


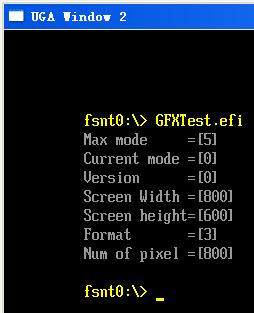
运行结果(还是NT32模拟器中)

gopinfo

完整代码下载:

GFXTest

参考:

1.UEFI Spec 2.4 P488 11.9 Graphics Output Protocol

==========================================================

2025年3月17日 额外同一个功能类似的代码

#include <Uefi.h>
#include <Library/UefiBootServicesTableLib.h>
#include <Library/UefiLib.h>
#include <Protocol/GraphicsOutput.h>
#include <Library/DebugLib.h>

INTN
EFIAPI
ShellAppMain (
  IN UINTN Argc,
  IN CHAR16 **Argv
)
{
  EFI_STATUS Status;
  EFI_GRAPHICS_OUTPUT_PROTOCOL *GraphicsOutput;
  UINTN HandleCount;
  EFI_HANDLE *HandleBuffer;
  UINTN Index;
  UINT32 ModeIndex;
  EFI_GRAPHICS_OUTPUT_MODE_INFORMATION *Info;
  UINTN SizeOfInfo;

  // Locate the handles that support the Graphics Output Protocol
  Status = gBS->LocateHandleBuffer(ByProtocol, &gEfiGraphicsOutputProtocolGuid, NULL, &HandleCount, &HandleBuffer);
  if (EFI_ERROR(Status)) {
    Print(L"Failed to locate handles for Graphics Output Protocol\n");
    return Status;
  }

  // Iterate over all handles
  for (Index = 0; Index < HandleCount; Index++) {
    // Get the Graphics Output Protocol instance
    Status = gBS->HandleProtocol(HandleBuffer[Index], &gEfiGraphicsOutputProtocolGuid, (VOID**)&GraphicsOutput);
    if (EFI_ERROR(Status)) {
      Print(L"Failed to handle protocol for handle %d\n", Index);
      continue;
    }
	Print(L"Controler [%d]\n", Index);
    // Iterate over each mode
    for (ModeIndex = 0; ModeIndex < GraphicsOutput->Mode->MaxMode; ModeIndex++) {
      // Get mode information
      Status = GraphicsOutput->QueryMode(GraphicsOutput, ModeIndex, &SizeOfInfo, &Info);
      if (EFI_ERROR(Status)) {
        Print(L"Failed to query mode %d\n", ModeIndex);
        continue;
      }

      // Output the resolution and pixel format
      Print(L"Mode %d: Resolution: %ux%u, Pixels Per Scanline: %u\n",
            ModeIndex,
            Info->HorizontalResolution,
            Info->VerticalResolution,
            Info->PixelsPerScanLine);

      // Free the mode information
      gBS->FreePool(Info);
    }
  }

  // Free the handle buffer
  gBS->FreePool(HandleBuffer);

  return EFI_SUCCESS;
}
## @file
#  A simple, basic, EDK II native, "hello" application.
#
#   Copyright (c) 2010 - 2018, Intel Corporation. All rights reserved.&lt;BR>
#   SPDX-License-Identifier: BSD-2-Clause-Patent
#
##

[Defines]
  INF_VERSION                    = 0x00010006
  BASE_NAME                      = gm
  FILE_GUID                      = a912f198-2025-0317-b908-b757b806ec83
  MODULE_TYPE                    = UEFI_APPLICATION
  VERSION_STRING                 = 0.1
  ENTRY_POINT                    = ShellCEntryLib

#
#  VALID_ARCHITECTURES           = IA32 X64
#

[Sources]
  GetModeInfo.c

[Packages]
  MdePkg/MdePkg.dec
  ShellPkg/ShellPkg.dec

[LibraryClasses]
  UefiLib
  ShellCEntryLib

Step to UEFI (50) —– 实现一个简单的菜单功能

屏幕显示功能搭配取按键信息的功能可以实现一个简单的菜单,用户可以使用上下键移动后选项,回车确认,ESC退出。

代码本身不复杂

#include  <Uefi.h>
#include  <Library/UefiLib.h>
#include  <Library/ShellCEntryLib.h>

#include  <stdio.h>
#include  <stdlib.h>
#include  <wchar.h>
#include  <time.h>
#include <Protocol/EfiShell.h>
#include <Library/ShellLib.h>

#include <Protocol/SimpleFileSystem.h>
#include <Protocol/BlockIo.h>
#include <Library/DevicePathLib.h>
#include <Library/HandleParsingLib.h>
#include <Library/SortLib.h>
#include <Library/MemoryAllocationLib.h>
#include <Library/BaseMemoryLib.h>

extern EFI_BOOT_SERVICES         *gBS;
extern EFI_SYSTEM_TABLE			 *gST;
extern EFI_RUNTIME_SERVICES 	 *gRT;

extern EFI_SHELL_ENVIRONMENT2    *mEfiShellEnvironment2;
extern EFI_HANDLE				 gImageHandle;

//
// EFI Scan codes 
// copied from \EdkCompatibilityPkg\Foundation\Efi\Protocol\SimpleTextIn\SimpleTextIn.h
//
#define SCAN_NULL       0x0000
#define SCAN_UP         0x0001
#define SCAN_DOWN       0x0002
#define SCAN_ESC        0x0017
#define CHAR_CARRIAGE_RETURN  0x000D

#define	POSX 7
#define	POSY 3
#define NUM  5
CHAR16 HELPSTR[40]=L"UP/DOWN, ENTER , ESC";
CHAR16 ITEM[NUM][20]= {
				L"Item1 MOVSXX",
				L"Item2 CPUID",
				L"Item3 RETF",
				L"Item4 PUSHF",
				L"Item5 SUB"
				};

int
EFIAPI
main (                                         
  IN int Argc,
  IN char **Argv
  )
{

  EFI_INPUT_KEY	Key;
  EFI_STATUS		Status;
  int current=0;
  int i;
  
  gST -> ConOut ->ClearScreen(gST->ConOut);
 
  ShellPrintEx(POSX-3,POSY-1,L"%N%S",HELPSTR);
  ShellPrintEx(POSX,POSY,L"%H%S",ITEM[0]);
  for (i=1;i<NUM;i++) 
	{
    ShellPrintEx(POSX,POSY+i,L"%N%S",ITEM[i]);
	}
	
  Key.ScanCode=SCAN_NULL;
  while (SCAN_ESC!=Key.ScanCode)
    {
		Status= gST -> ConIn -> ReadKeyStroke(gST->ConIn,&Key);	
		if (Status == EFI_SUCCESS)	{
			ShellPrintEx(POSX,POSY+current,L"%N%S",ITEM[current]);
			if (SCAN_UP == Key.ScanCode) {current = (current-1+NUM)%NUM;}
			if (SCAN_DOWN == Key.ScanCode) {current = (current+1)%NUM;}
			ShellPrintEx(POSX,POSY+current,L"%H%S",ITEM[current]);			
			ShellPrintEx(POSX,POSY+NUM,L"Current[%d] Scancode[%d] UnicodeChar[%x] \n\r",current,Key.ScanCode,Key.UnicodeChar);		
		}
		if (CHAR_CARRIAGE_RETURN == Key.UnicodeChar) {
			ShellPrintEx(POSX,POSY+NUM+1,L"You have chosen: %N%S",ITEM[current]);
			break;
		}
	};	

  return EFI_SUCCESS;
}


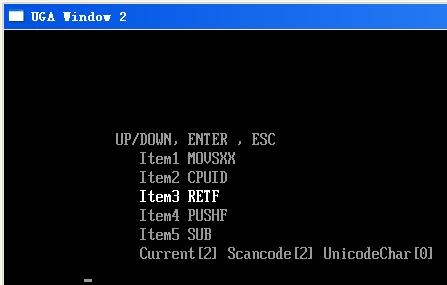
运行结果:

smenu

工作视频:

http://www.tudou.com/programs/view/R_932wqGuYw/?resourceId=414535982_06_02_99

完整的代码下载:

Menu

Step to UEFI (49) —– 内存驻留程序

之前,我们通过修改Shell的代码,能够实现在右上角不断显示当前时间的功能。但是这个方法过于复杂。于是我请教了一下 HZZZ ,看看他是否有什么好办法。

经过他的研究,还是使用定时器的方式不断触发,困难点在于如果退出时没有对应的 Handle,再次触发会导致问题。解决这个问题的方法是:让程序在内存中重新加载自己,跳进去执行之后,最开始的部分就可以丢弃掉了。

当然,如果你想读懂这个程序,要先读懂前面几篇 《Step to UEFI>> 系列的文章。

#include  <Uefi.h>
#include  <Library/UefiLib.h>
#include  <Library/ShellCEntryLib.h>

#include  <stdio.h>
#include  <stdlib.h>
#include  <wchar.h>
#include  <time.h>
#include <Protocol/EfiShell.h>
#include <Library/ShellLib.h>

#include <Protocol/SimpleFileSystem.h>
#include <Protocol/BlockIo.h>
#include <Library/DevicePathLib.h>
#include <Library/HandleParsingLib.h>
#include <Library/SortLib.h>
#include <Library/MemoryAllocationLib.h>
#include <Library/BaseMemoryLib.h>

#include <Protocol/LoadedImage.h>

extern EFI_BOOT_SERVICES         *gBS;
extern EFI_SYSTEM_TABLE		 *gST;
extern EFI_RUNTIME_SERVICES 	 *gRT;

extern EFI_SHELL_ENVIRONMENT2    *mEfiShellEnvironment2;
extern EFI_HANDLE		  gImageHandle;

STATIC CONST UINTN SecondsToNanoSeconds = 500000;

/**
  The callback function for the timer event used to get map.

  @param[in] Event    The event this function is registered to.
  @param[in] Context  The context registered to the event.
**/
VOID
EFIAPI
Timeout (
  IN EFI_EVENT      Event,
  IN VOID           *Context
  )
{
	EFI_TIME   ET;
	UINTN		x;
	UINTN		y;
  

  //Get cursor postion
  x = gST->ConOut->Mode->CursorColumn;
  y = gST->ConOut->Mode->CursorRow;
  //Move cursor to Up-Left 
  gST -> ConOut -> SetCursorPosition(gST -> ConOut,70,0);  
  //Output current time
  gRT->GetTime(&ET, NULL);  
  Print(L"%2d:%2d:%2d",ET.Hour,ET.Minute,ET.Second);
  //Move cursor back
  gST -> ConOut -> SetCursorPosition(gST -> ConOut,x,y);
  
  return ;
}

typedef struct {
  UINTN                       Signature;
  /// Image handle
  EFI_HANDLE                  Handle;   
  /// Image type
  UINTN                       Type;           
  /// If entrypoint has been called
  BOOLEAN                     Started;        
  /// The image's entry point
  EFI_IMAGE_ENTRY_POINT       EntryPoint;     
  /// loaded image protocol
  EFI_LOADED_IMAGE_PROTOCOL   Info; 
} LOADED_IMAGE_PRIVATE_DATA_TEMP;

#define _CR(Record, TYPE, Field)  ((TYPE *) ((CHAR8 *) (Record) - (CHAR8 *) &(((TYPE *) 0)->Field)))

#define LOADED_IMAGE_PRIVATE_DATA_FROM_THIS(a) \
          _CR(a, LOADED_IMAGE_PRIVATE_DATA_TEMP, Info)


typedef void (*Fun)();

void function()
{
    EFI_STATUS                Status;
    EFI_HANDLE                TimerOne = NULL;
	
    printf("function called\n");
	
    Status  = gBS->CreateEvent (
                    EVT_NOTIFY_SIGNAL | EVT_TIMER,
                    TPL_CALLBACK,
                    Timeout,
                    NULL,
                    &TimerOne
                    );

    if (EFI_ERROR (Status)) {
        Print(L"Create Event Error! \r\n");
		return ;
    }

    Status = gBS->SetTimer (
                   TimerOne,
                   TimerPeriodic,
                   MultU64x32 (SecondsToNanoSeconds, 1)
                   );

    if (EFI_ERROR (Status)) {
        Print(L"Set Timer Error! \r\n");
		return ;
    }
}


int
EFIAPI
main (                                         
  IN int Argc,
  IN char **Argv
  )
{


  EFI_STATUS                         Status = EFI_SUCCESS;
  EFI_LOADED_IMAGE_PROTOCOL          *ImageInfo = NULL;
  EFI_HANDLE                         Handle = 0;
  EFI_GUID                           gEfiLoadedImageProtocolGuid = 
                                     { 0x5B1B31A1, 0x9562, 0x11D2, { 0x8E, 0x3F, 0x00, 0xA0, 0xC9, 0x69, 0x72, 0x3B }};
  LOADED_IMAGE_PRIVATE_DATA_TEMP      *private = NULL;
  Fun                                fun;
  UINTN                              FunOffset;
  UINTN                              FunAddr;

  Status = gBS->HandleProtocol (gImageHandle, &gEfiLoadedImageProtocolGuid, &ImageInfo);
  // function offset in the old image
  FunOffset = (UINTN)function - (UINTN)ImageInfo->ImageBase;

  // load the image in memory again
  Status = gBS->LoadImage(FALSE, gImageHandle, NULL, ImageInfo->ImageBase, (UINTN)ImageInfo->ImageSize, &Handle);  

  // get the newer imageinfo
  Status = gBS->HandleProtocol (Handle, &gEfiLoadedImageProtocolGuid, &ImageInfo);

  private = LOADED_IMAGE_PRIVATE_DATA_FROM_THIS(ImageInfo);
  FunAddr = (UINTN)FunOffset + (UINTN)ImageInfo->ImageBase;
  
  fun = (Fun)((UINTN)FunOffset + (UINTN)ImageInfo->ImageBase);
  // called the newer function in new image,the new image will be always in memory because it will not be free
  fun();
  return EFI_SUCCESS;
}


工作的视频,看得出来这样的方法适应性更好

完整代码下载

ShowTime2

Step to UEFI (48) —– 被加载程序的ENTRYPOINT

之前能获得被加载程序的一些基本信息,但是只是“基本”的信息,比如我们需要 EntryPoint应该怎么办呢?

我在网上搜索了一下无果,请教 HZZZ,他给我的建议是:LOADED_IMAGE_PRIVATE_DATA_TEMP。

可以在 \MdeModulePkg\Core\Dxe\Image\Image.h 中看到这个定义。

typedef struct {
  UINTN                       Signature;
  /// Image handle
  EFI_HANDLE                  Handle;   
  /// Image type
  UINTN                       Type;           
  /// If entrypoint has been called
  BOOLEAN                     Started;        
  /// The image's entry point
  EFI_IMAGE_ENTRY_POINT       EntryPoint;     
  /// loaded image protocol
  EFI_LOADED_IMAGE_PROTOCOL   Info;           
  /// Location in memory
  EFI_PHYSICAL_ADDRESS        ImageBasePage;  
  /// Number of pages
  UINTN                       NumberOfPages;  
  /// Original fixup data
  CHAR8                       *FixupData;     
  /// Tpl of started image
  EFI_TPL                     Tpl;            
  /// Status returned by started image
  EFI_STATUS                  Status;         
  /// Size of ExitData from started image
  UINTN                       ExitDataSize;   
  /// Pointer to exit data from started image
  VOID                        *ExitData;      
  /// Pointer to pool allocation for context save/retore
  VOID                        *JumpBuffer;    
  /// Pointer to buffer for context save/retore
  BASE_LIBRARY_JUMP_BUFFER    *JumpContext;  
  /// Machine type from PE image
  UINT16                      Machine;        
  /// EBC Protocol pointer
  EFI_EBC_PROTOCOL            *Ebc;           
  /// Runtime image list
  EFI_RUNTIME_IMAGE_ENTRY     *RuntimeData;   
  /// Pointer to Loaded Image Device Path Protocl
  EFI_DEVICE_PATH_PROTOCOL    *LoadedImageDevicePath;  
  /// PeCoffLoader ImageContext
  PE_COFF_LOADER_IMAGE_CONTEXT  ImageContext; 

} LOADED_IMAGE_PRIVATE_DATA;


根据我的理解,我们之前使用到的 EFI_LOADED_IMAGE_PROTOCOL 只是这个结构体的一部分。我们知道 EFI_LOADED_IMAGE_PROTOCOL 的内存地址,然后可以反推出整个 LOADED_IMAGE_PRIVATE_DATA_TEMP 结构。为了实现这个需要用一个比较有技巧的宏:

#define _CR(Record, TYPE, Field) ((TYPE *) ((CHAR8 *) (Record) – (CHAR8 *) &(((TYPE *) 0)->Field)))

#define LOADED_IMAGE_PRIVATE_DATA_FROM_THIS(a) _CR(a, LOADED_IMAGE_PRIVATE_DATA_TEMP, Info)

(在其他地方也能看到这个宏的,它的作用就是根据一个结构体中已知Field的地址反推出整个结构体的内存地址。充满了C语言让人炫目的技巧。)

简单起见 HZZZ 给我的建议是这个结构体可以只使用一部分,不需要声明全部。

完整的代码:

#include  <Uefi.h>
#include  <Library/UefiLib.h>
#include  <Library/ShellCEntryLib.h>

#include  <stdio.h>
#include  <stdlib.h>
#include  <wchar.h>

#include <Protocol/EfiShell.h>
#include <Library/ShellLib.h>

extern EFI_BOOT_SERVICES           	 *gBS;
extern EFI_SYSTEM_TABLE				 *gST;
extern EFI_RUNTIME_SERVICES 		 *gRT;

extern EFI_SHELL_PROTOCOL            *gEfiShellProtocol;
extern EFI_SHELL_ENVIRONMENT2 		 *mEfiShellEnvironment2;

extern EFI_HANDLE					 gImageHandle;

typedef struct {
  UINTN                       Signature;
  /// Image handle
  EFI_HANDLE                  Handle;   
  /// Image type
  UINTN                       Type;           
  /// If entrypoint has been called
  BOOLEAN                     Started;        
  /// The image's entry point
  EFI_IMAGE_ENTRY_POINT       EntryPoint;     
  /// loaded image protocol
  EFI_LOADED_IMAGE_PROTOCOL   Info; 
  /// Location in memory
  EFI_PHYSICAL_ADDRESS        ImageBasePage;    
} LOADED_IMAGE_PRIVATE_DATA_TEMP;

#define _CR(Record, TYPE, Field)  ((TYPE *) ((CHAR8 *) (Record) - (CHAR8 *) &(((TYPE *) 0)->Field)))

#define LOADED_IMAGE_PRIVATE_DATA_FROM_THIS(a) \
          _CR(a, LOADED_IMAGE_PRIVATE_DATA_TEMP, Info)
		  
/**
  GET  DEVICEPATH
**/
EFI_DEVICE_PATH_PROTOCOL *
EFIAPI
ShellGetDevicePath (
  IN CHAR16                     * CONST DeviceName OPTIONAL
  )
{
  //
  // Check for UEFI Shell 2.0 protocols
  //
  if (gEfiShellProtocol != NULL) {
    return (gEfiShellProtocol->GetDevicePathFromFilePath(DeviceName));
  }

  //
  // Check for EFI shell
  //
  if (mEfiShellEnvironment2 != NULL) {
    return (mEfiShellEnvironment2->NameToPath(DeviceName));
  }

  return (NULL);
}

int
EFIAPI
main (
  IN int Argc,
  IN CHAR16 **Argv
  )
{
  EFI_DEVICE_PATH_PROTOCOL *DevicePath;
  EFI_HANDLE	NewHandle;
  EFI_STATUS	Status;
  LOADED_IMAGE_PRIVATE_DATA_TEMP      *private = NULL;  
  UINTN			ExitDataSizePtr;
  EFI_LOADED_IMAGE_PROTOCOL	*ImageInfo = NULL;
  
  if (Argc!=2) {
		Print(L"Usage: Exec4 FileName\n");
		return EFI_SUCCESS;
  }
  
  Print(L"File [%s]\n",Argv[1]);

  DevicePath=ShellGetDevicePath(Argv[1]);

  //
  // Load the image with:
  // FALSE - not from boot manager and NULL, 0 being not already in memory
  //
  Status = gBS->LoadImage(
    FALSE,
    gImageHandle,
    DevicePath,
    NULL,
    0,
    &NewHandle);  

  if (EFI_ERROR(Status)) {
    if (NewHandle != NULL) {
      gBS->UnloadImage(NewHandle);
    }
	Print(L"Error during LoadImage [%X]\n",Status);
    return (Status);
  }

  Status = gBS -> HandleProtocol (
						NewHandle,
						&gEfiLoadedImageProtocolGuid,
						&ImageInfo
						);
						
  private = LOADED_IMAGE_PRIVATE_DATA_FROM_THIS(ImageInfo);  

  Print(L"ImageBase in EFI_LOADED_IMAGE_PROTOCOL      [%lX]\n",ImageInfo->ImageBase);
  Print(L"ImageBase in LOADED_IMAGE_PRIVATE_DATA_TEMP [%lX]\n",private->ImageBasePage);
  Print(L"Entry Point [%lX]\n",private->EntryPoint);

  Print(L"================================RUN================================\r\n",Status);
  //
  // now start the image, passing up exit data if the caller requested it
  //
  Status = gBS->StartImage(
                     NewHandle,
                     &ExitDataSizePtr,
                     NULL
              );
  if (EFI_ERROR(Status)) {
    if (NewHandle != NULL) {
      gBS->UnloadImage(NewHandle);
    }
	Print(L"Error during StartImage [%X]\r\n",Status);
    return (Status);
  }
  Print(L"===============================EXIT================================\r\n",Status);
  
  gBS->UnloadImage (NewHandle);  
  return EFI_SUCCESS;
}


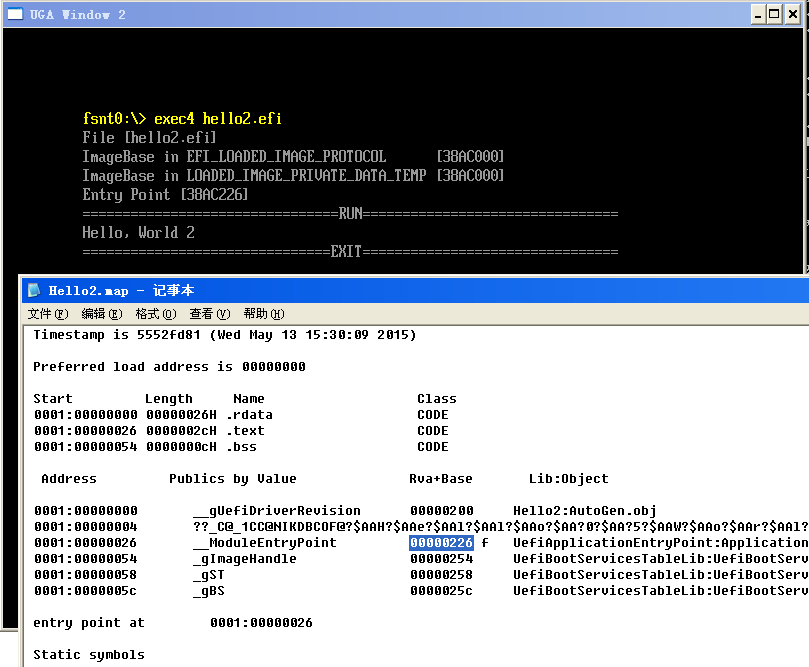
程序接收文件名作为参数,显示接收到EFI文件的入口。运行结果

N48

完整代码下载
exec4

本程序示例代码和编译中间文件

Hello2

Hello2build

Step to UEFI (47) —– 偏移正确吗?

前面展示了在一个程序中调用另外一个程序的方法,还有加载过程中获取被加载程序的一些基本信息。其中的一个是ImageBase。这里做一个实验来验证上面显示的ImageBase是否正确。

上次的HelloWorld.c代码中我们还加入一条显示UefiMain在内存中的位置。

#include <Uefi.h>
#include <Library/PcdLib.h>
#include <Library/UefiLib.h>
#include <Library/UefiApplicationEntryPoint.h>


/**
  The user Entry Point for Application. The user code starts with this function
  as the real entry point for the application.

  @param[in] ImageHandle    The firmware allocated handle for the EFI image.  
  @param[in] SystemTable    A pointer to the EFI System Table.
  
  @retval EFI_SUCCESS       The entry point is executed successfully.
  @retval other             Some error occurs when executing this entry point.

**/
EFI_STATUS
EFIAPI
UefiMain (
  IN EFI_HANDLE        ImageHandle,
  IN EFI_SYSTEM_TABLE  *SystemTable
  )
{
  Print(L"Hello,World! \r\n");
  Print(L"www.lab-z.com \r\n");
  
  Print(L"UefiMain  [%X]",(UINTN)UefiMain);  
  
  return EFI_SUCCESS;
}


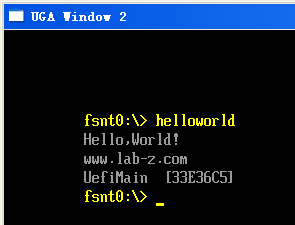
直接运行编译后的结果如下:
elipc1

可以看到,UefiMain被加载到了0x033E 36C5 的位置。运用之前的知识,我们在
\Build\AppPkg\RELEASE_MYTOOLS\IA32\AppPkg\Applications\HelloWorld\HelloWorld\OUTPUT\
能看到编译过程中生成的HelloWorld.map文件(特别注意:我是用build –a IA32 –p AppPkg\AppPkg.dsc –b RELEASE 来生成Release版本的,其他版本会出现在不同的目录中)。

  Address         Publics by Value              Rva+Base       Lib:Object
 0001:00000490       ??_C@_02PCIJFNDE@?$AN?6?$AA@ 00000690     BasePrintLib:PrintLibInternal.obj
 0001:00000494       ??_C@_01LIIJDEN@?$AN?$AA@  00000694     BasePrintLib:PrintLibInternal.obj
 0001:00000496       __ModuleEntryPoint         00000696 f   UefiApplicationEntryPoint:ApplicationEntryPoint.obj
 0001:000004c5       _UefiMain                  000006c5 f   HelloWorld:HelloWorld.obj
 0001:000004fa       _DebugAssert               000006fa f   BaseDebugLibNull:DebugLib.obj
 0001:000004fb       _DebugAssertEnabled        000006fb f   BaseDebugLibNull:DebugLib.obj


实际加载的偏移是 6C5 ( Rva+Base ,具体解释请看【参考1 2 3】)

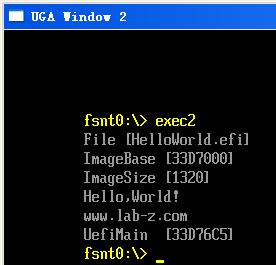
再使用我们的exec2来加载这个EFI可执行程序

elipc2

因此从结果上看,我们用EFI_LOADED_IMAGE_PROTOCOL 获得的ImageBase是准确的。

参考:

1. http://blog.csdn.net/fantcy/article/details/4474604 PE格式深入浅出之RAV,AV,ImageBase之间的关系
2. http://www.cnblogs.com/lzjsky/archive/2011/09/22/2184942.html PE格式全分析
3. http://blog.sina.com.cn/s/blog_6cc1c52d0100t4wa.html PE文件格式学习笔记

Step to UEFI (46) —– EFILOADEDIMAGEPROTOCOL的使用

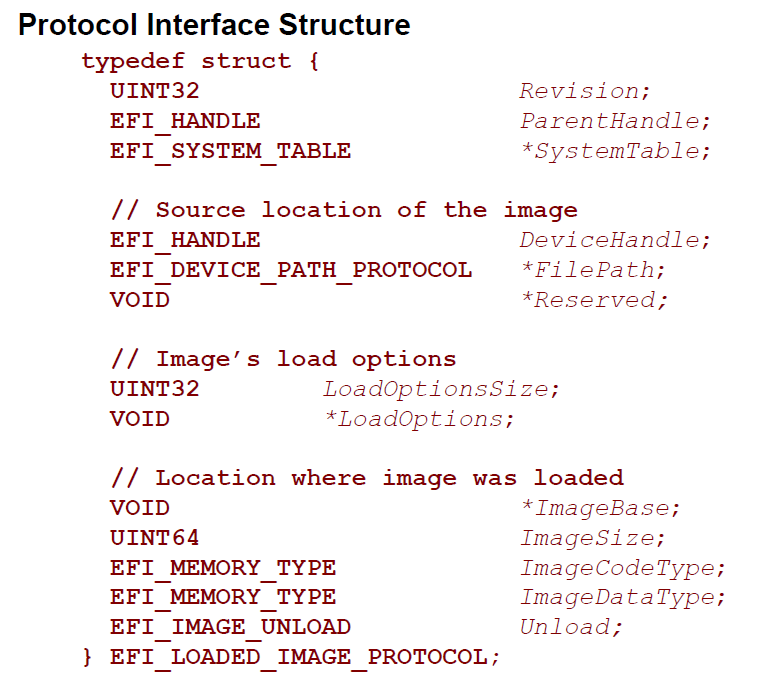
上次介绍了如何在一个程序中直接调用另外的程序,那么在调用过程中是否有机会获得一些加载起来的EFI的信息呢?经过一番搜索,发现EFI_LOADED_IMAGE_PROTOCOL【参考1】。这个protocol的作用就是 “Can be used on any image handle to obtain information about the loaded image.”

elip

从定义上看,我们能够得到加载的Image的一些基本信息。在上次程序的基础上,添加一些代码来实验。

#include  <Uefi.h>
#include  <Library/UefiLib.h>
#include  <Library/ShellCEntryLib.h>

#include  <stdio.h>
#include  <stdlib.h>
#include  <wchar.h>

#include <Protocol/EfiShell.h>
#include <Library/ShellLib.h>

extern EFI_BOOT_SERVICES           	 *gBS;
extern EFI_SYSTEM_TABLE				 *gST;
extern EFI_RUNTIME_SERVICES 		 *gRT;

extern EFI_SHELL_PROTOCOL            *gEfiShellProtocol;
extern EFI_SHELL_ENVIRONMENT2 		 *mEfiShellEnvironment2;

extern EFI_HANDLE					 gImageHandle;
/**
  GET  DEVICEPATH
**/
EFI_DEVICE_PATH_PROTOCOL *
EFIAPI
ShellGetDevicePath (
  IN CHAR16                     * CONST DeviceName OPTIONAL
  )
{
  //
  // Check for UEFI Shell 2.0 protocols
  //
  if (gEfiShellProtocol != NULL) {
    return (gEfiShellProtocol->GetDevicePathFromFilePath(DeviceName));
  }

  //
  // Check for EFI shell
  //
  if (mEfiShellEnvironment2 != NULL) {
    return (mEfiShellEnvironment2->NameToPath(DeviceName));
  }

  return (NULL);
}

int
EFIAPI
main (
  IN int Argc,
  IN char **Argv
  )
{
  EFI_DEVICE_PATH_PROTOCOL 	*DevicePath;
  EFI_HANDLE				NewHandle;
  EFI_STATUS				Status;
  UINTN			ExitDataSizePtr;  
  CHAR16 					*R=L"HelloWorld.efi";
  EFI_LOADED_IMAGE_PROTOCOL	*ImageInfo = NULL;
  
  Print(L"File [%s]\n",R);

  DevicePath=ShellGetDevicePath(R);

  //
  // Load the image with:
  // FALSE - not from boot manager and NULL, 0 being not already in memory
  //
  Status = gBS->LoadImage(
    FALSE,
    gImageHandle,
    DevicePath,
    NULL,
    0,
    &NewHandle);  

  if (EFI_ERROR(Status)) {
    if (NewHandle != NULL) {
      gBS->UnloadImage(NewHandle);
    }
	Print(L"Error during LoadImage [%X]\n",Status);
    return (Status);
  }

  Status = gBS -> HandleProtocol (
						NewHandle,
						&gEfiLoadedImageProtocolGuid,
						&ImageInfo
						);
  Print(L"ImageBase [%lX]\n",ImageInfo->ImageBase);
  Print(L"ImageSize [%lX]\n",ImageInfo->ImageSize);

  //
  // now start the image, passing up exit data if the caller requested it
  //
  Status = gBS->StartImage(
                     NewHandle,
                     &ExitDataSizePtr,
                     NULL
              );
  if (EFI_ERROR(Status)) {
    if (NewHandle != NULL) {
      gBS->UnloadImage(NewHandle);
    }
	Print(L"Error during StartImage [%X]\n",Status);
    return (Status);
  }
  
  gBS->UnloadImage (NewHandle);  
  return EFI_SUCCESS;
}


特别注意,我们代码中需要使用这个Protocol的GUID,在INF中添加下面的引用即可。

[Protocols]
  gEfiLoadedImageProtocolGuid    


运行结果

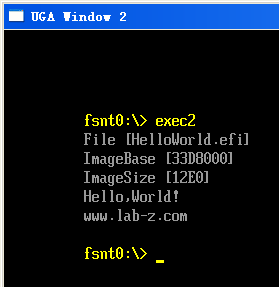
elip2

可以看到显示的ImageSize就是 HelloWorld.efi的大小。

elip3

实验调用的代码比较特殊,如果直接调用CLIB编写的程序会导致错误。至于具体的原因,后续再进行研究。

实验的 HelloWorld.EFI 的代码在下面

#include <Uefi.h>
#include <Library/PcdLib.h>
#include <Library/UefiLib.h>
#include <Library/UefiApplicationEntryPoint.h>


/**
  The user Entry Point for Application. The user code starts with this function
  as the real entry point for the application.

  @param[in] ImageHandle    The firmware allocated handle for the EFI image.  
  @param[in] SystemTable    A pointer to the EFI System Table.
  
  @retval EFI_SUCCESS       The entry point is executed successfully.
  @retval other             Some error occurs when executing this entry point.

**/
EFI_STATUS
EFIAPI
UefiMain (
  IN EFI_HANDLE        ImageHandle,
  IN EFI_SYSTEM_TABLE  *SystemTable
  )
{
  Print(L"Hello,World! \r\n");
  Print(L"www.lab-z.com \r\n");
  
  return EFI_SUCCESS;
}


对应的INF

[Defines]
  INF_VERSION                    = 0x00010005
  BASE_NAME                      = HelloWorld
  FILE_GUID                      = 6987936E-ED34-44db-AE97-1FA5E4ED2116
  MODULE_TYPE                    = UEFI_APPLICATION
  VERSION_STRING                 = 1.0
  ENTRY_POINT                    = UefiMain

#
# The following information is for reference only and not required by the build tools.
#
#  VALID_ARCHITECTURES           = IA32 X64 IPF EBC
#

[Sources]
  HelloWorld.c

[Packages]
  MdePkg/MdePkg.dec
  MdeModulePkg/MdeModulePkg.dec

[LibraryClasses]
  UefiApplicationEntryPoint
  UefiLib
  PcdLib

[FeaturePcd]

[Pcd]


实验完整代码下载

exec2
参考:

1.UEFI Spec 2.4 P265

Step to UEFI (45) —– 在程序中执行另外的程序

某些情况下,我们有在自己的程序中调用另外一个 EFI 程序的需求。

关于这个问题【参考1】建议参考Shell的源程序。如果有时间,建议阅读这一段代码,相信对于具体的实现很有帮助。

“RunCommandOrFile()
==> case Efi_Application:
InternalShellExecuteDevicePath()
==> Status = gBS->LoadImage( … ) ”

另外,【参考2】介绍了一下调用的流程:

1. BS->LoadImage 加载你要调用的 EFI 到内存
2. BS->StartImage 执行你加载的EFI程序
3. BS->UnLoadImage 执行完成之后释放EFI

了解了基本流程原理,下面就要认真阅读函数的原型。

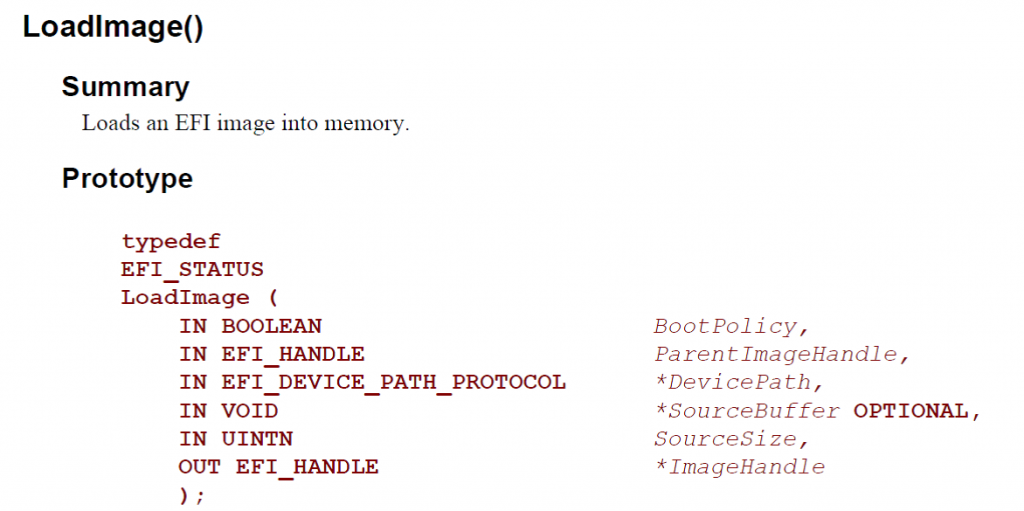
LoadImage的原型如下,来自【参考3】

loadimage

BootPolicy 告诉加载的EFI是否为可启动的选项
ParentImageHandle 是调用者的Handle
DevicePath 告诉要调用的EFI文件的位置
SourceBuffer 可选如果不为NULL的话,是指向内存中的要加载的EFI的指针
SourceSize 如果上面这个指针存在的话,给出指向内存的大小
EFI_HANDLE 加载之后Image的Handle

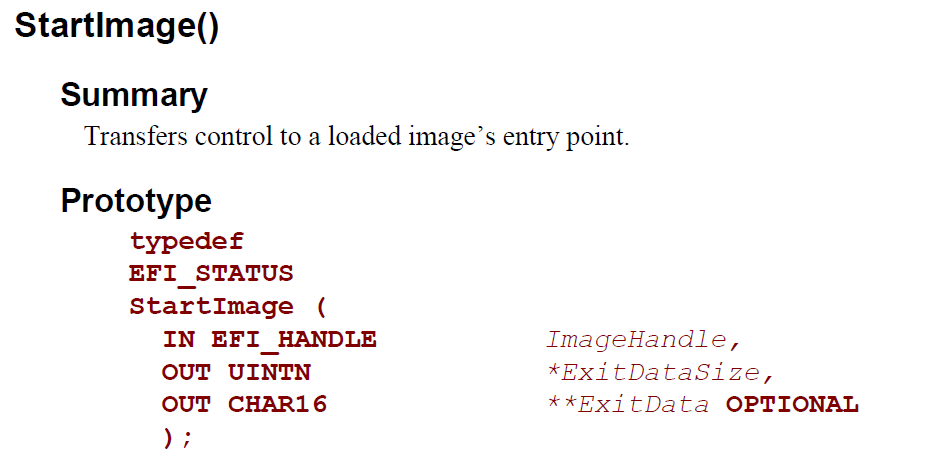
StartImage 原型

startimage

ImageHandle  前面LoadImage给出来的EFI Image Handle
ExitDataSize 下面ExitData的大小
ExitData 看起来在一个 EFI 结束的时候,可以返回一些内容

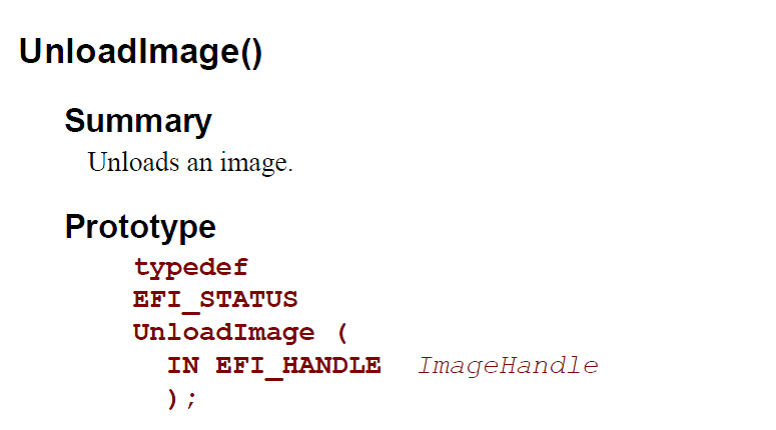
UnLoadImage 原型

unimage

给出要释放的EFI的Handle即可

根据上面的介绍,再结合Shell.c中的具体实现,编写程序如下。为了方便验证和保持整个程序的简洁,程序固定调用“HellowWorld.efi”。这个程序的作用是输出一段String。

#include  <Uefi.h>
#include  <Library/UefiLib.h>
#include  <Library/ShellCEntryLib.h>

#include  <stdio.h>
#include  <stdlib.h>
#include  <wchar.h>

#include <Protocol/EfiShell.h>
#include <Library/ShellLib.h>

extern EFI_BOOT_SERVICES           	 *gBS;
extern EFI_SYSTEM_TABLE				 *gST;
extern EFI_RUNTIME_SERVICES 		 *gRT;

extern EFI_SHELL_PROTOCOL            *gEfiShellProtocol;
extern EFI_SHELL_ENVIRONMENT2 		 *mEfiShellEnvironment2;

extern EFI_HANDLE					 gImageHandle;
/**
  GET  DEVICEPATH
**/
EFI_DEVICE_PATH_PROTOCOL *
EFIAPI
ShellGetDevicePath (
  IN CHAR16                     * CONST DeviceName OPTIONAL
  )
{
  //
  // Check for UEFI Shell 2.0 protocols
  //
  if (gEfiShellProtocol != NULL) {
    return (gEfiShellProtocol->GetDevicePathFromFilePath(DeviceName));
  }

  //
  // Check for EFI shell
  //
  if (mEfiShellEnvironment2 != NULL) {
    return (mEfiShellEnvironment2->NameToPath(DeviceName));
  }

  return (NULL);
}

int
EFIAPI
main (
  IN int Argc,
  IN char **Argv
  )
{
  EFI_DEVICE_PATH_PROTOCOL *DevicePath;
  EFI_HANDLE	NewHandle;
  EFI_STATUS	Status;
  UINTN			ExitDataSizePtr;
  CHAR16 *R=L"HelloWorld.efi";
  
  Print(L"File [%s]\n",R);

  DevicePath=ShellGetDevicePath(R);

  //
  // Load the image with:
  // FALSE - not from boot manager and NULL, 0 being not already in memory
  //
  Status = gBS->LoadImage(
    FALSE,
    gImageHandle,
    DevicePath,
    NULL,
    0,
    &NewHandle);  

  if (EFI_ERROR(Status)) {
    if (NewHandle != NULL) {
      gBS->UnloadImage(NewHandle);
    }
	Print(L"Error during LoadImage [%X]\n",Status);
    return (Status);
  }

  //
  // now start the image, passing up exit data if the caller requested it
  //
  Status = gBS->StartImage(
                     NewHandle,
                     &ExitDataSizePtr,
                     NULL
              );
  if (EFI_ERROR(Status)) {
    if (NewHandle != NULL) {
      gBS->UnloadImage(NewHandle);
    }
	Print(L"Error during StartImage [%X]\n",Status);
    return (Status);
  }
  

  gBS->UnloadImage (NewHandle);  
  return EFI_SUCCESS;
}


运行结果:

execres

工作的视频:

http://www.tudou.com/programs/view/92MTmguSCZk/?resourceId=414535982_06_02_99

代码下载

exec

最后,如果你只是想简单的执行一个程序,可以考虑直接使用 EFI_SHELL_PROTOCOL 的 EfiShellExecute 或者 EFI_SHELL_ENVIRONMENT2的 Execute ,这样会简单许多。

参考:
1. http://biosren.com/viewthread.php?tid=7440&highlight=%BC%D3%D4%D8%2B%B3%CC%D0%F2 请问:在shell下,应用程序的.efi文件被加载到内存的基地址为多少?
2. http://blog.csdn.net/kaven128708/article/details/6042307 EFI Load Image
3. UEFI Spec 2.4 P196

Step to UEFI (42) —– 给Shell加一个时间显示功能

目标是:在Shell的右上角实现一个时间显示,类似DOS下的那种内存驻留程序,不影响其他程序的运行一直显示时间。

方法:首先想到的最简单方法是修改Shell.bin的代码,在开始的地方加入一个定时器,触发之后,首先保存当前光标位置,然后移动光标到右上角,自动更新显示时间,最后再将光标移回原位置。

需要修改的文件是 \ShellPkg\Application\Shell 下面的 Shell.C

定时器触发之后动作的代码如下:

//LabZDebug_Start
/**
  The callback function for the timer event used to get map.

  @param[in] Event    The event this function is registered to.
  @param[in] Context  The context registered to the event.
**/
VOID
EFIAPI
Timeout (
  IN EFI_EVENT      Event,
  IN VOID           *Context
  )
{
  EFI_TIME   ET;
  UINTN		x;
  UINTN		y;
  

  //Get cursor postion
  x = gST->ConOut->Mode->CursorColumn;
  y = gST->ConOut->Mode->CursorRow;
  //Move cursor to Up-Left 
  gST -> ConOut -> SetCursorPosition(gST -> ConOut,70,0);  
  //Output current time
  gRT->GetTime(&ET, NULL);  
  Print(L"%2d:%2d:%2d",ET.Hour,ET.Minute,ET.Second);
  //Move cursor back
  gST -> ConOut -> SetCursorPosition(gST -> ConOut,x,y);  

  return ;
}
//LabZDebug_End


设置定时器的代码如下

	//LabZDebug_Start
	Status  = gBS->CreateEvent (
                    EVT_NOTIFY_SIGNAL | EVT_TIMER,
                    TPL_CALLBACK,
                    Timeout,
                    NULL,
                    &TimerOne
                    );

    if (EFI_ERROR (Status)) {
        Print(L"Create Event Error! \r\n");
    }
	else {
		Status = gBS->SetTimer (
                   TimerOne,
                   TimerPeriodic,
                   MultU64x32 (1000, 1)
                   );

    if (EFI_ERROR (Status)) {
        Print(L"Set Timer Error! \r\n");
		}
	}
	//LabZDebug_End


最后还要销毁定时器,否则会发生 exit 到 setup 之后崩溃的情况

FreeResources:
	//LabZDebug_Start
	    gBS->SetTimer (TimerOne, TimerCancel, 0);
		gBS->CloseEvent (TimerOne);	
	//LabZDebug_End


之后需要重新编译出来 Shell.efi 替换原先的文件。运行结果如下

stim

工作的视频:

http://www.tudou.com/programs/view/DcPCkOrO2lQ/?resourceId=414535982_06_02_99

完整的代码下载

ShellC

Step to UEFI (41) —– x64 的 FreqCalc程序

之前的一篇文章《Step to UEFI (9)—-使用RDTSC计算当前CPU 频率》【参考1】给出了一个计算当前CPU频率的方法。不过 Tim 给我留言,他说这篇文章的程序无法在 x64下正常编译:
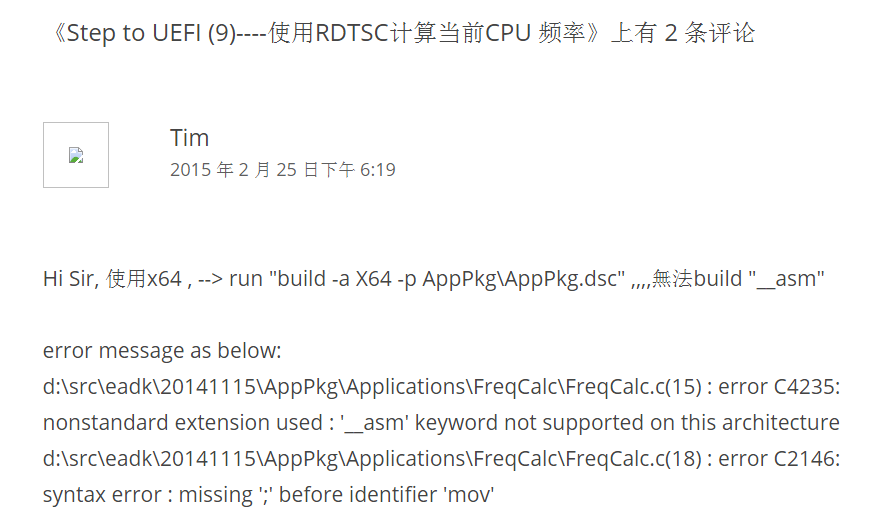
freq

我猜测原因是因为我的程序使用的内嵌汇编,内嵌汇编无法被X64的编译器正常编译的。关于这个说法可以看【参考2】。

动手在 UDK2014 下面实验,不过在看到描述的问题之前还是要走一段路的。

使用编译命令 build -a X64 -p AppPkg\AppPkg.dsc 得到下面的错误信息

c:\edk\AppPkg\AppPkg.dsc(94): error 000E: File/directory not found in workspace
        c:\edk\PerformancePkg\Library\DxeTscTimerLib\DxeTscTimerLib.inf


检查 AppPkg.dsc

修改

[LibraryClasses.X64]
  TimerLib|PerformancePkg/Library/DxeTscTimerLib/DxeTscTimerLib.inf


修改为

[LibraryClasses.X64]
  TimerLib|PerformancePkg/Library/TscTimerLib/DxeTscTimerLib.inf


再次编译,有下面的错误信息

Processing meta-data .. done!
Building ... c:\edk\MdePkg\Library\BaseLib\BaseLib.inf [X64]
        "C:\Program Files\Microsoft Visual Studio 9.0\Vc\bin\x86_amd64\cl.exe" /Foc:\edk\Build\AppPkg\DEBUG_MYTOOLS\X64\MdePkg\Library\BaseLib\BaseLib\OUTPUT\.\CheckSum.obj /nologo /c /WX /GS- /W4 /Gs32768 /Gy /D UNICODE /O1ib2 /GL /FIAutoG
en.h /EHs-c- /GR- /GF /Zi /Gm /X /Zc:wchar_t /X /Zc:wchar_t /GL- /Ic:\edk\MdePkg\Library\BaseLib\X64  /Ic:\edk\MdePkg\Library\BaseLib  /Ic:\edk\Build\AppPkg\DEBUG_MYTOOLS\X64\MdePkg\Library\BaseLib\BaseLib\DEBUG  /Ic:\edk\MdePkg  /Ic:\edk\M
dePkg\Include  /Ic:\edk\MdePkg\Include\X64 c:\edk\MdePkg\Library\BaseLib\CheckSum.c
'C:\Program' 不是内部或外部命令,也不是可运行的程序或批处理文件。
NMAKE : fatal error U1077: '"C:\Program Files\Microsoft Visual Studio 9.0\Vc\bin\x86_amd64\cl.exe' : return code '0x1' Stop.


build...
 : error 7000: Failed to execute command
        C:\Program Files\Microsoft Visual Studio 9.0\Vc\bin\nmake.exe /nologo tbuild 

build...
 : error 7000: Failed to execute command
        C:\Program Files\Microsoft Visual Studio 9.0\Vc\bin\nmake.exe /nologo tbuild 


build...
 : error F002: Failed to build module
        c:\edk\MdePkg\Library\BaseLib\BaseLib.inf [X64, MYTOOLS, DEBUG]

- Failed -
Build end time: 11:22:09, Mar.09 2015
Build total time: 00:00:03


尝试在命令行窗口直接运行”C:\Program Files\Microsoft Visual Studio 9.0\Vc\bin\x86_amd64\cl.exe” 错误提示是:

C:\EDK>"C:\Program Files\Microsoft Visual Studio 9.0\Vc\bin\x86_amd64\cl.exe"
系统找不到指定的路径。


这是因为目前的编译环境缺少 64位编译器。我使用的是 vs2008 express 版本,默认是没有 64位的cl.exe的。

找到 ‘x86_amd64’ 拷贝到 “C:\Program Files\Microsoft Visual Studio 9.0\VC\bin”

需要的朋友可以在这里下载到 x86_amd64

再次编译,然后就能看到 Tim 说的问题啦

C:\Program Files\Microsoft Visual Studio 9.0\VC\bin

Building ... c:\edk\AppPkg\Applications\FreqCalc\FreqCalc.inf [X64]
        "C:\Program Files\Microsoft Visual Studio 9.0\Vc\bin\x86_amd64\cl.exe" /Foc:\edk\Build\AppPkg\DEBUG_MYTOOLS\X64\AppPkg\Applications\FreqCalc\FreqCalc\OUTPUT\.\FreqCalc.obj /nologo /c /WX /GS- /W4 /Gs32768 /Gy /D UNICODE /O1ib2 /GL /
FIAutoGen.h /EHs-c- /GR- /GF /Zi /Gm /X /Zc:wchar_t /Ic:\edk\AppPkg\Applications\FreqCalc  /Ic:\edk\Build\AppPkg\DEBUG_MYTOOLS\X64\AppPkg\Applications\FreqCalc\FreqCalc\DEBUG  /Ic:\edk\MdePkg  /Ic:\edk\MdePkg\Include  /Ic:\edk\MdePkg\Includ
e\X64  /Ic:\edk\ShellPkg  /Ic:\edk\ShellPkg\Include  /Ic:\edk\MdeModulePkg  /Ic:\edk\MdeModulePkg\Include c:\edk\AppPkg\Applications\FreqCalc\FreqCalc.c
FreqCalc.c
c:\edk\AppPkg\Applications\FreqCalc\FreqCalc.c(15) : error C4235: nonstandard extension used : '__asm' keyword not supported on this architecture
c:\edk\AppPkg\Applications\FreqCalc\FreqCalc.c(18) : error C2146: syntax error : missing ';' before identifier 'mov'
c:\edk\AppPkg\Applications\FreqCalc\FreqCalc.c(18) : warning C4550: expression evaluates to a function which is missing an argument list
c:\edk\AppPkg\Applications\FreqCalc\FreqCalc.c(18) : error C2065: 'mov' : undeclared identifier
c:\edk\AppPkg\Applications\FreqCalc\FreqCalc.c(18) : error C2146: syntax error : missing ';' before identifier 'dword'
c:\edk\AppPkg\Applications\FreqCalc\FreqCalc.c(18) : error C2065: 'dword' : undeclared identifier
c:\edk\AppPkg\Applications\FreqCalc\FreqCalc.c(18) : error C2146: syntax error : missing ';' before identifier 'ptr'
c:\edk\AppPkg\Applications\FreqCalc\FreqCalc.c(18) : error C2065: 'ptr' : undeclared identifier
c:\edk\AppPkg\Applications\FreqCalc\FreqCalc.c(18) : error C2146: syntax error : missing ';' before identifier 'value'
c:\edk\AppPkg\Applications\FreqCalc\FreqCalc.c(19) : error C2065: 'eax' : undeclared identifier
c:\edk\AppPkg\Applications\FreqCalc\FreqCalc.c(19) : error C2146: syntax error : missing ';' before identifier 'mov'
c:\edk\AppPkg\Applications\FreqCalc\FreqCalc.c(19) : error C2065: 'mov' : undeclared identifier
c:\edk\AppPkg\Applications\FreqCalc\FreqCalc.c(19) : error C2146: syntax error : missing ';' before identifier 'dword'
c:\edk\AppPkg\Applications\FreqCalc\FreqCalc.c(19) : error C2065: 'dword' : undeclared identifier
c:\edk\AppPkg\Applications\FreqCalc\FreqCalc.c(19) : error C2146: syntax error : missing ';' before identifier 'ptr'
c:\edk\AppPkg\Applications\FreqCalc\FreqCalc.c(19) : error C2065: 'ptr' : undeclared identifier
c:\edk\AppPkg\Applications\FreqCalc\FreqCalc.c(19) : error C2109: subscript requires array or pointer type
c:\edk\AppPkg\Applications\FreqCalc\FreqCalc.c(20) : error C2065: 'edx' : undeclared identifier
c:\edk\AppPkg\Applications\FreqCalc\FreqCalc.c(20) : error C2143: syntax error : missing ';' before '}'
NMAKE : fatal error U1077: '"C:\Program Files\Microsoft Visual Studio 9.0\Vc\bin\x86_amd64\cl.exe"' : return code '0x2'
Stop.


build...
 : error 7000: Failed to execute command
        C:\Program Files\Microsoft Visual Studio 9.0\Vc\bin\nmake.exe /nologo tbuild 


build...
 : error F002: Failed to build module
        c:\edk\AppPkg\Applications\FreqCalc\FreqCalc.inf [X64, MYTOOLS, DEBUG]

- Failed -
Build end time: 11:26:31, Mar.09 2015
Build total time: 00:01:16


然后就考虑如何解决,网上搜索了一下,有人遇到同样的问题【参考3】,具体的解决方法在【参考4】

简单的说,就是单独写一个 asm 然后在对应的 Inf中声明一下即可。

针对我遇到的问题,程序如下

FreqCalc.inf

## @file
#  Sample UEFI Application Reference EDKII Module
#
#  This is a sample shell application that will print "UEFI Hello World!" to the 
#  UEFI Console based on PCD setting.
#
#  It demos how to use EDKII PCD mechanism to make code more flexible.
#
#  Copyright (c) 2008 - 2011, Intel Corporation. All rights reserved.<BR>
#
#  This program and the accompanying materials
#  are licensed and made available under the terms and conditions of the BSD License
#  which accompanies this distribution. The full text of the license may be found at
#  http://opensource.org/licenses/bsd-license.php
#  THE PROGRAM IS DISTRIBUTED UNDER THE BSD LICENSE ON AN "AS IS" BASIS,
#  WITHOUT WARRANTIES OR REPRESENTATIONS OF ANY KIND, EITHER EXPRESS OR IMPLIED.
#
#
##

[Defines]
  INF_VERSION                    = 0x00010005
  BASE_NAME                      = FreqCalc
  FILE_GUID                      = 6987936E-ED34-44db-AE97-2FA5E4ED2216
  MODULE_TYPE                    = UEFI_APPLICATION
  VERSION_STRING                 = 1.0
  ENTRY_POINT                    = UefiMain 

#
# The following information is for reference only and not required by the build tools.
#
#  VALID_ARCHITECTURES           = IA32 X64 IPF EBC
#

[Sources]
  FreqCalc.c
  ReadTsc1.asm

[Packages]
  MdePkg/MdePkg.dec
  ShellPkg/ShellPkg.dec
  MdeModulePkg/MdeModulePkg.dec

[LibraryClasses]
  UefiApplicationEntryPoint
  UefiLib
  PcdLib
  ShellCEntryLib
  ShellLib


[FeaturePcd]


[Pcd]


然后在FreqCalc.c 写成下面这样,特别注意要声明一下你用的那个汇编语言中的函数名

//
// FreqCalc.C
//

#include <Uefi.h>
#include <Library/UefiLib.h>
#include <Library/ShellLib.h>

EFI_SYSTEM_TABLE	*gST;
EFI_BOOT_SERVICES  	*gBS;

UINT64
EFIAPI
zReadTsc (
  VOID
);

//
// Entry point function - ShowVersion
//
EFI_STATUS
EFIAPI
UefiMain (
  IN EFI_HANDLE        ImageHandle,
  IN EFI_SYSTEM_TABLE  *SystemTable
  )
{

  UINT64  elsp;

  gST = SystemTable;
  gBS = SystemTable->BootServices;

  elsp=zReadTsc();

  gBS -> Stall(1000000);  
  Print(L"CPU Frequency: %ld \n",zReadTsc() - elsp);

  return EFI_SUCCESS;
}


然后还有一个ReadTsc1.asm (其实 uefi 里面提供了一个 x64的 ReadTsc.asm,可以直接使用,这里是为了让读者看的更清楚,取了一个不会重复的名称)

    .code

;------------------------------------------------------------------------------
; UINT64
; EFIAPI
; zReadTsc (
;   VOID
;   );
;------------------------------------------------------------------------------
zReadTsc  PROC
    rdtsc
    shl     rdx, 20h
    or      rax, rdx
    ret
zReadTsc  ENDP

    END


接下来就可以正常编译了,生成的 efi 文件会比 x64的大一些。然后我在实体机的 x64 shell下面运行成功。就是说上面的方法是没问题的。

FreqCalc

参考:

1.http://www.lab-z.com/rdtsc/ Step to UEFI (9)—-使用RDTSC计算当前CPU 频率

2.http://stackoverflow.com/questions/1295452/why-does-msvc-not-support-inline-assembly-for-amd64-and-itanium-targets 简单解释,说x64下无法支持 _ASM汇编

3.http://biosren.com/viewthread.php?tid=6822&highlight=%C4%DA%C7%B6%2B%BB%E3%B1%E0 請問如何在EDK2的AppPkg裡面使用asm (有人问同样的问题)

4.http://www.biosren.com/thread-6632-1-1.html 給個UEFI 內嵌彙編的小程序吧? 本文的主要参考,其中介绍了如何写单独写一个ASM文件