Step to UEFI (100)InstallProtocolInterface

前面介绍了很多“消费”Protocol的代码,这次试试自己生产一个 Protocol 试试。根据我的理解,产生的 protocol 可以挂接在任何的 Handle 上(DH 命令看到的都可以),提供服务的代码需要常驻内存,一般的 Application 是不会常驻内存的,驱动直接可以常驻内存。于是,我们实验编写一个驱动程序,使用 Load 来加载驱动产生自定义的 Protocol ,挂接在自身Image 的Handle上。
需要使用的主要服务是 InstallProtocolInterface,我们先看看它的定义和输入参数:

typedef
EFI_STATUS
(EFIAPI *EFI_INSTALL_PROTOCOL_INTERFACE)(
  IN OUT EFI_HANDLE               *Handle,          //安装到哪个Handle上
  IN     EFI_GUID                 *Protocol,               //安装的Protocol 的名字
  IN     EFI_INTERFACE_TYPE       InterfaceType,  ,  //目前只有一种类型:EFI_NATIVE_INTERFACE
  IN     VOID                     *Interface                  //Protocol的实例
  );


实际上,代码中更加常见的是InstallMultipleProtocolInterfaces, 这是因为 “ Installs a protocol interface on a device handle. If the handle does not exist, it is created and added to the list of handles in the system. InstallMultipleProtocolInterfaces() performs more error checking than InstallProtocolInterface(), so it is recommended that InstallMultipleProtocolInterfaces() be used in place of InstallProtocolInterface()” 因此,我们代码中会使用 InstallMultipleProtocolInterfaces 而不是前面提到的 InstallProtocolInterface。

/**
  Installs one or more protocol interfaces into the boot services environment.

  @param[in, out]  Handle       The pointer to a handle to install the new protocol interfaces on,
                                or a pointer to NULL if a new handle is to be allocated.
  @param  ...                   A variable argument list containing pairs of protocol GUIDs and protocol
                                interfaces.

  @retval EFI_SUCCESS           All the protocol interface was installed.
  @retval EFI_OUT_OF_RESOURCES  There was not enough memory in pool to install all the protocols.
  @retval EFI_ALREADY_STARTED   A Device Path Protocol instance was passed in that is already present in
                                the handle database.
  @retval EFI_INVALID_PARAMETER Handle is NULL.
  @retval EFI_INVALID_PARAMETER Protocol is already installed on the handle specified by Handle.

**/
typedef
EFI_STATUS
(EFIAPI *EFI_INSTALL_MULTIPLE_PROTOCOL_INTERFACES)(
  IN OUT EFI_HANDLE           *Handle,
  ...
  );


InstallMultipleProtocolInterfaces 服务支持一次性安装多个Protocol,所以接收的变量是可变数量的,看起来让人有眼晕的感觉。最简单的方法是照葫芦画瓢,我们在UDK2014的代码中找一下我们的“葫芦”。在MdeModulePkg中,有一个 PrintDxe,它会向系统中注册名称为Print2Protocol 的 Protocol。

先分析一下他的代码结构。主要文件有3个:

1. \MdeModulePkg\Universal\PrintDxe\PrintDxe.inf 可以看做是工程文件,特别注意,其中有用到gEfiPrint2ProtocolGuid 在 MdeModulePkg.dec 中有定义:

  ## Print protocol defines basic print functions to print the format unicode and ascii string.
  # Include/Protocol/Print2.h
  gEfiPrint2ProtocolGuid          = { 0xf05976ef, 0x83f1, 0x4f3d, { 0x86, 0x19, 0xf7, 0x59, 0x5d, 0x41, 0xe5, 0x38 } }


2 \MdeModulePkg\Universal\PrintDxe\Print.c 其中有这个 Protocol的实例,还有入口函数PrintEntryPoint。其中使用了InstallMultipleProtocolInterfaces 将mPrint2Protocol 安装到了mPrintThunkHandle(==0) 上面。

3. \MdeModulePkg\Include\Protocol\Print2.h 定义了提供的 Protocol 的结构。

struct _EFI_PRINT2_PROTOCOL {
  UNICODE_BS_PRINT                     UnicodeBSPrint;
  UNICODE_S_PRINT                      UnicodeSPrint;
  UNICODE_BS_PRINT_ASCII_FORMAT        UnicodeBSPrintAsciiFormat;
  UNICODE_S_PRINT_ASCII_FORMAT         UnicodeSPrintAsciiFormat;
  UNICODE_VALUE_TO_STRING              UnicodeValueToString;
  ASCII_BS_PRINT                       AsciiBSPrint;
  ASCII_S_PRINT                        AsciiSPrint;
  ASCII_BS_PRINT_UNICODE_FORMAT        AsciiBSPrintUnicodeFormat;
  ASCII_S_PRINT_UNICODE_FORMAT         AsciiSPrintUnicodeFormat;
  ASCII_VALUE_TO_STRING                AsciiValueToString;
};


更多的介绍可以在【参考1】中看到。
之后就可以尝试进行编译,需要在 MdeModulePkg.dec 中声明一次 gEfiPrint9ProtocolGuid ,注意我修改了GUID保证不会和原来的发生冲突。再在MdeModulePkg.dsc 中加入 PrintDxe.inf 加入的位置和我们之前编译过的GOP旋转驱动还有截图的驱动位置一样。

编译之后的结果可以直接在 NT32 模拟器下试验:
st1001
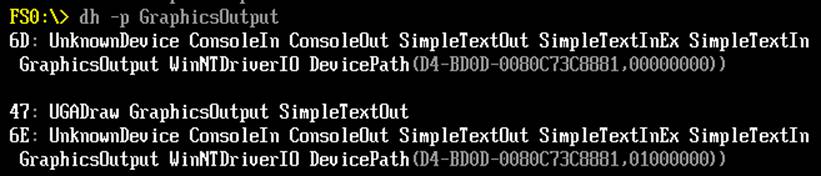
加载之后可以发现用 DH 命令列出当前的 Handle会多了一个image(如果我们再Load一次,那么还会多出来一个Image,我们的代码不完善,没有自动查找确认当前是否已经执行过一次的功能)
stu1002

我们编写一个简单的Application来调用这个 Protocol 测试:

#include  <Uefi.h>
#include  <Library/UefiLib.h>
#include  <Library/ShellCEntryLib.h>

#include "Print9.h"

EFI_GUID gEfiPrint9ProtocolGuid =
		{ 0xf05976ef, 0x83f1, 0x4f3d, 
			{ 0x86, 0x19, 0xf7, 0x59, 
				0x5d, 0x41, 0xe5, 0x61 } };

							
extern EFI_BOOT_SERVICES         *gBS;
extern EFI_SYSTEM_TABLE			 *gST;
extern EFI_RUNTIME_SERVICES 	 *gRT;

int
EFIAPI
main (
  IN int Argc,
  IN CHAR16 **Argv
  )
{
	EFI_PRINT9_PROTOCOL		*Print9Protocol;
	EFI_STATUS				Status;	
	CHAR16					*Buffer=L"12345678";
	// Search for the Print9 Protocol
    //
    Status = gBS->LocateProtocol(
      &gEfiPrint9ProtocolGuid,
      NULL,
      (VOID **)&Print9Protocol
     );
    if (EFI_ERROR(Status)) {
      Print9Protocol = NULL;
	  Print(L"Can't find Print9Protocol.\n");
	  return EFI_SUCCESS;
     }
	Print(L"Find Print9Protocol.\n"); 
	Print9Protocol->UnicodeSPrint(Buffer,8,L"%d",200);
	Print(L"%s\n",Buffer); 
	
	return EFI_SUCCESS;
}


运行结果:
stu1003
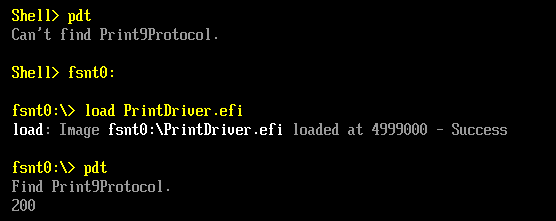
首先运行的时候找不到对应的 Protocol,需要Load一次,再次运行就可以正常运行了。
本文提到的完整代码下载:

pdt

printdriver

参考:
1. http://feishare.com/attachments/065_EFI%20Howto,%20%20%20%E6%B3%A8%E5%86%8C%EF%BC%8C%E5%8F%91%E5%B8%83%EF%BC%8C%E4%BD%BF%E7%94%A8%E8%87%AA%E5%AE%9A%E4%B9%89%E7%9A%84protocol.pdf EFI Howto ,注册,发布,使用自定义的protocol

Step to UEFI (98)Shell加载EFI的分析

继续阅读《UEFI 原理与编程》,其中的第三章介绍了一个 EFI Application如何在 Shell下加载运行的。ShellProtocol.c中的InternalShellExecuteDevicePath 是具体实现这个功能的函数。
函数头:

/**
  internal worker function to load and run an image via device path.

  @param ParentImageHandle      A handle of the image that is executing the specified
                                command line.
  @param DevicePath             device path of the file to execute
  @param CommandLine            Points to the NULL-terminated UCS-2 encoded string
                                containing the command line. If NULL then the command-
                                line will be empty.
  @param Environment            Points to a NULL-terminated array of environment
                                variables with the format 'x=y', where x is the
                                environment variable name and y is the value. If this
                                is NULL, then the current shell environment is used.
                            
  @param[out] StartImageStatus  Returned status from gBS->StartImage.

  @retval EFI_SUCCESS       The command executed successfully. The  status code
                            returned by the command is pointed to by StatusCode.
  @retval EFI_INVALID_PARAMETER The parameters are invalid.
  @retval EFI_OUT_OF_RESOURCES Out of resources.
  @retval EFI_UNSUPPORTED   Nested shell invocations are not allowed.
**/
EFI_STATUS
EFIAPI
InternalShellExecuteDevicePath(
  IN CONST EFI_HANDLE               *ParentImageHandle,
  IN CONST EFI_DEVICE_PATH_PROTOCOL *DevicePath,
  IN CONST CHAR16                   *CommandLine OPTIONAL,
  IN CONST CHAR16                   **Environment OPTIONAL,
  OUT EFI_STATUS                    *StartImageStatus OPTIONAL
  )


第一步,先将 EFI Application加载到内存中,生成Image对象。取得这个对象的句柄为 NewHandle。

  //
  // Load the image with:
  // FALSE - not from boot manager and NULL, 0 being not already in memory
  //
  Status = gBS->LoadImage(
    FALSE,
    *ParentImageHandle,
    (EFI_DEVICE_PATH_PROTOCOL*)DevicePath,
    NULL,
    0,
    &NewHandle);

  if (EFI_ERROR(Status)) {
    if (NewHandle != NULL) {
      gBS->UnloadImage(NewHandle);
    }
    return (Status);
  }

第二步,取得命令行参数,将命令行的参数交给 NewHandle

 Status = gBS->OpenProtocol(
    NewHandle,
    &gEfiLoadedImageProtocolGuid,
    (VOID**)&LoadedImage,
    gImageHandle,
    NULL,
    EFI_OPEN_PROTOCOL_GET_PROTOCOL);

  if (!EFI_ERROR(Status)) {
    ASSERT(LoadedImage->LoadOptionsSize == 0);
    if (NewCmdLine != NULL) {
      LoadedImage->LoadOptionsSize  = (UINT32)StrSize(NewCmdLine);
      LoadedImage->LoadOptions      = (VOID*)NewCmdLine;
    }


看到这里我有一个问题:前面加载之后,为什么第二步就能够在被加载的Image上找到“EFI_Loaded_Image_Protocol”? 带着这样的问题追踪了代码。首先要找到 gBS->LoadImage 的真正实现代码,在\MdeModulePkg\Core\Dxe\DxeMain\DxeMain.c有定义,

//
// DXE Core Module Variables
//
EFI_BOOT_SERVICES mBootServices = {
  {
.................
.................
  (EFI_IMAGE_LOAD)                              CoreLoadImage,                            // LoadImage
.................
.................
}


再追CoreLoadImage代码在 \MdeModulePkg\Core\Dxe\Image\Image.c

/**
  Loads an EFI image into memory and returns a handle to the image.

  @param  BootPolicy              If TRUE, indicates that the request originates
                                  from the boot manager, and that the boot
                                  manager is attempting to load FilePath as a
                                  boot selection.
  @param  ParentImageHandle       The caller's image handle.
  @param  FilePath                The specific file path from which the image is
                                  loaded.
  @param  SourceBuffer            If not NULL, a pointer to the memory location
                                  containing a copy of the image to be loaded.
  @param  SourceSize              The size in bytes of SourceBuffer.
  @param  ImageHandle             Pointer to the returned image handle that is
                                  created when the image is successfully loaded.

  @retval EFI_SUCCESS             The image was loaded into memory.
  @retval EFI_NOT_FOUND           The FilePath was not found.
  @retval EFI_INVALID_PARAMETER   One of the parameters has an invalid value.
  @retval EFI_UNSUPPORTED         The image type is not supported, or the device
                                  path cannot be parsed to locate the proper
                                  protocol for loading the file.
  @retval EFI_OUT_OF_RESOURCES    Image was not loaded due to insufficient
                                  resources.
  @retval EFI_LOAD_ERROR          Image was not loaded because the image format was corrupt or not
                                  understood.
  @retval EFI_DEVICE_ERROR        Image was not loaded because the device returned a read error.
  @retval EFI_ACCESS_DENIED       Image was not loaded because the platform policy prohibits the 
                                  image from being loaded. NULL is returned in *ImageHandle.
  @retval EFI_SECURITY_VIOLATION  Image was loaded and an ImageHandle was created with a 
                                  valid EFI_LOADED_IMAGE_PROTOCOL. However, the current 
                                  platform policy specifies that the image should not be started.

**/
EFI_STATUS
EFIAPI
CoreLoadImage (
  IN BOOLEAN                    BootPolicy,
  IN EFI_HANDLE                 ParentImageHandle,
  IN EFI_DEVICE_PATH_PROTOCOL   *FilePath,
  IN VOID                       *SourceBuffer   OPTIONAL,
  IN UINTN                      SourceSize,
  OUT EFI_HANDLE                *ImageHandle
  )
{
  EFI_STATUS    Status;
  UINT64        Tick;
  EFI_HANDLE    Handle;

  Tick = 0;
  PERF_CODE (
    Tick = GetPerformanceCounter ();
  );

  Status = CoreLoadImageCommon (
             BootPolicy,
             ParentImageHandle,
             FilePath,
             SourceBuffer,
             SourceSize,
             (EFI_PHYSICAL_ADDRESS) (UINTN) NULL,
             NULL,
             ImageHandle,
             NULL,
             EFI_LOAD_PE_IMAGE_ATTRIBUTE_RUNTIME_REGISTRATION | EFI_LOAD_PE_IMAGE_ATTRIBUTE_DEBUG_IMAGE_INFO_TABLE_REGISTRATION
             );

  Handle = NULL; 
  if (!EFI_ERROR (Status)) {
    //
    // ImageHandle will be valid only Status is success. 
    //
    Handle = *ImageHandle;
  }

  PERF_START (Handle, "LoadImage:", NULL, Tick);
  PERF_END (Handle, "LoadImage:", NULL, 0);

  return Status;
}
在CoreLoadImageCommon 中可以找到加载安装EFI_Loaded_Image_Protocol 的代码。
  //
  //Reinstall loaded image protocol to fire any notifications
  //
  Status = CoreReinstallProtocolInterface (
             Image->Handle,
             &gEfiLoadedImageProtocolGuid,
             &Image->Info,
             &Image->Info
             );
  if (EFI_ERROR (Status)) {
    goto Done;
  }


就是说,在加载过程中,还要对Image 安装EFI_Loaded_Image_Protocol。因此,Load 的动作并不是简单的读取到内存中。

继续回到InternalShellExecuteDevicePath 代码中。

    //第三步,将修改好的ShellParamsProtocol 再安装到 Image上。
    //
    // Initialize and install a shell parameters protocol on the image.
    //
    ShellParamsProtocol.StdIn   = ShellInfoObject.NewShellParametersProtocol->StdIn;
    ShellParamsProtocol.StdOut  = ShellInfoObject.NewShellParametersProtocol->StdOut;
    ShellParamsProtocol.StdErr  = ShellInfoObject.NewShellParametersProtocol->StdErr;
    Status = UpdateArgcArgv(&ShellParamsProtocol, NewCmdLine, NULL, NULL);
    ASSERT_EFI_ERROR(Status);
    //
    // Replace Argv[0] with the full path of the binary we're executing:
    // If the command line was "foo", the binary might be called "foo.efi".
    // "The first entry in [Argv] is always the full file path of the
    //  executable" - UEFI Shell Spec section 2.3
    //
    ImagePath = EfiShellGetFilePathFromDevicePath (DevicePath);
    // The image we're executing isn't necessarily in a filesystem - it might
    // be memory mapped. In this case EfiShellGetFilePathFromDevicePath will
    // return NULL, and we'll leave Argv[0] as UpdateArgcArgv set it.
    if (ImagePath != NULL) {
      if (ShellParamsProtocol.Argv == NULL) {
        // Command line was empty or null.
        // (UpdateArgcArgv sets Argv to NULL when CommandLine is "" or NULL)
        ShellParamsProtocol.Argv = AllocatePool (sizeof (CHAR16 *));
        if (ShellParamsProtocol.Argv == NULL) {
          Status = EFI_OUT_OF_RESOURCES;
          goto UnloadImage;
        }
        ShellParamsProtocol.Argc = 1;
      } else {
        // Free the string UpdateArgcArgv put in Argv[0];
        FreePool (ShellParamsProtocol.Argv[0]);
      }
      ShellParamsProtocol.Argv[0] = ImagePath;
    }

    Status = gBS->InstallProtocolInterface(&NewHandle, &gEfiShellParametersProtocolGuid, EFI_NATIVE_INTERFACE, &ShellParamsProtocol);
    ASSERT_EFI_ERROR(Status);
//第四步,用 gBS->StartImage执行Image。
    //
    // now start the image and if the caller wanted the return code pass it to them...
    //
    if (!EFI_ERROR(Status)) {
      StartStatus      = gBS->StartImage(
                          NewHandle,
                          0,
                          NULL
                          );
      if (StartImageStatus != NULL) {
        *StartImageStatus = StartStatus;
      }


Step to UEFI (96)Build 参数介绍

最近在认真研读《UEFI 原理与编程》,强烈推荐这本书,希望深入学习UEFI 的朋友都应该购买一本反复阅读。

《UEFI 原理与编程》第二章提到了build 命令的常用参数,我认真考察了一下。在 CMD窗口下运行 build –h 可以获得支持的命令参数列表:

–version 显示build的版本然后退出
-h, –help 显示帮助信息然后退出
-a TARGETARCH, –arch=TARGETARCH 指定编译目标,可选的有IA32, X64, IPF, ARM, AARCH64 或者 EBC。这个参数会覆盖 target.txt中指定的TARGET_ARCH。我们经常使用的 –a IA32 编译出来的 Application,更换为 –a X64即可编译出X64平台下可以用的 Application。
  -p PLATFORMFILE, –platform=PLATFORMFILE


指令要编译的 package。这个参数会覆盖 target.txt中指定的 ACTIVE_PLATFORM。
  -m MODULEFILE, –module=MODULEFILE 编译指定的模块。就是编译指定 INF文件。
  -b BUILDTARGET, –buildtarget=BUILDTARGET 指定编译为 RELASE版本还是 DEBUG版本。这个参数会覆盖 target.txt中指定的TARGET。
  -t TOOLCHAIN, –tagname=TOOLCHAIN


指定使用的工具集。这个参数会覆盖 target.txt中的TOOL_CHAIN_TAG 定义.


-x SKUID, –sku-id=SKUID


使用的给出的SKU ID来进行编译,覆盖DSC文件中的SKUID_IDENTIFIER (没用过。检查UDK2015 Source Code这个参数定义为 DEFAULT)
  -n THREADNUMBER 指定编译中使用的线程数量。理论上说线程越多,编译速度越快。这个参数会覆盖target.txt中的MAX_CONCURRENT_THREAD_NUMBER
  -f FDFFILE, –fdf=FDFFILE


指定 FDF的名称。这个参数会覆盖DSC文件中指定的FDF文件名。
  -r ROMIMAGE, –rom-image=ROMIMAGE 指定生成的 FD文件名称。这个名称必须是FDF文件中[FD] 节中存在的文件名。
  -i FVIMAGE, –fv-image=FVIMAGE

file.

指定生成的FV文件名称。这个名称必须是FDF文件中[FV] 节中存在的名称。
  -C CAPNAME, –capsule-image=CAPNAME


指定生成的Capsule文件名称。这个名称必须是FDF文件中[Capsule] 节中存在的名称。Capsule 是一种专门用来升级的UEFI定义的格式。比如:有对应的BIOS Capsule 文件,在启动过程中你把对应的文件放在U盘上,BIOS会自动识别并且加载然后升级自身,这样的好处是刷新环境稳定,避免操作系统的影响,避免被破解的风险。坏处是实际操中挺麻烦,需要准备FAT32格式的U盘。
  -u, –skip-autogen 跳过 Autogen 的过程进行编译
  -e, –re-parse 只做分析和生成编译需要的准备工作,不做实际编译,相当于只做AutoGen。
  -c, –case-insensitive 不检查 INF文件中的大小写
  -w, –warning-as-error 将 Warning视作 Error
-j LOGFILE, –log=LOGFILE


将编译过程中输出到屏幕上的信息同样输入到文件中。如果信息太多,无法看到期望的出错信息不妨试试这个参数直接查看Log文件。
  -s, –silent 沉默模式执行NMAKE。
  -q, –quiet           Disable all messages except FATAL ERRORS.


关闭除了致命错误之外的全部信息显示。感觉和上面的 –s没有差别。
-v, –verbose


打开 verbose模式(完整信息),包括 library实例,dependency表达式,warning信息等等。
  -d DEBUG, –debug=DEBUG


看起来是控制编译期的Debug信息输出。
  -D MACROS, –define=MACROS


定义宏
-y REPORTFILE, –report-file=REPORTFILE

Create/overwrite the report to the specified filename.


创建/覆盖指定的报告。这个功能非常有用,可以生成一个 report文件,其中包括了项目定义的 PCD变量等等的信息。这对于查看一些编译期的参数非常有用。
  -Y REPORTTYPE, –report-type=REPORTTYPE


创建/覆盖指定内容的报告。内容范围在[PCD, LIBRARY, FLASH, DEPEX, BUILD_FLAGS, FIXED_ADDRESS, EXECUTION_ORDER]。
  -F FLAG, –flag=FLAG  Specify the specific option to parse EDK UNI file.

Must be one of: [-c, -s]. -c is for EDK framework UNI

file, and -s is for EDK UEFI UNI file. This option can

also be specified by setting *_*_*_BUILD_FLAGS in

[BuildOptions] section of platform DSC. If they are

both specified, this value will override the setting

in [BuildOptions] section of platform DSC.


指定处理uni文件的方法,可选项是[-c,-s]。-c是用来处理EDK架构的UNI;-s用来处理EDK架构的 UNI。我不清楚具体有什么差别,如果你了解不妨告诉我
-N, –no-cache 关闭缓存机制。在EDK编译过程中是要生成一个小型的数据库文件的。我之前就遇到过杀毒软件会误杀这个数据库导致无法正常编译的情况。
–conf=CONFDIRECTORY 指定 Conf 的目录。
  –check-usage


检查 INF中提到的Source文件是否存在。只是检查而已,没有其他动作。
  –ignore-sources      Focus to a binary build and ignore all source files 不使用源程序,强制使用编译生成的二进制文件继续编译。


上述是通过简单实验和个人理解进行翻译的,如果有不妥当欢迎直接评论中指出或者给我写邮件。万分感谢!


2019年2月12日 补充。上面提到的 -Y 参数查看 PCD 设定的例子(UDK2018):

build -x X64 -Y PCD -y zz.txt

运行结束后在根目录下可以看到 zz.txt。需要注意的是:

1.建议先编译一次,确定能跑过再继续;

2.zz.txt 是编译结束的时候才生成的。

Step to UEFI (93)FTDI 串口驱动

FDTI232系列芯片是最好的USB转串口芯片,驱动全,芯片本身很稳定,兼容性也很好。这次介绍一个FTDI USB串口芯片的项目,地址是

https://github.com/tianocore/tianocore.github.io/wiki/Tasks-USB-Serial-Adapter-driver#Real_UEFI_system

项目的简介如下:

“Today there are many inexpensive USB Serial adapters available, and most systems are built with USB ports available. But at the same time, the dedicated Serial port is becoming less common to find available in a system.
A serial port can still be useful for software debugging purposes. (debug trace messages)
It can also be useful in providing a secondary terminal to the UEFI system.
This task would involve writing a USB driver which interfaces with a USB Serial Adapter.
Ideally, this project should enable a driver that will attach to the USB Serial Adapter and produce the SerialIo protocol to enable the UEFI terminal to become available through the USB Serial adapter.”。

简单的说如果你的系统当前有 FTDI的USB串口,那么驱动会帮你生成一个 SerialIO 供你使用。这样你就可以在UEFI 环境中使用 FTDI 的USB 串口进行通讯。
在使用之前,请确定你的USB串口设备ID,例如:我现在使用的USB串口在 Windows下面看到的信息是这样的:
image002

image001

本文并不打算做原理上的分析,只是介绍如何编译和实验。
实验环境是 UDK2015

1.在 C:\EDK\Nt32Pkg\Nt32Pkg.dsc 文件的 [Components] 段中添加下面的内容


Nt32Pkg/WinNtBlockIoDxe/WinNtBlockIoDxe.inf
Nt32Pkg/WinNtSerialIoDxe/WinNtSerialIoDxe.inf
Nt32Pkg/WinNtGopDxe/WinNtGopDxe.inf
Nt32Pkg/WinNtSimpleFileSystemDxe/WinNtSimpleFileSystemDxe.inf
MdeModulePkg/Application/HelloWorld/HelloWorld.inf
#LabZ_Start
FtdiUsbSerialDxe/FtdiUsbSerialDxe.inf
#LabZ_End
#
# Network stack drivers
# To test network drivers, need network Io driver(SnpNt32Io.dll), please refer to NETWORK-IO Subproject.
#

特别说明:如果有可能,最好在你当前的项目上重新这样编译一次。比如,你打算在BayTrail上用这个驱动,那么最好再Baytrail的BIOS中重新编译一次,这样最为稳妥。
2.将FtdiUsbSerialDxe目录拷贝到你UDK 的根目录下 例如: C:\EDK\
3.使用 Build 命令编译 NT32,这次是编译为 X64 的驱动。 命令式 Build –a X64
至此,驱动程序已经编译完成。可以在Build目录下找到我们需要的驱动,名称是 FtdiUsbSerialDxe.efi。 接下来我们就可以进行实验。
实验是在实体机上进行的,让一款“酷比魔方”的平板电脑和台式机进行通讯。实验中我使用了2个USB串口设备,还有一段双母头线(因为USB转串口都是公头)。

1. 首先检查一下,当前系统中没有 SerialIo Protocol
image003

2. 加载驱动image004

3. 再次检查会发现系统中多了一个 SerialIO protocol
image005
直接 dh 进行检查会发现多了2个handle 一个是驱动,一个是新增的挂protocol
image006
4. 之后使用我们前面介绍过的串口工具【参考1】
image007
看起来在启动的时候串口上会有一些乱码

在 Windows 端启动串口工具,双方可以进行通讯。
image008

完整的代码下载
FtdiUsbSerialDxe
编译好的X64 驱动下载
FtdiUsbEFI

特别注意:本文提到的代码是在 Windows7 VS2013 UDK2015环境下编译生成。

参考:
1. http://www.lab-z.com/stu91/ Step to UEFI (91) Shell下的串口测试软件

Step to UEFI (92)关于 ConOut 的奇怪实验

UEFI System Table 中的 ConOut-> OutputString 能够让我们直接在屏幕上输出字符串。这里介绍一种方法,能够让我们截获并且修改这个函数输出的字符串。

首先看一下 System Table 的定义在 \MdePkg\Include\Uefi\UefiSpec.h

///

/// EFI System Table

///

typedef struct {

///

/// The table header for the EFI System Table.

///

EFI_TABLE_HEADER                  Hdr;

///

/// A pointer to a null terminated string that identifies the vendor

/// that produces the system firmware for the platform.

///

CHAR16                            *FirmwareVendor;

///

/// A firmware vendor specific value that identifies the revision

/// of the system firmware for the platform.

///

UINT32                            FirmwareRevision;

///

/// The handle for the active console input device. This handle must support

/// EFI_SIMPLE_TEXT_INPUT_PROTOCOL and EFI_SIMPLE_TEXT_INPUT_EX_PROTOCOL.

///

EFI_HANDLE                        ConsoleInHandle;

///

/// A pointer to the EFI_SIMPLE_TEXT_INPUT_PROTOCOL interface that is

/// associated with ConsoleInHandle.

///

EFI_SIMPLE_TEXT_INPUT_PROTOCOL    *ConIn;

///

/// The handle for the active console output device.

///

EFI_HANDLE                        ConsoleOutHandle;

///

/// A pointer to the EFI_SIMPLE_TEXT_OUTPUT_PROTOCOL interface

/// that is associated with ConsoleOutHandle.

///

EFI_SIMPLE_TEXT_OUTPUT_PROTOCOL   *ConOut;

///

/// The handle for the active standard error console device.

/// This handle must support the EFI_SIMPLE_TEXT_OUTPUT_PROTOCOL.

///

EFI_HANDLE                        StandardErrorHandle;

///

/// A pointer to the EFI_SIMPLE_TEXT_OUTPUT_PROTOCOL interface

/// that is associated with StandardErrorHandle.

///

EFI_SIMPLE_TEXT_OUTPUT_PROTOCOL   *StdErr;

///

/// A pointer to the EFI Runtime Services Table.

///

EFI_RUNTIME_SERVICES              *RuntimeServices;

///

/// A pointer to the EFI Boot Services Table.

///

EFI_BOOT_SERVICES                 *BootServices;

///

/// The number of system configuration tables in the buffer ConfigurationTable.

///

UINTN                             NumberOfTableEntries;

///

/// A pointer to the system configuration tables.

/// The number of entries in the table is NumberOfTableEntries.

///

EFI_CONFIGURATION_TABLE           *ConfigurationTable;

} EFI_SYSTEM_TABLE;


其中的ConOut 是指向  EFI_SIMPLE_TEXT_OUTPUT_PROTOCOL  的指针

具体定义可以在 \MdePkg\Include\Protocol\SimpleTextOut.h 查到

///

/// The SIMPLE_TEXT_OUTPUT protocol is used to control text-based output devices.

/// It is the minimum required protocol for any handle supplied as the ConsoleOut

/// or StandardError device. In addition, the minimum supported text mode of such

/// devices is at least 80 x 25 characters.

///

struct _EFI_SIMPLE_TEXT_OUTPUT_PROTOCOL {

EFI_TEXT_RESET                Reset;

EFI_TEXT_STRING               OutputString;

EFI_TEXT_TEST_STRING          TestString;

EFI_TEXT_QUERY_MODE           QueryMode;

EFI_TEXT_SET_MODE             SetMode;

EFI_TEXT_SET_ATTRIBUTE        SetAttribute;

EFI_TEXT_CLEAR_SCREEN         ClearScreen;

EFI_TEXT_SET_CURSOR_POSITION  SetCursorPosition;

EFI_TEXT_ENABLE_CURSOR        EnableCursor;

///

/// Pointer to SIMPLE_TEXT_OUTPUT_MODE data.

///

EFI_SIMPLE_TEXT_OUTPUT_MODE   *Mode;

};

我们需要的是将  EFI_TEXT_STRING OutputString; 替换为我们自己的函数。

最终的代码如下

#include  <Uefi.h>
#include  <Library/UefiLib.h>
#include  <Library/ShellCEntryLib.h>


extern EFI_BOOT_SERVICES         *gBS;
extern EFI_SYSTEM_TABLE		  *gST;
extern EFI_RUNTIME_SERVICES 	 *gRT;

EFI_SYSTEM_TABLE	myST;
EFI_SYSTEM_TABLE	*pmyST=&myST;

EFI_SIMPLE_TEXT_OUTPUT_PROTOCOL	myConOut;

EFI_STATUS
myOut (
  IN EFI_SIMPLE_TEXT_OUTPUT_PROTOCOL        *This,
  IN CHAR16                                 *String
  )
{
	//Just a experiment, add a String to the output
	CHAR16 R[40]=L"LAB-Z:";
	StrCat(R,String);
	gST->ConOut->OutputString(This,R);
	
	return EFI_SUCCESS;
}
  
int
EFIAPI
main (
  IN int Argc,
  IN CHAR16 **Argv
  )
{	
    //Create a fake EFI_SYSTEM_TABLE named myST
	memcpy(&myST,gST,sizeof(EFI_SYSTEM_TABLE));	
	//Test this EFI_SYSTEM_TABLE
	  gST->ConOut->OutputString(  gST->ConOut,L"Test of gSt 1\n\r");
	pmyST->ConOut->OutputString(pmyST->ConOut,L"Test of pmyST 2\n\r");
	
	//Create a fake EFI_SIMPLE_TEXT_OUTPUT_PROTOCOL
	memcpy(&myConOut,gST->ConOut,sizeof(EFI_SIMPLE_TEXT_OUTPUT_PROTOCOL));	
    //Test the fake ConOut
	pmyST->ConOut=&myConOut;
	
	//If we use pmyST->ConOut it will be an error
	pmyST->ConOut->OutputString(gST->ConOut,L"Test of myConOut 3\n\r");
	
	//Replace OutputString function with our function
	pmyST->ConOut->OutputString=&myOut;
	pmyST->ConOut->OutputString(gST->ConOut,L"Test of myConOut 4\n\r");
	
	return EFI_SUCCESS;
}


运行结果

image001

特别需要注意的地方,如果我们写成

pmyST->ConOut->OutputString(pmyST ->ConOut,L”Test of myConOut 3\n\r”);

那么会碰到下面这个错误

image003

产生问题的代码在  \ShellPkg\Application\Shell\ConsoleLogger.c 中,看起来是向 Handle 安装另外一个 Protocol的时候出现报错信息。

  Status = gBS->InstallProtocolInterface(&gImageHandle, &gEfiSimpleTextOutProtocolGuid, EFI_NATIVE_INTERFACE, (VOID*)&((*ConsoleInfo)->OurConOut));
  if (EFI_ERROR(Status)) {
    SHELL_FREE_NON_NULL((*ConsoleInfo)->Buffer);
    SHELL_FREE_NON_NULL((*ConsoleInfo)->Attributes);
    SHELL_FREE_NON_NULL((*ConsoleInfo));
    *ConsoleInfo = NULL;
    return (Status);
  }

  gST->ConsoleOutHandle = gImageHandle;
  gST->ConOut           = &(*ConsoleInfo)->OurConOut;

  return (Status);


完整的代码下载:
MySt

Step to UEFI (91) Shell下的串口测试软件

这里【参考1】提供了一个Shell下调用 SerialIO Protocol 进行通讯的 Application。下面介绍一下如何重新编译和使用这个程序。

这里我使用UDK2014下面的 EADK作为编译环境:
1. 将代码目录copy到EADK的AppPkg\Application 下面
2. 需要在 AppPkg.dsc中加入下面的代码
[LibraryClasses] 下面加入
UefiHandleParsingLib|ShellPkg/Library/UefiHandleParsingLib/UefiHandleParsingLib.inf
3. 同样使用 build –a IA32 –p AppPkg\AppPkg.dsc 进行编译
4. 编译之后即生成了 Serial-Test.efi

我选择在 VirtualBox 中测试这个 Application。把它放在一个 ISO 之中,挂接启动到 UEFI虚拟机中,然后在 FS0: 下面即可看到这个 Application。

image001

同样,虚拟机中需要打开串口,我是采用 pipe通讯的方法在虚拟机中模拟出来com1。

image002
之后再打开putty,设置如下:
image003
双方连接之后即可进行通讯。
image004

image005

可以看到双方能够进行正常的通讯。
image006

本文提到的代码下载:
SerialTest
制作好的 ISO下载
test

特别提醒:VirtualBox 的BIOS有一些问题(至少5.0.20 r106931依然如此),无法彻底关闭Redirection功能,所以如果你要用它来实验一些串口相关内容时,需要特别注意,显示在虚拟机EFI Shell下面的东西还会发送一份到串口上。
参考:
1. https://github.com/tianocore/edk2/tree/master/OptionRomPkg/Bus/Usb/FtdiUsbSerialDxe

Step to UEFI (90) 给Shell 加入一个 command

上一次【参考1】介绍的屏幕旋转项目中还带有 Shell Command的内容。就是说可以把他调用驱动的Application”包”到Shell 中。这次介绍一下具体的实现。
源代码放置的位置目录和上一次实验相同。之后进行下面的步骤:
1.在 C:\EDK\ShellPkg\ShellPkg.dsc的 增加内容:

  ShellPkg/Application/Shell/Shell.inf {
    <LibraryClasses>
      NULL|ShellPkg/Library/UefiShellLevel2CommandsLib/UefiShellLevel2CommandsLib.inf
      NULL|ShellPkg/Library/UefiShellLevel1CommandsLib/UefiShellLevel1CommandsLib.inf
      NULL|ShellPkg/Library/UefiShellLevel3CommandsLib/UefiShellLevel3CommandsLib.inf
!ifndef $(NO_SHELL_PROFILES)
      NULL|ShellPkg/Library/UefiShellDriver1CommandsLib/UefiShellDriver1CommandsLib.inf
      NULL|ShellPkg/Library/UefiShellInstall1CommandsLib/UefiShellInstall1CommandsLib.inf
      NULL|ShellPkg/Library/UefiShellDebug1CommandsLib/UefiShellDebug1CommandsLib.inf
      NULL|ShellPkg/Library/UefiShellNetwork1CommandsLib/UefiShellNetwork1CommandsLib.inf
!ifdef $(INCLUDE_DP)
      NULL|ShellPkg/Library/UefiDpLib/UefiDpLib.inf
!endif #$(INCLUDE_DP)
!endif #$(NO_SHELL_PROFILES)
##LABZDEBUG_Start
      NULL|GopRotatePkg/Library/GopRotateShellCommandLib/GopRotateShellCommandLib.inf
##LABZDEBUG_End	  
  }


2. 使用编译命令 重新编译 Shell。具体方法还可以在【参考2】看到

build by build -a IA32 -p ShellPkg\ShellPkg.dsc -b RELEASE

3.正常编译之后shell.efi 可以在这个目录中找到 C:\EDK\Build\Shell\RELEASE_MYTOOLS\IA32

4.从C:\EDK\Nt32Pkg\Nt32Pkg.fdf) 可以看到,NT32Pkg 用的是 FullShell

5.用生成的Shell .efi 替换C:\EDK\EdkShellBinPkg\FullShell\Ia32中的 Shell_Full.efi

6.用 Build 重新编译Nt32 项目,然后再用 Build run 运行模拟器

7.在模拟器中先加载Driver Load GopRotate.efi

8.枚举一下当前Shell中有 GraphicsOutput Protocol支持的 Device Handle。模拟器中有两个设备,分别对应2个窗口
image002

9.设置其中一个旋转,效果如下
image003

10.再旋转另外一个
image005

下面是重新编译通过的 shell 有兴趣的朋友可以直接使用

Shell_Full

参考:

1. http://www.lab-z.com/stu88/ Step to UEFI (88) 一个转屏驱动
2. http://www.lab-z.com/how2buildshell/ Step to UEFI (35) —– How to build Shell.efi

Step to UEFI (89) 内存访问

初学 Watcom C的时候遇到一个问题“如何访问指定的内存”。当时为了这个问题花费了不少功夫,最后才发现直接用指针就可以进行访问,因为过于简单以至于网上都没有人问过…….
最近看 UEFI 编程,同样也遇到了这个问题,我去查找了 mm命令的source code,看到了它使用了PCI Root Bridge I/O Protocol 这个Protocol,然后就去研究之。同样越研究越迷糊,最终发现虽然这个Protocol提供了内存访问函数,但是本质上依然使用指针来直接访问。出于保护模式下的内存,任何其他方法都有“脱了裤子放屁—–多此一举”之嫌。
参考 mm 源程序,很快写出代码:

#include  <Uefi.h>
#include  <Library/UefiLib.h>
#include  <Library/ShellCEntryLib.h>

#include <Library/MemoryAllocationLib.h>
#include  <Protocol/DeviceIo.h>

extern EFI_BOOT_SERVICES         *gBS;
extern EFI_SYSTEM_TABLE			 *gST;
extern EFI_RUNTIME_SERVICES 	 *gRT;

typedef enum {
  EfiPciWidthUint8,
  EfiPciWidthUint16,
  EfiPciWidthUint32,
  EfiPciWidthUint64
} DUMMY;

VOID
ReadMem (
  EFI_IO_WIDTH  Width,
  UINT64        Address,
  UINTN         Size,
  VOID          *Buffer
  )
{
  do {
    if (Width == EfiPciWidthUint8) {
      *(UINT8 *) Buffer = *(UINT8 *) (UINTN) Address;
      Address -= 1;
    } else if (Width == EfiPciWidthUint16) {
      *(UINT16 *) Buffer = *(UINT16 *) (UINTN) Address;
      Address -= 2;
    } else if (Width == EfiPciWidthUint32) {
      *(UINT32 *) Buffer = *(UINT32 *) (UINTN) Address;
      Address -= 4;
    } else if (Width == EfiPciWidthUint64) {
      *(UINT64 *) Buffer = *(UINT64 *) (UINTN) Address;
      Address -= 8;
    } else {
      Print(L"Can't read memory at %X",Width);
      break;
    }
    //
    //
    //
    Size--;
  } while (Size > 0);
}

int
EFIAPI
main (
  IN int Argc,
  IN CHAR16 **Argv
  )
{
	CHAR8		*Mem1;
	UINT32		Buffer;

	Mem1=AllocatePool(4);
	*(Mem1+0)='L'; 
	*(Mem1+1)='A';
	*(Mem1+2)='B';
	*(Mem1+3)='Z';
	Print(L"Memory Address: %X\n",Mem1);
	Print(L"%X\n",*Mem1);
	Print(L"%X\n",*(Mem1+1));
	Print(L"%X\n",*(Mem1+2));
	Print(L"%X\n",*(Mem1+3));
	
	ReadMem(EfiPciWidthUint32, (UINT64)Mem1, 1, &Buffer);
	
	Print(L"Read[%X]=%X\n",Mem1,Buffer);
	
	FreePool(Mem1);
	
  return EFI_SUCCESS;
}


在NT32模拟器中实验时发现,模拟环境中不是所有的内存空间都是可以直接访问的。稍有不慎就会得到错误信息,模拟器也会随之崩溃。于是,代码是创建一个4 Bytes长的内存空间,写入一些字符,然后再 ReadMem 读取出来,这样做能够保证访问的内存是可以被正常操作的。

运行结果:

ma

参考的 mm.c 来自EfiShell 1.06\Shell\mm\mm.c。
mm

本文提到的完整代码下载
ReadMEM

Step to UEFI (88) 一个转屏驱动

这次介绍一个通过驱动程序旋转屏幕的项目,地址是https://github.com/apop2/GopRotate 。项目的简介是“A EDK2 Package that supplies a UEFI driver that will bind on top of Graphics Output Devices and rotate any BLT operations by 0, 90, 180 or 270 degrees.”。

本文并不打算做原理上的分析,只是介绍如何编译和实验。

实验环境是 UDK2014
1.在 C:\EDK\Nt32Pkg\Nt32Pkg.dsc 文件的 [Components] 段中添加下面的内容

  MdeModulePkg/Application/VariableInfo/VariableInfo.inf
  MdeModulePkg/Universal/PlatformDriOverrideDxe/PlatformDriOverrideDxe.inf
##LABZDebug_Start  
  GopRotatePkg/GopRotate/GopRotate.inf
##LABZDebug_End
###################################################################################################
#
# BuildOptions Section - Define the module specific tool chain flags that should be used as
#                        the default flags for a module. These flags are appended to any 


2.将 GopRotatePkg 目录拷贝到你UDK 的根目录下 例如: C:\EDK\
3.使用 Build 命令编译 NT32
4.使用 build run 运行模拟器
至此,驱动程序已经编译完成。下面要编译使用这个驱动的 Application。
5.将GopRot 按照一个普通的Application编译
编译完成后可以进行实验了。
6.使用 load goprotate.efi 加载驱动
image001

7.输入 goprot.efi 2 进行测试。
运行之前的屏幕是这样的:
image003
运行之后屏幕就变成这样了
image005

完整的代码下载

前面提到的驱动项目完整代码
GopRotatePkg

调用驱动的应用程序代码
GopRot

Step to UEFI (87) EFI_UNICODE_COLLATION_PROTOCOL

查看UEFI下的大小写转换函数的时候,偶然发现了EFI_UNICODE_COLLATION_PROTOCOL【参考1】提供了几个有意思的函数。

u1

具体的头文件定义在 \MdePkg\Include\Protocol\UnicodeCollation.h

///
/// The EFI_UNICODE_COLLATION_PROTOCOL is used to perform case-insensitive 
/// comparisons of strings. 
///
struct _EFI_UNICODE_COLLATION_PROTOCOL {
  EFI_UNICODE_COLLATION_STRICOLL    StriColl;   
  EFI_UNICODE_COLLATION_METAIMATCH  MetaiMatch;
  EFI_UNICODE_COLLATION_STRLWR      StrLwr;
  EFI_UNICODE_COLLATION_STRUPR      StrUpr;

  //
  // for supporting fat volumes
  //
  EFI_UNICODE_COLLATION_FATTOSTR    FatToStr;
  EFI_UNICODE_COLLATION_STRTOFAT    StrToFat;
  
  ///
  /// A Null-terminated ASCII string array that contains one or more language codes.
  /// When this field is used for UnicodeCollation2, it is specified in RFC 4646 format.
  /// When it is used for UnicodeCollation, it is specified in ISO 639-2 format.
  ///
  CHAR8                             *SupportedLanguages;
};


根据介绍,大概的介绍一些功能(如果你发现有错误,欢迎eMail指出)
EFI_UNICODE_COLLATION_STRICOLL StriColl; //大小写不敏感的比较函数
EFI_UNICODE_COLLATION_METAIMATCH MetaiMatch; //正则表达式匹配
EFI_UNICODE_COLLATION_STRLWR StrLwr; //字符串转小写
EFI_UNICODE_COLLATION_STRUPR StrUpr; //字符串转大写
EFI_UNICODE_COLLATION_FATTOSTR FatToStr; //8.3格式的OEM定义字符文件名转String
EFI_UNICODE_COLLATION_STRTOFAT StrToFat; //String转8.3格式的OEM定义字符
CHAR8 *SupportedLanguages; //列出当前系统支持的语言代码

之后,根据上面的介绍,编写一个测试例子:

#include  <Uefi.h>
#include  <Library/UefiLib.h>
#include  <Library/ShellCEntryLib.h>

#include <Protocol/UnicodeCollation.h>

extern EFI_BOOT_SERVICES         *gBS;
extern EFI_SYSTEM_TABLE			 *gST;
extern EFI_RUNTIME_SERVICES 	 *gRT;

int
EFIAPI
main (
  IN int Argc,
  IN CHAR16 **Argv
  )
{
	EFI_STATUS	Status;
	EFI_UNICODE_COLLATION_PROTOCOL *mUnicodeCollation;
	CHAR16	*TestStr=L"wWw.LaB-z.cOm";
	CHAR16  *Pattern1=L"w*";
	CHAR16  *Pattern2=L"*z.c*";
	CHAR16  *Pattern3=L"c*";
	
	Status = gBS->LocateProtocol(
				&gEfiUnicodeCollation2ProtocolGuid, 
				NULL, 
				&mUnicodeCollation);
    if (EFI_ERROR (Status)) {
      Print(L"Can't Locate Protocol\n");
      return Status;
    }
	
	mUnicodeCollation->StrLwr(mUnicodeCollation,TestStr);
	Print(L"%s\n",TestStr);
	
	mUnicodeCollation->StrUpr(mUnicodeCollation,TestStr);
	Print(L"%s\n",TestStr);

	Print(L"%d\n",(mUnicodeCollation->
					MetaiMatch(mUnicodeCollation,
					   TestStr,
					   Pattern1)));

	Print(L"%d\n",(mUnicodeCollation->
					MetaiMatch(mUnicodeCollation,
					   TestStr,
					   Pattern2)));

	Print(L"%d\n",(mUnicodeCollation->
					MetaiMatch(mUnicodeCollation,
					   TestStr,
					   Pattern3)));					   
  return EFI_SUCCESS;
}


运行结果:
u2

其中测试了大小写转换不必细说,多说两句关于正则表达式的用法:

	CHAR16	*TestStr=L"wWw.LaB-z.cOm";
	CHAR16  *Pattern1=L"w*";
	CHAR16  *Pattern2=L"*z.c*";
	CHAR16  *Pattern3=L"c*";


其中 “*” 表示匹配一个或者任意多个字符, Pattern1 表示的是“以w开头的字符串”;Pattern2 表示的是“中间含有 z.c 字符的字符串”;Pattern3 表示的是“以c开头的字符串”。最终运行结果如下:

完整的代码下载:
UnicTest

参考:
1. UEFI 2.4 P592