Step to UEFI (86) StartImage 加载CLib程序的解决方法

前面【参考1】提到了 StartImage 加载 CLib 编写Application 出错的原因,这篇文章介绍如何解决这个问题。
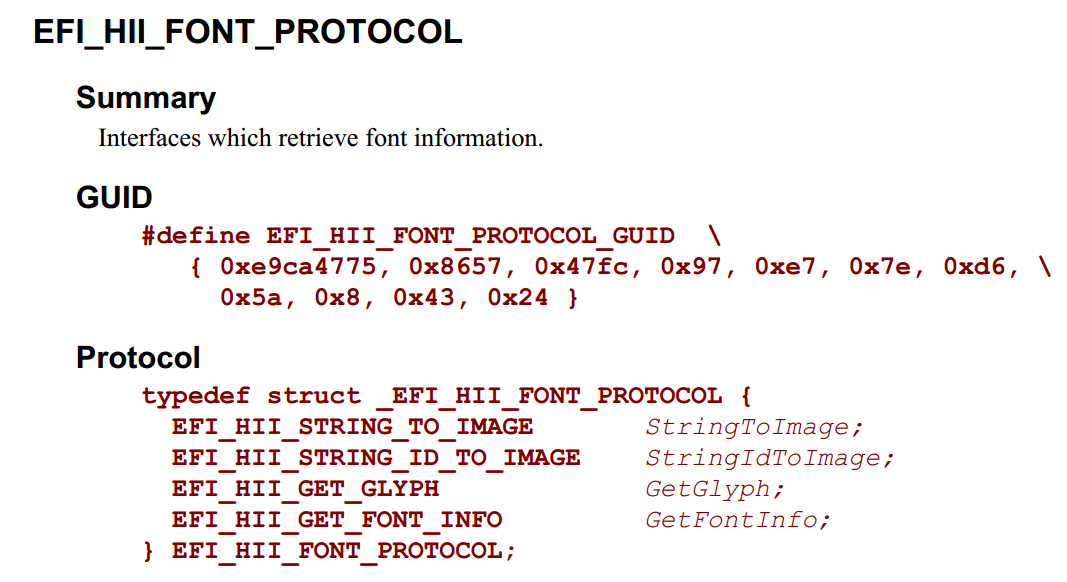
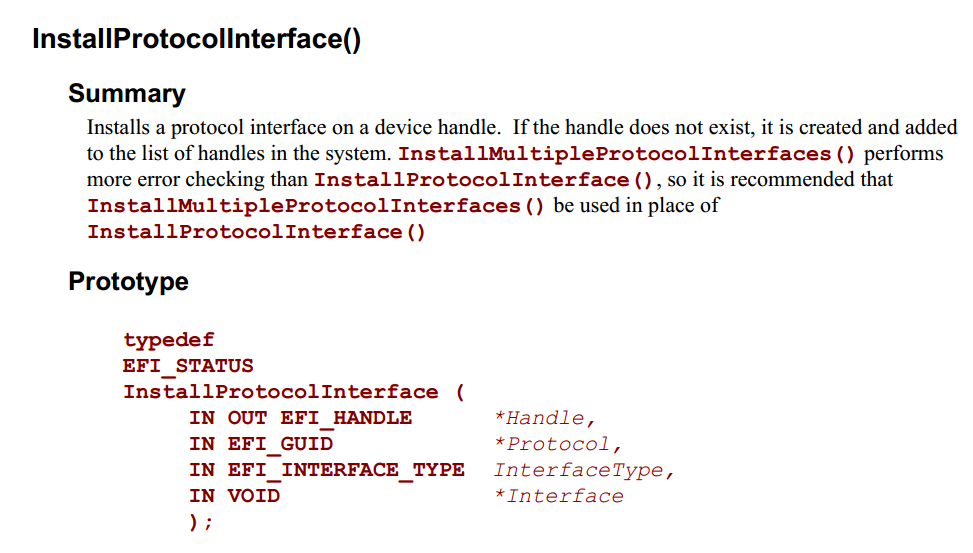
根据原因来看是因为找不到提供 Parameters 的Protocol,那么我们在调用之前给被加载的Application 装上需要的Protocol即可。安装 Protocol 需要用到 InstallProtocollInterface,具体定义如下【参考2】:
image001

欲安装的 Protocol 实例则是从加载程序(Exec6)上面取下来的。

没有多少人愿意看大篇幅的代码,我这里列下最关键的部分:

首先,取出当前的 Shell Interface, 不同的环境下还可以使用 Shell Parameter Protocol , NT32 环境下只支持前者

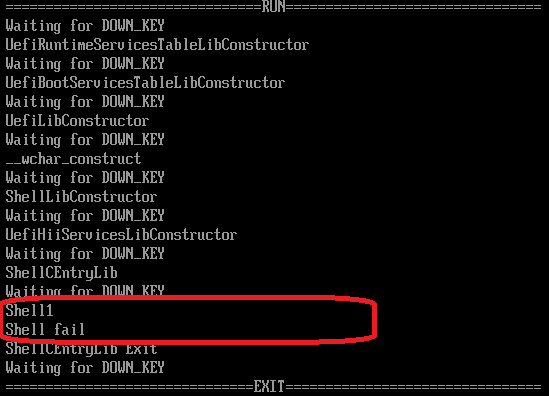
//如果你在实体机上发现有问题,那么可以考虑这段代码的问题
  Status = gBS->OpenProtocol(gImageHandle,
                             &gEfiShellInterfaceGuid,
                             (VOID **)&EfiShellInterface,
                             gImageHandle,
                             NULL,
                             EFI_OPEN_PROTOCOL_GET_PROTOCOL
                            );
  if (EFI_ERROR(Status)) {
	Print(L"Shell Parameters Protocol not Found!\r\n",Status);	
    return (Status);	
  } 
//之后,将取下来的 Protocol 安装给被加载的 Application
  Status = gBS->InstallProtocolInterface (
            &NewHandle,
            &gEfiShellInterfaceGuid,
            EFI_NATIVE_INTERFACE,
            EfiShellInterface
           ); 
  if (EFI_ERROR(Status)) {
	Print(L"Protocol Interface Installed fail!\r\n",Status);
	return (Status);
  } 	


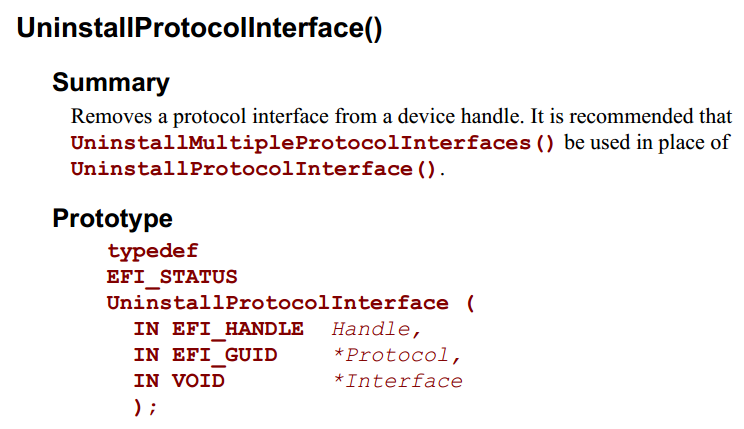
最后,安装之后不能忘记 Uninstall,还要调用一下,特别注意第一个参数传递的不是指针。

image003

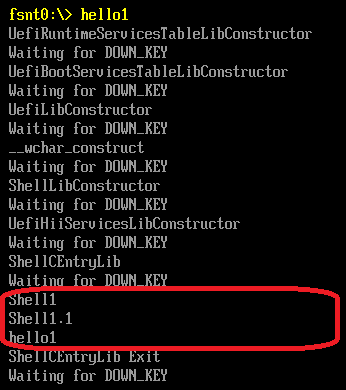
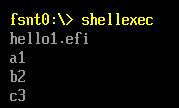
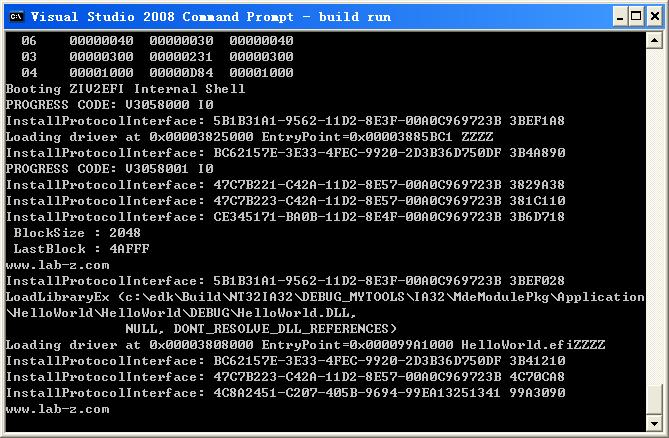
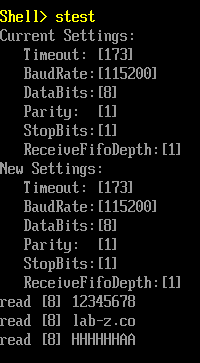
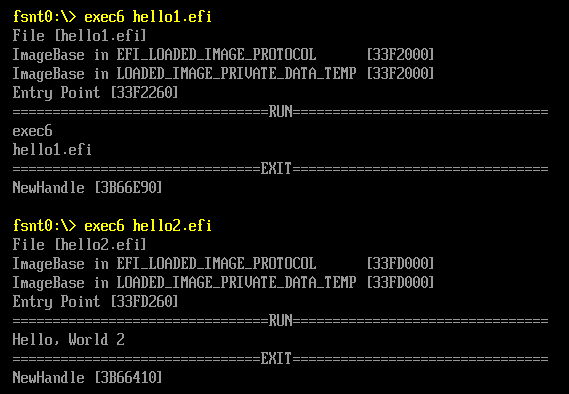
运行结果,可以看出 Hello1和 Hello2都可以被正常加载运行:

image005

看到这里,这篇文章就可以结束了,下面列出 Exec6 的代码:

#include  <Uefi.h>
#include  <Library/UefiLib.h>
#include  <Library/ShellCEntryLib.h>

#include  <stdio.h>
#include  <stdlib.h>
#include  <wchar.h>

#include <Protocol/EfiShell.h>
#include <Library/ShellLib.h>

extern EFI_BOOT_SERVICES           	 *gBS;
extern EFI_SYSTEM_TABLE				 *gST;
extern EFI_RUNTIME_SERVICES 		 *gRT;

extern EFI_SHELL_PROTOCOL            *gEfiShellProtocol;
extern EFI_SHELL_ENVIRONMENT2 		 *mEfiShellEnvironment2;

extern EFI_HANDLE					 gImageHandle;

typedef struct {
  UINTN                       Signature;
  /// Image handle
  EFI_HANDLE                  Handle;   
  /// Image type
  UINTN                       Type;           
  /// If entrypoint has been called
  BOOLEAN                     Started;        
  /// The image's entry point
  EFI_IMAGE_ENTRY_POINT       EntryPoint;     
  /// loaded image protocol
  EFI_LOADED_IMAGE_PROTOCOL   Info; 
  /// Location in memory
  EFI_PHYSICAL_ADDRESS        ImageBasePage;    
} LOADED_IMAGE_PRIVATE_DATA_TEMP;

#define _CR(Record, TYPE, Field)  ((TYPE *) ((CHAR8 *) (Record) - (CHAR8 *) &(((TYPE *) 0)->Field)))

#define LOADED_IMAGE_PRIVATE_DATA_FROM_THIS(a) \
          _CR(a, LOADED_IMAGE_PRIVATE_DATA_TEMP, Info)
		  
/**
  GET  DEVICEPATH
**/
EFI_DEVICE_PATH_PROTOCOL *
EFIAPI
ShellGetDevicePath (
  IN CHAR16                     * CONST DeviceName OPTIONAL
  )
{
  //
  // Check for UEFI Shell 2.0 protocols
  //
  if (gEfiShellProtocol != NULL) {
    return (gEfiShellProtocol->GetDevicePathFromFilePath(DeviceName));
  }

  //
  // Check for EFI shell
  //
  if (mEfiShellEnvironment2 != NULL) {
    return (mEfiShellEnvironment2->NameToPath(DeviceName));
  }

  return (NULL);
}

int
EFIAPI
main (
  IN int Argc,
  IN CHAR16 **Argv
  )
{
  EFI_DEVICE_PATH_PROTOCOL *DevicePath;
  EFI_HANDLE	NewHandle;
  EFI_STATUS	Status;
  LOADED_IMAGE_PRIVATE_DATA_TEMP      *private = NULL;  
  UINTN			ExitDataSizePtr;
  EFI_LOADED_IMAGE_PROTOCOL	*ImageInfo = NULL;
    EFI_SHELL_INTERFACE           *EfiShellInterface=NULL;
	
  if (Argc!=2) {
		Print(L"Usage: Exec4 FileName\n");
		return EFI_SUCCESS;
  }
  
  Print(L"File [%s]\n",Argv[1]);

  DevicePath=ShellGetDevicePath(Argv[1]);

  //
  // Load the image with:
  // FALSE - not from boot manager and NULL, 0 being not already in memory
  //
  Status = gBS->LoadImage(
    FALSE,
    gImageHandle,
    DevicePath,
    NULL,
    0,
    &NewHandle);  

  if (EFI_ERROR(Status)) {
    if (NewHandle != NULL) {
      gBS->UnloadImage(NewHandle);
    }
	Print(L"Error during LoadImage [%X]\n",Status);
    return (Status);
  }

  Status = gBS -> HandleProtocol (
						NewHandle,
						&gEfiLoadedImageProtocolGuid,
						&ImageInfo
						);
						
  private = LOADED_IMAGE_PRIVATE_DATA_FROM_THIS(ImageInfo);  

  Print(L"ImageBase in EFI_LOADED_IMAGE_PROTOCOL      [%lX]\n",ImageInfo->ImageBase);
  Print(L"ImageBase in LOADED_IMAGE_PRIVATE_DATA_TEMP [%lX]\n",private->ImageBasePage);
  Print(L"Entry Point [%lX]\n",private->EntryPoint);
							  
  Status = gBS->OpenProtocol(gImageHandle,
                             &gEfiShellInterfaceGuid,
                             (VOID **)&EfiShellInterface,
                             gImageHandle,
                             NULL,
                             EFI_OPEN_PROTOCOL_GET_PROTOCOL
                            );
  if (EFI_ERROR(Status)) {
	Print(L"Shell Parameters Protocol not Found!\r\n",Status);	
    return (Status);	
  } 

  Status = gBS->InstallProtocolInterface (
            &NewHandle,
            &gEfiShellInterfaceGuid,
            EFI_NATIVE_INTERFACE,
            EfiShellInterface
           ); 
  if (EFI_ERROR(Status)) {
	Print(L"Protocol Interface Installed fail!\r\n",Status);
	return (Status);
  } 		   
 
  Print(L"================================RUN================================\r\n",Status);
 
  //
  // now start the image, passing up exit data if the caller requested it
  //
  Status = gBS->StartImage(
                     NewHandle,
                     &ExitDataSizePtr,
                     NULL
              );
  if (EFI_ERROR(Status)) {
    if (NewHandle != NULL) {
      gBS->UnloadImage(NewHandle);
    }
	Print(L"Error during StartImage [%X]\r\n",Status);
    return (Status);
  }

  Print(L"===============================EXIT================================\r\n",Status);

  Status = gBS->UninstallProtocolInterface (
            NewHandle,
            &gEfiShellInterfaceGuid,
            EfiShellInterface
           ); 
  if (EFI_ERROR(Status)) {
	Print(L"Protocol Interface Uninstalled fail!\r\n",Status);
	return (Status);
  } 
  
  gBS->UnloadImage (NewHandle);  

  Print(L"NewHandle [%lX]\n",NewHandle);  
  
  return EFI_SUCCESS;
}


完整代码下载:
exec6

至此,终于回答了 StartImage 执行Application 的问题,如果你发现本文有任何问题欢迎给我留言,或者你有什么其他问题,同样可以给我发 e-Mail。

就是这样。

参考:
1. http://www.lab-z.com/stu85/ StartImage CLib
2. Uefi Spec 2.4 P153

Step to UEFI (85) StartImage CLib

之前文章中提到过,用LoadImage和StartImage无法加载CLIB build出来的 Application。这次认真研究一下这个问题。

首先,准备实验的材料: 两个简单的小程序 Hello1 和 Hello2 。前者是 CLIB 编出来的,后者是普通的EFI 程序。此外还有一个加载器程序 exec4.efi 。

1. 单独执行编译出来的 Hello1.efi 和Hello2.efi都没问题。实验 exec4 ,加载 hello1.efi 会出错,虚拟机会重启到 Setup中,加载 hello2.efi 正常;
2. 对 Hello1 进行分析,分析的方法是加入【参考1】提到的那种按键Pause。
2.1 在Build\NT32IA32\DEBUG_MYTOOLS\IA32\AppPkg\Applications\Hello1\Hello1\Makefile文件中可以看到,入口定义:

         IMAGE_ENTRY_POINT = _ModuleEntryPoint


2.2 我们再根据编译过程生成的MAP文件,确定 _ModuleEntryPoint 是在 ApplicationEntryPoint.c 中。同样【参考2】可以给我们提供很多经验,相比普通的EFI程序,增加的CLib只是在整个架构中插入了多函数,并不会改变整体的架构。

/**
  Entry point to UEFI Application.

  This function is the entry point for a UEFI Application. This function must call
  ProcessLibraryConstructorList(), ProcessModuleEntryPointList(), and ProcessLibraryDestructorList().
  The return value from ProcessModuleEntryPointList() is returned.
  If _gUefiDriverRevision is not zero and SystemTable->Hdr.Revision is less than _gUefiDriverRevison,
  then return EFI_INCOMPATIBLE_VERSION.

  @param  ImageHandle                The image handle of the UEFI Application.
  @param  SystemTable                A pointer to the EFI System Table.

  @retval  EFI_SUCCESS               The UEFI Application exited normally.
  @retval  EFI_INCOMPATIBLE_VERSION  _gUefiDriverRevision is greater than SystemTable->Hdr.Revision.
  @retval  Other                     Return value from ProcessModuleEntryPointList().

**/
EFI_STATUS
EFIAPI
_ModuleEntryPoint (
  IN EFI_HANDLE        ImageHandle,
  IN EFI_SYSTEM_TABLE  *SystemTable
  )
{
  EFI_STATUS                 Status;

  if (_gUefiDriverRevision != 0) {
    //
    // Make sure that the EFI/UEFI spec revision of the platform is >= EFI/UEFI spec revision of the application.
    //
    if (SystemTable->Hdr.Revision < _gUefiDriverRevision) {
      return EFI_INCOMPATIBLE_VERSION;
    }
  }

  //
  // Call constructor for all libraries.
  //
  ProcessLibraryConstructorList (ImageHandle, SystemTable);

  //
  // Call the module's entry point
  //
  Status = ProcessModuleEntryPointList (ImageHandle, SystemTable);

  //
  // Process destructor for all libraries.
  //
  ProcessLibraryDestructorList (ImageHandle, SystemTable);

  //
  // Return the return status code from the driver entry point
  //
  return Status;
}


首先追到的是 ProcessLibraryConstructorList 我们在其中插入Debug信息。特别注意,插入的位置在 \Build\NT32IA32\DEBUG_MYTOOLS\IA32\AppPkg\Applications\Hello1\Hello1\DEBUG\AutoGen.c
因为这个文件是编译过程中生成的,所以我们不可以重新 Build AppPkg,而要在目录中(\Build\NT32IA32\DEBUG_MYTOOLS\IA32\AppPkg\Applications\Hello1\Hello1\) 直接运行 NMake来编译;
2.3 插入Debug信息后,NMAKE 编译通过,直接运行 Hello1.efi 一次,确保没问题,再用 exec4 加载 hello1.efi 。同样有错误,这说明问题不是发生在ProcessLibraryConstructorList 中;下面是插入后的代码式样:

VOID
EFIAPI
ProcessLibraryConstructorList (
  IN EFI_HANDLE        ImageHandle,
  IN EFI_SYSTEM_TABLE  *SystemTable
  )
{
  EFI_STATUS  Status;
  EFI_INPUT_KEY	Key;
  
  SystemTable->ConOut->OutputString(SystemTable->ConOut,L"UefiRuntimeServicesTableLibConstructor\n\r");
  Key.ScanCode=SCAN_NULL;
  while (SCAN_UP!=Key.ScanCode)
  {Status= SystemTable -> ConIn -> ReadKeyStroke(SystemTable->ConIn,&Key);}
  SystemTable->ConOut->OutputString(SystemTable->ConOut,L"Waiting for DOWN_KEY\n\r");	
  Key.ScanCode=SCAN_NULL;
  while (SCAN_DOWN!=Key.ScanCode)
  {Status= SystemTable -> ConIn -> ReadKeyStroke(SystemTable->ConIn,&Key);}
	
  Status = UefiRuntimeServicesTableLibConstructor (ImageHandle, SystemTable);
  ASSERT_EFI_ERROR (Status);

   
  SystemTable->ConOut->OutputString(SystemTable->ConOut,L"UefiBootServicesTableLibConstructor\n\r");
  Key.ScanCode=SCAN_NULL;
  while (SCAN_UP!=Key.ScanCode)
  {Status= SystemTable -> ConIn -> ReadKeyStroke(SystemTable->ConIn,&Key);}
  SystemTable->ConOut->OutputString(SystemTable->ConOut,L"Waiting for DOWN_KEY\n\r");	
  Key.ScanCode=SCAN_NULL;
  while (SCAN_DOWN!=Key.ScanCode)
  {Status= SystemTable -> ConIn -> ReadKeyStroke(SystemTable->ConIn,&Key);}

  Status = UefiBootServicesTableLibConstructor (ImageHandle, SystemTable);
  ASSERT_EFI_ERROR (Status);


  SystemTable->ConOut->OutputString(SystemTable->ConOut,L"UefiLibConstructor\n\r");
  Key.ScanCode=SCAN_NULL;
  while (SCAN_UP!=Key.ScanCode)
  {Status= SystemTable -> ConIn -> ReadKeyStroke(SystemTable->ConIn,&Key);}
  SystemTable->ConOut->OutputString(SystemTable->ConOut,L"Waiting for DOWN_KEY\n\r");	
  Key.ScanCode=SCAN_NULL;
  while (SCAN_DOWN!=Key.ScanCode)
  {Status= SystemTable -> ConIn -> ReadKeyStroke(SystemTable->ConIn,&Key);}
  
  Status = UefiLibConstructor (ImageHandle, SystemTable);
  ASSERT_EFI_ERROR (Status);
  

  SystemTable->ConOut->OutputString(SystemTable->ConOut,L"__wchar_construct\n\r");
  Key.ScanCode=SCAN_NULL;
  while (SCAN_UP!=Key.ScanCode)
  {Status= SystemTable -> ConIn -> ReadKeyStroke(SystemTable->ConIn,&Key);}
  SystemTable->ConOut->OutputString(SystemTable->ConOut,L"Waiting for DOWN_KEY\n\r");	
  Key.ScanCode=SCAN_NULL;
  while (SCAN_DOWN!=Key.ScanCode)
  {Status= SystemTable -> ConIn -> ReadKeyStroke(SystemTable->ConIn,&Key);}
  
  Status = __wchar_construct (ImageHandle, SystemTable);
  ASSERT_EFI_ERROR (Status);


  SystemTable->ConOut->OutputString(SystemTable->ConOut,L"ShellLibConstructor \n\r");
  Key.ScanCode=SCAN_NULL;
  while (SCAN_UP!=Key.ScanCode)
  {Status= SystemTable -> ConIn -> ReadKeyStroke(SystemTable->ConIn,&Key);}
  SystemTable->ConOut->OutputString(SystemTable->ConOut,L"Waiting for DOWN_KEY\n\r");	
  Key.ScanCode=SCAN_NULL;
  while (SCAN_DOWN!=Key.ScanCode)
  {Status= SystemTable -> ConIn -> ReadKeyStroke(SystemTable->ConIn,&Key);}

  Status = ShellLibConstructor (ImageHandle, SystemTable);
  ASSERT_EFI_ERROR (Status);


  SystemTable->ConOut->OutputString(SystemTable->ConOut,L"UefiHiiServicesLibConstructor  \n\r");
  Key.ScanCode=SCAN_NULL;
  while (SCAN_UP!=Key.ScanCode)
  {Status= SystemTable -> ConIn -> ReadKeyStroke(SystemTable->ConIn,&Key);}
  SystemTable->ConOut->OutputString(SystemTable->ConOut,L"Waiting for DOWN_KEY\n\r");	
  Key.ScanCode=SCAN_NULL;
  while (SCAN_DOWN!=Key.ScanCode)
  {Status= SystemTable -> ConIn -> ReadKeyStroke(SystemTable->ConIn,&Key);}
  Status = UefiHiiServicesLibConstructor (ImageHandle, SystemTable);
  ASSERT_EFI_ERROR (Status);

}


直接运行程序会不断暂停等待按键才继续:

image001

2.4 接下来在ProcessModuleEntryPointList中像上面一样插入Debug,

  //
  // Call the module's entry point
  //
  Status = ProcessModuleEntryPointList (ImageHandle, SystemTable);


EFI_STATUS
EFIAPI
ProcessModuleEntryPointList (
  IN EFI_HANDLE        ImageHandle,
  IN EFI_SYSTEM_TABLE  *SystemTable
  )

{
  EFI_STATUS  Status;
  EFI_INPUT_KEY	Key;

  SystemTable->ConOut->OutputString(SystemTable->ConOut,L"ShellCEntryLib  \n\r");
  Key.ScanCode=SCAN_NULL;
  while (SCAN_UP!=Key.ScanCode)
  {Status= SystemTable -> ConIn -> ReadKeyStroke(SystemTable->ConIn,&Key);}
  SystemTable->ConOut->OutputString(SystemTable->ConOut,L"Waiting for DOWN_KEY\n\r");	
  Key.ScanCode=SCAN_NULL;
  while (SCAN_DOWN!=Key.ScanCode)
  {Status= SystemTable -> ConIn -> ReadKeyStroke(SystemTable->ConIn,&Key);}
  Status=ShellCEntryLib (ImageHandle, SystemTable);
  
  SystemTable->ConOut->OutputString(SystemTable->ConOut,L"ShellCEntryLib Exit \n\r");
  Key.ScanCode=SCAN_NULL;
  while (SCAN_UP!=Key.ScanCode)
  {Status= SystemTable -> ConIn -> ReadKeyStroke(SystemTable->ConIn,&Key);}
  SystemTable->ConOut->OutputString(SystemTable->ConOut,L"Waiting for DOWN_KEY\n\r");	
  Key.ScanCode=SCAN_NULL;
  while (SCAN_DOWN!=Key.ScanCode)
  {Status= SystemTable -> ConIn -> ReadKeyStroke(SystemTable->ConIn,&Key);}  
  return EFI_SUCCESS;
}


再次实验 Exec4 加载发现,现象消失了。仔细琢磨一下,应该是我最后 return EFI_SUCCESS 导致的。所以问题就应该发生在进入 ShellCEntryLib 那里。

2.5 继续调试直接在 ShellCEntryLib 加入 Debug 信息

/**
  UEFI entry point for an application that will in turn call the
  ShellAppMain function which has parameters similar to a standard C
  main function.

  An application that uses UefiShellCEntryLib must have a ShellAppMain
  function as prototyped in Include/Library/ShellCEntryLib.h.

  Note that the Shell uses POSITIVE integers for error values, while UEFI
  uses NEGATIVE values.  If the application is to be used within a script,
  it needs to return one of the SHELL_STATUS values defined in ShellBase.h.

  @param  ImageHandle  The image handle of the UEFI Application.
  @param  SystemTable  A pointer to the EFI System Table.

  @retval  EFI_SUCCESS               The application exited normally.
  @retval  Other                     An error occurred.

**/
EFI_STATUS
EFIAPI
ShellCEntryLib (
  IN EFI_HANDLE        ImageHandle,
  IN EFI_SYSTEM_TABLE  *SystemTable
  )
{
  INTN                           ReturnFromMain;
  EFI_SHELL_PARAMETERS_PROTOCOL *EfiShellParametersProtocol;
  EFI_SHELL_INTERFACE           *EfiShellInterface;
  EFI_STATUS                    Status;

  ReturnFromMain = -1;
  EfiShellParametersProtocol = NULL;
  EfiShellInterface = NULL;

  Status = SystemTable->BootServices->OpenProtocol(ImageHandle,
                             &gEfiShellParametersProtocolGuid,
                             (VOID **)&EfiShellParametersProtocol,
                             ImageHandle,
                             NULL,
                             EFI_OPEN_PROTOCOL_GET_PROTOCOL
                            );
  if (!EFI_ERROR(Status)) {
SystemTable->ConOut->OutputString(SystemTable->ConOut,L"Shell2\n\r");	 
    //
    // use shell 2.0 interface
    //
    ReturnFromMain = ShellAppMain (
                       EfiShellParametersProtocol->Argc,
                       EfiShellParametersProtocol->Argv
                      );
  } else {
  SystemTable->ConOut->OutputString(SystemTable->ConOut,L"Shell1\n\r");	  
    //
    // try to get shell 1.0 interface instead.
    //
    Status = SystemTable->BootServices->OpenProtocol(ImageHandle,
                               &gEfiShellInterfaceGuid,
                               (VOID **)&EfiShellInterface,
                               ImageHandle,
                               NULL,
                               EFI_OPEN_PROTOCOL_GET_PROTOCOL
                              );
    if (!EFI_ERROR(Status)) {
SystemTable->ConOut->OutputString(SystemTable->ConOut,L"Shell1.1\n\r");	 	
      //
      // use shell 1.0 interface
      //
      ReturnFromMain = ShellAppMain (
                         EfiShellInterface->Argc,
                         EfiShellInterface->Argv
                        );
    } else {
SystemTable->ConOut->OutputString(SystemTable->ConOut,L"Shell fail\n\r");	 	
      ASSERT(FALSE);
    }
  }
  return ReturnFromMain;
}


直接运行,输出如下:
image002

用exec4加载之后输出如下:

image003

可以看到,两种方式下,运行路径是不同的。

最后的结论:产生问题的原因是,当我们用 StartImage 运行一个 CLib程序的时候,Clib带入的函数找不到 Efi Shell Interface (要用这个Interface 的原因是希望取命令行参数传给被调用者)。找不到的时候就报错,报告一个加载不成功。

本文提到的 hello1 hello2 exec4 的源代码下载:
exec4
Hello2
Hello1

参考:

1.http://www.lab-z.com/utpk/ UEFI Tips 用按键做Pause
2.http://www.lab-z.com/22applicationentry/ Application的入口分析

UEFI Tips 用按键做Pause

很多年前,我去AMI学习,偶然间看到他们在代码中加入通过 60/61 Port来读取键盘按键信息实现一个按需Delay ,深以为意。今天偶然间想起来,在调试Application 的时候,配合屏幕输出也可以用这样的方式来进行Debug。

下面是一个例子:

#include  <Uefi.h>
#include  <Library/UefiLib.h>
#include  <Library/ShellCEntryLib.h>


extern EFI_BOOT_SERVICES         *gBS;
extern EFI_SYSTEM_TABLE		 *gST;
extern EFI_RUNTIME_SERVICES 	 *gRT;

#define SCAN_NULL       0x0000
#define SCAN_UP         0x0001
#define SCAN_DOWN       0x0002
#define SCAN_ESC        0x0017

int
EFIAPI
main (
  IN int Argc,
  IN CHAR16 **Argv
  )
{
  EFI_INPUT_KEY	Key;
  EFI_STATUS		Status;  
  gST->ConOut->OutputString(gST->ConOut,L"Test Starting.....\n\r");
  gST->ConOut->OutputString(gST->ConOut,L"Waiting for UP_KEY\n\r");
  
  Key.ScanCode=SCAN_NULL;
  while (SCAN_UP!=Key.ScanCode)
    {
		Status= gST -> ConIn -> ReadKeyStroke(gST->ConIn,&Key);	
	}
  
  gST->ConOut->OutputString(gST->ConOut,L"Waiting for DOWN_KEY\n\r");	
  Key.ScanCode=SCAN_NULL;
  while (SCAN_DOWN!=Key.ScanCode)
    {
		Status= gST -> ConIn -> ReadKeyStroke(gST->ConIn,&Key);	
	}
  return EFI_SUCCESS;
}


通过按光标向上和向下继续运行,运行结果:

keypasue

完整文件下载

KeyPause

Step to UEFI (84) ShellExecute 的使用

之前提到过,使用 LoadImage 和 StartImage 无法加载 CLib Build出来的 EFI Application。一种变通的方法是通过 ShellLib 下面的 ShellExcute 来调用其他的 EFI Application。

具体定义在 \ShellPkg\Library\UefiShellLib\UefiShellLib.c

**
  Cause the shell to parse and execute a command line.

  This function creates a nested instance of the shell and executes the specified
  command (CommandLine) with the specified environment (Environment). Upon return,
  the status code returned by the specified command is placed in StatusCode.
  If Environment is NULL, then the current environment is used and all changes made
  by the commands executed will be reflected in the current environment. If the
  Environment is non-NULL, then the changes made will be discarded.
  The CommandLine is executed from the current working directory on the current
  device.

  The EnvironmentVariables pararemeter is ignored in a pre-UEFI Shell 2.0
  environment.  The values pointed to by the parameters will be unchanged by the
  ShellExecute() function.  The Output parameter has no effect in a
  UEFI Shell 2.0 environment.

  @param[in] ParentHandle         The parent image starting the operation.
  @param[in] CommandLine          The pointer to a NULL terminated command line.
  @param[in] Output               True to display debug output.  False to hide it.
  @param[in] EnvironmentVariables Optional pointer to array of environment variables
                                  in the form "x=y".  If NULL, the current set is used.
  @param[out] Status              The status of the run command line.

  @retval EFI_SUCCESS             The operation completed sucessfully.  Status
                                  contains the status code returned.
  @retval EFI_INVALID_PARAMETER   A parameter contains an invalid value.
  @retval EFI_OUT_OF_RESOURCES    Out of resources.
  @retval EFI_UNSUPPORTED         The operation is not allowed.
**/
EFI_STATUS
EFIAPI
ShellExecute (
  IN EFI_HANDLE                 *ParentHandle,
  IN CHAR16                     *CommandLine OPTIONAL,
  IN BOOLEAN                    Output OPTIONAL,
  IN CHAR16                     **EnvironmentVariables OPTIONAL,
  OUT EFI_STATUS                *Status OPTIONAL
  )
{
  EFI_STATUS                CmdStatus;
  //
  // Check for UEFI Shell 2.0 protocols
  //
  if (gEfiShellProtocol != NULL) {
    //
    // Call UEFI Shell 2.0 version (not using Output parameter)
    //
    return (gEfiShellProtocol->Execute(ParentHandle,
                                      CommandLine,
                                      EnvironmentVariables,
                                      Status));
  }

  //
  // Check for EFI shell
  //
  if (mEfiShellEnvironment2 != NULL) {
    //
    // Call EFI Shell version.
    // Due to oddity in the EFI shell we want to dereference the ParentHandle here
    //
    CmdStatus = (mEfiShellEnvironment2->Execute(*ParentHandle,
                                          CommandLine,
                                          Output));
    //
    // No Status output parameter so just use the returned status
    //
    if (Status != NULL) {
      *Status = CmdStatus;
    }
    //
    // If there was an error, we can't tell if it was from the command or from
    // the Execute() function, so we'll just assume the shell ran successfully
    // and the error came from the command.
    //
    return EFI_SUCCESS;
  }

  return (EFI_UNSUPPORTED);
}


调用参数如下:
ParentHandle 执行操作的父进程的Handle
CommandLine 要执行的命令行
Output 是否输出 Debug 信息(这里我没有搞明白,如果有清楚的朋友望不吝赐教)
EnvironmentVariables 环境变量

因为已经在头文件中定义过,所以我们可以直接调用。

比如用下面的方式可以执行 ls 命令:

Shell command
  CHAR16	  *S=L"ls";
  OpStat = ShellExecute( &MyHandle, S, FALSE, NULL, &CmdStat);


我们再编写一个简单的程序输出当前收到的命令行参数

#include  <Uefi.h>
#include  <Library/UefiLib.h>
#include  <Library/ShellCEntryLib.h>

int
EFIAPI
main (                                         
  IN int Argc,
  IN char **Argv
  )
{
	int	i;
	
	for (i=0;i<Argc; i++)	{
		Print(L"%S\n",Argv[i]);
	}
		
  return EFI_SUCCESS;
}


[Defines]
  INF_VERSION                    = 0x00010006
  BASE_NAME                      = Hello1
  FILE_GUID                      = 4ea97c46-7491-4dfd-0048-747010f3ce51
  MODULE_TYPE                    = UEFI_APPLICATION
  VERSION_STRING                 = 0.1
  ENTRY_POINT                    = ShellCEntryLib

#   
#  VALID_ARCHITECTURES           = IA32 X64 IPF
#

[Sources]
  Hello1.c

[Packages]
  StdLib/StdLib.dec   
  MdePkg/MdePkg.dec
  ShellPkg/ShellPkg.dec 


[LibraryClasses]
  LibC
  LibStdio
  ShellCEntryLib   
  ShellLib
  BaseLib
  BaseMemoryLib
  UefiLib

  
[Protocols]

  
[BuildOptions]


运行结果

se1

我们使用 ShellExecute 的代码

#include  <Uefi.h>
#include  <Library/UefiLib.h>
#include  <Library/ShellCEntryLib.h>

#include <Library/ShellLib.h>

extern EFI_BOOT_SERVICES           	 *gBS;
extern EFI_SYSTEM_TABLE				 *gST;
extern EFI_RUNTIME_SERVICES 		 *gRT;

extern EFI_SHELL_PROTOCOL            *gEfiShellProtocol;
extern EFI_SHELL_ENVIRONMENT2 		 *mEfiShellEnvironment2;
extern EFI_HANDLE 					 gImageHandle;

int
EFIAPI
main (
  IN int Argc,
  IN char **Argv
  )
{
  EFI_STATUS  CmdStat;
  EFI_STATUS  OpStat;
  EFI_HANDLE  MyHandle = gImageHandle;
  CHAR16	  *S=L"hello1.efi a1 b2 c3";
  
  OpStat = ShellExecute( &MyHandle, S, FALSE, NULL, &CmdStat);
  
  return EFI_SUCCESS;
}


最后运行结果
se2

可以看到,能够调用hello1.efi 并且正确的传递了参数。

本文提到的完整代码下载:

shellexecdemo

Step to UEFI (83) BlockIo Protocol

“因为硬盘是一种块设备,所以每个硬盘设备(硬盘设备包括分区设备)控制器都安装有一个 BlockIo 实例,一个 BlockIo2实例。BlockIo 提供了访问设备的阻塞函数,BlockIo2提供了访问设备的异步函数”【参考1】

blk2

blk1

这里提供一个枚举BlockIo,然后显示每一个 Media 属性的例子:

#include  <Uefi.h>
#include  <Library/UefiLib.h>
#include  <Library/ShellCEntryLib.h>
#include <Protocol/BlockIo.h>

extern EFI_BOOT_SERVICES         *gBS;
extern EFI_SYSTEM_TABLE			 *gST;
extern EFI_RUNTIME_SERVICES 	 *gRT;

int
EFIAPI
main (
  IN int Argc,
  IN CHAR16 **Argv
  )
{
    EFI_STATUS				Status;
    UINTN					HandleCount,HandleIndex;
    EFI_HANDLE              *BlockControllerHandles = NULL;	
	EFI_BLOCK_IO_PROTOCOL   *BlockIo;
	
	//找到全部有 BlockIo Protocol 的Device
    Status = gBS->LocateHandleBuffer(
            ByProtocol,
            &gEfiBlockIoProtocolGuid,
            NULL,
            &HandleCount,
            &BlockControllerHandles);  

   if (!EFI_ERROR(Status)) {
        //逐个打开 
        for (HandleIndex = 0; HandleIndex < HandleCount; HandleIndex++) {
            /*打开EFI_BLOCK_IO_PROTOCOL  */ 
            Status = gBS->HandleProtocol(
                    BlockControllerHandles[HandleIndex],
                    &gEfiBlockIoProtocolGuid,
                    (VOID**)&BlockIo);
			//显示信息		
			Print(L"-->[Device]<--:%d\n",HandleIndex);
			Print(L"MediaId       :%0x\n",BlockIo->Media->MediaId);
    		Print(L"RemovableMedia:%0x\n",BlockIo->Media->RemovableMedia);
    		Print(L"MediaPresent  :%0x\n",BlockIo->Media->MediaPresent);
    		Print(L"ReadOnly      :%0x\n",BlockIo->Media->ReadOnly); 
    		Print(L"WriteCaching  :%0x\n",BlockIo->Media->WriteCaching);
    		Print(L"BlockSize     :%0x\n",BlockIo->Media->BlockSize);
    		Print(L"IoAlign       :%0x\n",BlockIo->Media->IoAlign);
    		Print(L"LastBlock     :%0x\n",BlockIo->Media->LastBlock);
    		Print(L"LogicalPartition :%0x\n",BlockIo->Media->LogicalPartition);
    		Print(L"LowestAlignedLba :%0x\n",BlockIo->Media->LowestAlignedLba);
    		Print(L"LogicalBlocksPerPhysicalBlock   : %0x\n",
			BlockIo->Media->LogicalBlocksPerPhysicalBlock);
    		Print(L"OptimalTransferLengthGranularity: %0x\n",
			BlockIo->Media->OptimalTransferLengthGranularity);
        }	//for (HandleIndex = 0;
		
        gBS->FreePool(BlockControllerHandles);
    }			
  return EFI_SUCCESS;
}


在 Nt32 虚拟机中运行的结果

blockioa

完整的代码和程序下载:

BIOTest

参考
1. UEFI 原理与编程 P139

Step to UEFI (82) NT32Pkg的Debug Message

最近在查看EDKII代码的时候忽然有一个奇怪的想法:在运行模拟器的时候(Build Run),我们可以在编译窗口看到很多输出的Debug 信息,那么我们是否可以在自己编写的Application中输出这样的信息?

最直接的想法是在 Application中调用 gWinNt ,但是如果要用这个东西,需要定义很多文件头,最麻烦的是这些头文件最后都要使用 Windows.h ,编译的时候总是无法通过。另外的方法是,在 Application 中调用诸如 WinNtThunkDxe 或者 WinNtSerialIoDxe 这样的Protocol,但是在编译使同样会遇到有上面的问题。我尝试了很多次都没有成功,最后只好放弃。

换一种思路,我们可以在NT32Pkg中留下可供调用的函数,然后在 Application 中Call这个函数。

最简单的功能就是用于系统重启的 gST->Reset 。经过查找,模拟器中实现这个功能的代码在 \Nt32Pkg\ResetRuntimeDxe\reset.c 。头定义如下

VOID
EFIAPI
WinNtResetSystem (
  IN EFI_RESET_TYPE   ResetType,
  IN EFI_STATUS       ResetStatus,
  IN UINTN            DataSize,
  IN VOID             *ResetData OPTIONAL
  )
/*++

Routine Description:

  TODO: Add function description

Arguments:

  ResetType   - TODO: add argument description
  ResetStatus - TODO: add argument description
  DataSize    - TODO: add argument description
  ResetData   - TODO: add argument description

Returns:

  EFI_SUCCESS - TODO: Add description for return value

--*/


实现功能的代码只有一行 gWinNt->ExitProcess (0)。只要把这些语句注释掉,替换为我们的输出代码即可。参考 \Nt32Pkg\Library\PeiNt32OemHookStatusCodeLib\Nt32OemHookStatusCodeLib.c
,对编译窗口输出的语句如下:

 //
  // Callout to standard output.
  //
  mWinNt->WriteFile (
            mStdOut,
            Buffer,
            (DWORD)CharCount,
            (LPDWORD)&CharCount,
            NULL
            );


搬过来,写成下面的形式:

VOID
EFIAPI
WinNtResetSystem (
  IN EFI_RESET_TYPE   ResetType,
  IN EFI_STATUS       ResetStatus,
  IN UINTN            DataSize,
  IN VOID             *ResetData OPTIONAL
  )
/*++

Routine Description:

  TODO: Add function description

Arguments:

  ResetType   - TODO: add argument description
  ResetStatus - TODO: add argument description
  DataSize    - TODO: add argument description
  ResetData   - TODO: add argument description

Returns:

  EFI_SUCCESS - TODO: Add description for return value

--*/
{
  CHAR8			 *R="www.lab-z.com \n\r";	
  UINTN           CharCount=AsciiStrLen(R);
  
  //
  // Cache of standard output handle .
  //
	HANDLE                      mStdOut;
  
  //
  // Cache standard output handle.
  //
  mStdOut = gWinNt->GetStdHandle (STD_OUTPUT_HANDLE);  
  
  //
  // Callout to standard output.
  //
  gWinNt->WriteFile (
            mStdOut,
            R,
            (DWORD)CharCount,
            (LPDWORD)&CharCount,
            NULL
            );
			
  //
  // BUGBUG Need to kill all console windows later
  //
  //
  // Discard ResetType, always return 0 as exit code
  //
  //gWinNt->ExitProcess (0);

  //
  // Should never go here
  //
  //ASSERT (FALSE);
}


特别注意:字符串是 Ascii 定义的,末尾必须是 \r\n ,否则不会立即显示。

最后运行结果,只要在模拟器中输入 reset 即可看到字符串,正常的动作应该是退出模拟器。

nt32a

nt32b

因为我修改掉了退出的方法,每次需要在编译窗口用 ctrl+c来结束模拟器了。

这里只是一个Demo,最好还是重新在EDKII代码中定义一个用来直接输出的接口。

Step to UEFI (81) —–测试文件生成器

一些情况下,我们需要在 Shell 下面使用文件进行测试,这次编写一个工具,生成使用随机数填充的文件。为了校验方便,文件的末尾有一个 checksum,按照 32Bits 的 UINTN ,整个文件的和应该是 0 .

#include  <Uefi.h>
#include  <Library/UefiLib.h>
#include  <Library/ShellCEntryLib.h>

#include <Protocol/SimpleFileSystem.h>
#include <Library/MemoryAllocationLib.h>

extern EFI_BOOT_SERVICES         *gBS;
extern EFI_SYSTEM_TABLE			 *gST;
extern EFI_RUNTIME_SERVICES 	 *gRT;

//copied from \StdLib\Include\stdlib.h
/** Expands to an integer constant expression that is the maximum value
    returned by the rand function.

    The value of the RAND_MAX macro shall be at least 32767.
**/
#define RAND_MAX  0x7fffffff

//Copied from \StdLib\LibC\StdLib\Rand.c
static UINT32 next = 1;

/** Compute a pseudo-random number.
  *
  * Compute x = (7^5 * x) mod (2^31 - 1)
  * without overflowing 31 bits:
  *      (2^31 - 1) = 127773 * (7^5) + 2836
  * From "Random number generators: good ones are hard to find",
  * Park and Miller, Communications of the ACM, vol. 31, no. 10,
  * October 1988, p. 1195.
**/
UINT32
rand()
{
  INT32 hi, lo, x;

  /* Can't be initialized with 0, so use another value. */
  if (next == 0)
    next = 123459876;
  hi = next / 127773;
  lo = next % 127773;
  x = 16807 * lo - 2836 * hi;
  if (x < 0)
    x += 0x7fffffff;
  return ((next = x) % ((UINT32)RAND_MAX + 1));
}

int
EFIAPI
main (
  IN int Argc,
  IN CHAR16 **Argv
  )
{
	UINTN 							FileSize=0;
    EFI_STATUS          			Status;	
	EFI_FILE_PROTOCOL    			*Root;
	EFI_SIMPLE_FILE_SYSTEM_PROTOCOL *SimpleFileSystem;
	EFI_FILE_PROTOCOL 				*FileHandle=0;	
	UINTN		*HandleBuffer;
	UINT32		i,t,sum=0;

	if (Argc>1) {
		FileSize=StrDecimalToUintn(Argv[1])*1024;
		//Print(L"%d",FileSize);	
	}
	else
	{
		FileSize=1024*1024*10;
	}
	
	Status = gBS->LocateProtocol(
				&gEfiSimpleFileSystemProtocolGuid, 
				NULL,
				(VOID **)&SimpleFileSystem);
						
	if (EFI_ERROR(Status)) {
		Print(L"Cannot find EFI_SIMPLE_FILE_SYSTEM_PROTOCOL \r\n");
		return Status;	
	}

	Status = SimpleFileSystem->OpenVolume(SimpleFileSystem,&Root);
    if (EFI_ERROR(Status)) {
		    Print(L"OpenVolume error \r\n");
            return Status;	
	}
   
    Status = Root -> Open(Root,
			&FileHandle,
			(CHAR16 *) L"ztest.bin",
			EFI_FILE_MODE_CREATE | EFI_FILE_MODE_READ | EFI_FILE_MODE_WRITE,
			0);
			
    if (EFI_ERROR(Status) || (FileHandle==0)) {
		    Print(L"Open error \r\n");
            return Status;	
	}	
	
	HandleBuffer = AllocateZeroPool(FileSize);
    if (HandleBuffer == NULL) {
		Print(L"Not enough memory!\n");
		return Status;
    }
	
	for (i=0;i<(FileSize-4)/4;i++)
		{
			t=rand();
			*(HandleBuffer+i)=t;
			sum=sum+t;
		}

	*(HandleBuffer+(FileSize-4)/4)=(UINT32)(0-sum);

	Status = FileHandle -> Write(FileHandle, &FileSize, HandleBuffer);
	
	Print(L"Write Done \r\n");	
	FreePool(HandleBuffer);
	Status  = FileHandle -> Close (FileHandle);
	
  return EFI_SUCCESS;
}


除了生成文件的工具,还有一个用来校验文件的工具,他的作用是将文件全部内容相加,查看结果是否为0.

#include  <Uefi.h>
#include  <Library/UefiLib.h>
#include  <Library/ShellCEntryLib.h>

#include  <stdio.h>
#include  <stdlib.h>
#include  <wchar.h>

#include <Protocol/EfiShell.h>
#include <Library/ShellLib.h>
#include <Library/MemoryAllocationLib.h>

int
EFIAPI
main (
  IN int Argc,
  IN CHAR16 **Argv
  )
{
  EFI_FILE_HANDLE   FileHandle;
  RETURN_STATUS     Status;
  EFI_FILE_INFO     *FileInfo = NULL;
  UINT32	        *HandleBuffer=NULL;
  UINTN  			ReadSize;
  UINT32			i,sum=0;
  
  //Check if there is a parameter
  if (Argc == 1) {
	Print(L"Usage: crctest [filename]\n");
	return 0;
  }
  
  //Open the file given by the parameter
  Status = ShellOpenFileByName(Argv[1], (SHELL_FILE_HANDLE *)&FileHandle,
                               EFI_FILE_MODE_READ , 0);

  if(Status != RETURN_SUCCESS) {
        Print(L"OpenFile failed!\n");
		return EFI_SUCCESS;
      }			

  //Get file size	  
  FileInfo = ShellGetFileInfo( (SHELL_FILE_HANDLE)FileHandle);	

  //if the file size is not the multiple of 4, we don't check it!
  if ((UINTN) FileInfo-> FileSize % 4 !=0 ) {
	Print(L"We can't check this file as the filesize is wrong!\n");
  }
  
  //Allocate a memory buffer
  HandleBuffer = AllocateZeroPool((UINTN) FileInfo-> FileSize);
  if (HandleBuffer == NULL) {
      return (SHELL_OUT_OF_RESOURCES);   }

  ReadSize=(UINTN) FileInfo-> FileSize;
  
  //Load the whole file to the buffer
  Status = ShellReadFile(FileHandle,&ReadSize,HandleBuffer);
  
  for (i=0;i< FileInfo-> FileSize / 4;i++)
	{
		sum=sum+*(HandleBuffer+i);
	}
  if (sum==0) {
	Print(L"Pass!\n");
  }
  else
	{
		Print(L"Fail!\n");
	}
  
  FreePool(HandleBuffer);	
  FileHandle -> Close (FileHandle);  
  
  return EFI_SUCCESS;
}


完整的代码和 EFI 文件下载:
TestFileGen
Chker

Step to UEFI (80) —–取得汉字的字形

EFI 在设计之初就考虑了多语言的支持,使用HII可以轻松的实现汉字的显示。本篇文章介绍获得汉字字形的其他方法,掌握这种方法之后可以在没有HII支持的情况下显示汉字。当然,程序只是为了演示原理,介绍如何读取16×16的汉字字形信息,没有转为图形。
比如:“宋”字查询到的区位码是4346 【参考3】,意思是区码为43,位码是46。计算这个字在字库中的方法是:((43-1)*94+(46-1))*32=6828。之后,在字库文件的 6828偏移处连续读取32个字节即可。

shz

代码如下:

#include <Uefi.h>
#include <Library/UefiLib.h>
#include <Library/ShellCEntryLib.h>

#include <Library/ShellLib.h>
#include <Library/MemoryAllocationLib.h>

extern EFI_BOOT_SERVICES *gBS;

#define FONT_SIZE (16)
#define HZ_INDEX(hz) ((hz[0] - 1) * 94 + (hz[1] -1))*32
#define DOTS_BYTES (FONT_SIZE * FONT_SIZE / 8)

int
EFIAPI
main (
IN int Argc,
IN CHAR16 **Argv
)
{
EFI_FILE_HANDLE FileHandle;
RETURN_STATUS Status;
EFI_FILE_INFO *FileInfo = NULL;
EFI_HANDLE *HandleBuffer=NULL;
UINTN ReadSize;
UINTN i,j;
UINT8 HZChar[2] = {43,46};
CHAR8 *c;
CHAR8 k;

//Open the file given by the parameter
Status = ShellOpenFileByName(L"HZK16K.BIN",
(SHELL_FILE_HANDLE *)&FileHandle,
EFI_FILE_MODE_READ ,
0);

if(Status != RETURN_SUCCESS) {
Print(L"OpenFile failed!\n");
return EFI_SUCCESS;
}

//Get file size
FileInfo = ShellGetFileInfo( (SHELL_FILE_HANDLE)FileHandle);

//Allocate a memory buffer
HandleBuffer = AllocateZeroPool((UINTN) FileInfo-> FileSize);
if (HandleBuffer == NULL) {
return (SHELL_OUT_OF_RESOURCES); }

ReadSize=(UINTN) FileInfo-> FileSize;

//Load the whole file to the buffer
Status = ShellReadFile(FileHandle,&ReadSize,HandleBuffer);
if(Status != RETURN_SUCCESS) {
Print(L"ReadFile failed!\n");
return EFI_SUCCESS;
}

for (i=0;i<DOTS_BYTES;i++)
{
c=((UINT8*)HandleBuffer)+HZ_INDEX(HZChar)+i;
k=*c;
for (j=0;j<8;j++)
{
if (0 == (k & 0x80))
{
Print(L" ");
}
else
{
Print(L"OO");
}
k=k<<1;
}
if ((i+1)%2==0) {Print(L"\n");}
}

FreePool(HandleBuffer);
ShellCloseFile((SHELL_FILE_HANDLE *)&FileHandle);

}


运行结果(特别注意要把字库文件放在Fsnt0:这样的目录下):

image002

更换一下区位码,我们还可以取得“我”的字形。
image004

完整的代码下载:
HZ

最后,关于【参考1】的代码多说两句。其中有unsigned char word[3] = “我”; 这样直接的定义,这是因为很久很久之前,为了编便于 PC处理汉字定义一个汉字由两个大于127的ASCII码组成。组成的规则是:区码+A0,位码+A0。比如,我在中文环境下定义一个“宋”,
image008

然后切换到英文环境下打开,看到的是2个ASCII码,

image010

如果再切换到十六进制编辑,会看到 CB CE (前提是保存为 ANSI格式,如果你存为unicode,看到的又是另外的东西)

image012

时代已经变了,对于 Windows 编程来说上述的知识都已经过时,如果你需要搞嵌入式开发,还是值得认真学习和理解。
另外,PC刚开始流行的时候,很长一段时间都有汉字不适合PC处理等等的言论,对于普通用户来说,汉字的输入也是很大的困扰。而最终的解决,我认为是人们强烈的交流的需求使得这样的问题很快被克服掉了。时至今日,我仍然能记得同一个寝室的胖子在他的 Nokia手机上,在十几个按键上运指如飞和各种MM聊得火热。很快,没人再认为汉字在PC的普及上是一个问题。

参考 :
1.https://blog.twofei.com/embedded/hzk.html HZK16汉字16*16点阵字库的使用及示例程序
2.http://blog.csdn.net/turingo/article/details/8191712 图灵狗的专栏
3.http://www.jscj.com/index/gb2312.php 汉字区位码查询系统 (具体)

==============================================================
2018年12月30日 补充: 在【参考1】的文章中提供了一个取得字模的代码,我在 Win10 下实验过,很好用:

代码如下:

#include <stdio.h>
#include <stdlib.h>

int main(void)
{
	FILE* fphzk = NULL;
	int i, j, k, offset;
	int flag;
	unsigned char buffer[32];
	unsigned char word[5];
	unsigned char key[8] = {
		0x80,0x40,0x20,0x10,0x08,0x04,0x02,0x01
	};
	fphzk = fopen("hzk16", "rb");
	if(fphzk == NULL){
		fprintf(stderr, "error hzk16\n");
		return 1;
	}
	while(1){
		printf("输入要生成字模的汉字(多个):");
		for(;;){
			fgets((char*)word, 3, stdin);
			if(*word == '\n') 
				break;
			offset = (94*(unsigned int)(word[0]-0xa0-1)+(word[1]-0xa0-1))*32;
			fseek(fphzk, offset, SEEK_SET);
			fread(buffer, 1, 32, fphzk);
			for(k=0; k<16; k++){
				for(j=0; j<2; j++){
					for(i=0; i<8; i++){
						flag = buffer[k*2+j]&key[i];
						printf("%s", flag?"●":"○");
					}
				}
				printf("\n");
			}
			printf("uchar code key[32] = {");
			for(k=0; k<31; k++){
				printf("0x%02X,", buffer[k]);
			}
			printf("0x%02X};\n", buffer[31]);
			printf("\n");
		}
	}
	fclose(fphzk);
	fphzk = NULL;
	return 0;
}


如果你是英文的OS,需要先切换内码为 CP936

Step to UEFI (79) —–取得字形

我们可以通过EFI_HII_FONT_PROTOCOL【参考1】 中的 GetGlyph来取得一些字符的字形定义。

gly1

GetGlyph 的原型可以在 \MdePkg\Include\Protocol\HiiFont.h 中找到:

/**

  Convert the glyph for a single character into a bitmap.

  @param This       A pointer to the EFI_HII_FONT_PROTOCOL instance.

  @param Char       The character to retrieve.

  @param StringInfo Points to the string font and color
                    information or NULL if the string should use
                    the default system font and color.

  @param Blt        This must point to a NULL on entry. A buffer will
                    be allocated to hold the output and the pointer
                    updated on exit. It is the caller's responsibility
                    to free this buffer.

  @param Baseline   The number of pixels from the bottom of the bitmap
                    to the baseline.


  @retval EFI_SUCCESS             The glyph bitmap created.

  @retval EFI_OUT_OF_RESOURCES    Unable to allocate the output buffer Blt.

  @retval EFI_WARN_UNKNOWN_GLYPH  The glyph was unknown and was
                                  replaced with the glyph for
                                  Unicode character code 0xFFFD.

  @retval EFI_INVALID_PARAMETER   Blt is NULL, or Width is NULL, or
                                  Height is NULL


**/
typedef
EFI_STATUS
(EFIAPI *EFI_HII_GET_GLYPH)(
  IN CONST  EFI_HII_FONT_PROTOCOL *This,
  IN CONST  CHAR16                Char,
  IN CONST  EFI_FONT_DISPLAY_INFO *StringInfo,
  OUT       EFI_IMAGE_OUTPUT      **Blt,
  OUT       UINTN                 *Baseline OPTIONAL
);


其中 Char 是你要取对应字形的文字(特别注意是单个的CHAR16),StringInfo 为 NULL时取得的是系统默认的字体,输出结果在 Blt 中。最后一项含义我不清楚……
再看一下输出结果是 EFI_IMAGE_OUTPUT。它的定义在 \MdePkg\Include\Protocol\HiiImage.h中。其中含有一个Union的定义,在我们这里使用时,会按照 EFI_GRAPHICS_OUTPUT_BLT_PIXEL 给出。

最后写一个简单的测试程序如下,功能是取得“z”字符的字形。

#include  <Uefi.h>
#include  <Library/UefiLib.h>
#include  <Library/ShellCEntryLib.h>

#include <Protocol/HiiFont.h>

extern EFI_BOOT_SERVICES         *gBS;
 
int
EFIAPI
main (
  IN int Argc,
  IN CHAR16 **Argv
  )
{
    EFI_STATUS	Status = 0;
	UINTN		BaseLine;
	UINTN		i,j;	
    EFI_HII_FONT_PROTOCOL	*HiiFont = 0;
	EFI_IMAGE_OUTPUT		*Blt=NULL;
	CHAR8		*c,*p;
	
	Status = gBS->LocateProtocol (&gEfiHiiFontProtocolGuid, NULL, (VOID **) &HiiFont);
	if (Status!=EFI_SUCCESS) {
		Print(L"Error when LocateProtocol gEfiHiiFontProtocolGuid. Code[%r]\n",Status);
		return EFI_SUCCESS;
	}
   Status = HiiFont->GetGlyph (
				HiiFont,	//Protocol instance
				L'Z',		//Show char 'Z'
				NULL,		//Use the defualt system font and color
				&Blt,		//GLYPH information
				&BaseLine); //I don't know
				
	Print(L"This is [%d]x[%d]\n",Blt->Width,Blt->Height);
	
	c=(CHAR8*) Blt->Image.Bitmap;			
	for (j=0;j<Blt->Height;j++)
		{
			p=c;
			for (i=0;i<Blt->Width;i++)
				{
					Print(L"%2X",(*c)&0xFF);
					c=c+4;
				}
			Print(L"   ");	
			c=p+1;	
			for (i=0;i<Blt->Width;i++)
				{
					Print(L"%2X",(*c)&0xFF);
					c=c+4;
				}
			Print(L"   ");					
			c=p+2;	
			for (i=0;i<Blt->Width;i++)
				{
					Print(L"%2X",(*c)&0xFF);
					c=c+4;
				}
			c=p+(Blt->Width*4);
			Print(L"\n");	
		}	
		
	c=(CHAR8*) Blt->Image.Bitmap;			
	for (j=0;j<Blt->Height;j++)
		{
			for (i=0;i<Blt->Width;i++)
				{
					if (*c!=0) {
						Print(L"*");
					}
					else
					  {
						Print(L" ");
					  }	
					c=c+4;
				}
			Print(L"\n");	
		}			
		
	return EFI_SUCCESS;
}


运行结果,首先输出的是 R G B 数组,隐隐约约能看到其中有一个形状

gly2

程序后面有一个判断,直接输出星号和空格,结果如下,这样就看到非常清楚了。

gly3

完整的代码下载
GetGlyph

唯一的问题是:我还不知道取得这个东西能有什么用途…….

参考:
1.UEFI spec 2.4 P1711

Step to UEFI (78) —–SERIAL_IO_PROTOCOL

串口是非常有效和廉价的Debug手段,在开发中,几乎所有的UEFI 主板都会支持串口,本文介绍如何在Shell下面实现 串口通讯。
与之相关的是 EFI_SERIAL_IO_PROTOCOL,这个 Protocol 的定义可以在 UEFI Spec【参考1】中看到:

image001

代码如下:

#include  <Uefi.h>
#include  <Library/UefiLib.h>
#include  <Library/ShellCEntryLib.h>

#include  <Protocol/SerialIo.h>

extern EFI_BOOT_SERVICES         *gBS;
extern EFI_SYSTEM_TABLE	     *gST;
extern EFI_RUNTIME_SERVICES 	 *gRT;

EFI_GUID gEfiSerialIoProtocolGuid = { 0xBB25CF6F, 0xF1D4, 0x11D2, { 0x9A, 0x0C, 0x00, 0x90, 0x27, 0x3F, 0xC1, 0xFD }};

EFI_STATUS
DumpSetting( 
  IN UINT64    BaudRate,
  IN UINT32    ReceiveFifoDepth,
  IN UINT32    Timeout,
  IN EFI_PARITY_TYPE    Parity,
  IN UINT8              DataBits,
  IN EFI_STOP_BITS_TYPE StopBits)
{
	Print(L"   Timeout: [%d]\n",Timeout);
	Print(L"   BaudRate:[%ld]\n",BaudRate);
	Print(L"   DataBits:[%d]\n",DataBits);
	Print(L"   Parity:  [%d]\n",Parity);
	Print(L"   StopBits:[%d]\n",StopBits);	
	Print(L"   ReceiveFifoDepth:[%d]\n",ReceiveFifoDepth);
	
	return EFI_SUCCESS;
}

  
int
EFIAPI
main (                                         
  IN int Argc,
  IN char **Argv
  )
{
    EFI_STATUS          			Status;
	EFI_SERIAL_IO_PROTOCOL 			*Serial;
	CHAR8 							*Textbuf1 = "www.lab-z.com  waiting.........\n";
	CHAR8 							*Textbuf2 = "Continue............\n";
	CHAR8 							*Textbuf3 = "12345678";	
	CHAR16 							*Textbuf4 = L"                               ";	
	UINTN							BufferSize;
	EFI_TIME						TimeStart,TimeEnd;	
	
    Status = gBS->LocateProtocol(
						&gEfiSerialIoProtocolGuid, 
						NULL,
						(VOID **)&Serial);
				
	
    if (EFI_ERROR(Status)) {
		    Print(L"Cannot find EFI_SERIAL_IO_PROTOCOL \r\n");
            return Status;	
	}

	Print(L"Current Settings:\n");
	DumpSetting(
			Serial->Mode->BaudRate,
			Serial->Mode->ReceiveFifoDepth,
			Serial->Mode->Timeout,
			Serial->Mode->Parity,
			Serial->Mode->DataBits & 0xFF,			
			Serial->Mode->StopBits);

	// Baudrate 115200,Data Bits=8,Parity=None,Stop Bits=1,Flow Type= None
	Status=Serial->SetAttributes(  Serial,
							115200,
							Serial->Mode->ReceiveFifoDepth,
							Serial->Mode->Timeout,
							NoParity,
							8,
							OneStopBit);
	if (Status!=EFI_SUCCESS) {
		Print(L"[%d], %r",Status,Status);
	}
							
	Print(L"New Settings:\n");
	DumpSetting(
			Serial->Mode->BaudRate,
			Serial->Mode->ReceiveFifoDepth,
			Serial->Mode->Timeout,
			Serial->Mode->Parity,
			Serial->Mode->DataBits & 0xFF,			
			Serial->Mode->StopBits);							
	
	BufferSize=AsciiStrLen(Textbuf1);
	Serial->Write(Serial,&BufferSize,Textbuf1);
	
	gRT->GetTime(&TimeStart,NULL);
	TimeEnd=TimeStart;

	while ((TimeEnd.Hour - TimeStart.Hour) * 60 * 60 
			+ (TimeEnd.Minute - TimeStart.Minute)*60 
			+ (TimeEnd.Second - TimeStart.Second) < 30)
	  {
		 BufferSize=AsciiStrLen(Textbuf3);	  
		 Status=Serial->Read(Serial,&BufferSize,Textbuf3);
		 if ((Status==EFI_SUCCESS) && (BufferSize!=0))
			{
				Print(L"read [%d] %s\n",BufferSize,AsciiStrToUnicodeStr(Textbuf3,Textbuf4));
			}
			gRT->GetTime(&TimeEnd,NULL);	
	  }	

	BufferSize=AsciiStrLen(Textbuf2);	  
	Serial->Write(Serial,&BufferSize,Textbuf2);
	
    return EFI_SUCCESS;
}


上面程序的基本流程:首先检查一下串口设置,打印在屏幕上,然后设置为我们通常使用的 115200。最后测试用 Write从 Shell 下发送数据出来,再尝试用Read接收数据。

程序运行结果:

image002

完整代码下载:

SerialTest

特别注意:Shell 使用 Read 只能接收固定长度的数据。比如: Read(Serial,8,Textbuf) 那么只能接收8个字符,如果你只输入了7个bytes,不会有反应;如果输入了9个bytes,那么只能收到前面8个。目前不清楚为什么有这样的限制。

另外,对于普通的串口,使用GetControl 获得的当前的状态中并没有当前串口的发送接收状态。定义的 EFI_SERIAL_INPUT_BUFFER_EMPTY和EFI_SERIAL_OUTPUT_BUFFER_EMPTY 应该是给存在对应线路的串口使用的,是一种硬件线路的标志。如果你只用了 TX RX GND , 这里的状态是没有意义的。

参考:
1. UEFI Spec 2.4 P476