Step to UEFI (74) —– 通过 OpenVolume访问FSx上的文件

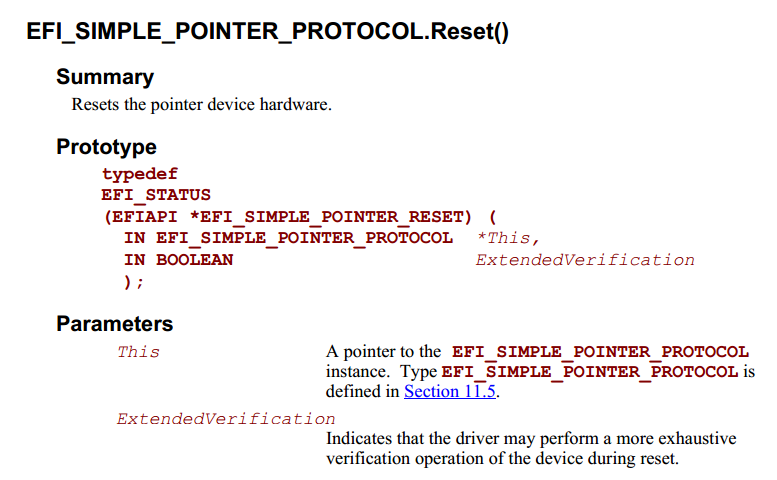
题目有点绕口,简单的说目标就是:我打算用 EFI_SIMPLE_FILE_SYSTEM_PROTOCOL 中的 OpenVolume 打开 FsX: 上面的文件怎么办?
实现的思路是:

1. 查找系统中所有支持 FS Protocol的Device
2. 对于每一个有 FS Protocol 的 Device 用 DevicePathFromHandle 取得 DevicePath
3. 再用 GetFsName 功能取得 FS0 ,FS1 这样的名称,然后判断是否为我们希望的名称
4. 如果是的话,再取得这个设备上的 SimpleFileSystem protocol
5. 最后用 OpenVolue 打开文件。

具体代码:

#include  <Uefi.h>
#include  <Library/UefiLib.h>
#include  <Library/ShellCEntryLib.h>

#include  <stdio.h>
#include  <stdlib.h>
#include  <wchar.h>

#include <Protocol/EfiShell.h>
#include <Library/ShellLib.h>

#include <Protocol/SimpleFileSystem.h>
#include <Protocol/BlockIo.h>
#include <Library/DevicePathLib.h>
#include <Library/HandleParsingLib.h>
#include <Library/SortLib.h>
#include <Library/MemoryAllocationLib.h>
#include <Library/BaseMemoryLib.h>

extern EFI_BOOT_SERVICES         *gBS;

extern EFI_SHELL_ENVIRONMENT2    *mEfiShellEnvironment2;
extern EFI_HANDLE				 gImageHandle;

EFI_STATUS
EFIAPI
PerformSingleMappingDisplay(
  IN CONST EFI_HANDLE Handle
  )
{
	EFI_DEVICE_PATH_PROTOCOL  *DevPath;
	CHAR16                    *CurrentName;
	CHAR16					*FSNAME=L"fsnt1";
	EFI_SIMPLE_FILE_SYSTEM_PROTOCOL *SimpleFileSystem;
	EFI_FILE_INFO     		*FileInfo = NULL;
	EFI_STATUS                Status;
	EFI_FILE_PROTOCOL   		*FileProtocol;
	EFI_FILE_HANDLE     		FileHandle;
	UINTN 					FileDataLength;
	CHAR16 					*FileData;

	CurrentName = NULL;
    DevPath = DevicePathFromHandle(Handle);
  
  //4. Covnver DevicePath to FSx (E.x FS2, FSNT1.....)
  mEfiShellEnvironment2->GetFsName(DevPath,FALSE,&CurrentName);

  //5. If the "FSx" string is what we want 
  if (StrCmp(CurrentName,FSNAME)==0) {
		Print (L"%s \r\n", CurrentName);  		
		
		//6. Open the SimpleFileSystem Protocol on it
		Status = gBS->OpenProtocol(
								Handle,
                                &gEfiSimpleFileSystemProtocolGuid,
                                (VOID**)&SimpleFileSystem,
								gImageHandle,
								NULL,
								EFI_OPEN_PROTOCOL_GET_PROTOCOL
                                );
		if (EFI_ERROR(Status)) {
			Print (L"LocateProtocol SimpleFileSystem Error \r\n");  	
			return (EFI_NOT_FOUND);
		}
	   
	    //7. Use OpenVolue to get FileProtocol
		Status = SimpleFileSystem->OpenVolume(SimpleFileSystem, &FileProtocol);
		if (EFI_ERROR(Status)) {
			Print (L"SimpleFileSystem OpenVolume Error \r\n");
			return Status;
		}
    
		//8. At last we can operate file by FileProtocol
		Status = FileProtocol->Open(FileProtocol, 
                              &FileHandle, 
                              L"Hello.txt",
                              EFI_FILE_MODE_READ,
                              0);
		if (EFI_ERROR(Status)) {
			Print (L"FileProtocol Open Error [%r]\r\n",Status);
			return Status;
		}
    
		FileInfo = ShellGetFileInfo( (SHELL_FILE_HANDLE)FileHandle);	
		Print(L"Filesize [%ld] bytes\n",FileInfo-> FileSize);
		FileDataLength=(UINTN) FileInfo->FileSize;
	
		FileData  = AllocatePool((UINTN) FileInfo->FileSize);
		Status = FileHandle->Read(FileHandle, &FileDataLength, FileData );
		if (EFI_ERROR(Status)) {
			Print(L"Loading file error! \n");
		}
		
		FileData[FileDataLength/2 -1]=0x0;
		Print(L"File contants: [%s]",FileData);
		
		FreePool(FileData);
		FileProtocol->Close(FileHandle);
  }
	
  if ((CurrentName) != NULL) { FreePool((CurrentName)); CurrentName = NULL; }

  return EFI_SUCCESS;
}

int
EFIAPI
main (                                         
  IN int Argc,
  IN char **Argv
  )
{
  EFI_STATUS                Status;
  EFI_HANDLE                *HandleBuffer=NULL;
  UINTN                     BufferSize=0;
  UINTN                     LoopVar;
  BOOLEAN                   Found;

  //1. We have to use some function in SE2 
  //
  // UEFI 2.0 shell interfaces (used preferentially)
  //
  Status = gBS->OpenProtocol(
    gImageHandle,
    &gEfiShellProtocolGuid,
    (VOID **)&gEfiShellProtocol,
    gImageHandle,
    NULL,
    EFI_OPEN_PROTOCOL_GET_PROTOCOL
   );
   
  if (EFI_ERROR(Status)) {
    //
    // Search for the shell protocol
    //
    Status = gBS->LocateProtocol(
      &gEfiShellProtocolGuid,
      NULL,
      (VOID **)&gEfiShellProtocol
     );
    if (EFI_ERROR(Status)) {
      gEfiShellProtocol = NULL;
     }
  }

  
  //
  //2. Look up all SimpleFileSystems in the platform
  //
  Status = gBS->LocateHandle(
    ByProtocol,
    &gEfiSimpleFileSystemProtocolGuid,
    NULL,
    &BufferSize,
    HandleBuffer);
	
  if (Status == EFI_BUFFER_TOO_SMALL) {
		HandleBuffer = AllocateZeroPool(BufferSize);
		if (HandleBuffer == NULL) {
			return (SHELL_OUT_OF_RESOURCES);
		}
		Status = gBS->LocateHandle(
			ByProtocol,
			&gEfiSimpleFileSystemProtocolGuid,
			NULL,
			&BufferSize,
			HandleBuffer);
   }

  //
  // Get the map name(s) for each one.
  //
  for ( LoopVar = 0, Found = FALSE
      ; LoopVar < (BufferSize / sizeof(EFI_HANDLE)) && HandleBuffer != NULL
      ; LoopVar ++
     ) {
	//3.Emulate every Handle which has SimpileFileSystem 
    Status = PerformSingleMappingDisplay(HandleBuffer[LoopVar]);
    if (!EFI_ERROR(Status)) {
      Found = TRUE;
    }
  }
  
  FreePool(HandleBuffer);
	
  return EFI_SUCCESS;
}


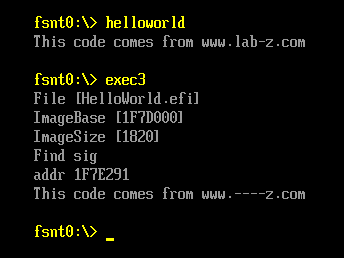
我是在虚拟机下实验的,运行之后打开并且读取 fsnt2:\hello.txt 的内容(内容是 www.lab-z.com123)。

openfs

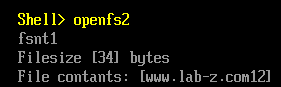
特别注意的是:直接读取之后按照 CHAR16 的字符串来处理,但是读取内容没有 0x00 0x00的结尾。直接用Print 输出的时候字符串后面会有意料之外的字符。所以用下面这个语句 FileData[FileDataLength/2 -1]=0x0; 直接添加一个结尾。这也是为什么字符3被截掉的原因。

完整代码下载
OpenFSX

参考:

1. http://www.lab-z.com/esptest/ Step to UEFI (54) —– EFI_SIMPLE_FILE_SYSTEM_PROTOCOL 写文件
2. http://www.lab-z.com/shellfsx/ Step to UEFI (36) —– 枚举Shell下的全部盘符
3. http://www.lab-z.com/stu63/ Step to UEFI (63) —– 常用的字符串函数(下)
4. http://www.lab-z.com/nstring/ Step to UEFI (62) —– 常用的字符串函数(上)

Step to UEFI (73) —– 获得鼠标信息

前面《获得 USB 设备的PID和VID》中提到 USB 鼠标上面有一个 SimplePointer 的 Protocol。 本文介绍一下这个 Protocol 的使用。

在【参考1】上提到EFI_SIMPLE_POINTER_PROTOCOL 的作用是获得鼠标或者轨迹球的输入数据。
“This would include devices such as mice and trackballs.
The EFI_SIMPLE_POINTER_PROTOCOLallows information about a pointer device to be
retrieved. This would include the status of buttons and the motion of the pointer device since the last
time it was accessed. This protocol is attached the device handle of a pointer device, and can be used
for input from the user inthe preboot environment.”

程序原理:首先用 LocateProtocol 取得EFI_SIMPLE_POINTER_PROTOCOL (这里假设系统中只有一个),然后做一次 Reset ,通过这个动作也确定设备是否可以使用。
image001

之后,不断使用 GetState 轮询,如果发现前后两次获得的信息不同那么就输出解析结果,打印当前鼠标的状态。
image002

特别注意,取得的信息如下,是一个 INT32 类型的 RelativeMovement 数值,这个数值必须通过 EFI_SIMPLE_POINTER_MODE 中给出来的 UINT64类型的Resolution 除一次才能得到真正的移动信息。
image003

最终的程序如下:

#include  <Uefi.h>
#include  <Library/UefiLib.h>
#include  <Library/ShellCEntryLib.h>
#include  <Protocol/SimplePointer.h>

extern EFI_BOOT_SERVICES         *gBS;
extern EFI_SYSTEM_TABLE		 *gST;
extern EFI_RUNTIME_SERVICES 	 *gRT;

// Include/Protocol/SimplePointer.h
EFI_GUID gEfiSimplePointerProtocolGuid  = { 0x31878C87, 0x0B75, 0x11D5, 
			{ 0x9A, 0x4F, 0x00, 0x90, 0x27, 0x3F, 0xC1, 0x4D }};
  
int
EFIAPI
main (
  IN int Argc,
  IN CHAR16 **Argv
  )
{
	EFI_STATUS	Status;
	EFI_SIMPLE_POINTER_PROTOCOL	*Mouse;
	EFI_SIMPLE_POINTER_STATE	Last,Current;
	EFI_INPUT_KEY				Key;
	INT32		X,Y,Z;
	
	//Get MP_Service Protocol
	Status = gBS->LocateProtocol (&gEfiSimplePointerProtocolGuid, NULL, (VOID**)&Mouse);
	if (EFI_ERROR (Status)) {
		Print(L"Unable to initialize EFI_SIMPLE_POINTER_PROTOCOL protocol interface!");
		return EFI_UNSUPPORTED;
	}
	
	Status = Mouse->Reset(Mouse,TRUE);
	if (EFI_ERROR (Status)) {
		Print(L"The device is not functioning correctly and could not be reset!");
		return EFI_UNSUPPORTED;
	}
 
	gST-> ConOut -> ClearScreen(gST->ConOut);
    Print(L"Resolution: [%lX] [%lX] [%lX] \n",
			Mouse->Mode->ResolutionX,
			Mouse->Mode->ResolutionY,
			Mouse->Mode->ResolutionZ);

 
	while (1) {
		Status = Mouse->GetState(Mouse,&Current);
		if (memcmp(&Current,&Last,sizeof(EFI_SIMPLE_POINTER_STATE))!=0) {
		
			X=(INT32) ( Current.RelativeMovementX / Mouse->Mode->ResolutionX);
			Y=(INT32) (Current.RelativeMovementY / Mouse->Mode->ResolutionY);
			Z=(INT32) ( Current.RelativeMovementZ / Mouse->Mode->ResolutionZ);
			
			Print(L"X=[%d] Y=[%d] Z=[%d] ",
					X,
					Y,
					Z);
			Current.LeftButton?
					Print(L"[Left Click]"):
					Print(L"[No Left   ]");
			Current.RightButton?
					Print(L"[Right Click]\n"):
					Print(L"[No Right   ]\n");
			memcpy(&Last,&Current,sizeof(EFI_SIMPLE_POINTER_STATE))	;	
		}
		Status = gST -> ConIn -> ReadKeyStroke (gST->ConIn,&Key);
		if (Status== EFI_SUCCESS) {
			break;
		}
	}
	return EFI_SUCCESS;
}


运行结果:

image004
上面可以看到有一些前后没有变化的数据也被打印出来,这个可能是因为取得的原始数据有不同,但是做过除法之后数据是相同的导致的。

关于上面程序需要注意的地方:
1.EDK自带的模拟环境虽然能找到这个 Protocol 但是实际上不会有数据出来的。我试验了很久才发现,同样的程序实体机中跑的很好,但是模拟器不会有结果,所以不能在模拟环境中实验;
2.在处理INT32 INT64输出时要特别注意输出方式,否则会有奇怪的结果。

完整的代码下载:
micetest1

参考:
1. UEFI Spec 2.4 P461

Step to UEFI —– TIPs

每次编译 Application 之后生成的 efi 文件都在

\Build\AppPkg\DEBUG_MYTOOLS\IA32\AppPkg\Applications\APPNAME\APPNAME 这样的目录中,每次需要手工 copy 到虚拟出来的目录下,这样比较麻烦。

经过研究发现可以在 \AppPkg\AppPkg.dsc 中做如下修改

#OUTPUT_DIRECTORY = Build/AppPkg
OUTPUT_DIRECTORY = Build/NT32IA32

这样,每次最后生成 efi 文件之后就会有一个自动 copy 的动作。

tips

Step to UEFI (72) —– MP_Service_Protocol 获得CPU信息

UEFI本身不支持多线程,据说主要原因是:UEFI设计本身是为了启动硬件,做一些比较简单的事情,如果支持多线程会使得设计复杂度直线上升,出现问题也不容易调试。

不过UEFI本身是有对应的Protocol 的,称作 EFI_MP_SERVICES_PROTOCOL 。 具体的这个 Protocol 可以在 PI spec 中找到(UEFI Spec中没有)。下面来自【参考1】

image001

同样可以作为参考的还有EFI_Toolkit_2.0.0.1 中的process.c 程序。

程序很简单,首先 LocateProtocol 到EFI_MP_SERVICES_PROTOCOL。然后,用 Protocol 提供的EFI_MP_SERVICES_GET_NUMBER_OF_PROCESSORS 和EFI_MP_SERVICES_GET_PROCESSOR_INFO 来获得关于处理器的一些信息。需要注意的是EFI_MP_SERVICES_GET_PROCESSOR_INFO,输入的参数ProcessorNumber 意思是:当前要获得的 Processor 号,输入0 表示你要去的编号为 0 的Processor 的信息,输入3 表示你要去的编号为 3 的Processor 的信息,取值范围从0到NumberOfProcessors -1。

image002

最终的代码:

#include  <Uefi.h>
#include  <Library/UefiLib.h>
#include  <Library/ShellCEntryLib.h>
#include  <Pi/PiDxeCis.h>
#include  <Protocol/MpService.h>

EFI_GUID  gEfiMpServiceProtocolGuid = { 0x3fdda605, 0xa76e, 0x4f46, 
						{ 0xad, 0x29, 0x12, 0xf4, 0x53, 0x1b, 0x3d, 0x08 }};
  
extern EFI_BOOT_SERVICES         *gBS;

int
EFIAPI
main (
  IN int Argc,
  IN CHAR16 **Argv
  )
{
	EFI_STATUS	Status;
	EFI_MP_SERVICES_PROTOCOL	*MP=NULL;
	UINTN   i;	
	UINTN	NumProcessors;
	UINTN	NumberOfEnabledProcessors;

	EFI_PROCESSOR_INFORMATION	ProcessorInfo;
	
	//Get MP_Service Protocol
	Status = gBS->LocateProtocol (&gEfiMpServiceProtocolGuid, NULL, (VOID**)&MP);
	if (EFI_ERROR (Status)) {
		Print(L"Unable to initialize MP protocol interface!");
		return EFI_UNSUPPORTED;
	}
	
	// Determine number of processors
	Status = MP->GetNumberOfProcessors( MP, &NumProcessors , &NumberOfEnabledProcessors );
	
	if (EFI_ERROR (Status))
	{
		Print( L"MP->GetNumEnabledProcessors:Unable to determine number of processors\n") ;
		return EFI_UNSUPPORTED;
	}	
	Print(L"Number of Processors %d\n",NumProcessors);
	Print(L"Number of Enabled Processors %d\n",NumberOfEnabledProcessors);
	
	//Get more information by GetProcessorInfo
	for (i=0;i<NumProcessors;i++)
	{
		Status = MP->GetProcessorInfo(MP, i , &ProcessorInfo);
		
		Print( L"Prcoessor #%d ACPI Processor ID = %lX, Flags = %x, Package = %x, Core = %x, Thread = %x \n", 
					i,
					ProcessorInfo.ProcessorId, 
					ProcessorInfo.StatusFlag,
					ProcessorInfo.Location.Package,
					ProcessorInfo.Location.Core,
					ProcessorInfo.Location.Thread);
	}
	
	return EFI_SUCCESS;
}

运行结果:

image003

完整的代码下载:

MPTest1

关于这部分程序,在《UEFI 原理与编程》第13章 深入了解多任务 有更详细的论述,如果你有这方面的需求,推荐直接阅读。

另外,如果你想获得更多CPU方面的信息,比如 Cache大小, 还可以通过 CPUID,但是非常不建议通过 SMBIOS 来获得,因为他并不可靠……

最后特别提醒:

开始编写程序时,我遇到了下面的错误,错误代码对于解决问题毫无帮助,最后经过分析发现是因为没有添加PiDxe.h头文件(感谢Marco指出)导致的。

c:\edk\MdePkg\Include\Protocol/MpService.h(361) : error C2146: syntax error : missing ‘)’ before identifier ‘Procedure’
c:\edk\MdePkg\Include\Protocol/MpService.h(361) : error C2081: ‘EFI_AP_PROCEDURE’ : name in formal parameter list illegal
c:\edk\MdePkg\Include\Protocol/MpService.h(361) : error C2061: syntax error : identifier ‘Procedure’
c:\edk\MdePkg\Include\Protocol/MpService.h(361) : error C2059: syntax error : ‘;’
c:\edk\MdePkg\Include\Protocol/MpService.h(361) : error C2059: syntax error : ‘,’
c:\edk\MdePkg\Include\Protocol/MpService.h(367) : error C2059: syntax error : ‘)’
c:\edk\MdePkg\Include\Protocol/MpService.h(459) : error C2146: syntax error : missing ‘)’ before identifier ‘Procedure’
c:\edk\MdePkg\Include\Protocol/MpService.h(459) : error C2081: ‘EFI_AP_PROCEDURE’ : name in formal parameter list illegal
c:\edk\MdePkg\Include\Protocol/MpService.h(459) : error C2061: syntax error : identifier ‘Procedure’
c:\edk\MdePkg\Include\Protocol/MpService.h(459) : error C2059: syntax error : ‘;’
c:\edk\MdePkg\Include\Protocol/MpService.h(459) : error C2059: syntax error : ‘,’
c:\edk\MdePkg\Include\Protocol/MpService.h(465) : error C2059: syntax error : ‘)’
c:\edk\MdePkg\Include\Protocol/MpService.h(623) : error C2061: syntax error : identifier ‘EFI_MP_SERVICES_STARTUP_ALL_APS’
c:\edk\MdePkg\Include\Protocol/MpService.h(624) : error C2061: syntax error : identifier ‘StartupThisAP’
c:\edk\MdePkg\Include\Protocol/MpService.h(624) : error C2059: syntax error : ‘;’
c:\edk\MdePkg\Include\Protocol/MpService.h(628) : error C2059: syntax error : ‘}’
NMAKE : fatal error U1077: ‘”C:\Program Files\Microsoft Visual Studio 9.0\Vc\bin\cl.exe”‘ : return code ‘0x2’
Stop.

参考:

1. Vol2_DXE CIS_1_3.pdf P174

Step to UEFI (71) —– 获得 USB 设备的 PID 和 VID

一个问题:如何获得 Shell 下面所有 USB 设备的 PID 和 VID ?

首先在网上搜索一下,找到【参考1】,上面使用了 USBIO Protocol。

typedef struct _EFI_USB_IO_PROTOCOL {
  EFI_USB_IO_CONTROL_TRANSFER            UsbControlTransfer;
  EFI_USB_IO_BULK_TRANSFER               UsbBulkTransfer;
  EFI_USB_IO_ASYNC_INTERRUPT_TRANSFER    UsbAsyncInterruptTransfer;
  EFI_USB_IO_SYNC_INTERRPUT_TRANSFER     UsbSyncInterruptTransfer;
  EFI_USB_IO_ISOCHRONOUS_TRANSFER        UsbIsochronousTransfer;
  EFI_USB_IO_ASYNC_ISOCHRONOUS_TRANSFER  UsbAsyncIsochronousTransfer;
  EFI_USB_IO_GET_DEVICE_DESCRIPTOR       UsbGetDeviceDescriptor;
  EFI_USB_IO_GET_CONFIG_DESCRIPTOR       UsbGetConfigDescriptor;
  EFI_USB_IO_GET_INTERFACE_DESCRIPTOR    UsbGetInterfaceDescriptor;
  EFI_USB_IO_GET_ENDPOINT_DESCRIPTOR     UsbGetEndpointDescriptor;
  EFI_USB_IO_GET_STRING_DESCRIPTOR       UsbGetStringDescriptor;
  EFI_USB_IO_GET_SUPPORTED_LANGUAGES     UsbGetSupportedLanguages;
  EFI_USB_IO_PORT_RESET                  UsbPortReset;
} EFI_USB_IO_PROTOCOL;

来自【参考2】。

我们在实体机上用 dh –p USBIO 命令看一下(注意:EDK自带的模拟环境没有设备挂USBIO 这个 Protocol,所以只能用实体机查看)。可以看到 USB设备上都有这个 Protocol,于是,一切都简单了。

image001

我们再把实体机启动到 Windows中,也是同样的顺序,分别是 USB Hub (这是我外接的一个 USB HUB),USB鼠标,USB键盘(这个键盘是一个复合设备,所以会显示为2个),最后是我的 U盘。多说两句对照上面的截图,我们可以看到USB鼠标上附加了一个 SimplePointer Protocol,键盘上有 TxtinEx/Txtin/ConIn Protocol ,U盘上附加了 DiskIo/BlkIo Protocol,后面我们会分别研究一下这些 Protocol 的使用。

image002

每一个USB设备上都有这个 Protocol 所以我们要用 LocateHandleBuffer 和HandleProtocol 这样的组合把所有有这个 Protocol 的设备都取下来,然后调用 UsbIO 中的UsbGetDeviceDescriptor 即可。
弄清楚原理整个程序还是比较简单的,如下:

#include  <Uefi.h>
#include  <Library/UefiLib.h>
#include  <Library/ShellCEntryLib.h>

#include  <Protocol/UsbIo.h>

extern EFI_BOOT_SERVICES         *gBS;

EFI_GUID  gEfiUsbIoProtocolGuid   = 
	{ 0x2B2F68D6, 0x0CD2, 0x44CF, 
		{ 0x8E, 0x8B, 0xBB, 0xA2, 0x0B, 0x1B, 0x5B, 0x75 }};

UINTN GetUSB( )
{
  EFI_STATUS  Status;
  UINTN       HandleIndex, HandleCount;
  EFI_HANDLE  *DevicePathHandleBuffer = NULL;
  EFI_USB_IO_PROTOCOL 			*USBIO;
  EFI_USB_DEVICE_DESCRIPTOR     DeviceDescriptor;

  Status = gBS->LocateHandleBuffer(
                  ByProtocol,
                  &gEfiUsbIoProtocolGuid,
                  NULL,
                  &HandleCount,
                  &DevicePathHandleBuffer);

  if (EFI_ERROR(Status)) 
  {
    Print(L"ERROR : Get USBIO count fail.\n");
    return 0;
  }   

  for (HandleIndex = 0; HandleIndex < HandleCount; HandleIndex++) 
  { 
     Status = gBS->HandleProtocol(
                      DevicePathHandleBuffer[HandleIndex],
                      &gEfiUsbIoProtocolGuid,
                      (VOID**)&USBIO);

      if (EFI_ERROR(Status))
      {
        Print(L"ERROR : Open USBIO fail.\n");
        gBS->FreePool(DevicePathHandleBuffer);  
        return 0;
      }

      Status = USBIO->UsbGetDeviceDescriptor(USBIO, &DeviceDescriptor);     
      if (EFI_ERROR(Status))
      {
        Print(L"ERROR : Usb Get Device Descriptor fail.\n");
        gBS->FreePool(DevicePathHandleBuffer);  
        return 0;
      }

      Print(L"VendorID = %04X, ProductID = %04X\n", 
                              DeviceDescriptor.IdVendor, 
                              DeviceDescriptor.IdProduct);      

  }
  gBS->FreePool(DevicePathHandleBuffer);       
  return HandleCount;
}

int
EFIAPI
main (
  IN int Argc,
  IN CHAR16 **Argv
  )
{
  GetUSB( );
  return EFI_SUCCESS;
}

最终运行结果如下:

image003

完整的代码和程序下载:
GetPIDVID

参考:
1. http://biosren.com/viewthread.php?tid=5925&highlight=usbio 請問如何透過DevicePath獲取對應的device全名?
2. http://wiki.phoenix.com/wiki/index.php/EFI_USB_IO_PROTOCOL EFI USB IO PROTOCOL 同样的,在 UEFI spec中也可以找到上面的定义

Step to UEFI (70) —– 获取 EDID 信息

之前介绍过使用 Arduino 用硬件的方法直接读取 EDID 【参考1】,这里介绍一下如何在 Shell下读取 EDID 信息。

我们使用 EFI_EDID_DISCOVERED_PROTOCOL 这个 Protocol 来获得信息。当然,类似的还可以使用 EFI_EDID_ACTIVE_PROTOCOL,都是没有问题的。

在要获取 EDID 信息之前,最好先使用 “DH -p EdidDiscovered” 命令来确定你当前的系统中存在 Edid 信息。例如:

edidpre

实现这个功能的代码如下:

#include  <Uefi.h>
#include  <Library/UefiLib.h>
#include  <Library/ShellCEntryLib.h>

#include  <Protocol/EdidDiscovered.h>


extern EFI_BOOT_SERVICES         *gBS;
extern EFI_SYSTEM_TABLE			 *gST;
extern EFI_RUNTIME_SERVICES 	 *gRT;

extern EFI_HANDLE				 gImageHandle;

EFI_GUID gEfiEdidDiscoveredProtocolGuid = 

{ 0x1C0C34F6, 0xD380, 0x41FA, { 0xA0, 0x49, 0x8A, 0xD0, 0x6C, 0x1A, 0x66, 0xAA }};

EFI_STATUS GetEDIDInfo()
{
    EFI_STATUS  Status;
    EFI_HANDLE *EDIDHandleBuffer;
    UINTN EDIDHandleCount, index, i;
    EFI_EDID_DISCOVERED_PROTOCOL * EDID;
    
    Status = gBS->LocateHandleBuffer (ByProtocol, 
                                      &gEfiEdidDiscoveredProtocolGuid, 
                                      NULL, 
                                      &EDIDHandleCount, 
                                      &EDIDHandleBuffer); 
    if (EFI_ERROR (Status))
    {
      Print(L"ERROR : Can't get EdidDiscoveredProtocol.\n");   
      return FALSE;
    }
    
    Print(L"EDID count = %d\n", EDIDHandleCount);
    for(index = 0 ; index < EDIDHandleCount ; index++)
    {
      Status = gBS->OpenProtocol( EDIDHandleBuffer[index],
                                  &gEfiEdidDiscoveredProtocolGuid,
                                  (VOID**)&EDID,
                                  gImageHandle,
                                  NULL,
                                  EFI_OPEN_PROTOCOL_GET_PROTOCOL
                                  );
      if (EFI_ERROR (Status))
      {
        Print(L"ERROR : Open EDID Protocol failed.\n");   
        return FALSE;
      }          
      
      Print(L"%d\n", EDID->SizeOfEdid);
      for(i = 0 ; i < 128 ; i++)
      {
        Print(L"%02X ", EDID->Edid[i]);
		
		if ((i+1) % 16 ==0) { 
				Print(L"\n"); }
		else	
			    if ((i+1) % 8 ==0) { Print(L"- ");}
      }
      Print(L"\n");
                
      Status = gBS->CloseProtocol(EDIDHandleBuffer[index],
			&gEfiEdidDiscoveredProtocolGuid, gImageHandle, NULL); 
      
      if (EFI_ERROR (Status))
      {
        Print(L"ERROR : Close EDID device handle failed.\n");   
        return FALSE;
      }
    }    
  return EFI_SUCCESS;    
}

int
EFIAPI
main (
  IN int Argc,
  IN CHAR16 **Argv
  )
{
 GetEDIDInfo();
 return EFI_SUCCESS;
}


上述程序运行结果

edidr

完整代码下载

GetEDID

比对之前获得的结果(我用的是同一个显示器,可以在【参考1】中看到),可以发现结果是相同的。

bq1

bq2

如果想程序解析每个值的具体含义,还按照【参考3】给出的例子。

参考:
1.http://www.lab-z.com/arduinoedid/ Arduino 读取显示器 EDID
2.http://biosren.com/thread-5921-1-1.html 求救如何取得EDID?
3.http://blog.fpmurphy.com/2012/09/accessing-edid-information-from-uefi-shell.html Accessing EDID Information From UEFI Shell

Step to UEFI (69) —– 动态加载修改Application

标题看起来非常拗口,具体来说描述起来就是下面的问题:

“我想写一个简单的程序,先把某个app的Load进内存,然后在内存里爆搜一个特征字串,搜到之后将该内存第一个字节替换。以下为代码片段,碰到一个问题就是,我搜到特征字串之后,修改其内存的内容一直改不了,请问各位大大,是不是UEFI有相应的保护策略,不能修改LoadImage的内存?我个人觉得是不应该,因为我是LoadImage的宿主,我Load的内存应该是可以被我修改的。请大牛们指教啊!!!

Status=gBS->LoadImage(TRUE, ImageHandle, DstDevicePath, NULL, 0, &DstImageHandle); //LoadImage
if (!EFI_ERROR(Status))
{
Print(L”Load Image success\n”);
}
Status=gBS->HandleProtocol(DstImageHandle, &gEfiLoadedImageProtocolGuid,(void **) &LoadedImage);
if (EFI_ERROR(Status)) {
Print(L”Can not retrieve a LoadedImageProtocol handle for ImageHandle\n”);
gBS->Exit(ImageHandle,EFI_SUCCESS,0,NULL);
}
//Get the loaded image base address
imageBase=LoadedImage->ImageBase;
size=LoadedImage->ImageSize;

temp=(char *)imageBase;

//Search the sig;, replace the first byte
for (; temp<(char *)imageBase+size; temp++) { if (*temp==0x55 && *(temp+1)==0x00 && *(temp+2)==0x45 && *(temp+3)==0x00) { Print(L"Find sig\n"); *temp=0x45; Print(L"addr %x\n",temp); break; } } 上述问题来自【参考1】 这个一个有趣的问题,也不知道那个朋友最后是否成功。根据上面的问题,我做一下实验。 首先,准备一个被修改的 App。当然,根据之前的知识,这个 App 不能使用 CLIB 库,目前为止我还是不知道为什么无法加载调用这个库的 Application.

#include <Uefi.h>
#include <Library/PcdLib.h>
#include <Library/UefiLib.h>
#include <Library/UefiApplicationEntryPoint.h>


/**
  The user Entry Point for Application. The user code starts with this function
  as the real entry point for the application.

  @param[in] ImageHandle    The firmware allocated handle for the EFI image.  
  @param[in] SystemTable    A pointer to the EFI System Table.
  
  @retval EFI_SUCCESS       The entry point is executed successfully.
  @retval other             Some error occurs when executing this entry point.

**/
EFI_STATUS
EFIAPI
UefiMain (
  IN EFI_HANDLE        ImageHandle,
  IN EFI_SYSTEM_TABLE  *SystemTable
  )
{
                                       
  CHAR8  *s1= "This code comes from www.lab-z.com";
  CHAR16 *s2=L"                                  ";
  CHAR16 *Result;
  
  Result=AsciiStrToUnicodeStr(s1,s2);
  Print(L"%s\n",s2);

  return EFI_SUCCESS;
}


代码非常简单,将一个 ASCII 字符串转化为 Unicode 的,然后显示出来。使用 ASCII 的原因是为了便于查找。

上面的程序编译之后,使用十六进制工具打开可以直接查看到 ASCII 字符。

exec3

然后,继续编写加载和修改的程序如下:

#include  <Uefi.h>
#include  <Library/UefiLib.h>
#include  <Library/ShellCEntryLib.h>

#include  <stdio.h>
#include  <stdlib.h>
#include  <wchar.h>

#include <Protocol/EfiShell.h>
#include <Library/ShellLib.h>

extern EFI_BOOT_SERVICES           	 *gBS;
extern EFI_SYSTEM_TABLE				 *gST;
extern EFI_RUNTIME_SERVICES 		 *gRT;

extern EFI_SHELL_PROTOCOL            *gEfiShellProtocol;
extern EFI_SHELL_ENVIRONMENT2 		 *mEfiShellEnvironment2;

extern EFI_HANDLE					 gImageHandle;
/**
  GET  DEVICEPATH
**/
EFI_DEVICE_PATH_PROTOCOL *
EFIAPI
ShellGetDevicePath (
  IN CHAR16                     * CONST DeviceName OPTIONAL
  )
{
  //
  // Check for UEFI Shell 2.0 protocols
  //
  if (gEfiShellProtocol != NULL) {
    return (gEfiShellProtocol->GetDevicePathFromFilePath(DeviceName));
  }

  //
  // Check for EFI shell
  //
  if (mEfiShellEnvironment2 != NULL) {
    return (mEfiShellEnvironment2->NameToPath(DeviceName));
  }

  return (NULL);
}

int
EFIAPI
main (
  IN int Argc,
  IN char **Argv
  )
{
  EFI_DEVICE_PATH_PROTOCOL 	*DevicePath;
  EFI_HANDLE				NewHandle;
  EFI_STATUS				Status;
  UINTN			ExitDataSizePtr;  
  CHAR16 					*R=L"HelloWorld.efi";
  EFI_LOADED_IMAGE_PROTOCOL	*ImageInfo = NULL;
  CHAR8						*temp;
  
  Print(L"File [%s]\n",R);

  DevicePath=ShellGetDevicePath(R);

  //
  // Load the image with:
  // FALSE - not from boot manager and NULL, 0 being not already in memory
  //
  Status = gBS->LoadImage(
    FALSE,
    gImageHandle,
    DevicePath,
    NULL,
    0,
    &NewHandle);  

  if (EFI_ERROR(Status)) {
    if (NewHandle != NULL) {
      gBS->UnloadImage(NewHandle);
    }
	Print(L"Error during LoadImage [%X]\n",Status);
    return (Status);
  }

  Status = gBS -> HandleProtocol (
						NewHandle,
						&gEfiLoadedImageProtocolGuid,
						&ImageInfo
						);
  Print(L"ImageBase [%lX]\n",ImageInfo->ImageBase);
  Print(L"ImageSize [%lX]\n",ImageInfo->ImageSize);

  temp=(char *)ImageInfo->ImageBase;
  //Search the sig;, replace the first byte
  for (; temp<(char *)ImageInfo->ImageBase+ImageInfo->ImageSize; temp++)
        {
				//"lab" 6C 61 62
                if (*temp==0x6C && *(temp+1)==0x61 && *(temp+2)==0x62)
                {
                        Print(L"Find sig\n");
                        Print(L"addr %x\n",temp);
						*(temp  )=0x2D;
						*(temp+1)=0x2D;
						*(temp+2)=0x2D;
                        break;
                } 
        }  
  
  
  //
  // now start the image, passing up exit data if the caller requested it
  //
  Status = gBS->StartImage(
                     NewHandle,
                     &ExitDataSizePtr,
                     NULL
              );
  if (EFI_ERROR(Status)) {
    if (NewHandle != NULL) {
      gBS->UnloadImage(NewHandle);
    }
	Print(L"Error during StartImage [%X]\n",Status);
    return (Status);
  }
  
  gBS->UnloadImage (NewHandle);  
  return EFI_SUCCESS;
}


加载部分的代码使用的是 【参考2】的框架,搜索部分的代码用的是前面问题中给出来的示例。我们在加载后的 Application 的空间中搜索 “lab” 字符串并且替换为 “—”。

运行结果如下,我们先执行了一次 HelloWorld.efi,可以看到他能正常打印字符串,之后再用我们的程序加载一次,可以看到字符串被修改掉了。

exec3r

看起来并没有什么保护之类的,轻而易举的改掉了 Application 的内容。猜测之前提出问题的朋友有可能是被加载的代码用到了 CLIB, 或者是代码中的字符串是按照 UNICODE 给出来的,所以无法找到。

这样的动态加载可以用在一些特殊的地方,比如,我见过一款 DOS 下的测试软件,有一个主程序 EXE 和 n多个独立的 EXE 构成。主程序可以调用其他的 EXE 进行测试,但是单独的 EXE 无法执行,这样的好处是开发时可以独立开发单独模块,分发之后有主程序进行控制只在需要的环境中运行。

本文提到的代码下载

exec3

HelloWorld

参考:

1. http://biosren.com/thread-4564-1-31.html
2. http://www.lab-z.com/efiloadedimageprotocol/ Step to UEFI (46) —– EFILOADEDIMAGEPROTOCOL的使用

Step to UEFI (67) —– zLib (上)

zlib 是一款开源的压缩解压库,在《UEFI原理与编程》第8章提到了他。我去书上提到的网站下载到了修改后的 zlib.inf 文件,然后尝试在AppPkg中重新编译之。

首先根据 zlib.inf 中[Sources]节给出的文件名提取出来需要用的文件。

[Sources]
#uefientry.c
adler32.c
crc32.c
deflate.c
infback.c
inffast.c
inflate.c
inftrees.c
trees.c
zutil.c
compress.c
uncompr.c
gzclose.c
gzlib.c
gzread.c
gzwrite.c

然后,把 zlib.inf 加入到 AppPkg.dsc 中。之后用 Build -a IA32 -p AppPkg\AppPkg.dsc 编译。编译过程中会出现很多错误,经过研究发现出现的都是一些 warning 而已,可以通过在文件头上加入编译开关来忽略掉。

#pragma warning(disable:4131)
#pragma warning(disable:4142)
#pragma warning(disable:4244)


* 很多 Warning 是因为老的语法格式导致的,所以不会对代码产生任何影响,比如下面这种,没有在函数名称中定义参数类型:

/* Open a gzip file either by name or file descriptor. */
local gzFile gz_open(path, fd, mode)
    const void *path;
    int fd;
    const char *mode;


此外,在 gzguts.h 中,需要删掉这一行。

#if defined(__TURBOC__) || defined(_MSC_VER) || defined(_WIN32)
  include <io.h>
#endif


完成上面的设置后,重新运行命令,可以正常编译:

zlibc

在 \Build\AppPkg\DEBUG_MYTOOLS\IA32\AppPkg\Applications\zsource\zlib\OUTPUT 下面看到 zlib.lib 文件

zlib

后续我们就可以在自己的程序中调用这个压缩库了。

本文修改后的 zlib zsource

修改之前的 zlib,版本是 1.2.8.0

zlib128

Step to UEFI (65) —– ShellWriteFile的使用

前面介绍过使用 ShellReadFile 读取文件的内容,这里介绍一下 ShellWriteFile 的使用。

例子是使用 ShellOpenFileByName 打开当前的 EFI Application,把内容读取到内存之后,创建一个名为 Test.efi 的文件,使用 ShellWriteFile 函数把内容写进去。

代码如下:

#include  <Uefi.h>
#include  <Library/UefiLib.h>
#include  <Library/ShellCEntryLib.h>
#include  <Library/ShellLib.h>
#include  <Library/MemoryAllocationLib.h>

extern EFI_BOOT_SERVICES         *gBS;
extern EFI_SYSTEM_TABLE			 *gST;
extern EFI_RUNTIME_SERVICES 	 *gRT;

int
EFIAPI
main (
  IN int Argc,
  IN CHAR16 **Argv
  )
{

  EFI_FILE_HANDLE   FileHandle;
  RETURN_STATUS     Status;
  EFI_FILE_INFO     *FileInfo = NULL;
  EFI_HANDLE        *HandleBuffer=NULL;
  UINTN  			ReadSize;
  
  //Open the file given by the parameter
  Status = ShellOpenFileByName(Argv[0], 
		(SHELL_FILE_HANDLE *)&
                FileHandle,
                EFI_FILE_MODE_READ , 0);

  if(Status != RETURN_SUCCESS) {
        Print(L"OpenFile failed!\n");
		return EFI_SUCCESS;
      }			

  //Get file size	  
  FileInfo = ShellGetFileInfo( (SHELL_FILE_HANDLE)FileHandle);	

  //Allocate a memory buffer
  HandleBuffer = AllocateZeroPool((UINTN) FileInfo-> FileSize);
  if (HandleBuffer == NULL) {
      return (SHELL_OUT_OF_RESOURCES);   }

  ReadSize=(UINTN) FileInfo-> FileSize;
  
  //Load the whole file to the buffer
  Status = ShellReadFile(FileHandle,&ReadSize,HandleBuffer);
  
  //Close the source file
  ShellCloseFile(&FileHandle);

  //Create a new file
  Status = ShellOpenFileByName(L"Test.efi", 
             (SHELL_FILE_HANDLE *)&FileHandle,
                               EFI_FILE_MODE_READ |
			       EFI_FILE_MODE_WRITE|
			       EFI_FILE_MODE_CREATE, 
			    0);  
  if(Status != RETURN_SUCCESS) {
        Print(L"CreatFile failed [%r]!\n",Status);
	    return EFI_SUCCESS;
      }	
  Status = ShellWriteFile(FileHandle,
			&ReadSize,
			HandleBuffer
			);
  //Close the source file
  ShellCloseFile(&FileHandle);
  
  return EFI_SUCCESS;
}


运行结果(运行结束之后我比较了一下生成文件和源文件是相同的):

ctf

特别注意:使用 ShellOpenFuleByName 创建一个文件时,要同时使用 EFI_FILE_MODE_READ ,EFI_FILE_MODE_WRITE 和 EFI_FILE_MODE_CREATE ,否则可能出现“Invalid Parameter”的错误【参考1】

完整代码下载
CreateFile

1.http://feishare.com/efimail/messages/20120331-0611-Re__edk2__Problems_creating_file_using_ShellOpenFileByName-_Bekefi__Stephen_C_.html

Step to UEFI (64) —– Print 直接输出错误信息

最近发现一个挺有意思的功能,Print 使用 %r 参数可以直接输出错误信息的含义。这样的话,我们可以直接取得错误信息,省去不少麻烦。例如,下面的代码

#include  <Uefi.h>
#include  <Library/UefiLib.h>
#include  <Library/ShellCEntryLib.h>


extern EFI_BOOT_SERVICES         *gBS;
extern EFI_SYSTEM_TABLE			 *gST;
extern EFI_RUNTIME_SERVICES 	 *gRT;

int
EFIAPI
main (
  IN int Argc,
  IN CHAR16 **Argv
  )
{
  Print(L"%r\n",EFI_SUCCESS);
  Print(L"%r\n",RETURN_WARN_WRITE_FAILURE);
  Print(L"%r\n",RETURN_COMPROMISED_DATA);
  
  return EFI_SUCCESS;
}


运行结果

printr

我们再仔细研究一下 %r 的具体实现。

查看 PrintR 编译生成的 printf.map ,可以看到 _Print 是链接到 UefiLibPrint.obj 中。用这个文件名,我们确定是在 \MdePkg\Library\UefiLib\UefiLibPrint.c 这个文件中

0001:000000ce _ShellCEntryLib 0000032e f UefiShellCEntryLib:UefiShellCEntryLib.obj
0001:00000140 _InternalPrint 000003a0 f UefiLib:UefiLibPrint.obj
0001:0000018b _Print 000003eb f UefiLib:UefiLibPrint.obj
0001:000001a8 _ShellFindSE2 00000408 f UefiShellLib:UefiShellLib.obj
0001:000002d8 _ShellLibConstructorWorker 00000538 f UefiShellLib:UefiShellLib.obj
0001:0000048d _ShellLibDestructor 000006ed f UefiShellLib:UefiShellLib.obj
0001:00000535 _ShellOpenFileByDevicePath 00000795 f UefiShellLib:UefiShellLib.obj

Print 函数:

/** 
  Prints a formatted Unicode string to the console output device specified by 
  ConOut defined in the EFI_SYSTEM_TABLE.

  This function prints a formatted Unicode string to the console output device 
  specified by ConOut in EFI_SYSTEM_TABLE and returns the number of Unicode 
  characters that printed to ConOut.  If the length of the formatted Unicode 
  string is greater than PcdUefiLibMaxPrintBufferSize, then only the first 
  PcdUefiLibMaxPrintBufferSize characters are sent to ConOut.
  If Format is NULL, then ASSERT().
  If Format is not aligned on a 16-bit boundary, then ASSERT().
  If gST->ConOut is NULL, then ASSERT().

  @param Format   A Null-terminated Unicode format string.
  @param ...      A Variable argument list whose contents are accessed based 
                  on the format string specified by Format.
  
  @return The number of Unicode characters printed to ConOut.

**/
UINTN
EFIAPI
Print (
  IN CONST CHAR16  *Format,
  ...
  )
{
  VA_LIST Marker;
  UINTN   Return;

  VA_START (Marker, Format);

  Return = InternalPrint (Format, gST->ConOut, Marker);

  VA_END (Marker);

  return Return;
}


InternalPrint 函数在同一个文件中

/**
  Internal function which prints a formatted Unicode string to the console output device
  specified by Console

  This function prints a formatted Unicode string to the console output device
  specified by Console and returns the number of Unicode characters that printed
  to it.  If the length of the formatted Unicode string is greater than PcdUefiLibMaxPrintBufferSize,
  then only the first PcdUefiLibMaxPrintBufferSize characters are sent to Console.
  If Format is NULL, then ASSERT().
  If Format is not aligned on a 16-bit boundary, then ASSERT().

  @param Format   A Null-terminated Unicode format string.
  @param Console  The output console.
  @param Marker   A VA_LIST marker for the variable argument list.

  @return The number of Unicode characters in the produced
          output buffer, not including the Null-terminator.
**/
UINTN
InternalPrint (
  IN  CONST CHAR16                     *Format,
  IN  EFI_SIMPLE_TEXT_OUTPUT_PROTOCOL  *Console,
  IN  VA_LIST                          Marker
  )
{
  EFI_STATUS  Status;
  UINTN       Return;
  CHAR16      *Buffer;
  UINTN       BufferSize;

  ASSERT (Format != NULL);
  ASSERT (((UINTN) Format & BIT0) == 0);
  ASSERT (Console != NULL);

  BufferSize = (PcdGet32 (PcdUefiLibMaxPrintBufferSize) + 1) * sizeof (CHAR16);

  Buffer = (CHAR16 *) AllocatePool(BufferSize);
  ASSERT (Buffer != NULL);

  Return = UnicodeVSPrint (Buffer, BufferSize, Format, Marker);

  if (Console != NULL && Return > 0) {
    //
    // To be extra safe make sure Console has been initialized
    //
    Status = Console->OutputString (Console, Buffer);
    if (EFI_ERROR (Status)) {
      Return = 0;
    }
  }

  FreePool (Buffer);

  return Return;
}


处理输出的核心是 UnicodeVSPrint 函数

/**
  Produces a Null-terminated Unicode string in an output buffer based on 
  a Null-terminated Unicode format string and a VA_LIST argument list
  
  Produces a Null-terminated Unicode string in the output buffer specified by StartOfBuffer
  and BufferSize.  
  The Unicode string is produced by parsing the format string specified by FormatString.  
  Arguments are pulled from the variable argument list specified by Marker based on the 
  contents of the format string.  
  The number of Unicode characters in the produced output buffer is returned not including
  the Null-terminator.
  If BufferSize is 0 or 1, then no output buffer is produced and 0 is returned.

  If BufferSize > 1 and StartOfBuffer is NULL, then ASSERT().
  If BufferSize > 1 and StartOfBuffer is not aligned on a 16-bit boundary, then ASSERT().
  If BufferSize > 1 and FormatString is NULL, then ASSERT().
  If BufferSize > 1 and FormatString is not aligned on a 16-bit boundary, then ASSERT().
  If PcdMaximumUnicodeStringLength is not zero, and FormatString contains more than 
  PcdMaximumUnicodeStringLength Unicode characters not including the Null-terminator, then
  ASSERT().
  If PcdMaximumUnicodeStringLength is not zero, and produced Null-terminated Unicode string
  contains more than PcdMaximumUnicodeStringLength Unicode characters not including the
  Null-terminator, then ASSERT().

  @param  StartOfBuffer   A pointer to the output buffer for the produced Null-terminated 
                          Unicode string.
  @param  BufferSize      The size, in bytes, of the output buffer specified by StartOfBuffer.
  @param  FormatString    A Null-terminated Unicode format string.
  @param  Marker          VA_LIST marker for the variable argument list.
  
  @return The number of Unicode characters in the produced output buffer not including the
          Null-terminator.

**/
UINTN
EFIAPI
UnicodeVSPrint (
  OUT CHAR16        *StartOfBuffer,
  IN  UINTN         BufferSize,
  IN  CONST CHAR16  *FormatString,
  IN  VA_LIST       Marker
  )
{
  ASSERT_UNICODE_BUFFER (StartOfBuffer);
  ASSERT_UNICODE_BUFFER (FormatString);
  return BasePrintLibSPrintMarker ((CHAR8 *)StartOfBuffer, BufferSize >> 1, FORMAT_UNICODE | OUTPUT_UNICODE, (CHAR8 *)FormatString, Marker, NULL);
}


BasePrintLibSPrintMarker 函数在 \MdePkg\Library\BasePrintLib\PrintLib.c

/**
  Worker function that produces a Null-terminated string in an output buffer 
  based on a Null-terminated format string and a VA_LIST argument list.

  VSPrint function to process format and place the results in Buffer. Since a 
  VA_LIST is used this routine allows the nesting of Vararg routines. Thus 
  this is the main print working routine.

  If COUNT_ONLY_NO_PRINT is set in Flags, Buffer will not be modified at all.

  @param[out] Buffer          The character buffer to print the results of the 
                              parsing of Format into.
  @param[in]  BufferSize      The maximum number of characters to put into 
                              buffer.
  @param[in]  Flags           Initial flags value.
                              Can only have FORMAT_UNICODE, OUTPUT_UNICODE, 
                              and COUNT_ONLY_NO_PRINT set.
  @param[in]  Format          A Null-terminated format string.
  @param[in]  VaListMarker    VA_LIST style variable argument list consumed by
                              processing Format.
  @param[in]  BaseListMarker  BASE_LIST style variable argument list consumed
                              by processing Format.

  @return The number of characters printed not including the Null-terminator.
          If COUNT_ONLY_NO_PRINT was set returns the same, but without any
          modification to Buffer.

**/
UINTN
BasePrintLibSPrintMarker (
  OUT CHAR8        *Buffer,
  IN  UINTN        BufferSize,
  IN  UINTN        Flags,
  IN  CONST CHAR8  *Format,
  IN  VA_LIST      VaListMarker,   OPTIONAL
  IN  BASE_LIST    BaseListMarker  OPTIONAL
  )


处理 %r 的代码如下

      case 'r':
        if (BaseListMarker == NULL) {
          Status = VA_ARG (VaListMarker, RETURN_STATUS);
        } else {
          Status = BASE_ARG (BaseListMarker, RETURN_STATUS);
        }
        ArgumentString = ValueBuffer;
        if (RETURN_ERROR (Status)) {
          //
          // Clear error bit
          //
          Index = Status & ~MAX_BIT;
          if (Index > 0 && Index <= ERROR_STATUS_NUMBER) {
            ArgumentString = mStatusString [Index + WARNING_STATUS_NUMBER];
          }
        } else {
          Index = Status;
          if (Index <= WARNING_STATUS_NUMBER) {
            ArgumentString = mStatusString [Index];
          }
        }
        if (ArgumentString == ValueBuffer) {
          BasePrintLibSPrint ((CHAR8 *) ValueBuffer, MAXIMUM_VALUE_CHARACTERS, 0, "%08X", Status);
        }
        break;


核心就是查 mStatusString 表,在 \MdePkg\Library\BasePrintLib\PrintLibInternal.c 中有定义


GLOBAL_REMOVE_IF_UNREFERENCED CONST CHAR8 *mStatusString[] = {
  "Success",                      //  RETURN_SUCCESS                = 0
  "Warning Unknown Glyph",        //  RETURN_WARN_UNKNOWN_GLYPH     = 1
  "Warning Delete Failure",       //  RETURN_WARN_DELETE_FAILURE    = 2
  "Warning Write Failure",        //  RETURN_WARN_WRITE_FAILURE     = 3
  "Warning Buffer Too Small",     //  RETURN_WARN_BUFFER_TOO_SMALL  = 4
  "Warning Stale Data",           //  RETURN_WARN_STALE_DATA        = 5
  "Load Error",                   //  RETURN_LOAD_ERROR             = 1  | MAX_BIT
  "Invalid Parameter",            //  RETURN_INVALID_PARAMETER      = 2  | MAX_BIT
  "Unsupported",                  //  RETURN_UNSUPPORTED            = 3  | MAX_BIT
  "Bad Buffer Size",              //  RETURN_BAD_BUFFER_SIZE        = 4  | MAX_BIT
  "Buffer Too Small",             //  RETURN_BUFFER_TOO_SMALL,      = 5  | MAX_BIT
  "Not Ready",                    //  RETURN_NOT_READY              = 6  | MAX_BIT
  "Device Error",                 //  RETURN_DEVICE_ERROR           = 7  | MAX_BIT
  "Write Protected",              //  RETURN_WRITE_PROTECTED        = 8  | MAX_BIT
  "Out of Resources",             //  RETURN_OUT_OF_RESOURCES       = 9  | MAX_BIT
  "Volume Corrupt",               //  RETURN_VOLUME_CORRUPTED       = 10 | MAX_BIT
  "Volume Full",                  //  RETURN_VOLUME_FULL            = 11 | MAX_BIT
  "No Media",                     //  RETURN_NO_MEDIA               = 12 | MAX_BIT
  "Media changed",                //  RETURN_MEDIA_CHANGED          = 13 | MAX_BIT
  "Not Found",                    //  RETURN_NOT_FOUND              = 14 | MAX_BIT
  "Access Denied",                //  RETURN_ACCESS_DENIED          = 15 | MAX_BIT
  "No Response",                  //  RETURN_NO_RESPONSE            = 16 | MAX_BIT
  "No mapping",                   //  RETURN_NO_MAPPING             = 17 | MAX_BIT
  "Time out",                     //  RETURN_TIMEOUT                = 18 | MAX_BIT
  "Not started",                  //  RETURN_NOT_STARTED            = 19 | MAX_BIT
  "Already started",              //  RETURN_ALREADY_STARTED        = 20 | MAX_BIT
  "Aborted",                      //  RETURN_ABORTED                = 21 | MAX_BIT
  "ICMP Error",                   //  RETURN_ICMP_ERROR             = 22 | MAX_BIT
  "TFTP Error",                   //  RETURN_TFTP_ERROR             = 23 | MAX_BIT
  "Protocol Error",               //  RETURN_PROTOCOL_ERROR         = 24 | MAX_BIT
  "Incompatible Version",         //  RETURN_INCOMPATIBLE_VERSION   = 25 | MAX_BIT
  "Security Violation",           //  RETURN_SECURITY_VIOLATION     = 26 | MAX_BIT
  "CRC Error",                    //  RETURN_CRC_ERROR              = 27 | MAX_BIT
  "End of Media",                 //  RETURN_END_OF_MEDIA           = 28 | MAX_BIT
  "Reserved (29)",                //  RESERVED                      = 29 | MAX_BIT
  "Reserved (30)",                //  RESERVED                      = 30 | MAX_BIT
  "End of File",                  //  RETURN_END_OF_FILE            = 31 | MAX_BIT
  "Invalid Language",             //  RETURN_INVALID_LANGUAGE       = 32 | MAX_BIT
  "Compromised Data"              //  RETURN_COMPROMISED_DATA       = 33 | MAX_BIT
};


具体的实现就是这样。