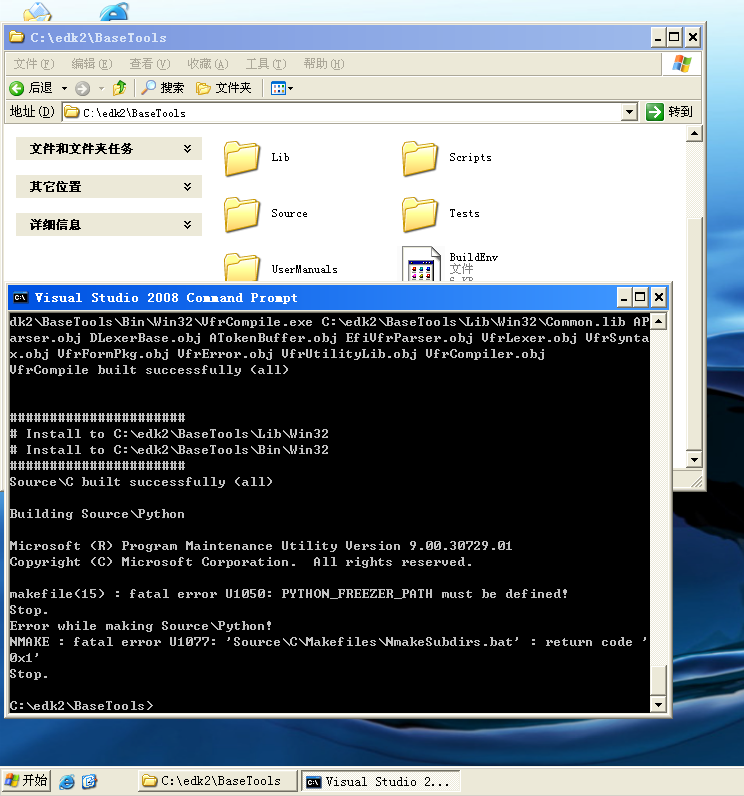
如果你在Shell下直接使用 Float 或者 Double 在编译的时候会遇到这样的问题
Architecture(s) = IA32
Build target = DEBUG
Toolchain = VS2008
Active Platform = c:\edk2\Nt32Pkg\Nt32Pkg.dsc
Flash Image Definition = c:\edk2\Nt32Pkg\Nt32Pkg.fdf
Processing meta-data … done!
“C:\Program Files\Microsoft Visual Studio 9.0\Vc\bin\link.exe” /out:”c:\edk2\Build\NT32\DEBUG_VS2008\IA32\SecMain.exe” /base:0x10000000 /pdb:”c:\edk2\Build\NT32\DEBUG_VS2008\IA32\SecMain.pdb” /LIBPATH:”C:\Program Files\Microsoft Visual Studio 9.0\VC\Lib” /LIBPATH:”C:\Program Files\Microsoft Visual Studio 9.0\VC\PlatformSdk\Lib” /NOLOGO /SUBSYSTEM:CONSOLE /NODEFAULTLIB /IGNORE:4086 /MAP /OPT:REF /DEBUG /MACHINE:I386 /LTCG Kernel32.lib MSVCRTD.lib Gdi32.lib User32.lib Winmm.lib Advapi32.lib /EXPORT:InitializeDriver=_ModuleEntryPoint /ALIGN:4096 /FILEALIGN:4096 /SUBSYSTEM:CONSOLE @c:\edk2\Build\NT32\DEBUG_VS2008\IA32\Nt32Pkg\Sec\SecMain\OUTPUT\static_library_files.lst
LINK : warning LNK4108: /ALIGN specified without /DRIVER; image may not run
LINK : warning LNK4001: no object files specified; libraries used
Creating library c:\edk2\Build\NT32\DEBUG_VS2008\IA32\SecMain.lib and object c:\edk2\Build\NT32\DEBUG_VS2008\IA32\SecMain.exp
Generating code
Finished generating code
“C:\Program Files\Microsoft Visual Studio 9.0\Vc\bin\link.exe” /OUT:c:\edk2\Build\NT32\DEBUG_VS2008\IA32\MdeModulePkg\Application\floattest\floattest\DEBUG\FloatTest.dll /NOLOGO /NODEFAULTLIB /IGNORE:4001 /OPT:REF /OPT:ICF=10 /MAP /ALIGN:32 /SECTION:.xdata,D /SECTION:.pdata,D /MACHINE:X86 /LTCG /DLL /ENTRY:_ModuleEntryPoint /SUBSYSTEM:EFI_BOOT_SERVICE_DRIVER /SAFESEH:NO /BASE:0 /DRIVER /DEBUG /EXPORT:InitializeDriver=_ModuleEntryPoint /ALIGN:4096 /FILEALIGN:4096 /SUBSYSTEM:CONSOLE @c:\edk2\Build\NT32\DEBUG_VS2008\IA32\MdeModulePkg\Application\floattest\floattest\OUTPUT\static_library_files.lst
Creating library c:\edk2\Build\NT32\DEBUG_VS2008\IA32\MdeModulePkg\Application\floattest\floattest\DEBUG\FloatTest.lib and object c:\edk2\Build\NT32\DEBUG_VS2008\IA32\MdeModulePkg\Application\floattest\floattest\DEBUG\FloatTest.exp
Generating code
Finished generating code
c:\edk2\Build\NT32\DEBUG_VS2008\IA32\MdeModulePkg\Application\floattest\floattest\DEBUG\FloatTest.dll : warning LNK4086: entrypoint ‘__ModuleEntryPoint’ is not __stdcall with 12 bytes of arguments; image may not run
FloatTest.lib(floattest.obj) : error LNK2001: unresolved external symbol __fltused
c:\edk2\Build\NT32\DEBUG_VS2008\IA32\MdeModulePkg\Application\floattest\floattest\DEBUG\FloatTest.dll : fatal error LNK1120: 1 unresolved externals
我baidu和google之后得到的大概的结论是:UEFI 替换了Link中的默认库(CRT.LIB?),但是因为MS的编译器存在一个bug,所以导致仍然使用部分的默认库,所以导致这样的问题【这个解释存疑,不确定】。至于解决方法,经过我的实验确认就是使用 EADK 库【参考1】。我的理解是这个库是用来替代标准C库编写EDKII程序的,因此Float之类在其中也有重新定义。
加入方法:
1.解压EADK,然后将其中三个目录放到你EDK2的根目录下
2.修改 Nt32Pkg.dsc 加入红色部分
#
# Misc
#
DebugLib|IntelFrameworkModulePkg/Library/PeiDxeDebugLibReportStatusCode/PeiDxeDebugLibReportStatusCode.inf
DebugPrintErrorLevelLib|MdeModulePkg/Library/DxeDebugPrintErrorLevelLib/DxeDebugPrintErrorLevelLib.inf
PerformanceLib|MdePkg/Library/BasePerformanceLibNull/BasePerformanceLibNull.inf
DebugAgentLib|MdeModulePkg/Library/DebugAgentLibNull/DebugAgentLibNull.inf
#LABZ_Start
SortLib|ShellPkg/Library/UefiSortLib/UefiSortLib.inf
FileHandleLib|ShellPkg/Library/UefiFileHandleLib/UefiFileHandleLib.inf
ShellLib|ShellPkg/Library/UefiShellLib/UefiShellLib.inf
ShellCEntryLib|ShellPkg/Library/UefiShellCEntryLib/UefiShellCEntryLib.inf
LibC|StdLib/LibC/LibC.inf
LibStdLib|StdLib/LibC/StdLib/StdLib.inf
LibString|StdLib/LibC/String/String.inf
LibWchar|StdLib/LibC/Wchar/Wchar.inf
LibCType|StdLib/LibC/Ctype/Ctype.inf
LibTime|StdLib/LibC/Time/Time.inf
LibStdio|StdLib/LibC/Stdio/Stdio.inf
LibGdtoa|StdLib/LibC/gdtoa/gdtoa.inf
LibLocale|StdLib/LibC/Locale/Locale.inf
LibUefi|StdLib/LibC/Uefi/Uefi.inf
LibMath|StdLib/LibC/Math/Math.inf
LibSignal|StdLib/LibC/Signal/Signal.inf
LibNetUtil|StdLib/LibC/NetUtil/NetUtil.inf
#LABZ_End
[LibraryClasses.common.USER_DEFINED]
DebugLib|MdePkg/Library/BaseDebugLibNull/BaseDebugLibNull.inf
PeCoffExtraActionLib|MdePkg/Library/BasePeCoffExtraActionLibNull/BasePeCoffExtraActionLibNull.inf
ReportStatusCodeLib|MdeModulePkg/Library/PeiReportStatusCodeLib/PeiReportStatusCodeLib.inf
OemHookStatusCodeLib|Nt32Pkg/Library/PeiNt32OemHookStatusCodeLib/PeiNt32OemHookStatusCodeLib.inf
MemoryAllocationLib|MdePkg/Library/PeiMemoryAllocationLib/PeiMemoryAllocationLib.inf
PcdLib|MdePkg/Library/BasePcdLibNull/BasePcdLibNull.inf
3. floattest.inf 中必须加入下面2个
[LibraryClasses]
UefiApplicationEntryPoint
UefiLib
PcdLib
ShellCEntryLib
ShellLib
LibMath
LibC|
下面就可以在你的代码中放心大胆的使用Float了。
一个计算 Pi 的Shell Application
#include <Library/UefiLib.h>
#include <Library/ShellCEntryLib.h>
//
// Based on code found at http://code.google.com/p/my-itoa/
//
int
Integer2AsciiString(int val, char* buf)
{
const unsigned int radix = 10;
char* p = buf;
unsigned int a;
int len;
char* b;
char temp;
unsigned int u;
if (val < 0) {
*p++ = '-';
val = 0 - val;
}
u = (unsigned int)val;
b = p;
do {
a = u % radix;
u /= radix;
*p++ =(char) a + '0';
} while (u > 0);
len = (int)(p - buf);
*p-- = 0;
// swap
do {
temp = *p; *p = *b; *b = temp;
--p; ++b;
} while (b < p);
return len;
}
//
// Based on code found on the Internet (author unknown)
// Search for ftoa implementations
//
int
Float2AsciiString(float f, char *buffer, int numdecimals)
{
int status = 0;
char *s = buffer;
long mantissa, int_part, frac_part;
short exp2;
char m;
typedef union {
long L;
float F;
} LF_t;
LF_t x;
if (f == 0.0) { // return 0.00
*s++ = '0'; *s++ = '.'; *s++ = '0'; *s++ = '0';
*s = 0;
return status;
}
x.F = f;
exp2 = (unsigned char)(x.L >> 23) - 127;
mantissa = (x.L & 0xFFFFFF) | 0x800000;
frac_part = 0;
int_part = 0;
if (exp2 >= 31 || exp2 < -23) {
*s = 0;
return 1;
}
if (exp2 >= 0) {
int_part = mantissa >> (23 - exp2);
frac_part = (mantissa << (exp2 + 1)) & 0xFFFFFF;
} else {
frac_part = (mantissa & 0xFFFFFF) >> -(exp2 + 1);
}
if (int_part == 0)
*s++ = '0';
else {
Integer2AsciiString(int_part, s);
while (*s) s++;
}
*s++ = '.';
if (frac_part == 0)
*s++ = '0';
else {
for (m = 0; m < numdecimals; m++) { // print BCD
frac_part = (frac_part << 3) + (frac_part << 1); // frac_part *= 10
*s++ = (frac_part >> 24) + '0';
frac_part &= 0xFFFFFF;
}
}
*s = 0;
return status;
}
VOID
Ascii2UnicodeString(CHAR8 *String, CHAR16 *UniString)
{
while (*String != '\0') {
*(UniString++) = (CHAR16) *(String++);
}
*UniString = '\0';
}
//PI= 4- /3+4/5-4/7+4/9
EFI_STATUS
EFIAPI
CalcPI()
{
char str[8];
static CHAR16 wstr[8];
int i;
float g1 = (float) 1;
float g2 = (float) 0;
for (i=0;i<100;i++)
{
if (i%2==0) {g2=g2+ 4/ g1;}
else {g2=g2-4/ g1;}
Float2AsciiString(g2, str, 4);
Ascii2UnicodeString(str, wstr);
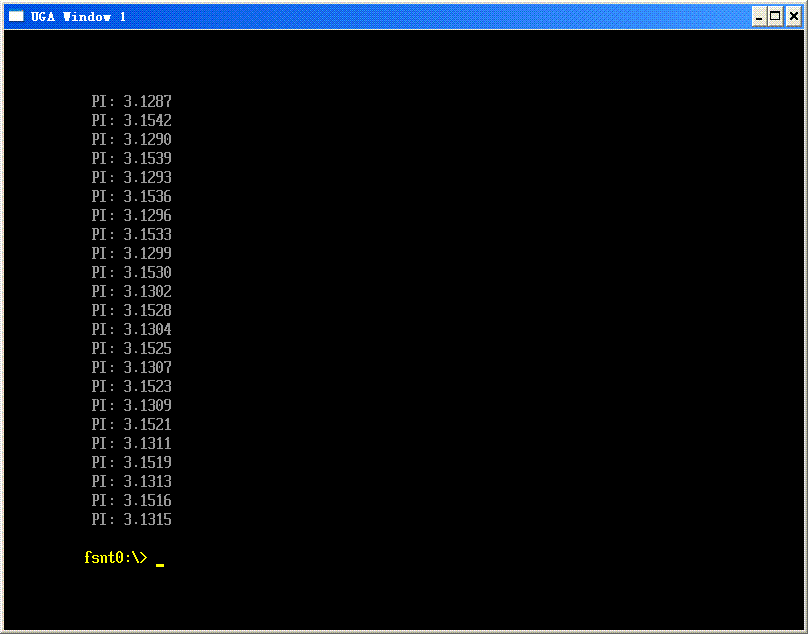
Print(L" PI: %s\n", wstr);
g1=g1+2;
}
return EFI_SUCCESS;
}
EFI_STATUS
EFIAPI
UefiMain(EFI_HANDLE image, EFI_SYSTEM_TABLE *systab)
{
CalcPI();
return EFI_SUCCESS;
}
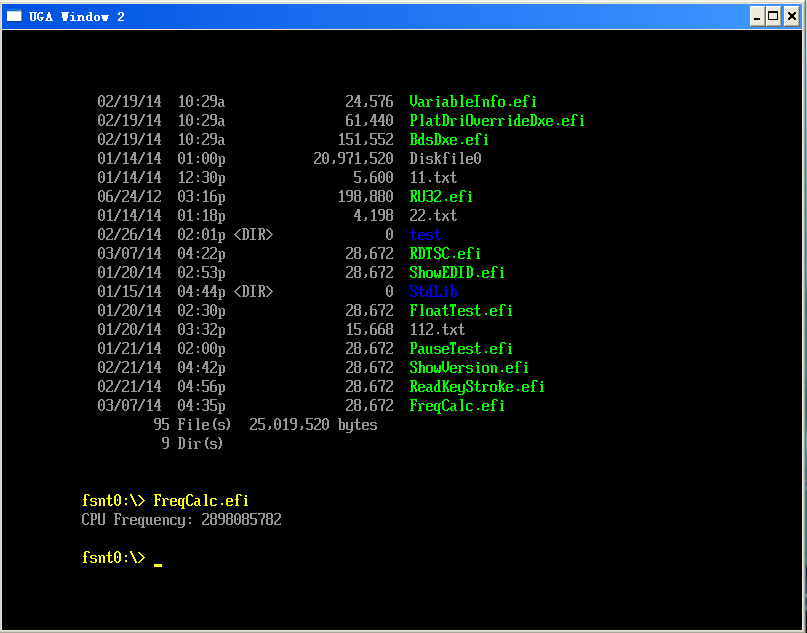
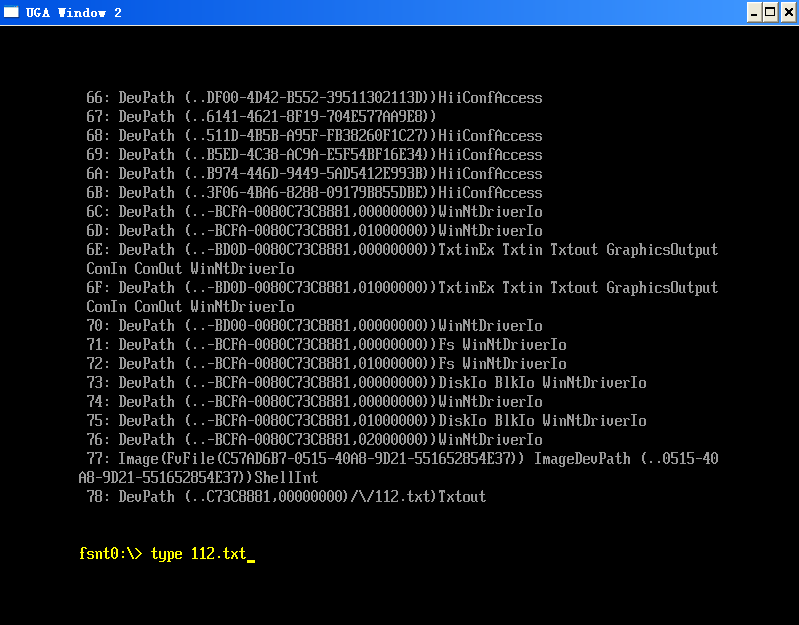
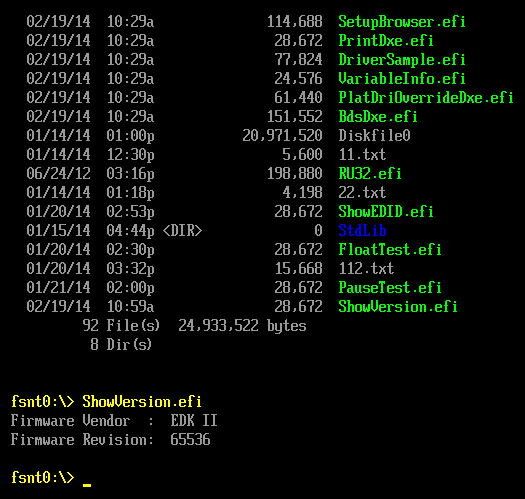
运行结果:
示例代码下载 floattest
参考:
1.http://sourceforge.net/apps/mediawiki/tianocore/index.php?title=EDKII_EADK
EDK II Application Development Kit for include the Standard C Libraries in UEFI Shell Applications