之前能获得被加载程序的一些基本信息,但是只是“基本”的信息,比如我们需要 EntryPoint应该怎么办呢?
我在网上搜索了一下无果,请教 HZZZ,他给我的建议是:LOADED_IMAGE_PRIVATE_DATA_TEMP。
可以在 \MdeModulePkg\Core\Dxe\Image\Image.h 中看到这个定义。
typedef struct {
  UINTN                       Signature;
  /// Image handle
  EFI_HANDLE                  Handle;
  /// Image type
  UINTN                       Type;
  /// If entrypoint has been called
  BOOLEAN                     Started;
  /// The image's entry point
  EFI_IMAGE_ENTRY_POINT       EntryPoint;
  /// loaded image protocol
  EFI_LOADED_IMAGE_PROTOCOL   Info;
  /// Location in memory
  EFI_PHYSICAL_ADDRESS        ImageBasePage;
  /// Number of pages
  UINTN                       NumberOfPages;
  /// Original fixup data
  CHAR8                       *FixupData;
  /// Tpl of started image
  EFI_TPL                     Tpl;
  /// Status returned by started image
  EFI_STATUS                  Status;
  /// Size of ExitData from started image
  UINTN                       ExitDataSize;
  /// Pointer to exit data from started image
  VOID                        *ExitData;
  /// Pointer to pool allocation for context save/retore
  VOID                        *JumpBuffer;
  /// Pointer to buffer for context save/retore
  BASE_LIBRARY_JUMP_BUFFER    *JumpContext;
  /// Machine type from PE image
  UINT16                      Machine;
  /// EBC Protocol pointer
  EFI_EBC_PROTOCOL            *Ebc;
  /// Runtime image list
  EFI_RUNTIME_IMAGE_ENTRY     *RuntimeData;
  /// Pointer to Loaded Image Device Path Protocl
  EFI_DEVICE_PATH_PROTOCOL    *LoadedImageDevicePath;
  /// PeCoffLoader ImageContext
  PE_COFF_LOADER_IMAGE_CONTEXT  ImageContext;

} LOADED_IMAGE_PRIVATE_DATA;
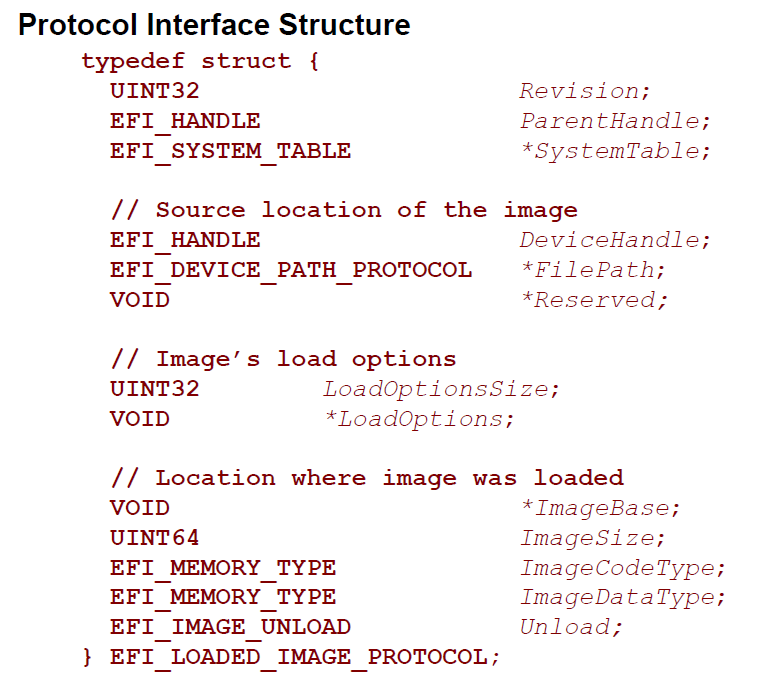
根据我的理解,我们之前使用到的 EFI_LOADED_IMAGE_PROTOCOL 只是这个结构体的一部分。我们知道 EFI_LOADED_IMAGE_PROTOCOL 的内存地址,然后可以反推出整个 LOADED_IMAGE_PRIVATE_DATA_TEMP 结构。为了实现这个需要用一个比较有技巧的宏:
#define _CR(Record, TYPE, Field) ((TYPE *) ((CHAR8 *) (Record) – (CHAR8 *) &(((TYPE *) 0)->Field)))
#define LOADED_IMAGE_PRIVATE_DATA_FROM_THIS(a) _CR(a, LOADED_IMAGE_PRIVATE_DATA_TEMP, Info)
(在其他地方也能看到这个宏的,它的作用就是根据一个结构体中已知Field的地址反推出整个结构体的内存地址。充满了C语言让人炫目的技巧。)
简单起见 HZZZ 给我的建议是这个结构体可以只使用一部分,不需要声明全部。
完整的代码:
#include <Uefi.h>
#include <Library/UefiLib.h>
#include <Library/ShellCEntryLib.h>
#include <stdio.h>
#include <stdlib.h>
#include <wchar.h>
#include <Protocol/EfiShell.h>
#include <Library/ShellLib.h>
extern EFI_BOOT_SERVICES *gBS;
extern EFI_SYSTEM_TABLE *gST;
extern EFI_RUNTIME_SERVICES *gRT;
extern EFI_SHELL_PROTOCOL *gEfiShellProtocol;
extern EFI_SHELL_ENVIRONMENT2 *mEfiShellEnvironment2;
extern EFI_HANDLE gImageHandle;
typedef struct {
UINTN Signature;
/// Image handle
EFI_HANDLE Handle;
/// Image type
UINTN Type;
/// If entrypoint has been called
BOOLEAN Started;
/// The image's entry point
EFI_IMAGE_ENTRY_POINT EntryPoint;
/// loaded image protocol
EFI_LOADED_IMAGE_PROTOCOL Info;
/// Location in memory
EFI_PHYSICAL_ADDRESS ImageBasePage;
} LOADED_IMAGE_PRIVATE_DATA_TEMP;
#define _CR(Record, TYPE, Field) ((TYPE *) ((CHAR8 *) (Record) - (CHAR8 *) &(((TYPE *) 0)->Field)))
#define LOADED_IMAGE_PRIVATE_DATA_FROM_THIS(a) \
_CR(a, LOADED_IMAGE_PRIVATE_DATA_TEMP, Info)
/**
GET DEVICEPATH
**/
EFI_DEVICE_PATH_PROTOCOL *
EFIAPI
ShellGetDevicePath (
IN CHAR16 * CONST DeviceName OPTIONAL
)
{
//
// Check for UEFI Shell 2.0 protocols
//
if (gEfiShellProtocol != NULL) {
return (gEfiShellProtocol->GetDevicePathFromFilePath(DeviceName));
}
//
// Check for EFI shell
//
if (mEfiShellEnvironment2 != NULL) {
return (mEfiShellEnvironment2->NameToPath(DeviceName));
}
return (NULL);
}
int
EFIAPI
main (
IN int Argc,
IN CHAR16 **Argv
)
{
EFI_DEVICE_PATH_PROTOCOL *DevicePath;
EFI_HANDLE NewHandle;
EFI_STATUS Status;
LOADED_IMAGE_PRIVATE_DATA_TEMP *private = NULL;
UINTN ExitDataSizePtr;
EFI_LOADED_IMAGE_PROTOCOL *ImageInfo = NULL;
if (Argc!=2) {
Print(L"Usage: Exec4 FileName\n");
return EFI_SUCCESS;
}
Print(L"File [%s]\n",Argv[1]);
DevicePath=ShellGetDevicePath(Argv[1]);
//
// Load the image with:
// FALSE - not from boot manager and NULL, 0 being not already in memory
//
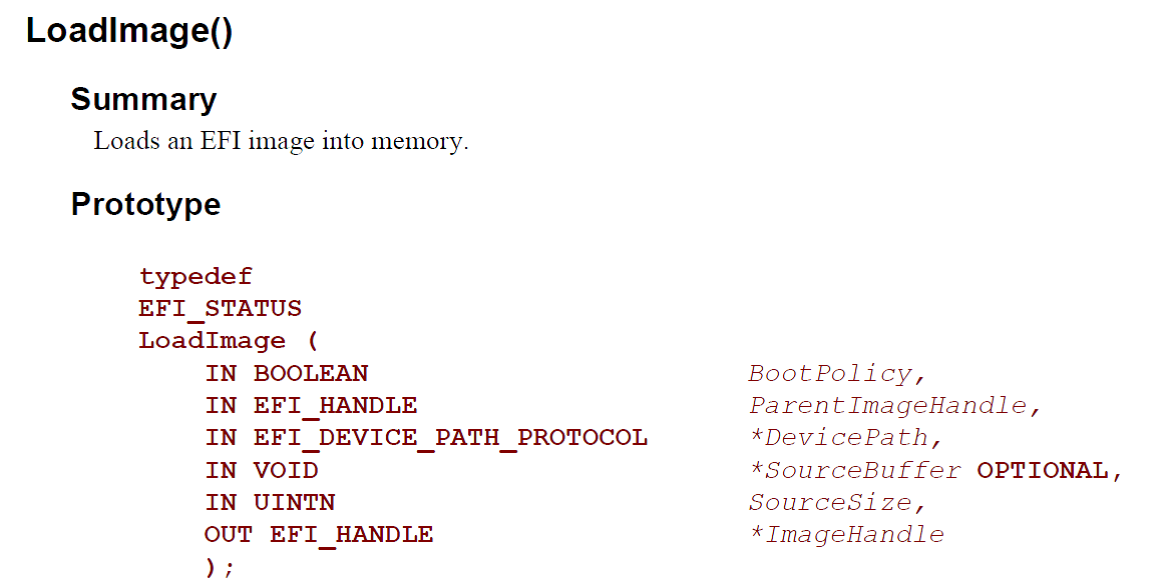
Status = gBS->LoadImage(
FALSE,
gImageHandle,
DevicePath,
NULL,
0,
&NewHandle);
if (EFI_ERROR(Status)) {
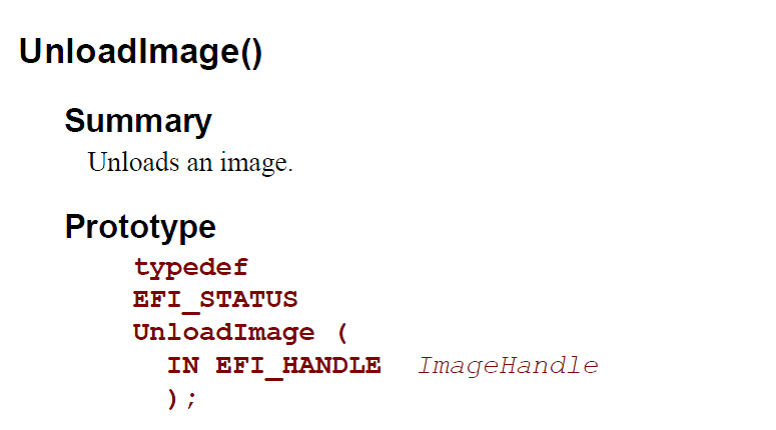
if (NewHandle != NULL) {
gBS->UnloadImage(NewHandle);
}
Print(L"Error during LoadImage [%X]\n",Status);
return (Status);
}
Status = gBS -> HandleProtocol (
NewHandle,
&gEfiLoadedImageProtocolGuid,
&ImageInfo
);
private = LOADED_IMAGE_PRIVATE_DATA_FROM_THIS(ImageInfo);
Print(L"ImageBase in EFI_LOADED_IMAGE_PROTOCOL [%lX]\n",ImageInfo->ImageBase);
Print(L"ImageBase in LOADED_IMAGE_PRIVATE_DATA_TEMP [%lX]\n",private->ImageBasePage);
Print(L"Entry Point [%lX]\n",private->EntryPoint);
Print(L"================================RUN================================\r\n",Status);
//
// now start the image, passing up exit data if the caller requested it
//
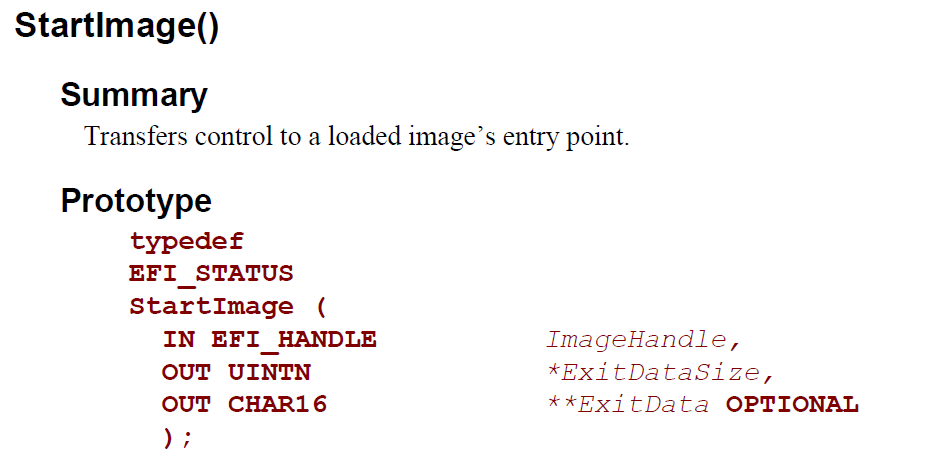
Status = gBS->StartImage(
NewHandle,
&ExitDataSizePtr,
NULL
);
if (EFI_ERROR(Status)) {
if (NewHandle != NULL) {
gBS->UnloadImage(NewHandle);
}
Print(L"Error during StartImage [%X]\r\n",Status);
return (Status);
}
Print(L"===============================EXIT================================\r\n",Status);
gBS->UnloadImage (NewHandle);
return EFI_SUCCESS;
}
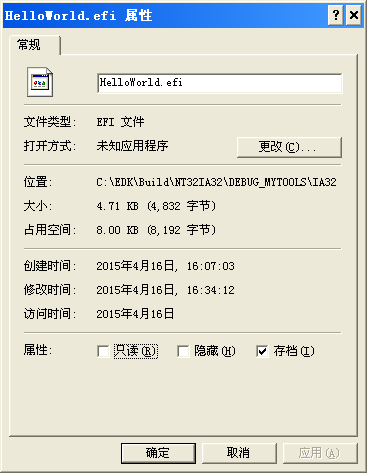
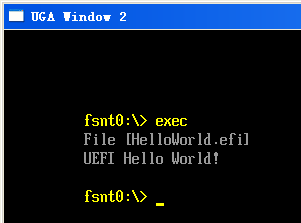
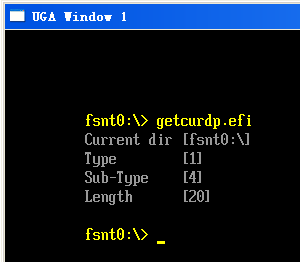
程序接收文件名作为参数,显示接收到EFI文件的入口。运行结果

完整代码下载
exec4
本程序示例代码和编译中间文件